I’m still here looking at blank white walls quite literally watching paint dry on some days and hoping that I’ll wake up to suitable humidity levels so that I can get on with this task and back to my loom! The humidity levels haven’t been playing along lately. On those days there’s always the “delightful” sanding jobs to do and when I’m done with those I find myself taking a tea break while staring at the blank walls and imagining how I’ll decorate the walls of my place in Australia when I finally get back there.
We had one week of winter with, according to the local press, some of the coldest days on record here in the tropics and I can tell you that there’s nothing cosy about bare white walls and ceramic floors. Today we are back to a more typical 89 degrees.
About decorating those walls….I have four sets of panels in combinations of red, black and white that could be hung. You might remember these from my Textile Trails set:

And this, being one of the three from the Plain Tales set:

I haven’t yet given this next set a name. I’ll call it Three Little Birds for now because I love that Bob Marley song so much. This was one of my projects where I created a shape in ikat which was then filled with pick-up pattern:

And of course there’s the foursome that make up the Within These Walls set:

Creating the shapes in ikat might seem like an excessive amount of trouble to go to just to get the solid rather than pebbly background but my long-term plan for this method is to create curved shapes that I otherwise wouldn’t be able to using the structure that I call Andean Pebble Weave. The block-shapes that I’ve created so far are just the warm-up!
Hmmm….I don’t think I’ll have that much wall space for all of these. What do you think?
There are also some hangings that I’d like to make in blues. For example, I’d like to weave these flower and foliage patterns again on a much larger scale in blue and cream and have the two strips flank a panel of hummingbirds…

I already have one piece in blues that I’d like to hang:

And so my mind keeps on turning things over. I start thinking about the colors I use in my weaving, one thing leads to another, and I remember this piece which I recently uncovered while emptying the closet for painting:

No, this was never meant to be hung. I’m not even sure that I like it! It was the practice piece that I wove as soon as I returned from my trip to Guatemala. I wanted to use my scribbled notes to practice some of the techniques I had learned there with my backstrap loom teachers. This was the best way to see if my notes were thorough enough and if they even made sense! Sometimes I leave out things while making notes thinking that they are too obvious to bother recording. That’s something I regret six months down the track when I come to try the technique and find that there are missing links. Once I finish one of these practice pieces and add to my notes, making sure than even the most obvious steps are included, I can write out the good copy and add the detailed step-by-step photos that I’ve taken while weaving them.

Seeing this piece again (I’m still deciding whether it will go to live in Australia or be abandoned) made me remember how fun these supplementary-weft patterning techniques are. I don’t use them enough. These figures are created by using warp-wrapping techniques to form horizontal, vertical and diagonal lines rather than the inlay technique that I most often use. I think I need to weave something using these techniques in colors that I find more pleasing. Maybe something in blues that can hang alongside my flowers and hummingbirds.

While I might be craving minimalism in terms of furniture when I move to Australia, I’m afraid my walls might end up not being in keeping with this idea!
I’ll finish here by including below a tutorial for the Guatemalan wrapping techniques that I used in that colorful piece. This tutorial has been here on my blog since 2012 and I thought I might drag it out here from the Tutorials page for those of you who are unaware that these things are lurking back there just waiting to be discovered. Here’s a link to the tutorial list. It’s a lot of work putting these tutorials together and I often wonder how many people actually find them in my blog labyrinth!
If you’re not interested in the tutorial we can leave each other here until next time…..
GUATEMALAN SUPPLEMENTARY WEFT PATTERNING TUTORIAL.
I suggest you follow the beginner tutorial on supplementary-weft patterning here before attempting this second more advanced one.
This tutorial was first presented over two weeks within blog posts so there are two parts. I have extracted the information from the two blog posts for this tutorial page. It shows the kind of supplementary-weft patterning that I learned in one particular town in Guatemala.
I wove a tree design at left using the various warp wrapping and inlay techniques that my Guatemalan teacher employs and this was fun as I hadn’t done any of this since 2008 immmediately after my return from my first visit there.
I learned these techniques with my teacher Martine and her daughter Carmen in Santa Catarina Palopo on the shores of Lake Atitlan. I met Martine in Panajachel where she sells textiles in the street market. She took me to her home and spent one morning setting up the loom and then her daughter took over weaving and teaching me for the next week or so. She was a good teacher. Each motif was repeated six or seven times across the cloth. Carmen would show me five times what to do and then would let me weave the last one or two motifs to practice what she had shown.
The weavers set up their looms with great care. Martine was obviously more skilled at doing this and Carmen only took over when everything was set to go. The warp is wound with two crosses. The second cross helps hold the shed rod in place.
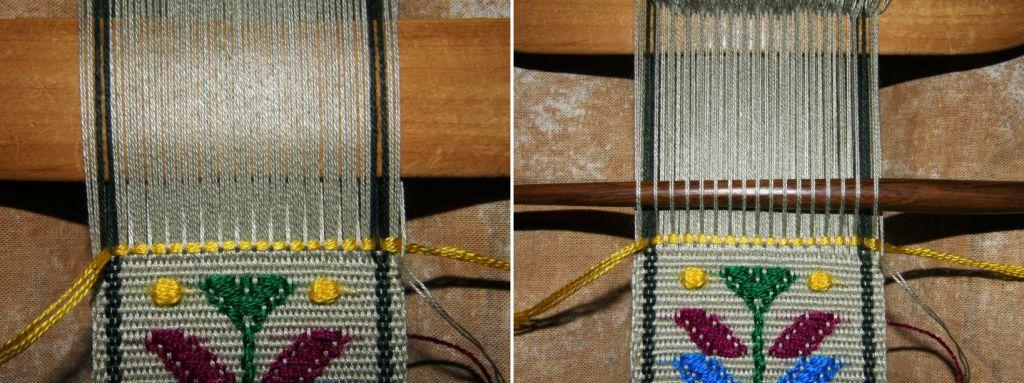
In the first part of this tutorial you will see a series of step-by-step pictures showing how the warp is prepared for this kind of supplementary-weft patterning. A plain-weave ground cloth is woven onto which the supplementary-weft motifs are woven. Certain warp threads are raised in each shed under which the supplementary weft threads are passed.
As the same warp threads for the supplementary weft patterning are raised every time, they can easily be picked and stored on pattern sticks so that the weaver does not have to continually pick them up by hand for every weft pass. There are two sets of these warp threads. One set is made up of certain threads from the shed-rod shed and the other of certain threads from the heddle shed.

In the above picture you can see four passes of yellow supplementary weft under the warp threads which form the two pattern sheds.. All the motifs that my teachers showed me were created by passing supplementary weft thread under the warps in these pattern sheds.
Two pattern sticks are used. One stick is inserted under the selected pattern warps in the shed-rod shed and another holds the selected pattern warps in the heddle shed.
I show the process of picking and inserting the pattern sticks first in step-by-step pictures and then in a video.
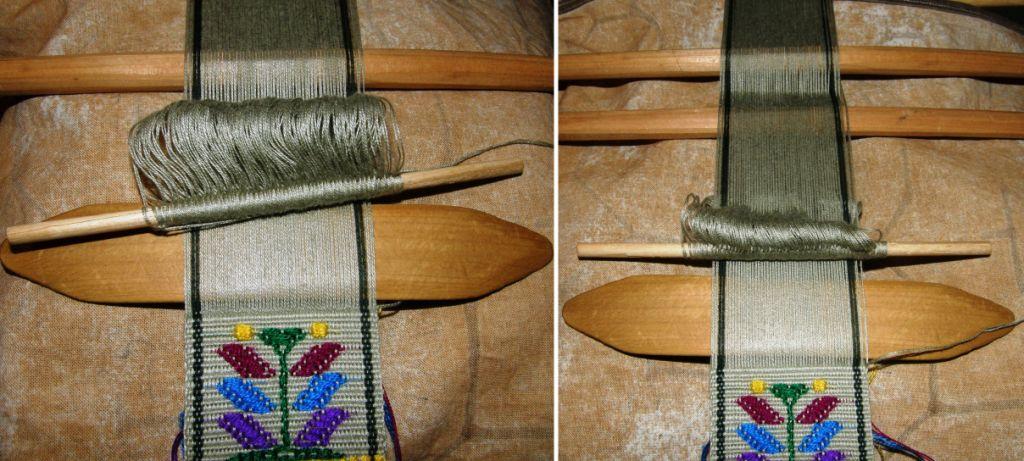
In order to create the patterns, two extra patterning sticks need to be inserted. These are stored up beyond the shed rod. One is stored on top of the warp and the other underneath.
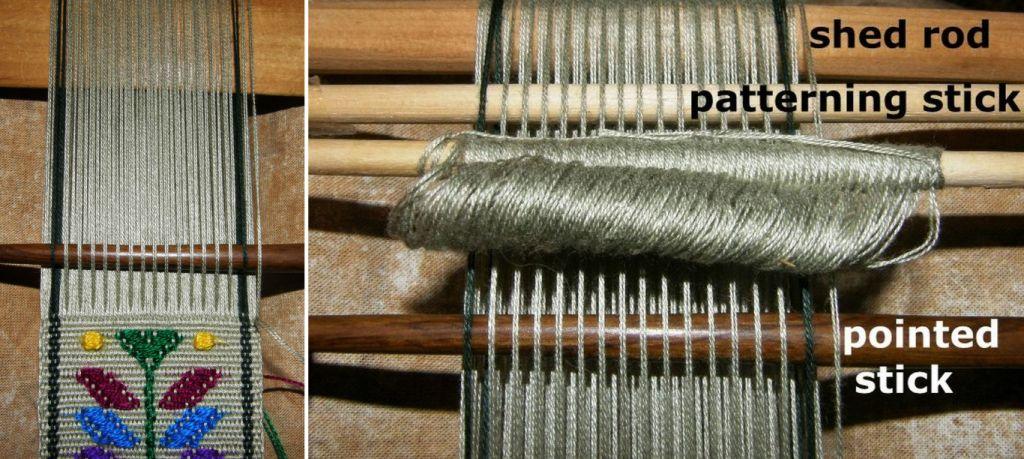
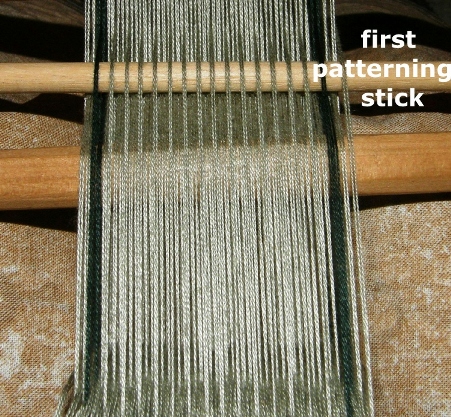
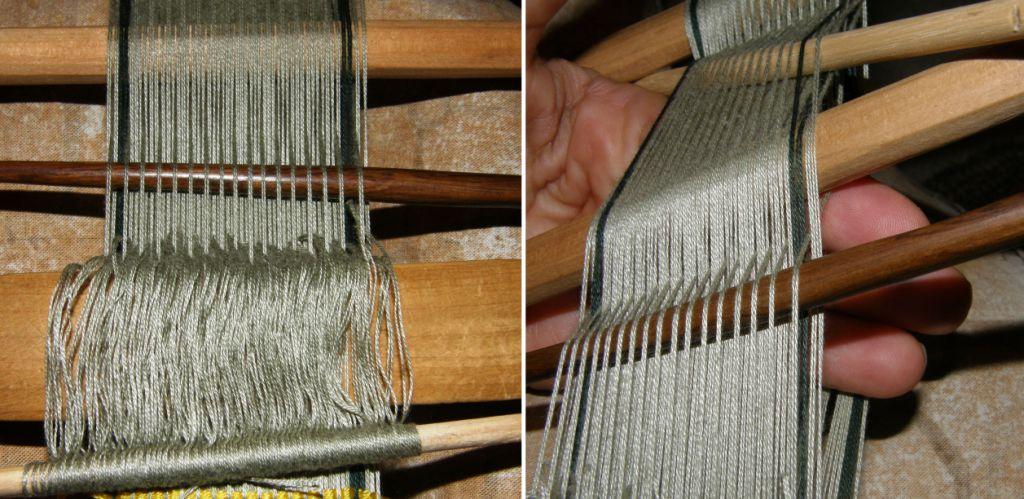

Now the warp has been prepared with its two patterning sticks ready to create patterns with supplementary wefts.
Watch the process again in the following video. I am using very thick yarn and only a few warps in the video just to demonstrate the basic process. The video is in two parts.
The second part of the video shows how to use the pattern sticks to raise the warps and lay in weft for some basic patterning. This is also explained in the photos below. I am using thick warp and weft in the video just so everything is easy to see.

Below are samples that I’ve woven since my return from Guatemala.


Here concludes Part One of this tutorial on Guatemalan single face supplementary-weft patterning. So far we have looked at how to pick the two patterning sheds and store them on sticks up beyond the shed rod, how to open the patterning sheds and how to weave the basic brick design which separates the motifs on a piece.
In Part Two, I will show you how to create the outlines of shapes by wrapping the supplementary weft around warp threads and fill them in by laying in supplementary weft. The Guatemalan weavers create all kinds of bird, plant and human figures in this way.
END OF PART ONE
#####################################################
PART TWO:
In this part of the tutorial I show you how to create the motifs using the supplementary wefts. I am using a tree motif as the example. You will see how to create:
- a horizontal line for the base of a tree,
- a vertical line to form a stem,
- filled-in shapes for leaves,
- diagonal lines to outline the tree top, and
- spots for buds.
This is a fun technique with little or no counting involved which allows you to play freely with shapes and colors.
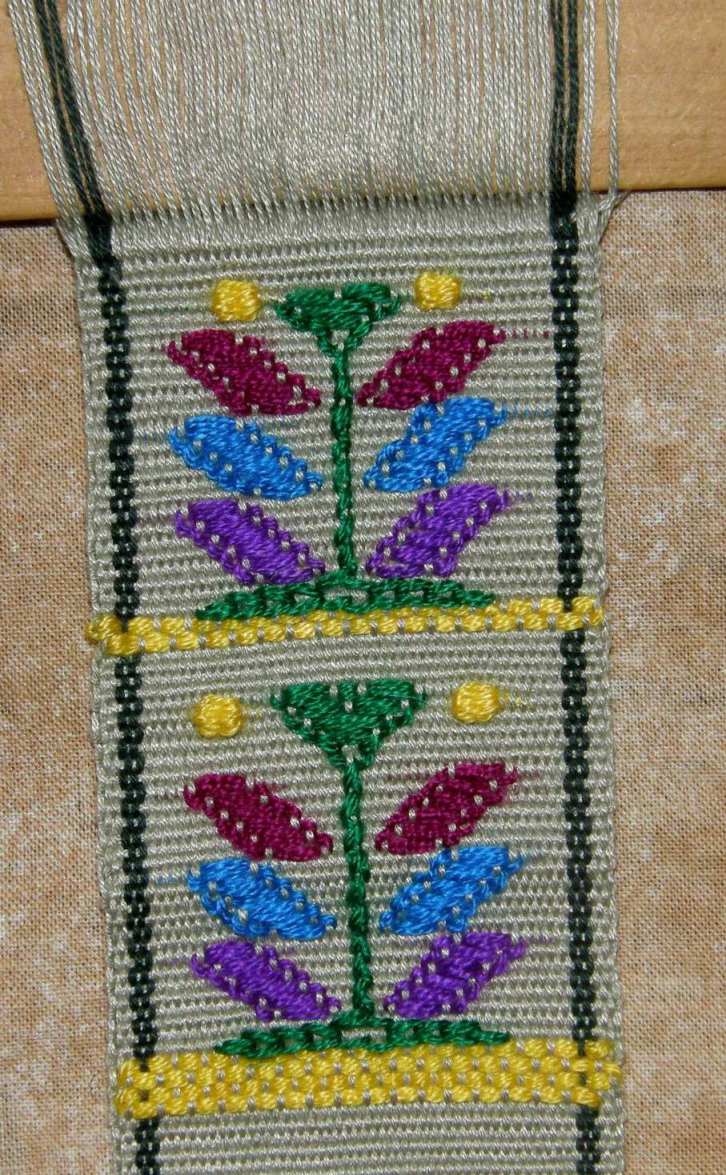
The resulting weaving looks like a piece of embroidered cloth except that the “stitches” only appear on one side of the fabric.

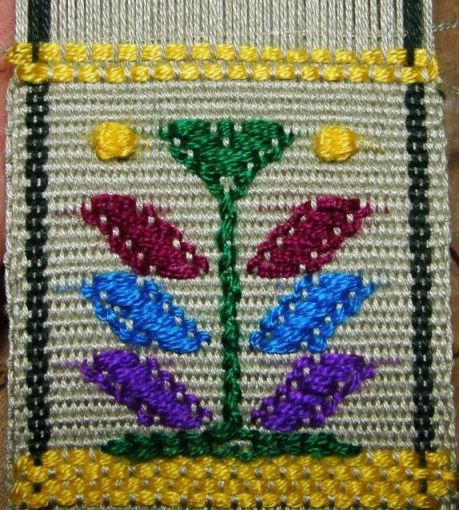
Last week when I started the tutorial on this technique, I was using acrylic threads that I had brought back from Guatemala to create bright mutlicolored trees on a green background, pictured at left.
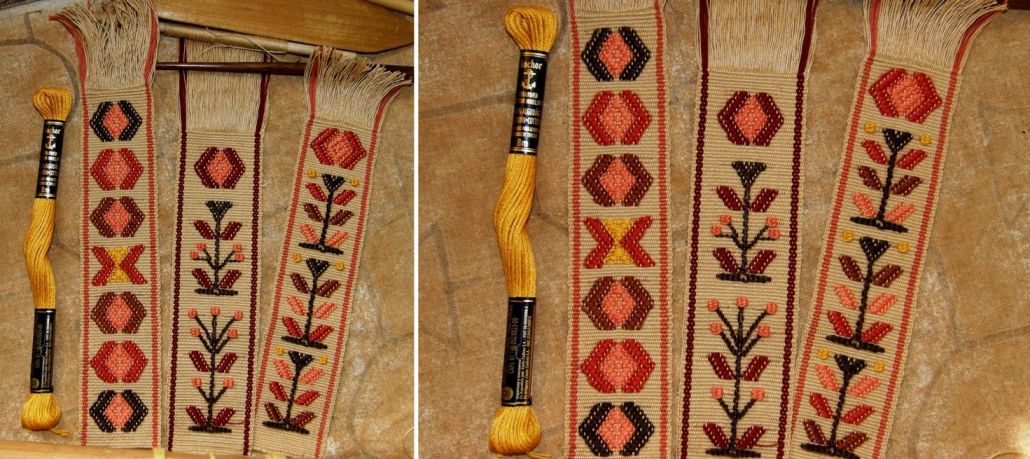
I decided to buy some embroidery floss to work with and it took some time to get just the right thickness to go with my chosen ground weave warp. The ground weave is a 50 wpi cotton and I used 4 strands of embroidery floss to do the patterning. (one piece of embroidery floss has 6 strands so you need to remove 2).
The 50 wpi warp produces a wonderfully thin cloth just right for bookmarks although the pattern wefts do add some bulk. Remember to always use a good firm beat.
So, let’s continue with the tutorial.
All the colored wefts that form the patterns pass under or wrap around the warps in the two patterning sheds. This green piece has 86 ends between the dark green border stripes. We will start with the horizontal line that forms the base of the tree motif.
FORMING A HORIZONTAL LINE

This completes the base of the tree. Now I am ready to start creating the stem….a vertical line.
FORMING A VERTICAL LINE
Open the next shed, which is, in my case, the shed rod shed and pass the main weft.

Open the heddle shed and raise the patterning warps in patterning shed 2.
Patterning shed 2 contains my central warp.
Every time I raise the warps in patterning shed 2, I will wrap my green tree base weft around the central warp to form a stem. The drawing at left shows the very simple vertical wrapping method.
The stem, therefore, is woven only in every second shed.
In this shed I will also lay in the wefts to form the first pair of leaves.
FORMING A SOLID SHAPE – A LEAF
Cut two lengths of weft around 24cm/9 1/2” long for the two leaves.


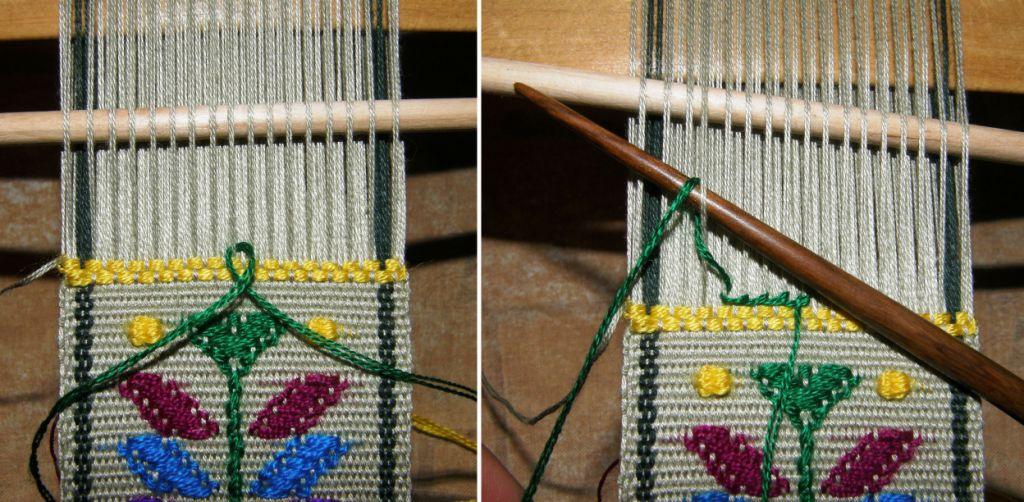
ABOVE RIGHT: I’m now working in the heddle shed and with the pattern warp threads held on the lower pattern stick. In this row I’ll turn the green weft around the center warp to continue forming the stem. I’ll also select pattern threads that sit immediately to the right of those used in the previous row for the right-hand leaf and immediately to the left for the left hand leaf.

In what you’ve decided is your final row of leaf pattern, pass the right hand tail of the supplementary weft under the pattern warps as usual and then pass it for a short distance to the left within the shed before pulling it out to hang from the back of the cloth where it can be cut later. The left tail does the same…passing under the two pattern warps and then continuing to the right within the shed. In the photo above right, you can just make out the slight bulge of the supplementary weft traveling within the shed to the right of the right-hand leaf.
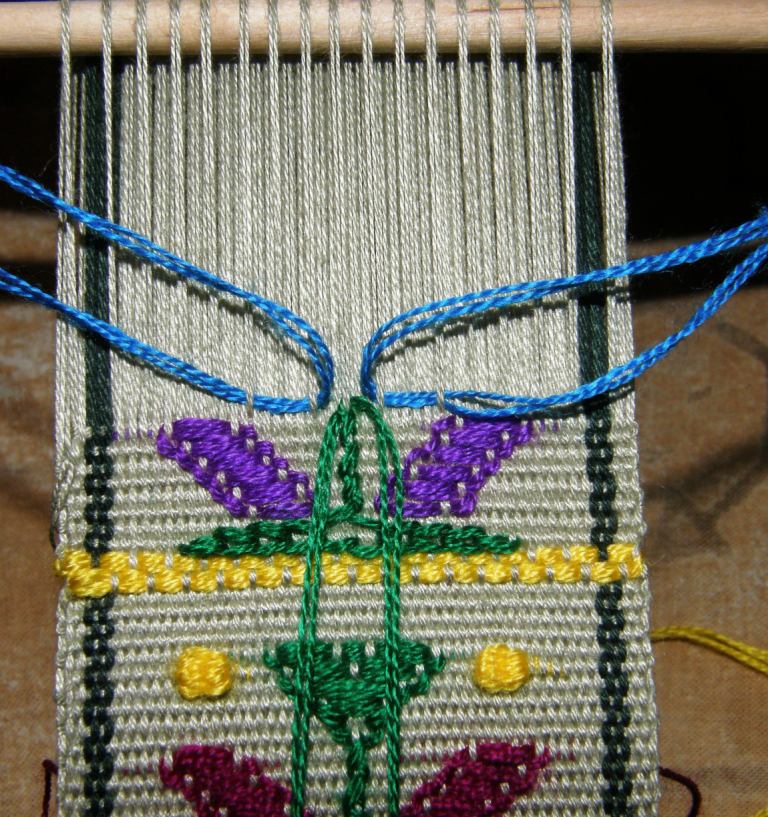
The little Guatemalan tree has three pairs of leaves and the stem continues growing until it eventually widens out into the tree top. You can see the green V-shaped top of the first tree in the photo.
Once you have woven your six leaves, I am sure that it will be very easy for you to see how the tree top is formed.
You’ve been weaving your stem with two strands of weft – to form the top, one strand will start traveling diagonally to the right and one to the left forming a solid V shape. The V shape gets filled in the same way that you “filled” the leaves.
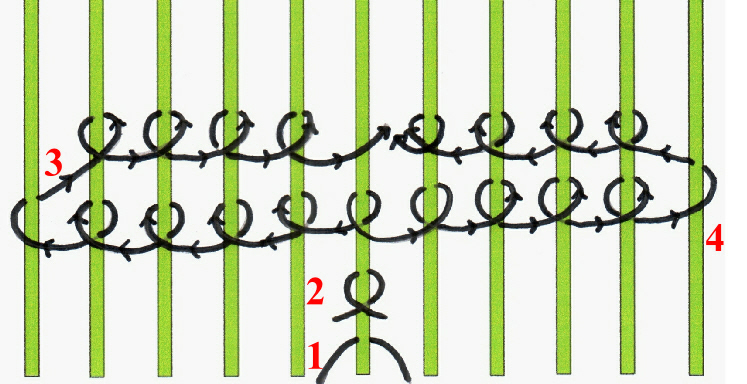
Sometimes you might wish to just weave a little branch rather than a leaf. In that case you would just wrap the weft thread around single pattern warp threads moving out diagonally as you progress from row to row as in the drawing below right.
Finally, there are the little spots that the Guatemalan weavers like to use to fill in blank spaces between motifs. I used them in my bookmarks as flower buds. You can see two yellow spots in the photos above and below.


To make a spot, you use two adjacent patterning warps as shown in the drawing above left. Use a strand of weft half the thickness that you were using for the tree. Around 12cm/5″ length should be plenty. First place the weft behind the right-hand warp in the pair that you’ve selected making sure that the two tails are of equal length. Then join the two ends together and go wrapping them back and forth in in a figure-eight in the same shed about six times as shown in the drawing. When you’re done, pass the ends a short distance through the main shed and out the back of the weaving.
It is very easy to improvise with this technique. Have fun with it!
 RSS - Posts


how can you not like that colorful one?! It’s beautiful. Send it my way if you don’t want it!
By: Cindy on July 19, 2024
at 3:15 am
I seem to go back and forth on it. In any case someone local has claimed it! It will have a good home.
By: lavernewaddington on July 19, 2024
at 4:43 am
Is the design on the textile in your second photo based on a Shipibo design?
By: Jim Castner on July 19, 2024
at 4:07 am
Yes, it is.
By: lavernewaddington on July 19, 2024
at 4:41 am
P.s…I wrote a blog post about the Shipibo designs way back when I was weaving that piece. Here’s a link to it…..https://wp.me/pIE91-2Fy
By: lavernewaddington on July 19, 2024
at 11:05 am
Hi Laverne!
Big fan of yours in Colorado, love reading your weekly updates! I’ve been reading your blog for years and I don’t recall how I found you… 🤔 Sounds like things in Bolivia are a bit difficult lately and very glad that you’re doing well. I was genuinely worried for you when the news came out! As a basic-ass weaver boy who’s happy when I can make a useable balanced plainweave placemat, super cool to see how you do fancy things in great detail! Mainly a knitter so everything in weaving is ridiculously complicated 😂
Anyway, thank you for everything you do! Hope for safe travels to Aus again and sad for you that south america is such a dumpster fire (thanks US!) that you have to leave 😢
-Seán in Colorado
By: Seán on July 19, 2024
at 8:47 am
Hi Sean! You don’t know how happy you’ve made me with this comment. It’s always nice to hear from someone “out there” who’s been following along for years. I feel silly babbling away to empty space sometimes and having a voice pop up out of the blue now and then is very much appreciated. Thank you. Being able to make useful things like placemats is awesome. Keep at it!
By: lavernewaddington on July 19, 2024
at 8:29 pm
So excited to see your blog on Guatemalan weaving – of pictures. I was there some year back and was amazed at what they do. Now I have a better understanding of it. Thanks so much
By: Susan Kesler Simpson on July 19, 2024
at 7:16 pm
You’re very welcome. Not everyone will want to try the techniques and I’m really pleased that the tutorial can have the other benefit of adding to people’s appreciation of the beautiful Guatemalan textiles. Reading through it again just now, I realized that I had left some photos to do the talking on their own and decided that they really needed to have accompanying written explanation as well. So, I’ve just added that now.
By: lavernewaddington on July 19, 2024
at 8:24 pm
I understand well the regret you speak of, about not writing down weaving instructions with enough thoroughness to recall the important parts later. When you were here the last time and were showing me double weave, there were catchy words to a familiar children’s rhyme you had invented that detailed the sequence perfectly. I have often wished since then I had written those words down while they were fresh in my hands and mind!
Lausanne in Vermont
By: lausanneha on July 23, 2024
at 5:21 pm
Hi Lausanne. I don’t think I’ve written them down either and I struggled just a little now to recall the verse. But, I have it now and I’ll send you a message with it.
By: lavernewaddington on July 23, 2024
at 5:41 pm
All of your weavings are absolutely beautiful! I especially love the blue one.
By: thebutterflygirl316 on July 26, 2024
at 1:04 pm
Thank you so much!
By: lavernewaddington on July 26, 2024
at 2:33 pm