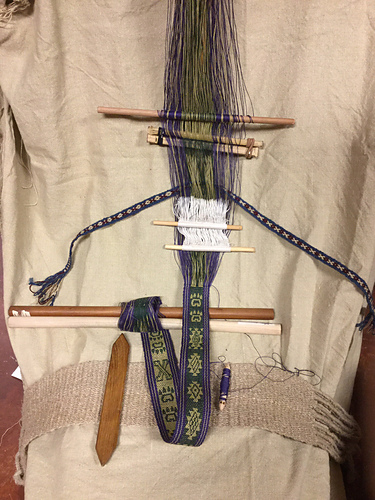
Backstrap Weaving – Inspired by Nature

It’s that time of year again. The beautiful bands that I order every year from a group of spinners, dyers and weavers of Cochabamba in the central highlands of Bolivia have arrived….a box of color and rich aromas from the countryside.

Here are some of the ladies who spend months spinning, plying and dyeing their yarn with plants and cochineal before winding warps and weaving beautiful cloth on their simple leaning vertical looms…

faja weavers

These are also the ladies who are part of the team that took part in the 2014 global spinning event –Spinzilla.

I wonder if some of that Spinzilla thread was used for these bands. Dorinda Dutcher of PAZA Bolivia, lives in Independencia and devotes herself to promoting the recovery and revival of  these fiber and textile skills. She told me that the ladies were overjoyed to have the time of the Spinzilla event to spin, chat and laugh.
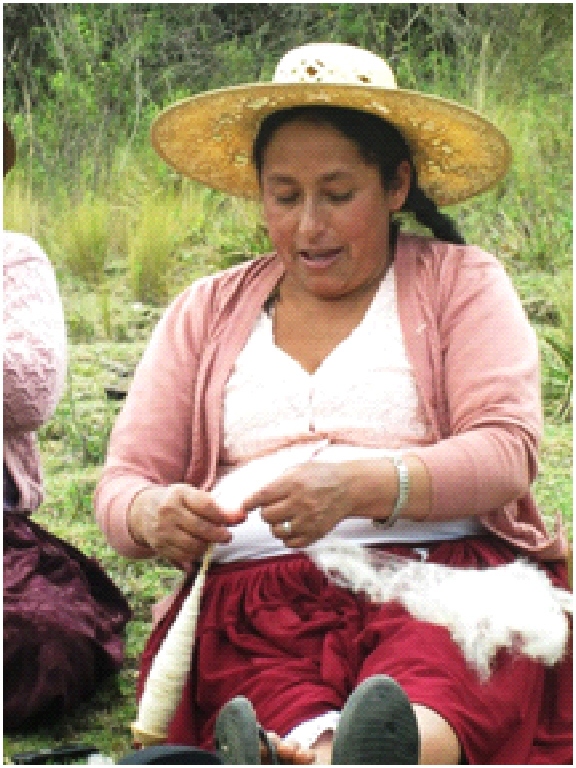
maxima It was exactly what they used to do as young teens. They would head out with the family flocks and meet up at a rendezvous point. 

The hottest topic of conversation would be the weaving advances they had made for the creation of their aguayos, the large pieces of cloth worn over the shoulders, that would be shown for the first time at Carnaval.

Because the ladies challenged and competed with each other, it was the time of their finest work. Now their daughters go to school and that particular tradition is no more.

Doña Máxima, at left,  is one of the few weavers whose daughters weave, most of the weavers’ daughters having migrated to the cities.

Here are the bands with all the stunning sun-soaked colors of the Bolivian hghlands…

weaving highland BoliviaI can’t help showing you picture after picture of individual pieces so that you can better see and enjoy the color arrangements. I love seeing how the varying amount of twist in the handspun yarn creates different textures  in the cloth and how each weaver has decided to arrange the colors that she has available from the latest days at the dye pot.

PAZA colors 1


??????????????????????

??????????????????????

??????????????????????

??????????????????????

??????????????????????

???????????????????????????????

??????????????????????All the patterns are Andean Pebble Weave.

And, we have our own talented spinners, dyers and weavers in the Backstrap Weaving Group on Ravelry as well as members who are brilliant at combining colors.

Here’s a cuff that Janet wove made from her own handspun Perendale wool which she dyed with indigo, cochineal and walnut…

janet cuff 2She made a series of wool cuffs and Wendy also showed one that she completed made from variegated cotton thread and finished so neatly with weft  twining…

cuffsJulia T in her home in tropical far north Queensland in Australia was inspired by the colors of nature and used fruit to inspire a set of bands for key fobs. She captured the essence of the fruit so well!

???????????????????????????????I contributed something cheery as well….a field of flowery “O” s amongst a lattice of ”X”s…

flowers both sidesCatharina joined our group to share with us her explorations in traditional Estonian patterns in the supplementary-warp structure and our minds have been blown.

llunallamaBut, back to the ky fob WAL which has been chugging along to its one-month anniversary…

pebble fobsJulia T, Arlene and Betsy worked on Andean Pebble Weave bands. After her first sample, Betsy added more twist to her handspun wool and is happier with this latest result. Arlene’s band, with its rope pattern, has an unusual and attractive tapered finish and Julia T used JoAnne’s original cat design along with her own heart composition and a knot work motif from my second book.

plain weaveI love that plain weave continues to be popular inspiring more and more creativity in combs and stripes. What I have dubbed ”Wendy’s Watermelon Warp” (center bottom left) inspired the idea for Julia T’s tropical fruit collection as well as Gwen’s comb combo, above right. WannaGTD wrapped the warp-ends for a neat finish on a her classic band of horizontal bars. The yellow stripes really give it a zing.
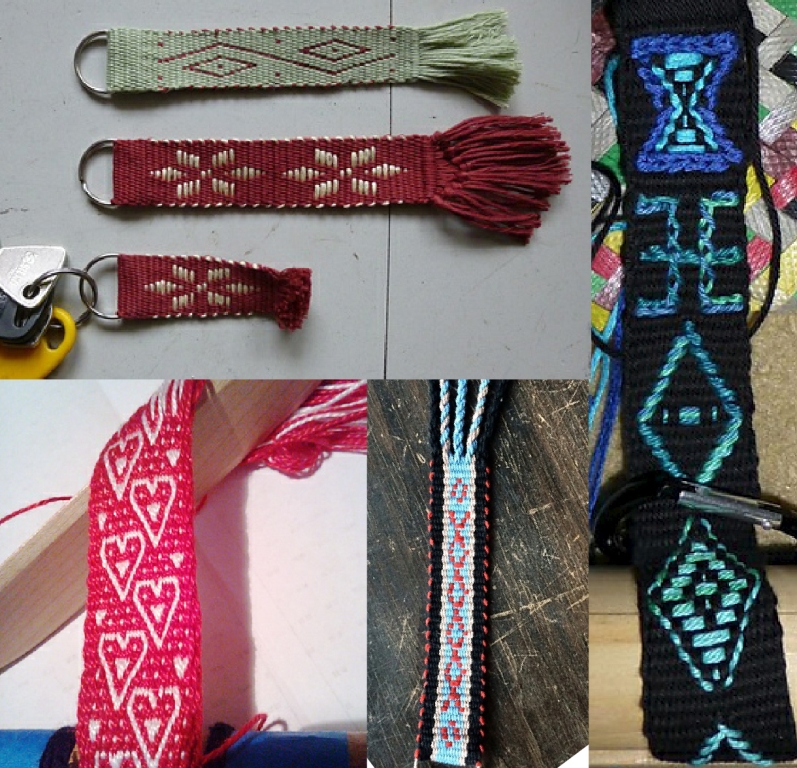
mixedSupplemental weft made another appearance in the work of Valtricot, above left, Linda, center bottom, and Wendy, bottom right. Wendy also put to use her considerable skills in Bhutanese supplemental weft technique. Susan celebrated Valentine’s Day with her own composition of hearts in Andean Pebble Weave. I like how she added the small heart spots betwen the large motifs…they really set it off.

sheep combo

??????????????????????I had been reading comments online about confusion in the English-speaking world about what exactly the animal is for this Chinese new year…a sheep, a goat, or…???? At the same time, I spotted Louise Ström’s sweet tablet-woven pouches (above left) with their animal motifs and decided that I would try something similar in Andean Pebble Weave (above center and right). The level of success of my attempt to create sheep will be left for you to decide!

I also played with beads, at left, in a plain-weave comb design band. I lined the edges with beads and popped couple up in the center just to see how they would hold there. I think I would like to use beads in the center of a band to form part of the pattern itself.

My large three-color Andean Pebble Weave/ikat bird  project is moving along at a snail’s pace with the workshop prep and key fob WAL having occupied my attention for the last few weeks.

And now I am going to warp to make covers for some small journals that I would like to take away and give as gifts. One of the key fobs I wove during the WAL will serve as my width sample for the Guatemalan thread that I want to use. I will use patterns inspired by nature…my little leaf motifs that I like so much.

supplementary weft leaf pattern journal cover backstrap weaving


Backstrap Weaving – Rewards

??????????????????????It is a fine comfortable feeling I have when I am  weaving away without challenging myself….I have the warping, set-up, heddle-making and loom operation all under control. I have not had to ditch a warp because of a ”fail”in any of these areas in a long, long time. I guess I am quite at home for the most part with creating motifs and charting patterns too.

But, throw in a little color challenge, I lose control and everything changes!

One of my personal challenges during the key fob WAL that we have been running on Ravelry this week was to take a bag of odds and ends of 3/2 perle cotton and put together some color combinations in plain weave…combinations that are not exactly natural for me. Yes, I am color-challenged. I had one result that I would call successful, the one pictured at left, one with which I am ”kind of” pleased and three ”fails”in the trash. It is funny how three colors that looked great together on their balls looked awful when warped up.

Luckily, only tiny amounts of yarn were involved. There was no point in trying to salvage them. I like burying failed projects deep in the trash and then immediately pretending that they never happened….clean slate.

I can understand the way that fellow weavers in the WAL feel when they have had to trash their projects too….things get tangled, sticks fall out, warps slip off bars before they can be lashed, crosses get lost. Throw that teeny tiny warp away, take a deep breath and start afresh.

plain weave backstrap weavingThat’s a five-strand braid at the end of my successful band. One of my students taught it to me and I love it. She had looked at me in horror when I had suggested finishing her band with lots of tiny four-strand round braids, my favorite braid for warp ends. She quickly grabbed all the ends and made this one fat attractive braid and then taught it to me. The looseness of this braid may not make it the best choice for a fob that will spend a lot of its life at the bottom of a handbag as the threads will most likely get snagged on things. This fob will hold one of my spare keys and will hang safely from a hook in my kitchen.There’s a tutorial for this five-strand flat braid here on my blog.

Sometimes it is good to be reminded of the process involved with setting up and weaving a plain-weave band on a simple body-tensioned loom. Here are a few process pictures…

This is the warping board I have been using….

???????????????????????????????It was built for me when I first moved up to Bolivia from Chile in 1998 and this is the first time I am using it. It is really quite awful. Of the ten embedded stakes, only four don’t wobble. Of the four sturdy ones, none stand perfectly straight. The whole thing weighs a ton. I would never consider warping all the way up the stakes as the difference in the length of the warp from start to finish would be noticeable due to the leaning stakes. However, I figured that with these very narrow warps we are creating for keyfobs, I could get away with using it as long as I kept my warp turns low down on the stakes. It has worked well, so I guess it is not so awful after all.

wal 3You can see the warp as it comes off the warping board with cross sticks in place. I attached it to my loom bar, and attached the other end to an S hook lashed to my bed. With the warp under tension, I made continuous string heddles around the ends on the near side of the cross and installed a shed loop around all the ends on the far side of the cross. In the last picture you see the warp all dressed up and ready to go.

Here’s a mini warping board that my friend Ruth made. She can dismantle it, throw it in a bag and to take it to weaving get-togethers in other people’s homes.

ruth's mini warping boardShe gave us some instructions and tips for making and using it….

To make one, get a piece of wood about the size of a furring strip—what I had is about 1/2 inch thick by just under 2″ wide, and a dowel at least 1/4″ in diameter, and make sure you have an Xacto or other carving knife to cut and trim the doweling. a sanding tool and a little bit of glue are all you need besides.

I recommend using the same size drill bit as the diameter of your doweling; you can wiggle the drill around a little bit in the hole to give yourself a little ease, without making it too loose.

ruths warping board 1Eyeballing all measures, I cut the board to the size I wanted (you may vary the length you want by how large is your usual carry-bag) plus two more little pieces to glue onto the ends; drilled holes to seat the pegs in for carrying, and the four holes for the pegs to friction-fit into for use. Here’s where you want to make sure your holes fit Just Right — you don’t want your pegs to lean inward at all when they’re under the tension that simple warping will put them under. If you’re unsure of your ability to drill vertically, use a drill press or a jig that ensures your drill bit is perpendicular to the wood in all ways.

ruths warping board 2You can hold the stick in your hand or set it on a table while winding your warp, which is ideal for travel use: you don’t need clamps for this part. 

Make sure you pick it up by the base when you go to finalize your warp set-up and make your string heddles, or no matter how splendidly wedged a post you pick it up by, it will pop out. If (ha. when) this happens, you can pick up your cross again from the nearest peg, and all is well.

Have fun practicing with many small warps!

Apart from the occasional color failures, I have been finding weaving these fobs lots of fun and really relaxing. I have been using them as little breaks and rewards while I slog away at my large project. My large projects are usually fun and relaxing too and the weaving is all the reward I need, but the current one went wrong and I had to unweave three days of work. I needed some little rewards to get over that!

Guatemalan natural dyed cottonHere is the fine Guatemalan cotton that I have been wanting to sample. This key fob WAL seemed like a fun way to do that. Cindy and I had bought this thread at ANWG in 2013. She bought a bag of the blue and I got the gold and we shared it. The tiny ball is the 60/2 silk that I have been using as supplementary weft.

Here’s the first fob in a set of process pictures…

wal 1

???????????????????????????????– Set up on the loom bar. I am using a fine steel knitting needle lashed to loom bar with cable ties which enables me to create a third selvedge.

– Removed from the loom bar and with the weft tail ready. I will thread that tail on a sewing needle, remove the steel knitting needle and, using the sewing needle, fill the space it occupied with the weft.

– Needle removed and space filled.

– The end of the band is fed through the ring and folded.

– The back of the band with the third selvedge that will be sewn down.

In the meantime, Julia has been using the WAL to try out some Maypole 3-ply worsted wool (before you Google that, let me tell you that, alas, the stuff has been discontinued) and some 5/2 perle cotton. We all think that the chocolate and melon together look fabulous. I like her use of the weft twining at the ends of her bands.

julia collageJanet  has been using her gorgeous handspun. She only uses natural dyes now and but still has some yarn in her stash of handspun that she colored with synthetic dyes.

janet collageThe yarn in the upper bands is Perendale lamb dyed with cochineal and walnut husks. The lower one is natural alpaca and dyed kid mohair.

JoAnne made the wee viscacha motif in Andean Pebble Weave using 5/2 perle cotton…

joanne collageLinda made three bands using stripes and tiny horizontal bars all with nice third selvedges. Joyful had me looking for the the beads I bought while in the US last spring when I saw the way she had used beads in her band. Our other Julia used the more traditional lashing method to attach her warp to her dowel and create the third selvedge. I love this combination of stripes and horizontal bars.

linda joyful juliaHere’s more handspun, this time from from Erin who actually made these fobs with Andean pick-up patterns before the WAL for an exchange amongst her weaving friends. She’ll be joining us to learn and practice some new techniques with cotton before trying them with her lovely wool yarn. She uses natural dyes.

ErinBetsy just started an Andean Pebble Weave fob with her handspun today and I will show you that next week when she has made a bit more progress, Each person’s handspun yarn has quite a different look and Betsy’s looks beautifully soft.

I am back on track with my current large project after all that unweaving. It is the third panel in my ”bird” project. This panel will have bird shapes in ikat filled in with Andean Pebble Weave motifs in three colors. I have decided to make one bird red and black and the other white and black rather than mix all three colors in each bird. I think it would be a bit too busy that way. Besides, it is quite a fiddly technique that I haven’t used all that often and I want to keep things simple while I get back into it.

???????????????????????????????What I am most pleased about so far is the ikat. I did some things differently this time and the ikat came out so very well even on the long sections. And the best part is that I know it wasn’t random and due to luck this time. There was only one tiny leak as wide as a pencil line. It feels like a nice reward for all the time spent experimenting.

And now you are going to want to slap me because I am about to complain….I kind of miss the seepage! My ikat shape is sharp and clean and in-your-face. While I am very pleased with having gained control over the leaks, I think I actually prefer that fade-in-fade-out look when the dye seeps in at the edges of the motif. Anyway, I feel prepared to go on to large circles and other curved shapes now and securely wrap long areas….yay.

Unweaving three days of work might sound like a lot of unweaving, but when you are doing pick-up it sometimes doesn’t represent a lot in terms of inches. I think I have mentioned here before that one of my weaving teachers here told me that weaving the distance of four fingers is what she would consider a good day’s work.

I spent breaks from this larger project working on the key fobs. I have been loving using the fine Guatemalan cotton with the silk supplementary weft and it is always fun to throw in work with 3/2 perle cotton and play with stripes. I have all my fob ”tools” sitting to one side ready to grab when I feel like I want to warp up for a wee fob…

???????????????????????????????…pick-up stick (optional for supplementary-weft inlay), sword/beater, pencils for cross sticks, heddle stick, coil rod (optional…I use it to eliminate ridging in plain weave) far loom bar (optional… string through the warp ends can be looped over an S hook or over a big toe!) near loom bar with cable ties…the steel needle slips under the ties. The steel needle is also optional and my use of one is not traditional. If you would like to see how a weaver from the Bolivian highlands lashes her warp to her loom bar take a look at the video on the right hand side of this webpage.

I have been using motifs that I wove into a ”Four Seasons” wool project some time ago. It’s been interesting seeing how my charted motifs look in this very fine cotton. It seemed fitting to weave that snow flake even in the middle of summer down here. Julia showed us snowy scenes from the window of her Pennsylvania home.

???????????????????????????????Linda gave me a great reminder of how luscious a bold solid color can look in warp-faced plain weave. She has been weaving her fobs using a pillowcase as a backstrap and decided it was about time she had a woven one.linda backstrap

She used a cotton yarn that I had never heard of …Luisa Harding’s Jesse…and it really looks beautiful. I will get to meet Linda this spring and will have a chance to look at this up close. Now I have the urge to make a whole bunch of fobs in bold bright solid colors like this! Maybe some of my wee balls of 3/2 perle cotton will do the trick. Beads, solid colors, handspun..I have been rewarded with lots and ideas and motivation in just one week of WAL.

??????????????????????


Backstrap Weaving – Long Time no WAL

It has been a long, long time since we ran a Weave-Along, or WAL, over in the Ravelry Backstrap Weaving group….too long!

jenI don’t know what the person who first created the idea of ‘weave-alongs’ had in mind but, for me, a weave-along means gathering a group of weavers together to explore structures or create projects based on a chosen theme. While I have lots of weave-alongs with friends as I travel, many of them tend to take place online.

The ‘theme’ could be a structure, like Andean Pebble Weave, which was the theme of the first WAL we ran online back in January 2011. You can see one of Jennifer’s Andean Pebble Weave bands from that WAL at left.

We ran a plain-weave WAL in which we were challenged to design with color rather than complex structures.

We had a Year of the Snake themed WAL in which we made something snake-like in any structure we liked and then, in another, we focused on a particular technique in plain-weave…warp ikat.

So, the new theme for this latest WAL is Key Fobs…lots of key fobs.

key fobs backstrap weaving???????????????????????????????The idea is to make short and narrow warps over and over again and turn out lots of key fobs. There may be the temptation to create one long warp and cut it into several fobs. Of course that would be more efficient, but the idea, as far as I am concerned, is to have people warping and setting up a loom over and over again. I can’t place enough emphasis on the importance of warping practice and it is the lack of confidence with this part of the process that tends to stop people from trying backstrap weaving or advancing beyond the basics. So, rather than weave one long band, I propose making many short ones.

The fobs can be in any structure…with pick-up patterns or plain-weave…a single solid color or a riot of stripes. Weave one and then another…warp, make heddles, weave…over and over again until you are winding those warps smoothly and efficiently and not dreading the heddle-making process because it will have become so easy… and maybe even enjoyable?

??????????????????????We can take advantage of the fact that  we can weave on the tiniest of warps using a body-tensioned set-up…

keyfob-loomThe other advantage of weaving individual key fobs, each on its own warp, is that each one can be started with a third selvedge. The selvedge is the edge of woven cloth that will not unravel. The two sides of a woven band are selvedges. You can create a third selvedge by starting to weave at the very end of the warp rather than having a fringe there. The starting end of the warp is the uppermost one in the above picture. That will be the end that gets passed through the metal ring of the fob, folded and sewn down…no need for hemming or extra folds as that end will not unravel.

??????????????????????I use some kind of metal rod at the start of my weaving and lash that to the loom bar. Depending on the weight of yarn or thread that I am using I use piano wire, a bicycle spoke or fine double-point steel knitting needles.

OLYMPUS DIGITAL CAMERA3651631230_0ffe08c581_zNote that this is not the way that backstrap weavers traditionally do this.

None of my indigenous weavers use such a metal rod. The use of the metal rod is just one of my ‘things’.

Backstrap weavers here generally use a piece of yarn in place of the metal rod that I use and lash that to the loom bar all the way across the width of the warp. You can see my teacher in Potosi preparing a warp below. She is in the process of lashing the header thread to the loom bar. The bar will then be dragged to the start of the warp and the heavy stake that was used for warping removed.

LASHING EGDE CORD_0And below, you can see a Peruvian weaver tightening the cord which she used to lash the header weft to the loom bar.

tightening the lashing cordAs for me, I like my metal rods. When I have finished weaving and remove the metal rod, I  fill the space that it once occupied with the tail of the first weft shot. I thread the end on a tapestry needle and pass it at least twice through the space. Therefore, when you start weaving, it is important to beat the first weft passes well against the metal rod so that the space the rod occupies is as small as possible.

third selvedgeI am going to use this key fob WAL as an opportunity to sample some yarn. I have some Guatemalan cotton that I want to use to weave a scarf and I think I will use that for the first fob to see how this thread behaves. Such small projects can be good for sampling your handspun too if you do not want to risk possibly wasting it on an unsuccessful larger project. I know that Janet, who uses her beautiful handspun in projects of all sizes, will most likely weave her fobs with handspun yarn. Here’s is her latest Andean Pebble Weave project using her handspun hemp and bast bamboo…

Janet finch ebble weave backstrap handspun hemp bambooShe created the dog paw and cross bone motifs herself…the paws are adorable!

In the meantime, in the Backstrap Group there have been questions about edges and how to make them neat. I know that this kind of response can be maddening, but the truth is, it really just takes practice!

Using a weft color that contrasts witthe color fo the edge warps can help you see better what is going on there.
Using a weft color that contrasts with the color of the edge warp threads can help you see better what is happening there.

I do tell people who have the chance to weave with me, that about 25% of it is being able to watch a demonstration and then doing your best to imitate the moves.

The other 75% is about experience and ‘feel’. A lot of it really is about ‘feel’ and that will come without your even realizing it.

Weavers of warp-faced cloth have different ways of handling their weft. Here are a few tips based on what I do.

Two problems I see with edges are….

1. Wobbly ones…the width wanders frequently from narrower to wider and back again with sudden and frequent indentations.
2. Loose ones…there is exposed weft between the last few warps and along the edge caused by excess weft in those areas.

1.Wobbly edges are usually caused by the weaver being erratic with the way he or she pulls the weft through the shed….getting into a rhythm and pulling it with a certain amount of tension and then suddenly losing it. That’s just all about practice.You can try pinching the edge of the cloth (on the side where your shuttle entered the shed) as you pull the weft through. As you do this, the weft itself is also trapped between your fingers and you will feel it sliding through. This will give you better control and can help stop you from pulling the weft through too hard and distorting that edge. You will be holding that edge firmly and not allowing it to be pulled out of line.

OLYMPUS DIGITAL CAMERAThe second problem with excess weft and spreading warp ends is best explained in video and I will try to add that to the FAQ page on this topic. This topic has been on the FAQ index list for years and I have never made the page for it.

arrow motif red on red panelsA big part of creating straight neat edges, for me, is knowing my yarn and, therefore, knowing exactly what width I can expect from the number of warp ends I have wound with that yarn. And I mean ‘exactly’. I measure down to the millimeter and spend a long time fiddling with my warp and pushing threads around before I pass the first weft.

Knowing my yarn means having woven several samples with it and having taken measurements from those. Samples need to be updated as your weaving changes and improves. If I am simply guessing the width, I might start weaving cloth that is too narrow. The band will want to widen and I might start to have to fight it to keep that initial width consistent. I might fight it harder and more successfully at some times than others and, as a result, the band edges get wobbly.

I believe that there is a place where the threads want to sit and a width that they want to create and, if you know that width and start off there, you should never have to fight the cloth’s urge to widen or contract. In this way and as long as you have a rhythm and are handling the weft in a consistent manner, you will be able to avoid wobbly edges . And that comes down to practice and experience.

I know very well the Clea cotton thread that I used in the red panels above and have been using it for years. This means that I know exactly what width I can expect from a certain number of warp ends in each of the structures that I weave.

As for progress on Panel 3 in the ‘bird’ project…

two of three pre columbian bird panels backstrap weaving…it has been a long week of tying ikat tape and sampling.

I have been tying tape over very long stretches of warp and seeing how different methods affect the amount of dye seepage. Some methods worked better than others but the worrying thing is that there does seem to be a certain amount of luck involved! There are times when I feel that I wrapped two sections in exactly the same way yet they give me different results.

3 color pebble weave samplesI have come to the conclusion that I am not yet willing to risk this on the large white bird panel that I wanted to create where very long sections of warp will need to be wrapped in tape. While the seepage in the first black panel and resulting staining kind of added to the fade-in/ fade-out character of ikat and actually got quite lost in amongst the black and white pick-up pattern, I don’t think that random grey stains on what are supposed to be large areas of white background will look quite as attractive.

So, I have come up with another idea for that third panel…birds patterned with three-color pebble weave. I’ll have the same all-black background as the first panel and tie the same sections to create the bird shapes. For the pick-up pattern, I’ll be adding a third color…no prizes for guessing what that third color might be. This means that it would be nice to have some red in the other two panels as well. I guess some red weft twining along the bottom might look good.

Here I am sampling for that. If only I had made the samples narrower, I could have turned them into keyfobs for the WAL and had a two-fer 🙂

See you next week…