Backstrap Weaving – Simply Red (and Black and White)!

These are the best light conditions I could find for photographing the red-on-red pattern on the two side panels of my wall hanging.

The late, low, winter sun was drifting in through my bedroom window and I looked up from my weft twining to discover how well the light and shadow brought out the relief pattern. I have posed these pieces all over the place…on the floor, on the table, in this room and that…used natural light and flash, held the camera in my hand, and used a tripod, and was not happy with any of the results. All I got was a flat red mass.

And then, there I was, happily seated with my backstrap in place and the warp stretched out before me. The light came to me through the window and gave me the shot at last.

sunlight on red panels backstrap weavingIt was great after all this time to be able to see how the red panels looked beside the center one. The tricky part was lining the three panels up precisely and have them suspended under the same amount of tension so that I could twine across the top of all three at the same time.

I still can’t decide which face of the double weave looks better…

back of double weave panelI used the solid stepped lines and the arrow motif as part of the weft-twined pattern in much the same way as I had in the red panels…

finished weft twining on backstrap loomI need to do a bit more solid black twining to finish. That will be the part that gets clamped within the wooden hanger. Once off the loom, I will decide how to finish the ends of the twined wefts and how I will cut the fringe around those long woven tabs at the other end (see below).I need to contemplate that for a while. Once cut, that will be that, and I want to get it right!

finishing the shipibo backstrap pieceSo, it is time to move on to the next project….a clean slate and a bunch of sticks…exciting!

I bought a large cone of UKI 20/2 cotton for the next project with which I have never woven before. That means it is time to sample the yarn while I play with ideas for the ikat  in the next wall hanging. I’ve been at the sketch book creating hooky designs. Whether I am creating a design that is way beyond my limited wrapping skills, remains to be seen.

First, I need to get an idea of what kind of width I can get with X number of ends in the 20/2 cotton and so I wound a short-ish warp as a sample.

To make it more interesting, I decided that I could play a bit with the silk that I recently bought at CNCH and try a new-to-me supplementary-weft technique that is used for decorating hair sashes from Jacaltenango in Guatemala. Dr Carol Ventura has written a book about the Jacaltenango hair sashes. I have owned this book for years and once dabbled with the technique many, many years ago. As is always the case when using supplemental weft, the success of the project is very much dependent on finding the right kind of material for the supplemental weft for the weight of the ground cloth. While I understood the technique, my sample was downright ugly because my supplemental weft was too “light” for the ground cloth and there were large gaps between the rows of pattern. Then, I got distracted and wandered off in another direction.

I don’t even know where that sample is now. It was obviously not worth keeping. However, seeing a Jacaltenango hair sash that one of my students brought to class in Seattle last spring re-ignited my desire to try this technique….

jacaltenango hair sashI have made mistakes in my new sample and my count is off. I will un-weave this and start again now that I have a better feel for handling and counting these fine warp threads.  Hopefully the next attempt will be better. In the meantime,  this 20/2 white sample will give me a good idea of how many ends I will need to wind for my next wall hanging panel. I like two-fers.

backstrap sample with new cottonAnd, do I feel confident about this next ikat project? No, not at all! My experience with ikat has been quite limited but I figure that I may as well just jump in there. I do know from my own experience that the wrapping and dyeing part, although painfully slow, is relatively easy. For me, the hardest part has been keeping the warps well enough aligned while weaving so that my motif remains recognizable. Yet, I don’t want them to be so rigidly aligned that I lose the feathery outlines that make ikat so charming. This is one of my tiny attempts…

three ikat motifsHere are some narrow strips of ikat that I placed in a piece that includes supplementary-weft patterns…

strips of ikat backstrap weavingAnd finally, this experiment involved dyeing and then removing some of the wraps to dye again for a second color.

ikat book coverWay back in 1998, my weaving teacher in Candelaria, Bolivia showed me the first piece of ikat I had ever been able to handle. It was a  bedspread on which she had been working on and off for several years. This was something she was weaving for herself rather than the usual pieces that she weaves for the store in the museum in Sucre.  She was weaving with rather coarse handspun wool and her name and her husband’s had been worked in amongst the flower motifs..

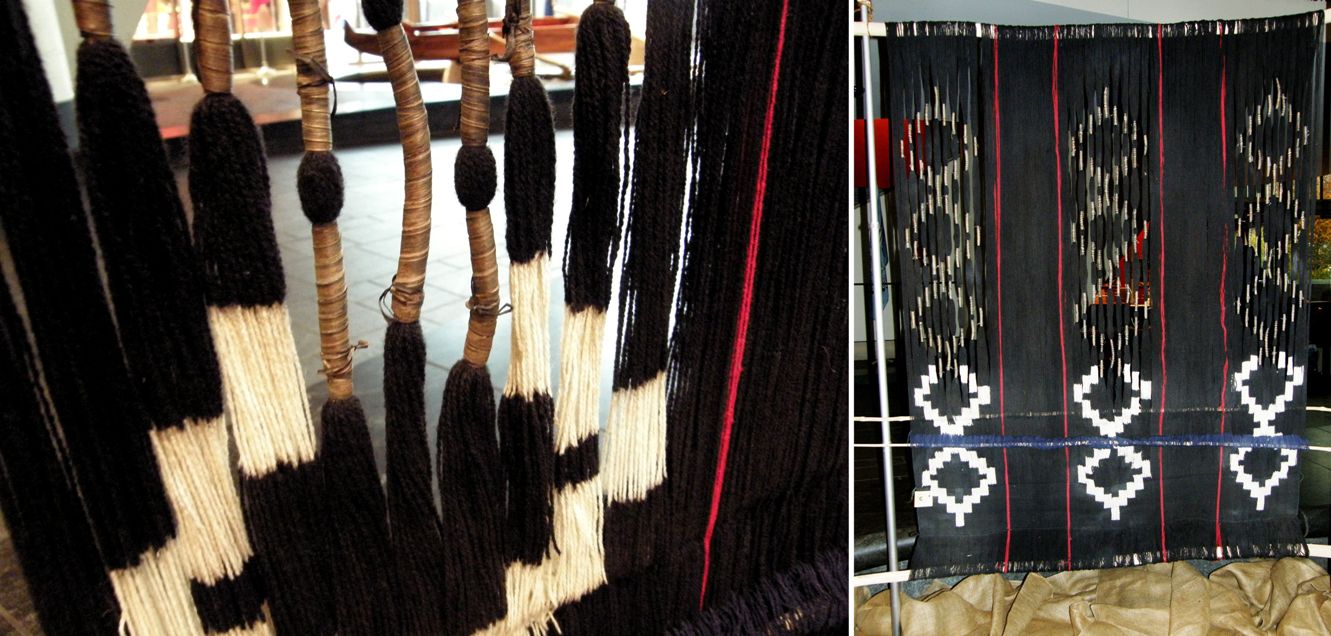
stitched-ikatI’ve examined the wrapped warps, the finished cloth, and watched the weavers at work in many different places in my travels in South and Central America, trying to capture the secret of limiting the amount of  movement of the warp threads and the resulting image distortion. Below are examples from Chile, Ecuador and Peru.
mapuche-ikat-2

ikat weaver Bulcay Ecuador

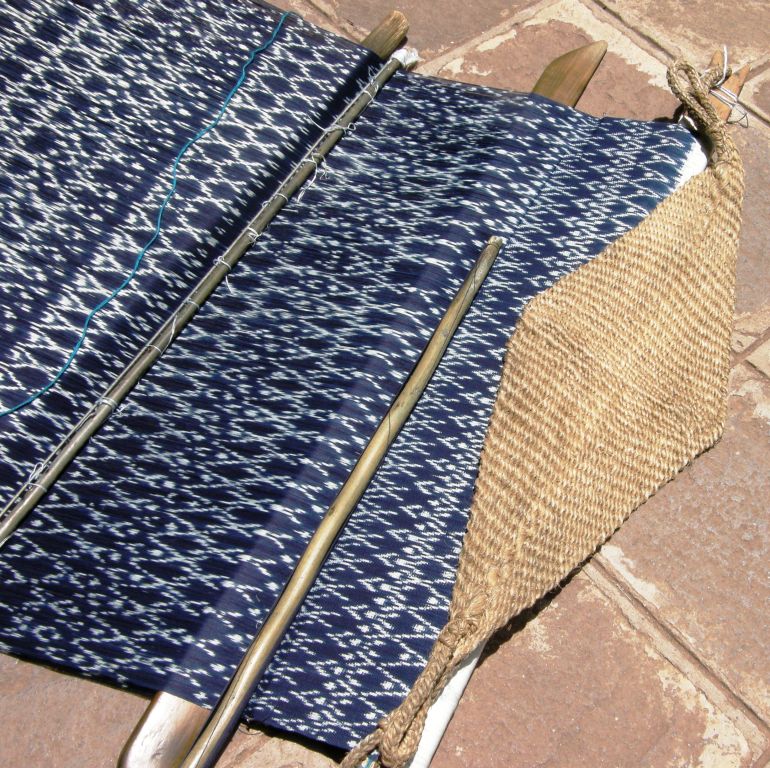
The simple backstrap loom of Tacabamba, Peru on which the indigo ikat-patterned "panones" are woven. They are up to one-meter wide, covered with tiny motifs and have patterns knotted into their fringes.
The simple backstrap loom of Tacabamba, Peru on which the indigo ikat-patterned “panones” are woven. They are up to one-meter wide, covered with tiny motifs and have patterns knotted into their fringes.

So, that is what I have been up to this last week….

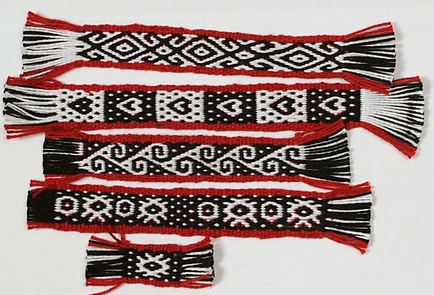
Meanwhile, there has been a fair bit of red, black and white appearing online in the various places where band weavers hang out.

Cheryl wove with me last spring and now she is already designing her own motifs and weaving more than just samples.

cheryl (3)She designed the gecko figure and I love the arrow motifs at the bottom which remind me of little boomerangs. This will be a strap for her camera. I showed you some weeks ago the sample bands that she wove in preparation for this project. Here is the completed weaving…

cheryl finished camera strap pebble weave backsrapThe center motif is charted in my second book and is a pattern that I adapted from tablet-woven band by Louise Ström.

Ann Mester created this enticing warp for backstrap weaving which could be used for complementary-warp pick-up techniques like Andean Pebble Weave, or simple warp floats, or just to create attractive horizontal bars of black and white…

ann mester fb (2)Rufio, the kitten (who would look very stylish with a red collar) was rescued from Pet Rescue of Mercer.

Susan AndersonAnd, if you are wondering about what I call “simple warp floats, the technique that I used on the red-on-red panels, Susan Anderson’s example. above, very clearly shows the single-faced nature of this pick-up technique. Susan has floated the warp threads singly. For me, this gives a more delicate yet solid look to the motifs than that which is achieved by floating pairs. The pattern is from Anne Dixon’s The Weaver’s Inkle Pattern Directory. Susan wove this on an inkle loom and has done a beautiful job.

So, it will most likely be all about winding the warp and then finding a comfortable position and set-up for wrapping many many threads for ikat this coming week…

cropped-ikatThis was my first ever attempt, around eight years ago, I would guess. It’s wool warp…Navajo warp…wrapped with cassette tape. The wrapping and dyeing were successful…the weaving was not! This is another sample that has disappeared!…nothing to show for those hours of work except this picture and “experience”.  And I am sure that there will be much more experience to be gained and  many more lessons to be learned in this coming week.

See you next week…


Backstrap Weaving -The Bag of Tricks

I had to dig deep into the bag of tricks this week to come up with a new idea for finshing off my latest three-panel wall hanging. Two days of experimenting with the structure that I had hoped to use for the two outer red panels finally led me to the conclusion that it just was not going to be as I had envisioned. It was time to plan again and take a look at all that I have at my disposal in my “bag of tricks”.  And there is a lot of stuff in that bag of tricks after having spent almost 18 years now studying weaving techniques and simple looms used in South America.

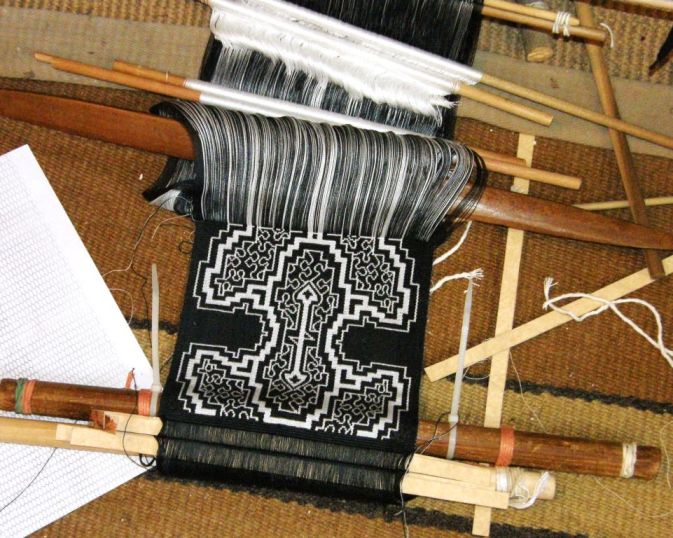
main panel of Shipibo inspired wall hanging backstrap loomThe main panel for the wall hanging is now finished. I can’t cut it off the loom yet to better show you the stepped effect of the woven fringe as I will need to place the two red panels, when I am done weaving them,  on this same loom and then twine across the top of all three to join them together.

It is always fun turning a finished piece over to look at the other side. I have been looking at white squiggles on black for so long now as I inched my way through this weaving. Yes, literally inched. I took note of my progress on the woven fringe part and it was pretty much an inch a day.

light sde of shipibo inspired hanging off loomThis side actually looks more like the painted Shipibo cloth that inspired this project. It is much more common to see light cloth with dark lines. But I don’t have to make any decisions here about which side to show. It needs to be the dark side in order to match the other pieces in this wall hanging series.

I want this second wall hanging to represent the weavers of the tropical lowland regions of Peru. For that reason I had chosen to use the structure that is used by people of the upper Amazon Basin to make wristlets.

shipibo-wristletsI have never been to that part of Peru and so was relying on a sample that I had been given from the work of Nora Rogers and Ann Blinks as well as notes by Cheryl Samuel in order to reproduce the structure. I bought red hemp twine for this project while in the USA. The weave is based on having twined warp threads lying next to what Samuel calls a “half basket weave”.

wristletI did succeed in reproducing the structure but the hemp twine did not give the design the relief that I had been hoping for. It was just a flat red mass at which I had to peer in just the right light in order to make out the pattern.I tried all kinds of weft and beat but I simply could not get the desired effect.  Nevertheless, I found myself sitting alone stupidly squealing with happiness as the piece started to take shape. It was a joy just to able to reproduce it but a disppointment  not to be able to use it in my hanging.

Back to the drawing board. I wanted something that would be all red but with texture and, of course, something that would represent textile techniques of the lowlands.

But, of course….simple warp floats!

shipibo pattern in simple warp floatsSome time ago I had woven the placemat, above, using a two-color simple warp float technique. I copied the pattern from a cotton bag from tropical lowland Peru that Teyacapan shows on her Flickr page. The design is one that I have also seen painted and even embroidered on Shipibo cloth.

The set of placemats I wove became a study of the use of this structure in several regions across the globe…

backstrap weaving placemats simple warp floatsAt the Encuentro de Tejedores that I attended in Cusco in 2012, I was able to observe Matsigenka backstrap weavers from Bajo Urubamba creating striking black and white pieces with their handspun cotton. The pieces were decorated with patterns that were created from simple warp floats.

??????????????????????

Photo by Jennifer Moore

The picture above was taken at Tinkuy 2013 in Cusco and shows a weaver from Pacaya, in tropical lowland Peru, weaving a warp float pattern with handspun cotton on a backstrap loom.

It isn’t necessary to have two colors to create patterns in this structure. If I used an all-red warp, I could create patterns of raised red-on-red….textured patterns rather than colored ones.  I also had a Mexican sash that my friend Annie MacHale had given me way back in 2010. I then remembered that weaving a single- colored piece with warp float patterns had been on my to-do list for some time. It was all coming together nicely!

???????????????????????????????The weaver of this Mexican sash has alternated a heavy warp thread (doubled threads) with fine to create a high-relief pattern in white on white.

???????????????????????????????Above, you can see my red experiments…the hemp twine wristlet structure and the red-on-red simple warp floats.

red-on-red simplewarp floatsI experimented with floating pairs and floating single threads and decided that single was the way to go. I wanted the pattern to be fairly delicate and subtle so as not to interfere with all that is going on in the main black-and-white panel. I decided to weave the solid lines of the main panel with the arrow motif in the center.

I set up both panels on the one loom in the same way that I had done for the first wall hanging. This would ensure that both came out the same way.

???????????????????????????????

red on red panels on backstrap loom

arrow motif red on red panelsYou’ll have to trust me when I tell you that these panels are deep red and not the weird pinkish-red that you see here.

Now it is time to start sketching ideas for the weft-twined pattern that will go across the top of the finished three panels. I remember I had a heck of a time with the twining on the first wall hanging trying to group the warps correctly so that the twined width matched the woven width. Hopefully it won’t take as many attempts this time to get it right!

And in my spare moments I doodle and think about wall hanging number three…the ikat one. Luckily I have a giant cone of thread and a a huge roll of ikat tape (thank you Betty!). I expect there to be a few do-overs for that one! I am also hoping to use supplementary-weft to create patterns on that piece. These ideas are just sloshing around in my mind for now but I hope to base the overall design on hook motifs in positive and negative space like the ones I played with recently in silk supplementary weft on cotton…hook motif mirrored and flippedThen there will be the third series of wall hangings in which I hope to put what I learned with my ticlla (discontinuous warp) experiments to use….using wool and the red-black-and-white combo, of course!

dovetail join ticlla waddington

ticlla with supplementary weft inlayI have spent a lot of time putting that big bag of tricks together. It is nice to be able to use these experiments to create bigger things. I look way, way ahead and I get excited about all these projects as I inch my way along!

See you next week.


Backstrap Weaving – Making Way for Things to Come

airport world cup 2014If you read my Boomerang Effect blog post a few weeks ago you will know that my first attempt to get back home to Bolivia after my Sydney visit was not successful. On the second attempt the boomerang sailed over the Pacific Ocean and all the way across the USA, showing no signs of returning to its place of origin, until… it hit a palm tree in Miami and got hung up there swinging around in circles.

I can think of worse place to get stuck for a few days but when you have been away for three months all you want to do is get home! The airport was lively and colorful with large tv screens showing Wimbeldon and the FIFA World Cup. Enthusiastic crowds of all nationalities gathered around. It passed the time. Of course, it would have been a whole lot jollier if the USA hadn’t lost its football match.

I tried to be productive, sat down with my laptop, and poured out the entire Table of Contents for my third book. That felt like an enormous hurdle. Then came a list of all the pictures that need to be taken for each chapter. That done, I was all the more eager to get home and get stuck into it.

???????????????????????????????In the end, I bought a ticket on the Bolivian airline BoA (Boliviana de Aviacion) who had recently added Miami to its system and was offering very good fares, free checked bags, and some of the best Economy Class airplane food I have had in ages.

The coolest thing about BoA was the flight attendant uniform.

They each had a handwoven warp-faced cotton pick-up patterned band made by weavers from the Bolivian lowlands sewn to their pants…very cool!

I had left my brother’s place in Sydney at 9am on Monday and got to my door at 9pm Thursday (Sydney time). It was quite a trip! The jet lag was huge. I have finally reached the point where I can eat lunch without falling asleep in my plate.

The BoA uniforms with their woven bands had stirred me into a longing to be home and back at my loom.

Killing time in the souvenir and Duty Free stores in Sydney airport had already given me guilty reminders of the abandoned project on my backstrap loom at home awaiting my return….here’s one item…

aboriginal art souvenirThis Aboriginal Art souvenir reminded me of the squiggly lines in my Shipibo-inspired project which was the last thing on which I had been working before leaving home in March…

Shipibo inspired wall hanging backstrap weavingI hadn’t packed it away and had simply covered it over wth a sheet. There it lay on the floor with the various shuttles, swords and pick-up sticks that I had been using to weave this double weave with its multiple heddles. It took a me a little while to get back into the rhythm to follow the sequence in which I had been putting all those tools to use…

finishing the shipibo backstrap pieceNow I have finished the main design and am weaving a “‘fringe” of sorts. I divided the fringe into seven sections and am weaving each separately in double weave. I need seven inches of  ”fringe” to complete the panel and have just reached halfway. Each section will be a different length with the center one being the longest and the two outer ones the shortest, creating a stepped effect. Years ago, my brother had sent me a picture of a Native American piece in a London museum that had been finished this way and I have been wanting to do that myself ever since.

twining on backstrap wall hangingThe picture above shows two balls of dark red hemp twine alongside the woven panel.

I hope to create two outer panels with this twine using a structure that includes warp-twining that is used by lowland weavers in Peru to make wristlets. The outer panels will be a quiet solid dark red so as not to clash with the crazy busy-ness of the center panel. The three panels will then be joined together across the top with weft twining. There is a long way to go before I get to that point. Much sampling with the hemp twine needs to be done first.

This will be the second piece of three in the second series of red-black-and-white hangings. That’s the first piece above left.

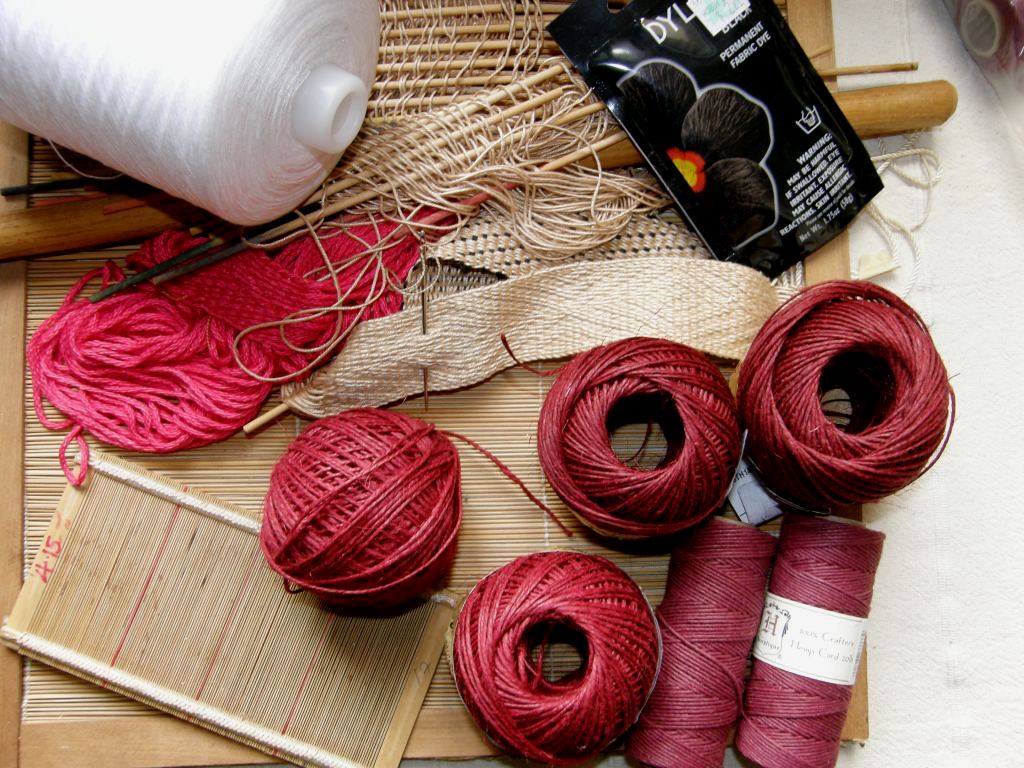
???????????????????????????????Things to come…exciting! There are a couple of varieties of hemp twine in this picture along with an example of the wristlet structure. You can also see the super fine bamboo reed that I bought at CNCH, now removed from its heavy frame and ready to be used on my backstrap loom. I can’t wait to try it out with some silk. The cone of white thread is the 20/2 perle cotton that I want to use for the third wallhanging…an ikat piece…and there’s some of the black dye that I’ll use for that. I am not sure if I will have time to get that started before I have to leave again but I am happy to have more time in which to ponder that one. I seem to get some of my best ideas while sitting on planes!

???????????????????????????????Then there’s the gorgeous 60/2 silk that I got at CNCH waiting to be used as supplementary weft. The large skeins of silk were given to me by my friend Susan in Sydney. It’s a heavier weight silk than the Redfish Dyeworks skeins and I am thinking of using it as the warp for a brocade project.

The project ideas go piling up. You can probably tell that I am pretty excited about being home again.

My weaving friends in Sydney remain in mind. Emerald has been sending me updates on her progress as she weaves off all the projects that we started in our two days together…

emeralds pebble weave collageThat lovely green warp is now a piece of Andean Pebble Weave patterned fabric ready to be made into a cell phone pouch. That’s my second book that she has opened on the floor. I was showing her how to read the spotted charts. That particular motif also appears in the first book.

sewing and weaving tuular band emeraldHere she is weaving and sewing a tubular edging to the pouch.

emeralds cell phone pouch and intermeshThere’s the finished pouch along with her intermesh sample band.

One of the good things about having to stay longer in Sydney than expected was that I got to visit with the Springwood group of weavers again up in the Blue Mountains at Helen Halpin’s place. What a lively and enthusiastic group of weavers! They meet once a month and there is always a lot of show-and-tell.

Yvonne, who had woven with me a couple of weeks earlier, brought in a band that she had since warped and woven. She had played about and created some of her own patterns. I love that! What was also interesting was that she had used bamboo thread. I have never considered using it as I had always thought that it would be too soft. Yvonne’s band felt lovely.

???????????????????????????????In the Ravelry group, Kim has been progressing with the two-color simple warp-float technique while copying as well as adapting motifs from Central Asian textiles. This piece is beautifully woven and I love the combination of colors. I am surprised at how well that green stands out from that background color….inspiration to be more adventurous with color choices.

kimberley swfKeith has formed a South American band weaving study group at the Weavers’ Guild of Minnesota. One of the members wove with me on one of my trips and it is nice that they can now study some pick-up weaving techniques together and support each other. Keith posted this picture of some of the first bands with some thoughts of what could be improved. He won me over right from the start with his color choice!

keithScott, a Facebook buddy, posted this striking double weave piece that he started some time ago and just finished…

scottSo, here I am back at home. I unpack and put away the yarn and other goodies that I have brought back on this trip. As is my policy when new things come in, old things have to go out…out went the rocking chair this time which opened up a whole lot of space! Even so, the “stick corner” in my bedroom gets increasingly crowded. I brought back a whole bunch of dowels that were being discarded and a couple of shuttles. I need sticks of all kinds of lengths for all kinds of warp widths…cross sticks, heddle rods and coil rods…shuttles and swords. I don’t weave a limited variety of traditional items as many backstrap weavers do and so, I need sticks that are suitable for a vast range of woven widths.

???????????????????????????????It’s a lot of stuff and I wouldn’t part with any of it!   Would you believe that there are still times when I can’t find just the right length of stick with the right girth?!

But, the equipment you use can be as complex or simple, as rustic or sophisticated as you want it to be. And it’s always nice to know how to improvise a set-up when there simply isn’t any “equipment” to be found..

???????????????????????????????Or when you just couldn’t be bothered fishing all the gear out of a packed bag…

??????????????????????????????? ….in which case a pencil will do for a front beam and a piece of string for a backstrap. The elastic bands will stop the string from sliding off the pencil.

For narrow bands, no equipment is required if you have a good set of “magic fingers and toes”!

??????????????????????Maxima tensions the warp between her index finger and big toe. Her fingers are used as cross sticks to form the picking cross and fast flying fingers and thumbs select the colored threads to form her patterns. Her hand is her sword and beater.

When sticks specifically for backstrap weaving are simply not to be found, as is often the case in the very highest parts of the Bolivian highlands, all kinds of other things can be called into play…like the spindles that Hilda is using in place of cross sticks while setting up a warp for double weave. Hilda’s large sticks and rods are saved for her horizontal ground loom.

hilda preparing backstrap warpIf I am home and have access to my collection of sticks in their handy bins at the end of my bed, I like to use them. I feel more comfortable with a wide breast beam and a backstrap…a nice wide cushy backstrap….no matter how narrow the warp.

This Mexican weaver from Santo Tomas Jalieza, Oaxaca seems to feel the same way!

Picture from Teyacapan's Flickr page
Picture from Teyacapan’s Flickr page.

So, I will never able to resist grabbing a good stick that comes within reach while I am traveling and bringing it home with me. While there are still things that can be removed from my little home to make space, there will always be room for more sticks!

Finally, I would like to thank everyone so very much  who went over to Facebook and ”liked” my nephew Ryan’s triathlete page at my request last week. Someone even posted a “Weavers for Waddington” comment. That was so cool 🙂 Ryan was very pleased to see all the new “likes”.  It really made a difference and he got a new sponsor last week…

1176105_696156010456849_9156188001071593550_nYep, that was THE best thing about being held back in Sydney…I got to hang out with Ryan some more.

If you didn’t get over to Facebook last week to “like’ his page, please help him out by going over now. More “likes” mean more sponsorship appeal, I am sure. I was happy to see so many familiar names there as well as some names I didn’t recognize…people who read my blog but with whom I have not yet connected…many thanks to all of you.