I was recently asked to describe the kind of weaving that I do in an audio-only interview. Ummmmmm ….I was completely stumped and now I don’t even remember what kind of awkward response I made! When talking about my weaving, I’ve always been in settings in which I could basically just let the textiles do most of the talking for me. Although I ramble on in these blog posts, I always try to include lots of captioned images for those who just want the eye candy yet still want to get a general idea of what I’m talking about.
Even when I am away from home and on a plane, for example, chatting with a stranger and the topic of what we do comes up (it doesn’t always), I can just show them perhaps a wrist cuff, my belt or a purse I’ve made with my woven cloth to give them an idea.
Although I don’t typically wear four at once, I’m almost always wearing a wrist cuff when I’m traveling.
I remember the time I was at the CNCH conference in 2010. Inkle weaver Annie MacHale messaged me to see if we could meet up. We’d never seen each other and she spotted my woven belt first from behind and was immediately able to identify me. The weaving did the talking.
Wearing my woven work, such as these belts, is sometimes more effective at gatherings than wearing a name tag!
A more recent addition to my belt collection using both warp and weft-faced structures.
And then there are always my bags and purses. In the last few years I’ve gained more confidence in my hand-sewing and have created quite a few more but there was always one to carry to show to curious strangers.
Using my cotton-spinning bag as a purse on an outing with my friend Emerald in Australia. Multi-purpose items are a bonus when traveling with limited space in luggage.
I was never without my big camera in the earlier days of my travels and a camera strap is always a nice way to give folks an idea of what I do (not forgetting of course all the images stored in the camera). Of course we all prefer to be able to touch textiles, right? We see textiles online and want so much to be able to reach out and touch them. We have to imagine how they feel. What about when you can only hear about them in an audio-only context? Um, I hope I did a decent job of answering that question.
My updated camera strap woven in my own handspun wool and original hummingbird figure in three-color reversible pebble weave.
It was nice when I got my little iPod and was able to leave the bulky camera behind on trips. I would use it as my camera, wearing it around my neck in its special woven pouch. It was often a conversation starter because it was plain to see there hanging around my neck…
Backstrap loom weaving with camera at the ready. There was to need to let the pouch do the talking in this case as there was plenty going on there at my loom.
Which reminds me, there are also woven necklaces like the one I’m wearing above to do the talking on my behalf.
Wearing jewelry in the street here in Santa Cruz is not a good idea. I learned that the hard way in my first months here. Naturally, I do enjoy being able to do so when I’m away.
After the iPod, I got a phone to use as a camera but I found it hard to find a commercially-produced case for this Redmi brand. So of course I had to weave fabric to make a case instead which allowed me to show it as an example of some of my work with wool…
Fabric for the phone slip case on the loom. I only use it when I travel.
Perhaps when I complete my move to Australia and live in the cooler Blue Mountains, I’ll be able to use my scarves and neck gaiters when those “let the weaving do the talking” moments arise. I confess that those items have only very rarely been worn here in the tropics. Even putting up with their unwanted warmth in order to photograph them was a big ask.
Hurry up and get the shot before I melt!
So when I was faced with the question of having to describe my weaving just in words, it was a big “Ummmm” moment. Even given a second chance, I’m not sure I could do it. As I wrote in a previous blog post, I feel that I’ve drifted away from having a particular recognizable style…my style actually being the loom I use rather than the kind of cloth I produce. As I get more and more into creating my own original patterns and change my home to the other side of the world, maybe a whole new assortment of patterns and structures will emerge. Whatever happens, I hope there’s more growth.
Designs with SE Asian leanings have already been starting to appear.
Ikat, rep weave with pick-up, warp-faced double weave, open balanced plain weave with inlay, complementary-warp pick-up, supplementary weft patterning.
I put this collage together to show some of the different kinds of things that I do. But of course, if you’ve been following my blog (maybe there are some die-hards who’ve even been with me for the last 15 years!) you’ll already know. I guess my purpose in writing this post is to to see if I can in fact, by way of these ramblings, answer the question for myself in my head….how would you describe the kind of weaving you do? I often find myself pondering certain things at the time I’m writing a blog post and find a solution right here as I sit typing. That’s one of the reasons I keep writing this blog and am so grateful to all of you who follow along and “listen”. It really helps clear out the mental clutter.
Until next time…….long-time blog followers may remember this dearly loved one making appearances in various posts. Rest in peace sweet girl.
I’m still here looking at blank white walls quite literally watching paint dry on some days and hoping that I’ll wake up to suitable humidity levels so that I can get on with this task and back to my loom! The humidity levels haven’t been playing along lately. On those days there’s always the “delightful” sanding jobs to do and when I’m done with those I find myself taking a tea break while staring at the blank walls and imagining how I’ll decorate the walls of my place in Australia when I finally get back there.
We had one week of winter with, according to the local press, some of the coldest days on record here in the tropics and I can tell you that there’s nothing cosy about bare white walls and ceramic floors. Today we are back to a more typical 89 degrees.
About decorating those walls….I have four sets of panels in combinations of red, black and white that could be hung. You might remember these from my Textile Trails set:
The only time these got hung was at the ANWG conference back in 2015, I think.Terry (RIP), whom many of you may know as the owner of Magical Moons Etsy shop, made me some beautiful wooden hangers for them. I own and cherish several of her lovely swords.
And this, being one of the three from the Plain Tales set:
Warp-faced double weave in the center flanked by a single-faced pattern of three-span floats.
I haven’t yet given this next set a name. I’ll call it Three Little Birds for now because I love that Bob Marley song so much. This was one of my projects where I created a shape in ikat which was then filled with pick-up pattern:
For the panels on the left and right I used the ikat technique to create the bird shapes. The advantage of that over the center panel is that the background of the ikat panels can be a strong solid color rather than a pebbly one.
And of course there’s the foursome that make up the Within These Walls set:
In these I also first used ikat to create the shapes which allowed the black areas to be solid.
Creating the shapes in ikat might seem like an excessive amount of trouble to go to just to get the solid rather than pebbly background but my long-term plan for this method is to create curved shapes that I otherwise wouldn’t be able to using the structure that I call Andean Pebble Weave. The block-shapes that I’ve created so far are just the warm-up!
Hmmm….I don’t think I’ll have that much wall space for all of these. What do you think?
There are also some hangings that I’d like to make in blues. For example, I’d like to weave these flower and foliage patterns again on a much larger scale in blue and cream and have the two strips flank a panel of hummingbirds…
60/2 silk in warp-faced double weave.
I already have one piece in blues that I’d like to hang:
Ikat on 60/2 silk with a little supplementary-weft patterning in the center.
And so my mind keeps on turning things over. I start thinking about the colors I use in my weaving, one thing leads to another, and I remember this piece which I recently uncovered while emptying the closet for painting:
Figures that I learned in Guatemala with my teacher, Carmen.
No, this was never meant to be hung. I’m not even sure that I like it! It was the practice piece that I wove as soon as I returned from my trip to Guatemala. I wanted to use my scribbled notes to practice some of the techniques I had learned there with my backstrap loom teachers. This was the best way to see if my notes were thorough enough and if they even made sense! Sometimes I leave out things while making notes thinking that they are too obvious to bother recording. That’s something I regret six months down the track when I come to try the technique and find that there are missing links. Once I finish one of these practice pieces and add to my notes, making sure than even the most obvious steps are included, I can write out the good copy and add the detailed step-by-step photos that I’ve taken while weaving them.
With one of my teachers, Lidia, back in 2008.
Seeing this piece again (I’m still deciding whether it will go to live in Australia or be abandoned) made me remember how fun these supplementary-weft patterning techniques are. I don’t use them enough. These figures are created by using warp-wrapping techniques to form horizontal, vertical and diagonal lines rather than the inlay technique that I most often use. I think I need to weave something using these techniques in colors that I find more pleasing. Maybe something in blues that can hang alongside my flowers and hummingbirds.
These are the colors that I used when learning the techniques with my teacher.
While I might be craving minimalism in terms of furniture when I move to Australia, I’m afraid my walls might end up not being in keeping with this idea!
I’ll finish here by including below a tutorial for the Guatemalan wrapping techniques that I used in that colorful piece. This tutorial has been here on my blog since 2012 and I thought I might drag it out here from the Tutorials page for those of you who are unaware that these things are lurking back there just waiting to be discovered. Here’s a link to the tutorial list. It’s a lot of work putting these tutorials together and I often wonder how many people actually find them in my blog labyrinth!
If you’re not interested in the tutorial we can leave each other here until next time…..
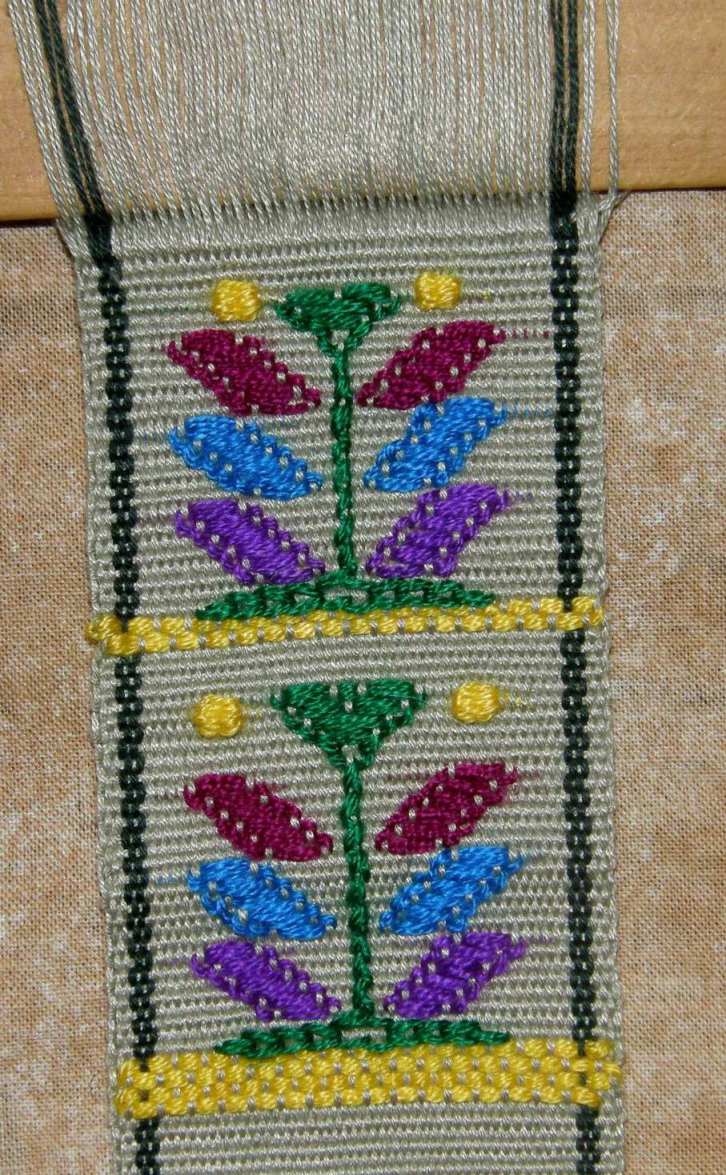
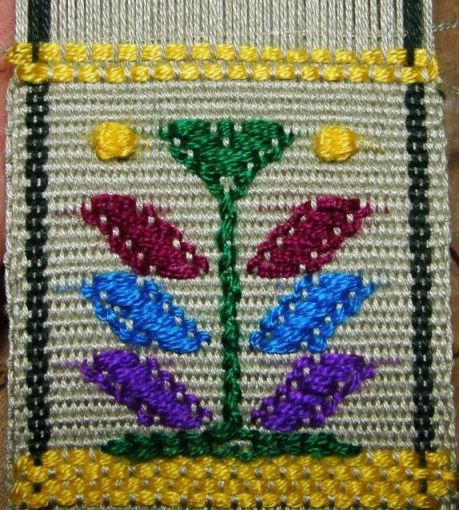
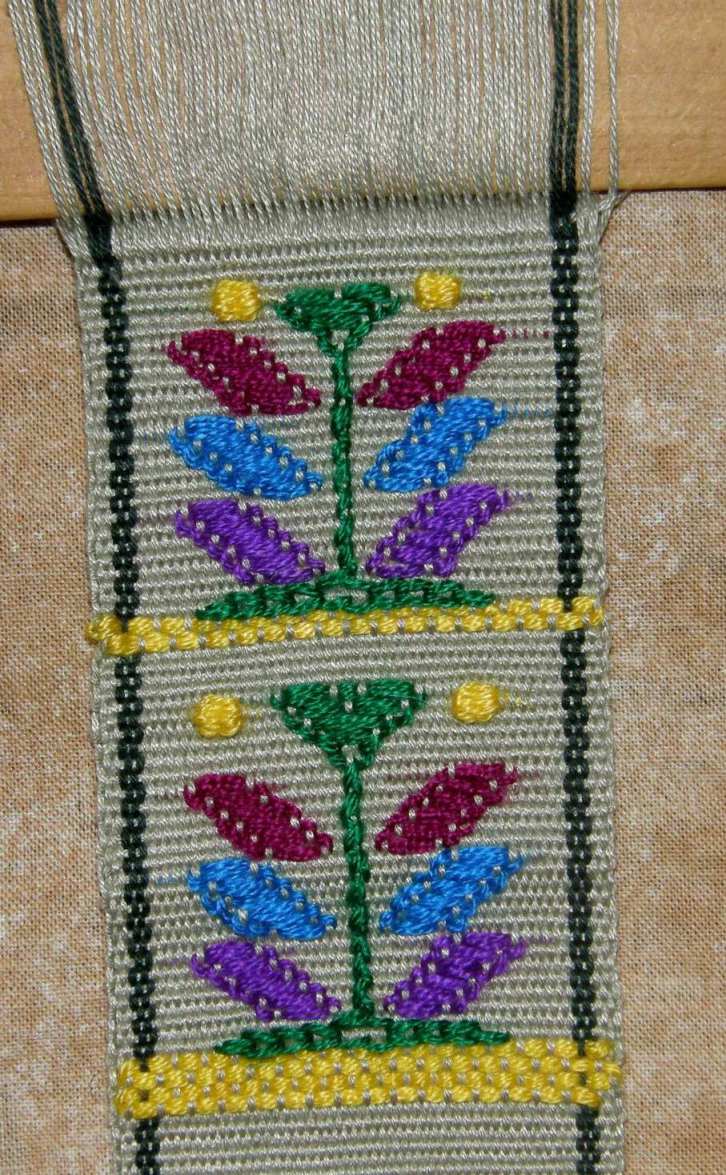
Guatemalan tree designs woven with acrylic supplementary wefts on a fine cotton ground weave.
I suggest you follow the beginner tutorial on supplementary-weft patterninghere before attempting this second more advanced one.
This tutorial was first presented over two weeks within blog posts so there are two parts. I have extracted the information from the two blog posts for this tutorial page. It shows the kind of supplementary-weft patterning that I learned in one particular town in Guatemala.
I wove a tree design at left using the various warp wrapping and inlay techniques that my Guatemalan teacher employs and this was fun as I hadn’t done any of this since 2008 immmediately after my return from my first visit there.
I learned these techniques with my teacher Martine and her daughter Carmen in Santa Catarina Palopo on the shores of Lake Atitlan. I met Martine in Panajachel where she sells textiles in the street market. She took me to her home and spent one morning setting up the loom and then her daughter took over weaving and teaching me for the next week or so. She was a good teacher. Each motif was repeated six or seven times across the cloth. Carmen would show me five times what to do and then would let me weave the last one or two motifs to practice what she had shown.
The weavers set up their looms with great care. Martine was obviously more skilled at doing this and Carmen only took over when everything was set to go. The warp is wound with two crosses. The second cross helps hold the shed rod in place.
In the first part of this tutorial you will see a series of step-by-step pictures showing how the warp is prepared for this kind of supplementary-weft patterning. A plain-weave ground cloth is woven onto which the supplementary-weft motifs are woven. Certain warp threads are raised in each shed under which the supplementary weft threads are passed.
As the same warp threads for the supplementary weft patterning are raised every time, they can easily be picked and stored on pattern sticks so that the weaver does not have to continually pick them up by hand for every weft pass. There are two sets of these warp threads. One set is made up of certain threads from the shed-rod shed and the other of certain threads from the heddle shed.
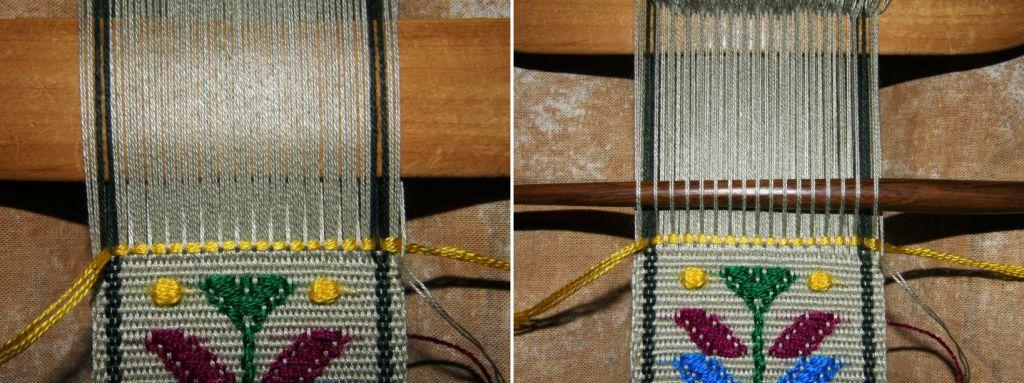
In the above picture you can see four passes of yellow supplementary weft under the warp threads which form the two pattern sheds.. All the motifs that my teachers showed me were created by passing supplementary weft thread under the warps in these pattern sheds.
Two pattern sticks are used. One stick is inserted under the selected pattern warps in the shed-rod shed and another holds the selected pattern warps in the heddle shed.
I show the process of picking and inserting the pattern sticks first in step-by-step pictures and then in a video.
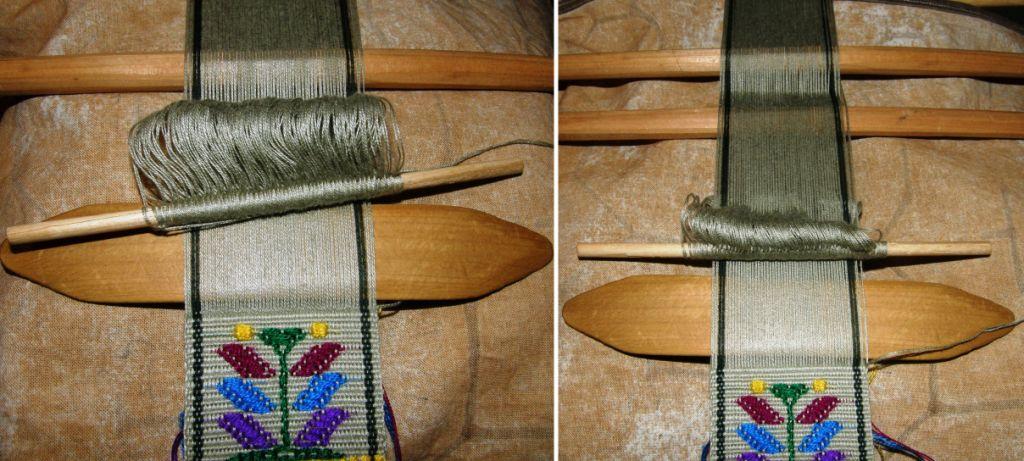
LEFT: This is the basic loom set-up with shed rod and string hedddles in place. RIGHT: An extra stick is placed in the second cross to hold the shed rod in position.
In order to create the patterns, two extra patterning sticks need to be inserted. These are stored up beyond the shed rod. One is stored on top of the warp and the other underneath.
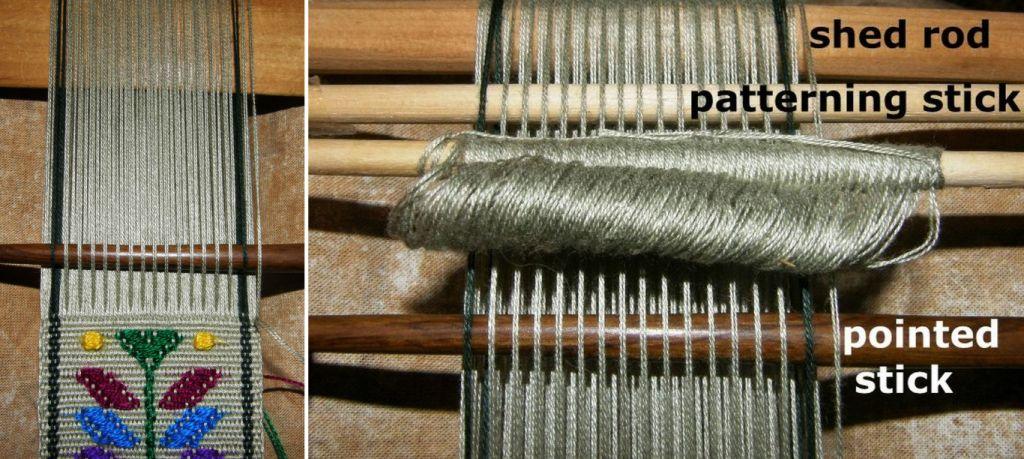
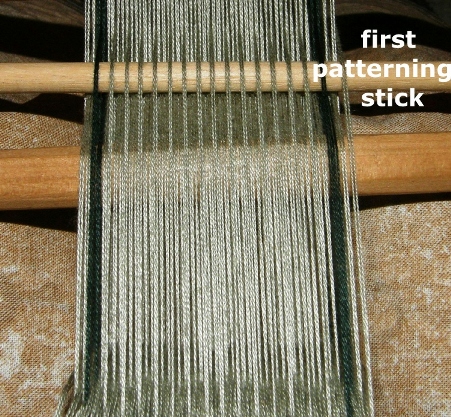
LEFT: To set up the patterning sticks, the shed rod shed is opened and the first set of patterning warps are picked up. Pick one, drop two, pick one, drop two across the width of the warp.. NOTE: I am using doubled threads so what looks like two threads in the photos actually counts as one thread. The weavers use a pointed stick to do this. RIGHT: The pointed stick is inserted under all the picked warp threads and then pushed up toward the heddles. This will raise the picked up threads on the other side of the heddles. Another stick is then placed under these threads on the other side of the heddles. This is the first patterning stick.
The first patterning stick sits up beyond the shed rod until called into use.
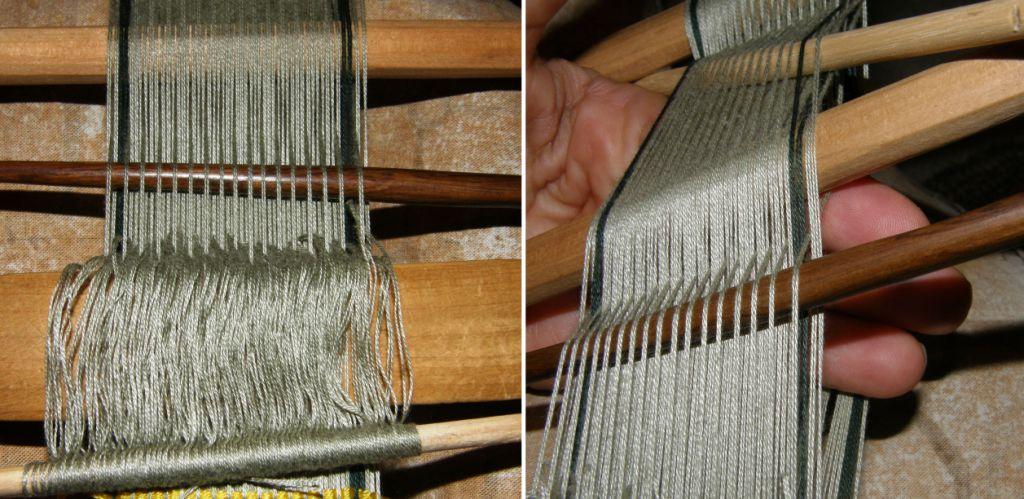
LEFT: A colored piece of weft is placed under the warps in the first patterning shed. This serves as a reference to make picking up the warps for the second patterning shed easier. RIGHT: The heddle shed is opened and the warp threads in the second patterning shed are picked up. Between each warp in the first patterning shed, there are three warp threads in the heddle shed. You need to pick up the middle one of these three warps. You will pick one, drop two, pick one, drop two all the way across the warp. The pointed stick is inserted under all the picked up warps. The pattern stick for these warps will be stored UNDER the warp and a special maneuver is required in order to do this…see the next set of pictures. (This is also all shown in the video clip a little further on).
LEFT: The pointed stick is moved up toward the heddles which will raise the picked up warp threads on the other side of the heddles. RIGHT: A stick is placed under the raised threads on the other side of the heddles. Then both the stick and the shed rod are raised in order to create a new shed underneath the two. In the picture I have my hand within this shed and will replace it with the second patterning stick.
Here you can see the two patterning sticks in place up beyond the shed rod…one on top of the warp and another underneath.
Now the warp has been prepared with its two patterning sticks ready to create patterns with supplementary wefts.
Watch the process again in the following video. I am using very thick yarn and only a few warps in the video just to demonstrate the basic process. The video is in two parts.
The second part of the video shows how to use the pattern sticks to raise the warps and lay in weft for some basic patterning. This is also explained in the photos below. I am using thick warp and weft in the video just so everything is easy to see.
Two wefts are used to weave the above typical patterns of Santa Catarina Palopo: a red weft is passed through the two main sheds (shed rod shed and heddle shed) to weave the red warp-faced ground weave and the brightly colored supplementary weft thread are passed under or wrapped around the patterning warps to form the motifs. Below are samples that I’ve woven since my return from Guatemala.
Motifs are usually started and ended with four rows of supplementary weft in the patterning sheds forming the yellow brick-like design shown above. The colored pattern weft (in this case yellow) is passed through the pattern shed and then the main weft (in this case light green) is passed through the main shed.
The two pattern sheds.
In this picture I have laid in the first pass of yellow supplementary weft and am in the process of passing the main weft. Four rows of yellow weft are usually woven before starting a new motif.
Here concludes Part One of this tutorial on Guatemalan single face supplementary-weft patterning. So far we have looked at how to pick the two patterning sheds and store them on sticks up beyond the shed rod, how to open the patterning sheds and how to weave the basic brick design which separates the motifs on a piece.
In Part Two, I will show you how to create the outlines of shapes by wrapping the supplementary weft around warp threads and fill them in by laying in supplementary weft. The Guatemalan weavers create all kinds of bird, plant and human figures in this way.
In this part of the tutorial I show you how to create the motifs using the supplementary wefts. I am using a tree motif as the example. You will see how to create:
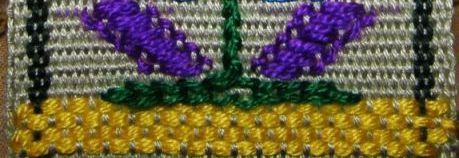
a horizontal line for the base of a tree,
a vertical line to form a stem,
filled-in shapes for leaves,
diagonal lines to outline the tree top, and
spots for buds.
This is a fun technique with little or no counting involved which allows you to play freely with shapes and colors.
The resulting weaving looks like a piece of embroidered cloth except that the “stitches” only appear on one side of the fabric.
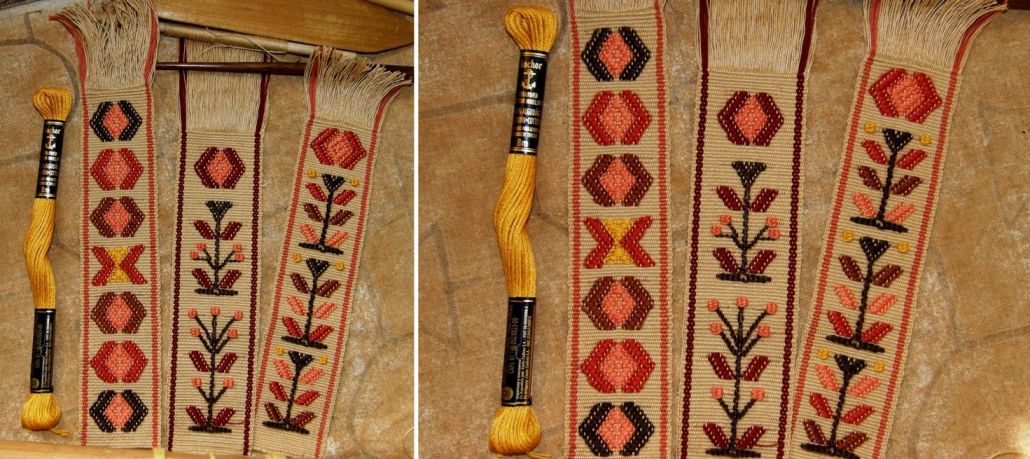
Bookmarks made with Guatemalan tree and sun motifs
Last week when I started the tutorial on this technique, I was using acrylic threads that I had brought back from Guatemala to create bright mutlicolored trees on a green background, pictured at left.
I decided to buy some embroidery floss to work with and it took some time to get just the right thickness to go with my chosen ground weave warp. The ground weave is a 50 wpi cotton and I used 4 strands of embroidery floss to do the patterning. (one piece of embroidery floss has 6 strands so you need to remove 2).
The 50 wpi warp produces a wonderfully thin cloth just right for bookmarks although the pattern wefts do add some bulk. Remember to always use a good firm beat.
So, let’s continue with the tutorial.
All the colored wefts that form the patterns pass under or wrap around the warps in the two patterning sheds. This green piece has 86 ends between the dark green border stripes. We will start with the horizontal line that forms the base of the tree motif.
FORMING A HORIZONTAL LINE
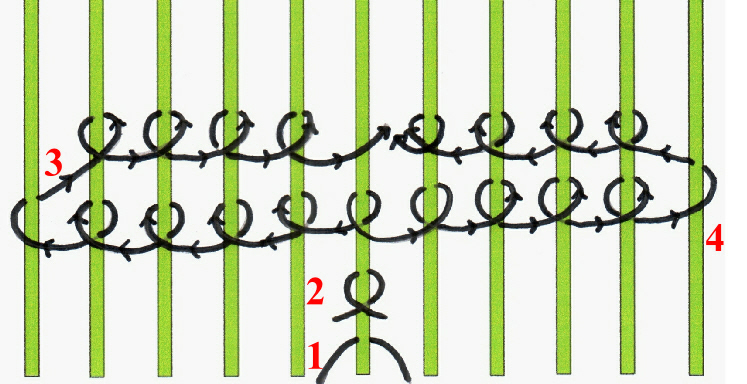
The base of the little Guatemalan tree is a double horizontal line. STEP ONE: To form this horizontal line, place a strand of around 40cm/16″ of supplementary weft under the central patterning warp. The two ends on either side should be of equal length. The central warp in my set- up just happens to be in patterning shed 2 so I have started in the heddle shed.
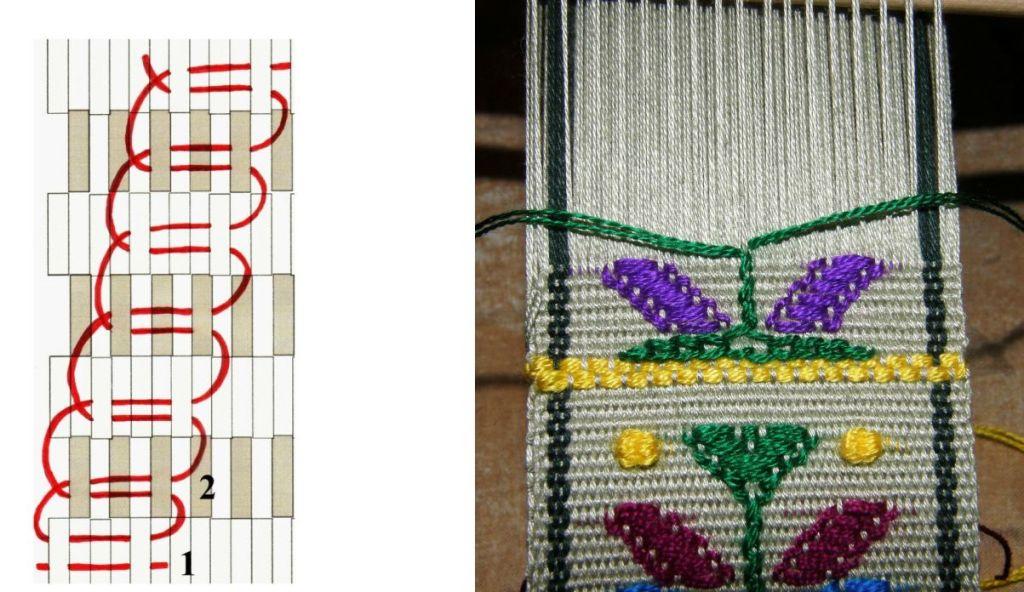
STEP TWO: Cross the ends of the supplementary weft as shown. STEP THREE: Start wrapping the left hand end around the 5 warps to the left of the central warp and return wrapping around 4 warps. The diagram below shows how this is done.
The steps for horizontal wrapping are shown here. The left end of the weft wraps to the left and returns and then in STEP 4, the right end wraps to the right and returns. These four steps all take place in the same pattern shed. The wefts wrap around four warps on their return journey to the center. STEP 5: Pass the main weft through the complete shed.
This completes the base of the tree. Now I am ready to start creating the stem….a vertical line.
FORMING A VERTICAL LINE
Open the next shed, which is, in my case, the shed rod shed and pass the main weft.
Open the heddle shed and raise the patterning warps in patterning shed 2.
Patterning shed 2 contains my central warp.
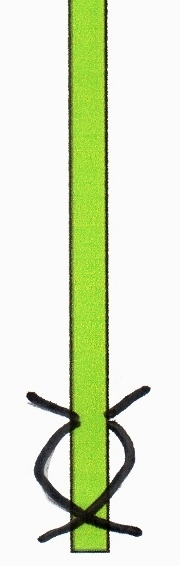
Every time I raise the warps in patterning shed 2, I will wrap my green tree base weft around the central warp to form a stem. The drawing at left shows the very simple vertical wrapping method.
The stem, therefore, is woven only in every second shed.
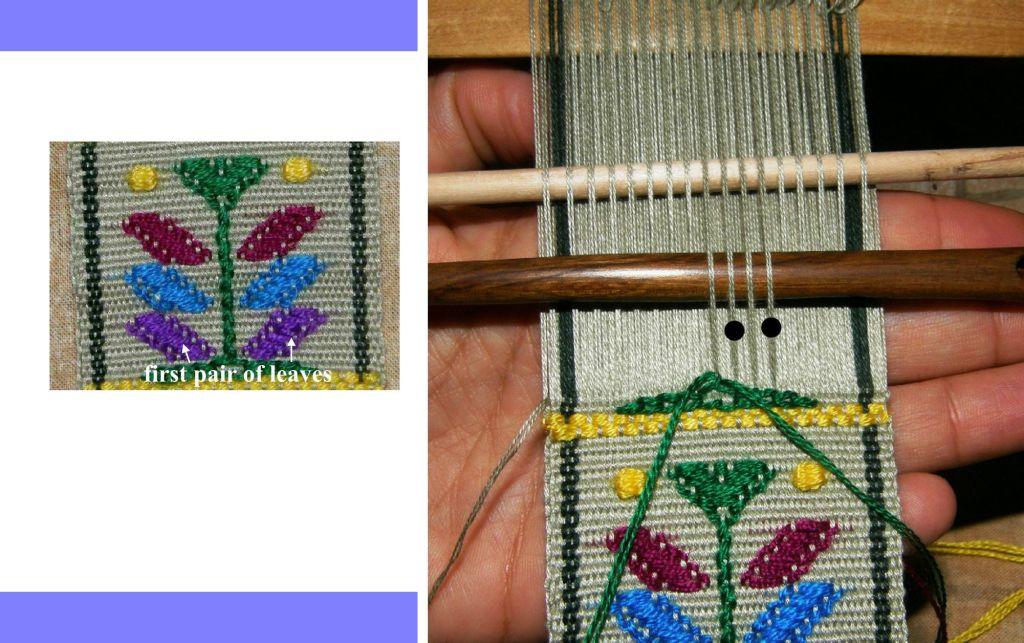
In this shed I will also lay in the wefts to form the first pair of leaves.
FORMING A SOLID SHAPE – A LEAF
Cut two lengths of weft around 24cm/9 1/2” long for the two leaves.
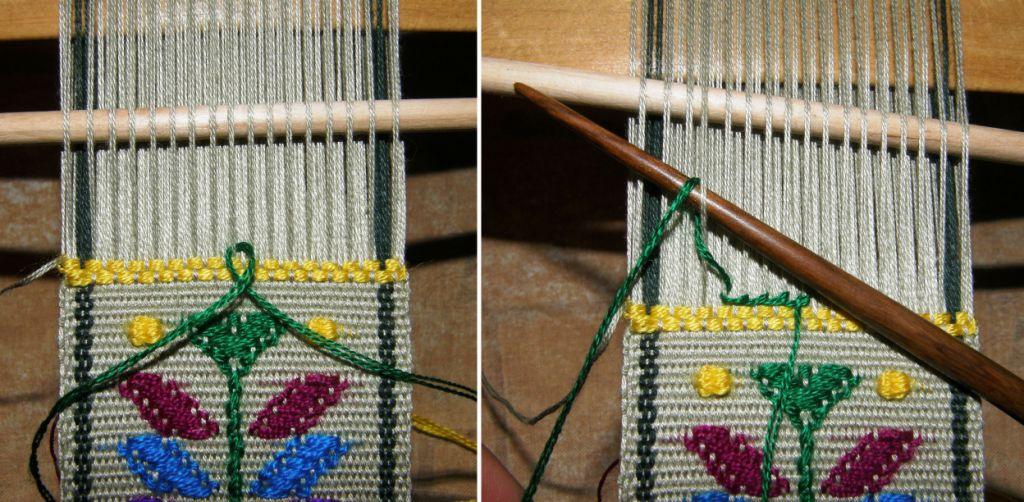
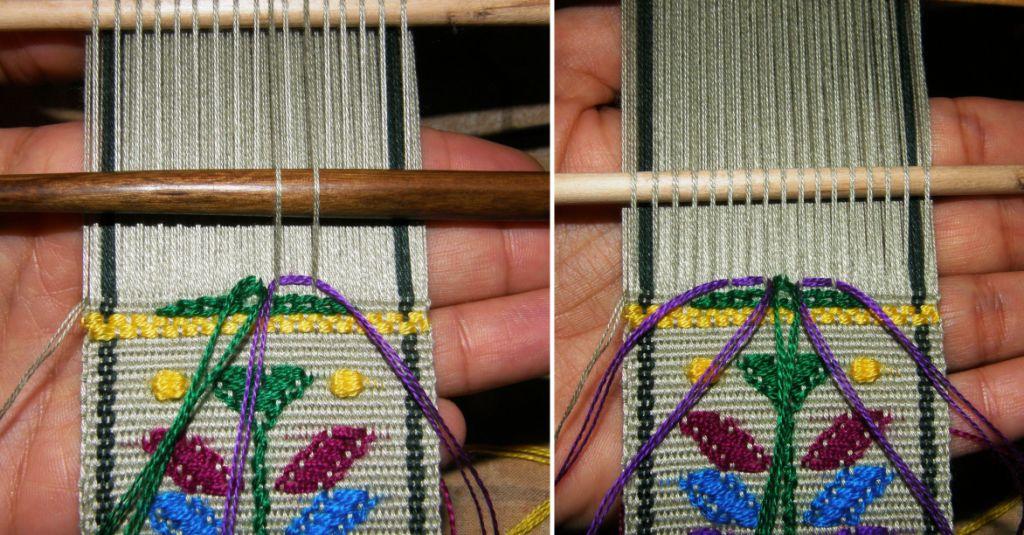
I choose the position of the base of the leaf shape from the available pattern warp threads. I decide on two threads (marked above with two black dots). Note that the two marked threads aren’t adjacent. I’ll use these to create one leaf on the right hand side of the stem and also select two threads on the left hand side.I lay the purple weft thread behind the two selected warp threads adjusting it so that its two tails are of equal length. Then I do the same on the left hand side. Now I can pass the main weft in the heddle shed, change sheds and beat.ABOVE LEFT: I’m now in the shed-rod shed. For the second row of leaf pattern I select two warp threads from the set of pattern threads on Pattern stick 1. For the right-hand leaf I select the two pattern warp threads that lie immediately to the right of those from the previous row. I pass the right tail of weft under these two warp threads from right to left and then the left tail passes from left to right. From now on, the supplementary weft is handled in this same way. The two tails are passed behind the selected warp threads in opposite directions. Use the tip of a pointed stick to gently push them down into position. they are relaxed as they turn around the warps. Make sure they don’t pull the warps out of position as they turn around them. On the left-hand side, I select the two threads that lie immediately to the left of those from the previous row and pass the supplementary weft tails in this same way. Then pass the main weft through the shed-rod shed. Change sheds and beat.
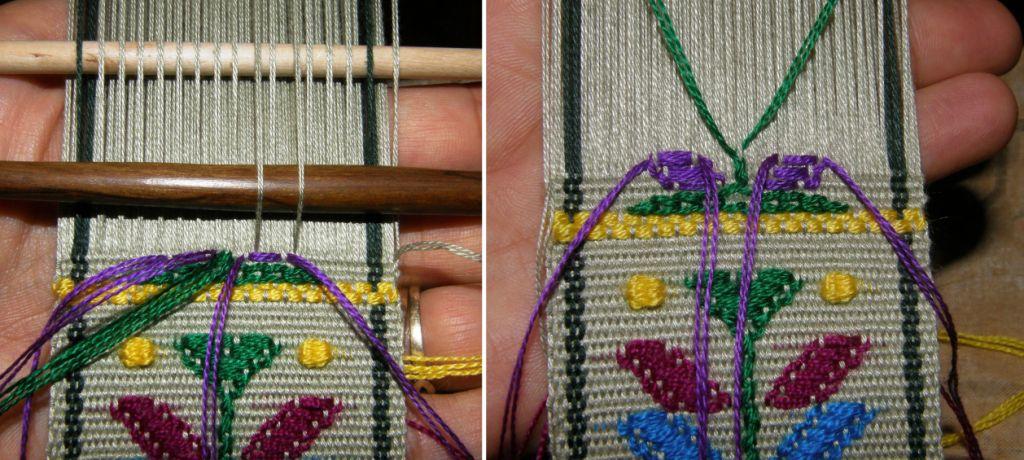
ABOVE RIGHT: I’m now working in the heddle shed and with the pattern warp threads held on the lower pattern stick. In this row I’ll turn the green weft around the center warp to continue forming the stem. I’ll also select pattern threads that sit immediately to the right of those used in the previous row for the right-hand leaf and immediately to the left for the left hand leaf.
The drawing shows the paths of the two tails of supplementary weft from row to row. In every row the leaves advance and in every other row, the stem advances. Make the leaves as many rows as you like. In what you’ve decided is your final row of leaf pattern, pass the right hand tail of the supplementary weft under the pattern warps as usual and then pass it for a short distance to the left within the shed before pulling it out to hang from the back of the cloth where it can be cut later. The left tail does the same…passing under the two pattern warps and then continuing to the right within the shed. In the photo above right, you can just make out the slight bulge of the supplementary weft traveling within the shed to the right of the right-hand leaf.
Starting the second leaf.
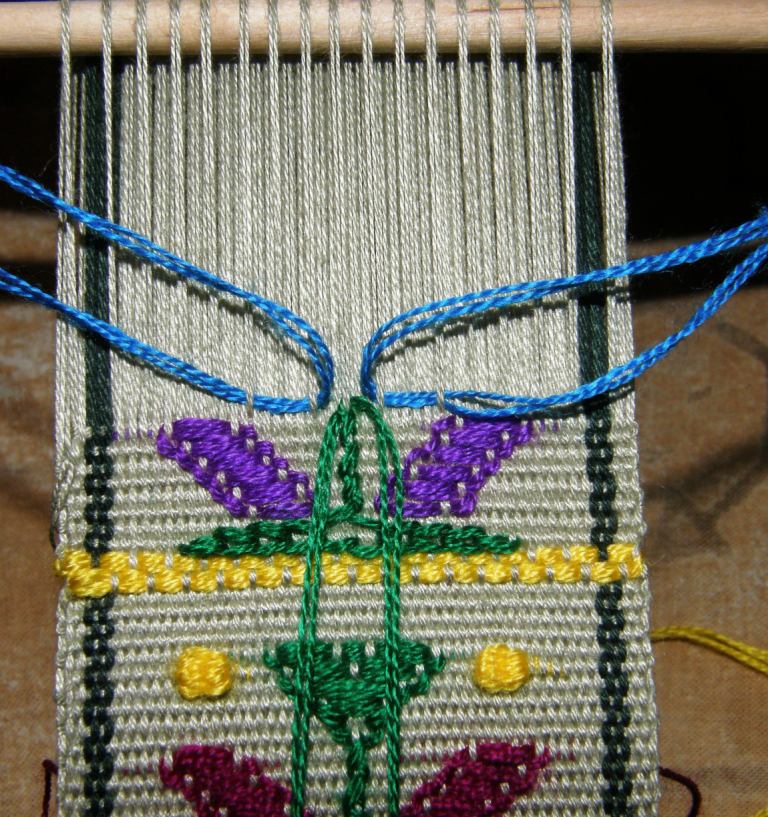
The little Guatemalan tree has three pairs of leaves and the stem continues growing until it eventually widens out into the tree top. You can see the green V-shaped top of the first tree in the photo.
Once you have woven your six leaves, I am sure that it will be very easy for you to see how the tree top is formed.
You’ve been weaving your stem with two strands of weft – to form the top, one strand will start traveling diagonally to the right and one to the left forming a solid V shape. The V shape gets filled in the same way that you “filled” the leaves.
Sometimes you might wish to just weave a little branch rather than a leaf. In that case you would just wrap the weft thread around single pattern warp threads moving out diagonally as you progress from row to row as in the drawing below right.
Finally, there are the little spots that the Guatemalan weavers like to use to fill in blank spaces between motifs. I used them in my bookmarks as flower buds. You can see two yellow spots in the photos above and below.
To make a spot, you use two adjacent patterning warps as shown in the drawing above left. Use a strand of weft half the thickness that you were using for the tree. Around 12cm/5″ length should be plenty. First place the weft behind the right-hand warp in the pair that you’ve selected making sure that the two tails are of equal length. Then join the two ends together and go wrapping them back and forth in in a figure-eight in the same shed about six times as shown in the drawing. When you’re done, pass the ends a short distance through the main shed and out the back of the weaving.
It is very easy to improvise with this technique. Have fun with it!
This white warp provided a fresh blank slate onto which I could weave any motif I liked using supplementary weft in any color.
I was very “creative” when I first bought my little apartment here in Bolivia. I wanted to try every novelty decorating technique that was popular at the time and cram it all into this small space! It was fun and then I was done. I had no desire to touch a can of paint ever again. There was water damage at one stage. I didn’t care. I wasn’t going to paint. After getting the cause of the damage seen to, I just hid all the flaking paint behind screens.
That matchstick screen on the right did the trick for years!Now every single wall adornment has been removed and won’t be going back up again no matter how long it takes me to sell this place and leave Bolivia forever.
I just now Googled how often interior walls should be painted….every 5-7 years. The horror. It’s now 23 years since I had my home decorating splurge.
Now that I face having to sell my place to hopefully eventually return to Australia, I’ve decided that I cannot inflict my eclectic and unique decorating style on potential buyers. So, I’ve been occupied for some time now erasing all that fun with coats of good white super-washable paint. It’s all going back to a blank slate and it’s amazing how much brighter and airier the place feels. It’s funny that even though there’s no creativity needed to simply paint things white, I’ve been having a lot of fun doing this job.
Fortunately, I have some weaving shots that allow glimpses of what once was.The point of this photo was to show a silk ikat neck gaiter that I’d just finished.
What’s been interesting is how mindless jobs like sanding and spackling have allowed my mind to also “wipe the slate clean” in a way and, in doing so, allow me to come up with plans of execution for ideas that I’ve been pondering for some time. One of these is a theme that I’ve been wanting to express in weaving: “She Needs no Embellishment”. This one’s been in my head for several years now and I think that I’ve finally pinned down how to go about weaving it. There will be hummingbirds.
I guess it’s similar to those months I used to spend away on weaving trips. The hours of mind-numbing waiting time in airports and on flights would bring me ideas in very unexpected ways.
This ad that I tore out of an American Airlines in-flight magazine gave me the idea to create ikat shapes and fill them with pick-up patterns.
I used that idea on-and-off over several years. The last piece that I wove in that way was this….
So, while I’ve been a little frustrated by being kept away from my loom, it has given me time to clear the slate and come up with new ideas.
In my last post, which seems so long ago now, I was talking about coming up with an idea for the double-faced supplementary-weft technique with which I’d been experimenting. I like the technique but was finding it hard to come up with a project which would allow both faces of the fabric to be appreciated and therefore justify the extra time and effort needed to create this kind of patterning. Thanks so much to those who left me a comment with ideas. Laura suggested a screen and I love that idea. I could probably use one in my place in Australia, who knows? But not one which sits on the wall to hide flaking paint! I’m thinking of one that can be used to stand freely and divide a space. In any case, I’ll weave the cloth and decide how best to use it later. But first, I need to get the painting job done in my bedroom studio space.
Since my last post, I’ve washed and hard pressed this little sample and am pleased with its sheen and drape. It was quite stiff with its double amount of supplementary weft when it was on the loom. Given the improvement in drape, I’m thinking that it may work after all as a reversible neck gaiter.
The neck gaiter can wait. I really have the urge to get a wide warp on my loom to use this technique and I just may have enough silk in my stash to allow that. I’ll spend the rest of my sanding time thinking about supplementary-weft colors and motifs. Hours spent staring at white should help! By the time I get done with the painting, I’ll have this project and the She-Needs-no-Embellishment piece competing for space.
I’m going to finish with some book talk. I know that many of my regular`readers must already own one or some of my books (thank you all so much!) but I do get new subscribers all the time and I’ll take this opportunity to let new folks know what I have to offer. I’ll just give three of my instructional patterning technique books a plug for now :-). All are available as PDFs or as spiral-bound books at Taproot Video. I provide direct links to each item below.
The cover of my Complementary-warp Pick-up book says that it’s aimed at “experienced band weavers”. By this I simply mean that you are able to set up a loom and weave a plain warp-faced band. What’s important is that the patterning method that I teach in this book can be used on any kind of loom that allows you to weave warp-faced bands. The structure that I call Andean Pebble Weave is one example of the complementary-warp structure. Some of the patterns in this book are in fact Andean Pebble Weave patterns. This book’s also available in German.
Here’s a fun little video clip that I made some time ago which gives a more complete description of this book and allows you to see examples of the patterns….
For my Andean Pebble Weave on Inkle Looms book, I took into account the particular characteristics of the standard inkle loom and adapted the methods that I had learned on the backstrap loom accordingly. I present three methods which all produce the same results so that each weaver can decide which one suits their particular style. I’ve used dozens of step-by-step photos, detailed descriptions as well as supplemental instructional video clips to walk you through the process. In this way I aim to address a variety of learning styles. The book is suitable for beginners at pick-up weaving or for those who would like to add another patterning technique to their repertoire. You do need to be able to weave plain warp-faced bands before taking this on.
Likewise, in my Warp-faced Double Weave on Inkle Looms book, I adapted the methods that I learned using simple horizontal ground looms here in Bolivia to the inkle loom. This book also comes with supplemental instructional video clips. It’s a more advanced technique for those who have already tried some kind of pick-up patterning and know that they enjoy this slower kind of weaving. The product pages on the Taproot Video website give much more detailed descriptions.I hope you’ll click on the links and take a look!
Hopefully I’ll be sitting in front of a new “blank slate” warp like this soon.
Sooooo busy lately with other stuff with little time to devote to weaving! I did, however, find time to make a little experiment with something that I’ve been wanting to try for a long time.
The experiment involved one of the patterning techniques with supplementary weft thread that I learned both here in Bolivia and in Guatemala.
One of the techniques involves carrying the supplementary weft thread all the way across the warp from selvedge to selvedge. I can use it to create all kinds of regular and irregular shapes and it’s the technique that I chose to weave many of my hummingbird figures as well as the silk pillow cover that I showed in my last blog post.
The teal supplementary weft travels from selvedge to selvedge of the band and you can just make out the little teal bumps along the edge where the weft exits one shed and turns to enter the next.
Naturally, adding a supplementary patterning weft to the main structural weft in each shed will thicken the fabric. Sometimes that’s exactly what I would like to have happen if I’m planning a product in which the fabric needs to be quite sturdy. Other times, I use a much finer structural weft than I would normally use to make up for the added weight of the supplementary weft. It’s what I do when I want the final product to be light and have more drape.
In this silk scarf project I used 60/2 silk as the structural weft in the sections that didn’t have pattern and changed to a 140/2 structural weft when I added the supplementary weft.
At other times, I’ve chosen to use a different technique in which the supplementary weft only travels from one edge of the actual motif to the other rather than across the entire warp. The weft turns in this case to surround the motif forming a sort of frame. This only looks good when I weave more geometric-type shapes with quite smooth sides. The weft-turns sit on the surface of the cloth following the contours of the motif. It wouldn’t have looked good at all around my arrangement of paisley shapes or hummingbirds.
I carried the supplementary weft from selvedge to selvedge to create the patterns at the two ends of the scarf. The little flower motifs in the main body were woven using the “frame” technique.
All the samples here used the “selvedge-to-selvedge” technique except the white band with turquoise pattern second from the right. There you can see how the turquoise weft turns on the surface of the cloth to frame the pattern of triangles.
Another patterning technique that I studied in Guatemala that uses supplementary weft involves wrapping the weft around certain warp threads rather than just having the weft float straight across the surface of the fabric.
The dark brown base, stem and branches of these plant figures were created with this wrapping technique. All other parts of the patterns were created using the “frame” technique.
The wrapping technique enables me to create those fine horizontal, vertical and diagonal lines (note: horizontal lines can be created in the other techniques but their length is limited. Long weft-floats on the surface of the fabric are not practical and can at times sag.)
It was exciting to discover that learning these same wrapping techniques enabled me to replicate motifs that I had seen on textiles from Bhutan (although the actual method of execution of the horizonal lines, is not exactly the same). These little differences in methods used in vastly different parts of the world that produce astonishingly similar results are always fascinating to me.
The upper pattern of horizontal and vertical lines was woven using the wrapping technique.
The scarf I wove using various Bhutanese motifs and two supplementary-weft patterning techniques.
All the techniques for patterning with supplementary weft that I’ve shown so far are single-faced techniques. The pattern only shows on the upper face of the cloth.
You can see the front and back of this profusely patterned head sash from Aguacatan, Guatemala on the left. The back is plain red. The supplementary weft threads only travel within the shed or float on the upper face of the fabric. They never appear on the back.
Sometimes the finish tail of the weft is pulled through to the back of the cloth and left hanging there rather than snipped off.
This is the back of my learning piece that I wove with one of my Guatemalan teachers. You can see all the weft tails have been left hanging. They could be cut shorter and left there or snipped off flush with the fabric.
My teacher would cut those tails to about 1 1/2″ length and leave them. The fabric is used to make the typical woman’s blouse (huipil) and the ends on the inside of the blouse can’t be seen when the piece is being worn.
This fabric that I was told is from Chichcastenango, Guatemala is part of a huipil that has been worn and laundered over many years. You can see how the weft tails have become tangled in a merry mess on the back.
I like the back of my textiles in these techniques to be open and plain. This is the back of the paisley scarf I showed above. Creating a “clean” back is, of course, is easy to do when the supplementary weft runs from selvedge to selvedge. When there are various color changes happening across the width of the warp as there are in the Guatemalan textiles that I’ve shown here, there’ll be many more weft tails with which to deal and carefully snip at the back of the cloth.
I did study one double-faced technique when I was in Guatemala in a town near Antigua. This technique allows the motif to appear on both faces of the cloth in exactly the same colors.
You can see the two faces of the Guatemalan textile on the left showing the double-faced nature of this technique. On the right is my own attempt at the pair of Guatemalan quetzal birds.
The Guatemalan women use these fabrics to create their blouses. The fact that the fabric is double faced cannot be appreciated when the blouse is being worn. The little baby’s cap with drawstring top, worn here by my teacher’s nephew, was woven in this technique making it reversible.
It’s the very slowest technique that I’ve learned so far! I wove a few motifs including the pair of quetzales when I got home and haven’t used it again since. My quetzal project was poorly chosen as I used the fabric as the cover of one of the books that I made in which I recorded instructions for the technique. The back side of the fabric can’t be seen! All that work for nothing.
This little bee pattern is the first double-faced one that I learned with my teacher. You can see that it almost looks like a cross-stitch pattern with it’s identical “stitches” stacked neatly in columns.
What I am heading to with all this talk about single-faced and double-faced patterning techniques that use supplementary weft is the latest experimental piece that I wove and mentioned right at the start of this post.
I wanted to see if I could create a double-faced pattern using one of the single-faced techniques….a pattern that appears simultaneously on both faces but without that sort of cross-stitch look.
I played around with that and it worked. In this example I used gold supplementary weft on one face and green on the other. I could have used the same color on both faces if I’d wanted to.
I used motifs that I’d designed for another single-faced project some time ago. This is black 60/2 silk and several strands of 120/2 silk as supplementary weft. I love the fact that the fabric can be double faced and have the smooth satin-y look that this technique with its longer weft floats allows. The problem is that using twice the amount of supplementary weft in order to cover both faces naturally thickens the fabric.
So, I need to think of a suitable product….something that requires a heavier fabric and which allows both faces to be exposed (so, that’s a “no” to the purses and bags that I like to make). Right now, as it is fresh off the loom, it doesn’t have enough drape to make a comfortable cowl or scarf (besides, I’ve decided that I don’t enjoy wearing scarves). However, I first need to wash and hard press it to find out how well it relaxes in order to see what kind of drape it gives me. It’s amazing how much my warp-faced silk textiles transform after a good hard press.
I’m big on process rather than product but I would really like to create something useful in this technique in which both faces of the cloth can be appreciated. If you have any ideas, do let me know, please. A bag strap has been suggested….but in 60/2 silk?….maybe not practical for everyday use. Maybe a silk strap for a silk bag for evening wear.
I’ll finish by telling you that Stacey Harvey-Brown’s book, Woven Optical Illusions, Pattern and Design from Four to 24 Shafts (The Crowood Press), has just been published. I was excited to be asked to contribute this photo of my backstrap-loom-woven Finnweave piece to the Gallery section of the book. I might try one of the four-shaft patterns in the book on my backstrap loom some time. Details on how to purchase the book are here.
Once again, other projects have kept me away from my loom which means that I’ve only just finished the silk cushion-cover fabric on which I’d been working.
In my last post, I left you with just the tail feathers of a hummingbird figure making their appearance. This isn’t a new pattern. It’s one of the figures that I designed during the pandemic when I was in my “hummingbird phase” and so you might recognize it.
The white-on-white leaf pattern continues along the sides. While it was tempting to fill all that center space with hummingbirds flitting amongst flowers, I decided in the end to keep it pretty open and quiet and only added one more figure.
Here you can see the head-less second hummer as I add a second beam to roll up the woven cloth and advance the warp.
Finished with the second figure and glad that I hadn’t cluttered the center space.
And then it was time to embark on the home stretch by duplicating the strip of foliage pattern that I’d woven at the start.
This photo gives a better view of the white-on-white pattern which is sometimes very hard to capture well. Note how the variegated thread mysteriously changes tone right at the middle of the warp.
With that, it was done…done on the loom, at least. I have yet to wet-finish it.
When laid out flat like this, it’s a bit disappointing how “flat” it looks considering that it is, after all, made from silk.
If I crinkle it up a bit it catches the light in places and shows off some of its sheen….
Of course, I know very well how silk behaves from the many silk projects I’ve woven in the past. It can be deceivingly dull, stiff and almost cotton-like on the loom only to melt into slinky, shiny softness after being washed and, most importantly, given a hard press. I’ll just have to be patient.
Here’s another look at the white-on-white patterning on the sides that I love so much.
When I eventually get myself over to Australia to live, I’ll use this as one face of a cushion cover in my home over there. While thinking about that, I remembered other hummingbird and foliage pieces that I’d woven during the pandemic that I think could be combined to match this project surprisingly well.
I wove this long silk hummingbird band for the pure joy of it. I didn’t have any kind of end product in mind and so it has been just sitting there in a drawer along with the two flower bands that I’d woven to accompany it. I used a warp-faced double weave structure using four sets of string heddles in this case in 60/2 silk. And here I was thinking that the colors in my latest project were all soft and feminine and not like me at all, forgetting that I’d already used very similar ones in this three-part project during those pandemic years.
Here it is with one of the two flower/foliage bands placed alongside.
The two flower/foliage bands together. I was particularly pleased with these two bands as they had been a study in how to switch background colors smoothly back and forth along the length of a band without using a harsh and sudden horizontal transition.
I think the three pieces could be combined to make another cushion cover and that both cushion projects would sit nicely together. So, it will take a move to the other side of the world before I can truly call these projects “done”.
I’ve absolutely loved having this wide-ish warp on my backstrap loom beams. I loved using the longest of my shuttles and hearing the clack-clacking of the long and heavy-ish swords as they worked together in the sheds. The silk was lovely to work with. I was able to create sheds easily with just a little gentle strumming action. I think my next project will involve experimenting and so I’ll most likely be back to good ol’ sampling on narrow warps to see how well my ideas translate to cloth.
Once again, thanks to Will for the gift of the lovely 10/2 variegated thread, to Susan for the white 20/2 and to Betty and Deanna for the white 30/2. This just about finishes off the cone of 30/2 silk with which I was able to do so much! But this isn’t the last I’ll see of it. I still have the little skeins of cochineal-dyed 30/2 which is one of many experiments that I used it for. I’ve yet to come up with a project for those.
I’ll leave you with images of two little slices of culture here in Santa Cruz…
On the left you see San Roque church which is two blocks from my home. It’s one of the venues for the International Baroque Music Festival which takes place here every two years. It’s nice to be able to stroll over there to enjoy a few of the concerts. This year’s festival starts tomorrow night and all the concerts are free (which can make things a little tedious as people line up early to get in on a first-come basis.)
On the right, I give you the view while dining outdoors at Burger King, would you believe?! Indoors, it’s your standard BK unloveliness. That’s the top of the San Lorenzo cathedral that you can see half a block away in the main square.