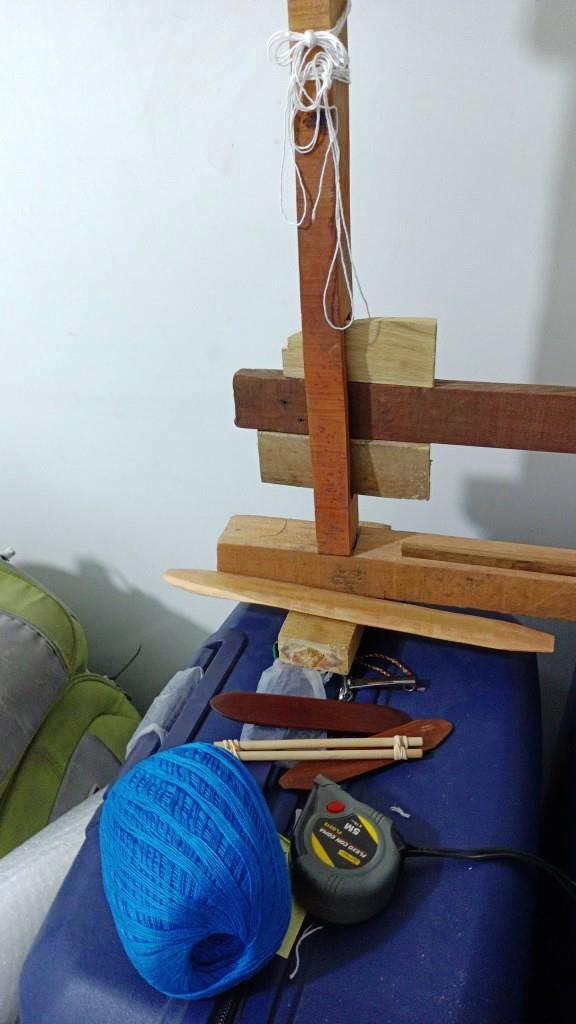
Let’s start this post with the bit that is actually about weaving on a backstrap loom.
I’ve been studying with two Guaraní ladies and learning all about the style of loom that they use. It’s not a backstrap loom but rather a free-standing vertical frame.
A mini version of a typical Guaraní loom.
After weaving my second project on this loom, I decided to use the cloth I’d produced to cover a notebook in which I could record all I was learning with my Guaraní as well as Ayoreo teachers.
That’s where the backstrap loom came in. I wanted to weave bands with the titles of the book. One half would be for all the notes on the Guaraní loom. The book could then be flipped over so that other half could be used for the Ayoreo notes. I used Clea cotton (2-ply approx 35wpi) and embroidery floss for the supplementary weft.
For the book cover fabric I used a generic cotton from a large cone that my Guaraní teachers typically use and dyed some of it two shades of blue.
And then I had to refer to my drawings again to get back into the swing of dovetail warping.
Dovetail warping….LEFT: Warping the Guaraní loom. RIGHT: Warping the fixed vertical loom in coastal Ecuador. I was creating a warp for a miniature hammock under my teacher’s watchful eye just so that I could learn the technique. We used her handspun cotton.
I had encountered this dovetail style of warping in several places in Ecuador and had had the chance to observe it being done in both wool (Otavalo) and cotton and acrylic (Salasaca) but I only had the opportunity to try it myself when I studied with weavers in coastal Ecuador.
My teacher Felipe demonstrating the way he sets up a dovetail warp for his backstrap loom in Salasaca, Ecuador. The post nearest his left thumb is the dovetail post. He uses an additional post for separating colors. He’s just winding a mini warp to teach me and provide me with a sample to take home.
It can be a little confusing but when working with only one color, you soon get the hang of following this kind of warping path.
W= Warping stake. C=Cross posts. D=Dovetail stick
It creates what I call a discontinuous circle. The warp threads travel in one direction until they reach D and then turn and proceed in the opposite direction until they again reach D. The drawing above resembles the set-up that we used in coastal Ecuador and the one that better represents the Guaraní set-up is below.
When weaving has been completed, element D (which was a stick in Ecuador and a string on the Guaraní loom) is removed and the cloth can be opened out to its full length leaving the loops at the ends of the unwoven warp intact. These loops are then used by the weavers in coastal Ecuador as part of the construction of their hammocks. In a normal circular warp, the warp has to be cut in order to open out the cloth to its full length.
When you start trying to use two colors at once on slightly different paths things get a little mind bending. Two colors are used when the Guarani weavers are going to create patterns in pick-up or just horizontal bars. The first time I did this with my Guaraní teachers, I have to admit that I hadn’t quite wrapped my head around it and was just blindly following the path that they patiently pointed out to me. Only later, when I sat down at my notebook and made my drawings, did I get it all straightened out in my head. But even so, I’ll be needing to refer to my notes for a while until I’ve had more practice.
Here I am passing the thread around the dovetail string. The two upper strings hold the warp cross.
With this learning warp I wove a piece that was wide enough to make a coin purse. However, once the piece was off the loom, I decided to sew two pieces together side by side and make a wider purse that’s more suitable for tools.
Winding the two colors together produced the horizontal bars. A weaving class often starts with winding yarn into balls. That’s Clara above. She and her daughter Eldina are the teachers.
The style of string heddles that the Guaraní weavers use is very unique. They are chained together and not held on a stick.
You can get a better view of them here. This is my teacher Angela who used to allow me to visit and watch her at work many years ago.
Clara was not keen on allowing me to make the heddles and I had to insist on being allowed to make at least the last three on my own. It wasn’t enough and I definitely need more practice. I hope to make our next class all about heddle making. So, when I created the much wider warp for the book cover, I went with the heddles that I am more used to making and tied them off in small bunches. I find it a lot easier to work with these bunches of heddles rather than with heddles suspended on a stick when working on a fixed tension loom such as this, and especially when the piece is wider than band-width.
Several two-color sections in my second warp gave me a lot of practice in sticking to the correct warping path.
This shows the wedges of wood that are the warp-tensioning system. So simple! The lower piece is removed after warping and the upper one, which is shaped, is positioned in order to maintain just the right amount of tension. It gets gradually moved along to its tapered end as weaving progresses and take-up tightens the warp.
The finished cloth….enough for the book cover and a zippered purse. I didn’t need the loops at the ends of the warp around the dovetail string and cut them off.
The cover is on the book and there’s the zippered purse. You can also see the purse I made from the first warp that I’d wound with my teachers.
The two faces of the finished book.
Imagine winding the warp on one of these looms for a hammock! And then making all the heddles. This is the first time I met Angela way back in 2002.
As`for my studies with the Ayoreo looping technique, I made use of the small amounts of the remaining garabatá thread by dyeing it and creating another cuff. Because I only had quite short pieces left and I haven’t got the hang of the clever knotless way of joining two lengths of thread together, I created this cuff in a slightly different way. Instead of working a wide and short piece, I made a narrow and long piece. That way I never ran out of thread in the middle of a row.
I made it mostly about stripes and added a small Chiqueno pattern in the middle.
The thread takes up the dye beautifully!
Dyed garabatá thread and an idea for an arrangement of stripes.
And because my edges, which got hidden within the hems in my other cuffs, would be exposed on this one….and weren’t pretty!….I added a cotton tubular edging to conceal them. And that tubular band is another backstrap loom project to add to this post.
I have a handy piece of furniture that allowed me to improvise a warping board for the tubular band warp.
When I next meet with my teacher Rocío, I’ll have her show me the neat way she has of carrying colors along the edge. And then we’ll get into spinning the big wad of fiber that she got for me! (I showed it in my last post if you missed it and are curious).
The tubular edging makes the cuff hold its shape very nicely, conceals messy edges and adds a really nice finish. I used a button-and-loop closure.
In the meantime, I’ve been visiting a lovely outdoor artisan market that’s just a few blocks from my place. Señora Carmen has a very small stall there where she sells handwork of the indigenous peoples of this lowland part of Bolivia. There I discovered that there is another group here that works with the same fiber as the Ayoreo people. They’re called Weenhayek and they call the fiber caraguata. They work the looped stitch much more loosely but the finishing stitch that they use along the mouths of the bags is different (and I think nicer than the one used by the Ayoreo). I had to buy one of their bags so that I could figure it out (I managed to) and I’m wondering if Rocío knows how to do it.
You can see the difference in tightness in the two Ayoreo examples on the left and the Weenhayek on the right.
And there I’ll leave it for this post. I’ll be getting back to my classes once we’re into the new year. In the meantime there’s plenty to keep me busy with Guaraní, Ayoreo and backstrap loom projects.
Hopefully next time I’ll be able to show a bit about how the garabatá fiber is spun. Until then, sporting a cooling summer cut (the hottest days are yet to come!), I’ll wish you all from my “transition home” here in Santa Cruz, Bolivia a Happy New Year.
We’re standing still as we enter the sixteenth day of a city-wide strike but I have been pretty busy and entertained during this latest of the stay-at-home situations. It’s nowhere near as anxiety-ridden as the last time we did this for twenty-one days at the end of 2019.
DYEING: Sighing (over the dull colors), squealing (over the lovely ones), searching (for the right additives)
Dyeing experiments on silk with cochineal and alum mordant have kept me entertained during the strike.
But I don’t have the right stuff if I want to get the gorgeous reds normally associated with cochineal. Never mind, I’ll just pop out and get some. But of course everything is closed due to the strike. What I would like to have is cream of tartar and distilled water. The former is supposed to push the color towards a cherry red. Yum. My tap water is far too hard. I have read that dye molecules tend to adhere to the minerals in the water and not so much to the fiber. And that’s where the distilled water comes in.
Citric acid shifts the color to a strong orange.
The supermarkets have been allowed to open on two mornings a week from 6am to 11am. Imagine the whole city out trying to shop in those two time slots especially since the Day of the Dead fell right in the middle of it all. You would think that it would be a simple matter of getting some cream of tartar at the supermarket. I went to three and didn’t find it. I don’t have an oven and, therefore, don’t bake. I have never had a reason to look for it before. I found a place on Facebook that supplies commercial kitchens. Of course, it’s not open during the strike. I suppose I will have to buy a bagful! The distilled water will have to wait until the end of the strike too. In the meantime, I’ll just make do with what I’ve got and have fun.
This is the kind of red-ish purple that I got on my handspun llama with an alum mordant and tap water many years ago. I was really pleased with it. Many years ago, I used to have a softening attachment on my tap and I don’t remember if I still had it when I was dyeing this llama fiber. The company that supplied the cartridges for the attachment closed and that was the end of that. I know for sure that I hadn’t used cream of tartar.
In a way it’s a lot of fun making do with what you have on hand. Using coffee filters was suggested as a way to strain the bug particles out of the cochineal liquid. I don’t have any but I found that cutting two of the three layers out of one of the disposable surgical masks made a pretty good strainer. I could hang the elastic straps over two bottles to suspend the mask over a bowl. I had a little re-usable draw-string sack that can be used for tea leaves or yerba mate. That worked well for containing the crushed cochineal while the color was being extracted.
I got a few different purples…nothing terribly exciting….but adding lemon juice to the bath brought on a powerful zing of orange. Wow. Almost too powerful. I learned that I had to rinse the orange skeins in water that had a few drops of lemon juice. My first orange skein, rinsed under the tap, released a lot of orange liquid in the first rinse, a rosy quite attractive orange in the second, and then the skein magically turned purple before my eyes… and a very dark purple at that! Not a trace of orange left. How bizarre. I rinsed the others in lemon-y water after that and got some pretty colors.
Purple and orange and pink tones in silk from cochineal.
So, that’s what I have so far. I am looking forward to getting some reds when things are back to normal and I can get the right stuff. In the meantime I can start skeining and scouring and mordanting the next lot of silk. I have a new even greater appreciation for the person who prepared all these tiny sample silk skeins from natural dye experiments using all kinds of mordants and color-shifting agents.
Skeins of naturally dyed silk that were gifted to me.
I had so much fun combining those small skeins to weave book covers…
Hopefully I can get colors that work well enough together for a future ikat project.
As you can imagine, when doing this kind of thing there is a lot of time spent waiting for yarn to dry or soak or steep. I had to keep myself busy with other fiber pursuits so that I would stop impatiently poking at things in the pot. I am still spinning the brown cotton that is labeled as Cinnamon and am about to start experimenting with boiling small quantities of it for different lengths of time to see how that affects the resulting deepening of color. I first soaked one lot and allowed it to dry to see if the color changes at all from simply being thoroughly wetted. It doesn’t. Now it’s time to start boiling.
The color labeled Cinnamon is the uppermost one in this picture.
The other thing I did was weave a band in 60/2 silk to experiment with making jewelry…wrist-cuff bracelets and possibly pendants. I enjoy wearing these when I travel but am also thinking about possible income sources when I eventually return to live in Australia.
I added a hummingbird cuff bracelet to my collection of blue ones….
And then I unearthed a sample I had woven in indigo-dyed fine cotton from Guatemala. It will make a nice storage bag for the blue bracelets.
I finish my cuff bracelets in a number of ways. Sometimes I add a button to one end and a loop to the other. This involves finishing the raw edges of the band in some way. Usually the material is fine enough to turn under twice and hem. If not, I turn once and sew down after having sealed the edge with diluted PVA glue. This is not my favorite way as the dried glue can sometimes be scratchy against the skin. A more complicated but enjoyable way is to edge the perimeter with a woven tubular band. Using metal ribbon crimps and some sort of clasp takes care of the raw edges. However, cuffs with clasps like these are the hardest ones to do up. I have had lots of practice, though!
A tubular edging added to a wool band encloses and protects the edges.
Apart from enclosing and protecting the cut raw edges, ribbon crimps also allow you to wear the bracelet showing either of the two faces.
I wove my hummingbird design in warp-faced double weave. I love the smooth, solid color look of this structure. There are no floats and no spotted background. If you think that you would like to try double weave yourself, I have written a book which gives instructions via dozens of step-by-step photos, detailed explanations and video clips for those who like to weave bands on standard inkle looms. I think that it is a technique for those who have already tried and decided that they like the slower pace of weaving bands with pick-up patterns. It’s not the first-ever kind of pick-up patterning that I would recommend trying. I learned this structure in the highlands of Bolivia way back in 1997on a horizontal ground loom and have adapted the method to the inkle loom. Warp-faced Double Weave on Inkle Looms is available as a PDF or as a spiral-bound book at Taproot Video.
I made the most of every piece of this short band…
My friend Dorinda is back in the States now after visiting Maxima and all her other friends in the Bolivian highlands. Maxima runs a small grass roots weaving co-op made up of women from her town and neighboring rural communities far, far away from tourist trails. Pre pandemic, I was able to take and show examples of the ladies’ work that I own using their handspun wool and natural dyes and generate a lot of orders for them. The profits would go towards simple needs like buying supplies for their children at the start of the school year. If you were reading my blog during those years you will know that I got around a lot and there are now folks from Florida to Washington state who own some of the beautiful woven cloth. Although the ladies do sew the cloth into useful products, most of my weaving friends were interested in buying lengths of cloth that they could use in their own sewing projects.
Here are some of the youngest and newest members of the co-op who have recently graduated from the body-tensioned band loom to the leaning vertical frame loom on which they weave wider pieces. The youngest one has yet to graduate but will do so next year. Look at those lovely reds they get on the wool from cochineal. I need to get some of that good highland water!
Maxima’s sister, Narciza is one of my weaving buddies and is here showing the 4350 meters of yarn that she spun during the Spinning Week competition that Dorinda helped organize in October by seeking out funding for prizes.
Two groups of spinners competed for prizes. The first prize winners on the right are wearing their new skirts and the second prize winners received a knitted cardigan. Donated funds were used for the purchase of the skirt fabric and yarn and the skirts were sewn and cardigans machine-knitted by members of the co-op. 89, 887 meters of yarn were spun in the week!There’ll be plenty to go into the dye pots next season.
These ladies were the participants in the Spinning Week competition in the first week of October. It’s a very humble group of ladies living a simple rural existence deep within the highlands, growing vegetables for the Sunday market and raising livestock. There are no passing foreign tourists and no local interest in their woven goods in the nearest city nine hours away (it’s a spectacular bus journey!) Please do take a look at Dorinda’s blog, PAZA Bolivia, to read her fascinating stories about the lives of these women and their efforts to keep their spinning and weaving traditions alive. You might think about subscribing to automatically receive notification of her future posts. I hope that I can travel soon to promote their work and help out in my own small way as I used to. In the meantime, I’ll do my best via my blog.
I’ll leave you here with an idea for using ribbon crimps to make some tree ornaments. I show these every year! The bands don’t necessarily need to be holiday themed. I think any pattern looks good.
These are all woven using the structure that I call Andean Pebble Weave. If you would like to learn how to weave Andean Pebble Weave on an inkle loom. I have written a book that teaches just that: Andean Pebble Weave on Inkle Looms. If you use any other kind of loom to weave bands you can still learn the method that enables you to weave these kinds of double-faced bands in this book: Complementary-warp Pick-up. The advantage of the inkle loom book is that it includes instructional video clips in both its digital and physical versions.. Both these books teach the method that enables you weave all the patterns in my two follow-up pattern books.
Hopefully, the strike won’t last too much longer and there will be a peaceful end and a solution to satisfy all concerned. Until next time…..
I’ve been spending a couple of weeks finishing things off, sampling, researching, soaking up some online inspiration and planning while I build up to getting into some meatier projects.
First I added the loops to my cuffs so that I could call them well and truly finished. I made simple three-strand braids from some of my hand spun wool, threaded them through the bands and knotted them on the other side. These slip over the buttons that have been sewn to the other end and secure the cuffs nicely around my wrist.
Next, I decided that I really needed to add a Finnweave cuff to the collection. It was fun planning and weaving this small Finnweave project after the larger one that I had recently completed. I used rows of curl patterns that are often found on Huichol double weave pieces and designed a pattern that I thought had a Mexican flavor to sit between them.
You can see the difference in the gold color in my Finnweave cuff and the cowl on the left. So much of the gold color came out when I wet-finished the fabric for the cowl! Not a bit of black came out and my Color Catcher cloth turned a deep gold color, almost orange. The cuff fabric in 20/2 cotton was light enough to allow me to turn a hem at the two ends without adding too much bulk. I used two black plastic snaps to secure it.
Apparently there is some golden yellow inspiration out on the streets these last weeks. I haven’t been out to see them, but the Bolivia 360 page on Facebook tells me that the yellow tajibos have been blooming. This is one of their photos…
So all three of the latest cuffs are finished and are ready for an outing one of these days!
I would love to also make a cuff from my three-color pebble weave sample in 8/2 tencel on the left but it is just that little bit too wide for any of my ribbon crimps and too thick to hem. It can sit in the sample drawer until I come up with an idea for it.
Next on the list was a return to something I had been playing around with back in early 2015. Back then, I was in one of my ikat phases and wanted to create shapes in ikat and fill them with pick-up patterns. I was heading in the direction of creating curved shapes in ikat to fill with pick-up and was working with 8/2 cotton at the time. I wove a wall hanging with angular shapes…two bird figures that I had seen in a book on a large piece of pre-columbian cloth…I ended up making three pieces in this series of birds. They currently live in my closet. Hopefully one day they will hang on my walls.
That project of angular shapes was followed by ikat circles which I also wanted to fill with pebble weave pick-up. It was successful except for the fact that I had forgotten to account for take-up. when I first tied the shapes into the warp. When I wove the cloth, I ended up with shapes that were certainly curved, but not quite circles.
Now I am taking the same idea to my 60/2 silk and starting off once again with the somewhat safer angular shapes in order to ease myself back into this. But, I am not making anything nearly as large as a wall hanging! In fact, I thought that I might make this practice piece into a wrist cuff at first but decided that something a bit wider would be more helpful as a sample for future projects.
I used some red silk as the base color, tied it with ikat tape and dyed it black. I really shouldn’t take photos late at night as they are always pretty awful, but I wanted to get a quick picture of this so that it could go into the tub to soak overnight and be ready for dyeing the following afternoon.
I should mention that tying red warp with pink ikat tape is not fun! The colors are too similar and it was very hard to tell if the tape was reaching all the way to the margins of the pattern.
The pattern is a very simple one…horizontal and vertical bars that are supposed to look as if they are interwoven as warp and weft. I may have mentioned in other posts about ikat that I find creating straight horizontal lines particularly challenging. My bundles were pretty small. I find it much easier to wrap a thick bundle rather than a thin one.
Here it is on the loom with some of the shapes filled with Andean Pebble Weave pick-up….
I had by-passed my folders of charts and gone straight to the shelf and taken down my own pattern books to leaf through and choose a pattern. I used one from one of my pattern books after having modified it to suit these small strips of weaving. I wanted a fairly busy Andean Pebble Weave pattern but not one that had horizontal lines because I didn’t feel like fussing with the necessary modifications while weaving with this fine silk.
So far, the threads are behaving quite well. I think the interwoven effect would be more pronounced if there was less space between the vertical and horizontal bars. I was concerned that if I left too little space and if the shapes blurred along their upper and lower edges, one shape might end up merging with the next. You watch….next time I’ll leave less space and that is precisely what will happen!
I don’t often look at my own books because I have folders and folders of pattern charts with all the patterns that are found in my books along with so many more that haven’t yet been published. And so, it was kind of fun looking through my Complementary-warp Pattern Book and remembering the time when I was putting this book together. I spent something like six weeks at my brother’s home in Australia drawing charts and weaving the samples. That visit to Australia was supposed to be about visiting family and then popping over to Bali to take a workshop on weft ikat. You may remember my tale about being five hours into the six-hour flight to Denpasar when a volcano on the island of Bali erupted. That forced us to turn back and all flights from Australia to Bali got canceled for a week or so after that. Of course, the workshop went ahead without me.
And so I stayed in Sydney with my family instead and work on the book continued.
Starting the collection of sample bands.
The book was finished something like four months later and it has been wonderful seeing these patterns being woven around the world ever since….
By Gonit Poratin Israel (right) using a backstrap loom and one of her students using the frame of a rigid heddle loom.
Frances Lewis used the fish charts from the Rivers and Oceans set to weave a band of fish, but using tablets instead of heddles. She filled in some of the fish outlines with her own pattern ideas.
Julie B liked the set of four cats in the animal section. I love weaving these too and wove them into a silk wrist cuff along with some of the paw prints that are also charted in this book. There are three different kinds of paw prints in the book.
Wendy made this beautiful hat band for her fisherman husband using the fish and other watery patterns from the Oceans and Rivers set…
Bees get a section all of their own in the book as there are four of them to choose from. Here is Carlos’ backstrap-woven bee piece…
Carlos was one of the designers who made a contribution to this book. You can see his own bee design (below) flanked by some of the patterns from the Borders and Dividers set.
Original patterns contributed by Maja Burger, Laura McCarty and Carlos Vargas.
Nora included one of the bees and its hive in her band of patterns from the Garden-themed set…
I chose some patterns from this book (along with a couple from another one of my books) for the Christmas tree hangers that I made last year…
Could this be my favorite among my books? I’m not sure. I certainly had fun sitting down and looking through it while planning my latest ikat experiment and there are certainly some nice memories associated with weaving the samples (despite the disappointment of the failed Bali trip).
I guess one of the things I like the most about this book is the fact that there were so many contributions from people who had bought my earlier instructional books and then gone on to create their own awesome original patterns. Within the book itself, it’s impossible to pick favorites from the one hundred options. Julia transferred Sashiko sewing patterns to the Andean Pebble Weave structure. I love those. They are charted in the Geometric set.
I have woven my slightly adapted version of Maja’s weaving woman quite a few times. Yes, she might be my favorite….my current favorite in any case! She appears on the cover of the book. The cheeky viscachas (Andean chinchilla-like animals) also appear on the cover. I charted this pattern from a pre-columbian textile fragment.
I hope that if you own this book, you may now feel inspired to take it out and browse through the patterns as I have done. And, if you don’t yet own it, perhaps you will put it on your Christmas Wish List. Complementary-warp Pattern Book. And, if you haven’t learned how to weave Andean Pebble Weave yet, both myAndean Pebble Weave on Inkle Loomsand Complementary-warp Pick-up (for inkle and any other kind of loom that allows you to weave warp-faced bands) books show you how.
Our national election here in Bolivia is this Sunday. I hope it passes peacefully. I have re-stocked my pantry in case it doesn’t but let’s hope that there isn’t a repeat of last year’s upheaval.
Lots of people ask me about how the pandemic is affecting me here in Bolivia and there is plenty to say about all the negative ways in which lives have been changed. But, there’s also a flip side…at least there is in my case…and there are some positive things going on as well as a direct result of not being able to travel and being obliged to stay in one place. I was thinking about it and this is the longest period of time I have stayed here in Bolivia since 2005! There was a period prior to that during which I hadn’t left South America for nine years but, after 2005, I seemed to be regularly picking up and flying away.
This long period at home has my Ideas Notebook crammed with planned projects and leaves me with plenty of time to play with those things that do require more sampling, planning, charting and trial-and-error which, for me, is best done over one long uninterrupted period of time. I have lots of uninterrupted time.
I showed my finished Finnweave sampler in my last post and am pleased to tell you that I found a use for it beyond just being a sample to which I can refer for future projects. It makes a wonderful cowl. Having worn my hair long for most of my adult life, I am very much aware of my bare neck and how cold it can get now that I have cut my hair short. I was very conscious of that on my winter visits to Australia and New Zealand last year.
Yes, I had a moment of frustration the other day and took it out on my hair in the form of yet another DIY haircut. At 10:30 pm with toothbrush in mouth this suddenly seemed like a good idea. While we are certainly not in cowl-wearing weather here south of the equator, the time will come when I can be back visiting the USA in the spring and fall, and hopefully Australia in the winter months, when the air can get a little nippy.
Quite a few people have been curious about the Finnweave I have been doing. I explain that I chose this structure simply because the pre-columbian textile fragments that I have were woven this way. There are of course other kinds of double weave pick-up structures that can be used to weave figures and the figures will have a certain appearance on the front and back of the cloth. Weavers can choose the look that they prefer. As always, I refer to the Doramay Keasbey article in Handwoven Jan/Feb 2011 in which she compares the front and back of bookmarks that she wove using five different doubleweave pick-up structures.
So, what about the flip side of my Finnweave? The Keasbey article includes Finnweave and I can show you the two sides of a motif on a piece that I wove some years ago using 8/2 cotton which I think is much clearer than trying to show you the example in the finer 20/2 cotton that I just wove.
You can see that smooth horizontal lines on one face look like toothy lines on the other . This particular motif does not have any fine vertical lines but a fine vertical line on the “good’ face looks like a column of small disconnected horizontal dashes on the back. Occasionally, I prefer the way a particular motif looks on the back in that from a distance it resembles blurry ikat with those toothy edges. It’s a softer look. The upper face has a much smoother and sharper appearance.
So, I will keep my Finnweave cowl on hand as I think about my next project using this structure. There’s not much chance of it being used as a cowl any time soon as we have temperatures in the high 90s with one day at 100 degrees forecast for the next eight days. The tropical “winter” is over!
What has been keeping me busy lately is refreshing my memory on three-color reversible pebble weave. It’s another one of those things that grabs my attention every few years. I showed you in my last post the sample I wove in tencel using this technique some years ago in which I used yellow and white on a blueberry background.
I can’t find that sample anywhere now but, thank goodness, I am better at keeping tabs on my notes. However, my notes could have been better and it was frustration with trying to interpret them that led to the late night hair-cutting incident! After a good night’s sleep, I got the notes all sorted and I chose primary colors in 8/2 tencel once again to test whether I had indeed understood the steps.
Examples from Peru shared with me by Mary Spanos with the red, green and yellow sections of three-color pebble..
I am using my backstrap loom with string heddles as you know. If you are a tablet-weaver, three-color double-faced pebble weave is apparently quite straightforward. I have read about people doing it by using triangular tablets but also square tablets that have holes in the sides. So, if you are in a great hurry to learn this, you might want to go with tablets. I’ll leave you to investigate that further.
I will be writing a tutorial on this eventually for those who use string heddles. “Why don’t you just use tablets?” you might ask… I am more interested in the string heddle process as that is the way the technique is woven here inSouth America.
I have examples of three-color pebble weave in pieces I bought in Peru on my very first visit in 1996. These particular pieces were relatively expensive and I had to think long and hard about investing in them back in my do-it-on-a-shoestring backpacking days. They blew my budget for the following ten days. I am so glad I bought them, though. My weaving friend Mary also sent me pictures of some similar pieces that she owns.
The three-color pebble weave figures in these particular pieces are not identical in appearance on the back of the cloth.
Here you can see the back of one that I wove myself many years ago in a non-reversible technique….
I haven’t yet had the chance to sit with a weaver who knows how to do the double-faced version and so my efforts have been guided by the writings of Adele Cahlander and Marjorie Cason in The Art of Bolivian Highland Weaving and a lot of trial-and-error of my own. Just by chance I was able to pick up a small piece of cloth that was woven using the double-faced three-color version. It was being used as the cover of a small photo album that I found in a souvenir store right here in Santa Cruz. I grabbed it! Thankfully, it had only been glued to the photo album along its edges and I could easily remove the cloth.
Bolivian cloth with pattern in double-faced three-color pebble.
The cloth is so very tightly woven as is the way here in Bolivia, that it is impossible to separate the warp threads to perhaps get some clues about how it was woven. In any case, I am using a series of steps for my own experiments and am getting the results I want. I feel that I could replicate the pattern on this cloth if I wanted to.
I would, however, love to be able to spend time with the Bolivian weaver of this piece of cloth and see if she has some other less laborious and more efficient way of achieving this which will no doubt have me slapping my forehead and exclaiming “Of course!” On the other hand, perhaps I am doing it just the way she does….I would love to know! Bolivian weavers think nothing of what may appear to us as extremely laborious weaving tasks….think of what they go through every time they finish a piece of warp-faced cloth with four selvedges, or the thread-by-thread pick-up that goes into weaving pieces like the red and black one you see here….
A weaving of the Jalq’a people of Potolo, Bolivia.
So, here is the piece in tencel that I wove to practice creating patterns using all three colors as outlines, background and fillers. My sample motifs got smaller and smaller as I gradually centered my focus on just some very specific aspects. These patterns are charted in my Complementary-warp Pattern Book.
The idea was to refresh my memory about this technique and, as it turned out, improve my notes for next time. But it was also about wanting to weave something using the wool I had started spinning during the Tour de Fleece. My spinning output is quite sad. I simply can’t manage to motivate make myself to devote that much time to it. I am more interested in charting and weaving. In any case, I have some yarn to use and after sampling in tencel, I was ready. I had originally planned to sample in some industrially spun wool but everything I found in the closet was either too heavy or too stretchy. I do have some Knit Picks Palette but I didn’t want to push my luck with that. The method I use has a lot of heddle action and I wasn’t sure how well the Palette would stand up to it.
A couple of wrist cuff projects seemed like a good way to start….
I used a little leaf motif that I had created for my Complementary-warp Pattern Book (slightly modified here) as well as part of a larger flower motif that I had created for the same book in the Garden-themed section.
One of the challenges for me when using this three-color technique is finding three colors that will work well together on bothfaces. I have a light color -white, a very dark color – black and a medium color- let’s call it tan. These three work well together. Other combinations may not. If, for example, I use two medium colors like purple and green, I can have them sit on either side of the lightest color on one face, but they will have to sit right next to each other on the other face. In that case there may not be enough contrast between the two for the pattern to be easily distinguishable.
You can see that tan and black sit right next to each other in the leaf motifs on the upper face and are separated by white on the lower face. I played with the outline color in the flower motif using both white and black as shape outlines and tan and white as the fillers.
My hand spun yarn stood up well. Admittedly, this is only a very short and narrow piece but I can tell thatf it will do well even in something much larger.
I added an eye-patterned tubular band in the same colors and then played around with different buttons for the button-and-loop closure. I love this cuff!
Next on the loom, was another cuff project using the green and purple that I mentioned above. I didn’t do any outline color-flipping in this one. Here it is getting its tubular edging. I love weaving and sewing that edging! (Check out my book if you would like to learn how to weave this patterned tubular band to use independently as jewelry, for example, as well as weave and sew it as an edging).
These are the buttons that I eventually chose…a flower one for the garden-theme and an interlocking shape to match the interlocked motifs which are charted in my pattern books.
The last thing is to braid and sew on the loops that go around the buttons to close the cuffs.
So, what’s next? While I am in wrist-cuff mode, I might make one in Finnweave. I do like to have examples of the various structures that I use in my wrist-cuff collection. I also feel motivated to spin some of the colors that I am least likely to use and then dye them so I that I can continue to play with three-color pebble. If you have suggestions for three colors that would work well together no matter how they sit in relation to each other, please let me know. I wove this wool three-color pebble some years ago in which the orange and green played well together when placed right next to each other….….and look just as good on the other face where they are separated by white.
Finally, I would like to promote my publications…in this case, the one I produced on the eye-pattern tubular band which you have seen along the edge of the cuffs I made. My ability to earn has been greatly reduced with my inability to travel to teach and book sales help to keep me afloat. Perhaps youwould like to try weaving an eye-pattern tubular band. I have two versions of the book. One, which is only available as a pdf, teaches how to weave the band as an independent tube which can be used in jewelry and other accessories. Ideas are given in the book.
In addition to this, the other extended version shows you how to weave and sew the band to the edge of cloth as I have done. It also goes on to teach two other decorative finishing techniques that are used by some of my Bolivian weaving teachers. This extended version is available as a pdf and as a spiral-bound book.
Both the short and extended versions, in either pdf or book form, give access to supplementary instructional video clips and are available atTaproot Video.
I’ll be donning my masks and venturing out a bit more in the next week or so as I need to re-stock the pantry before our national elections this month. I plan on staying in and well out of the way during and after that event.