
Backstrap Weaving – Building the Bag

The good news is that I FOUND IT! If you read my last blog post, you’ll know what I’m talking about….the lost balls and skeins of silk that I had dyed with cochineal bugs. It had been a quite a task dyeing that silk as I slowly learned by trial-and-error about just some of the mysteries of dyeing with cochineal. It had got me through the tedium of being stuck indoors during the 36-day general strike that we had here last November. I had tucked all the thread away in a small zippered pouch and then misplaced it. The thing is that my apartment is tiny and its pretty hard to lose anything here. That made it all the more frustrating.

As expected, it turned up in a very unexpected place at a time when I wasn’t even looking for it. It was in a different zippered bag on a shelf in the bathroom of all places. It was safely tucked away in a very sweet zippered bag that I had got for a mere $3 at a used clothing store while visiting Washington State in the US. I had been thrilled with this find. It’s made of backstrap-loom-woven cotton cloth that was woven by the Women’s Skills Development Project in Pokhara, Nepal. I often use it as my toiletries bag when I travel. I can’t think of anything more perfect for me with its little label displaying a weaver at her backstrap loom. It’s beautifully put together and was in brand new condition when I bought it.

In this picture it sits on another piece of backstrap-loom-woven fabric that my aunt brought back from a trip to India. It’s an interesting combination of warp-float patterning, supplementary weft and weft twining. I’ve been twice to Nepal but never as a weaver. I would love to return and trek with a spindle and loom and see how I can connect with women along the way.

I look at my little bag from Nepal and wonder how long it took the weavers to construct it. I know, I know….I’m not a fan of the “how long did it take?” question but I can’t help wanting to compare their construction process to mine. The black bands around the mouth and base finish it so beautifully. You can barely make out the seam where they start and finish. Only the base is lined and covers the seam where the base meets the sides. I watch Handymum’s videos on Facebook and marvel at how she cuts and prepares all the parts for her bag projects. She then methodically sews everything in place and just leaves a small opening through which she eventually pushes all the fabric to reveal the finished bag right side out with everything in place ready to go. It’s like magic to me!

I tend to just make things up as I go and admit that I really don’t have much idea about what I am doing as I hand-stitch my bag projects. I look at pictures that I see online and take it from there. I am not looking for speed. I love sitting and slowly hand-stitching but I can never truly be sure about the success of a project at any point in the process. There’s almost as much time spent de-constructing as constructing and this project was no exception. But when its finally done, it’s very satisfying!

As you know, it started with uncovering the ply-split strap in my closet and deciding that it would look nice as the sides and base of a bag. How I was going to sew this rather thick and stiff strap to my backstrap-loom-woven fabric, I had no idea. That’s all part of my make-it-up-as-I-go style. I’ll just figure that out later. In the meantime, I’d go to all the trouble of weaving an ikat patterned piece to use as the outer pocket. There was wrapping and unwrapping of ikat tape and three dye baths. And then onward to the bag itself. After all that effort I’d just have to make it work.

Two hundred and sixty-eight heddles later came the black fabric for the body of the bag. I scraped together several colors of yarn and dyed them all black. Surprisingly they all came out with the same intensity of black color.

Construction underway….or should I say, construction, de-construction, re-construction. Still unsure at this point if I was going to be completely wasting my time.

Let me tell you that when you cut a ply-split band, it goes completely bonkers. I sewed back and forth across the band to secure it before cutting. All the twisted cords immediately unraveled and splayed out wildly in all directions. Help! I remembered that I had a leather backstrap that had been given to me by a guild. It had been part of one their deceased member’s estates. It was in just the right shade of brown. It would often be the first backstrap that I would put my hand on when I leaned over from my seat on the floor to open the bottom drawer and it got quite a lot of use. I hope that its former owner wouldn’t have minded my cutting it up in order to rescue this project by covering and protecting the end of the cut ply-split band.
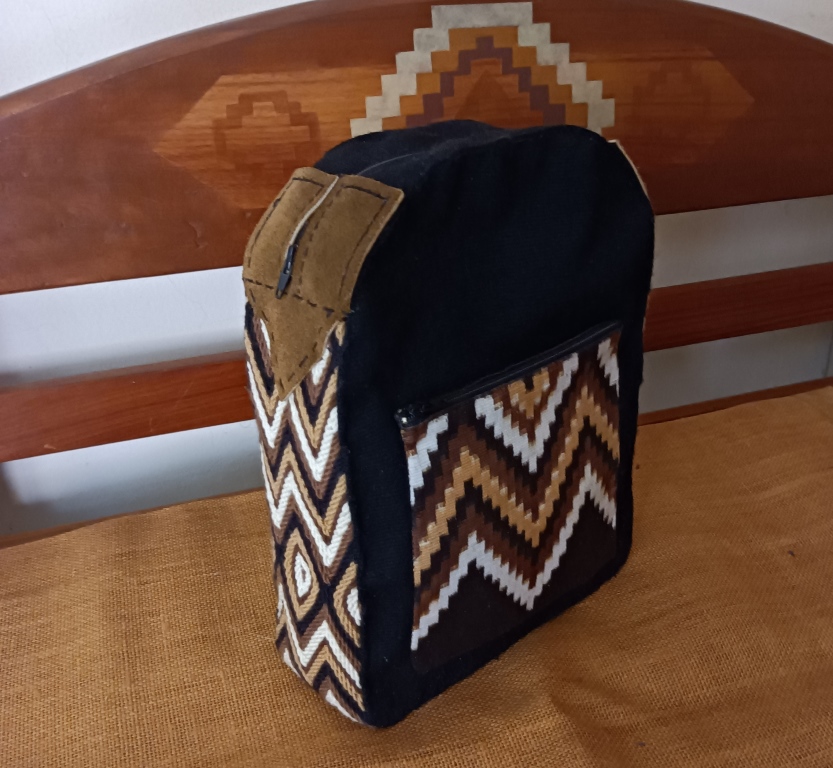
With the leather in place and the bands for the zippered top woven and sewn into place, I was starting to think that maybe this project was going to be a success after all. I only then prepared the lining. It had to be lined. The wild ends of the ply-split band on the inside needed to be hidden! Where would the straps go? No idea at this point. I was still just making it up as I went.

This is basically a mini backpack that is designed to be slung over one shoulder. I haven’t yet been able to find a one-inch length-adjustment buckle and so I had to improvise. The strap can be attached on the left or right depending on the shoulder I want to use. The leather backstrap yet again came to the rescue.

Done! It’s ready to use now but I’ll keep looking for that length-adjustment buckle so that I can change from double d-rings to a hook. I just had to get this finished because I know that if I left it until I found the buckle, it would never get done. If I were to do it over, I’d have the zipper go down another couple of inches. Making it up as you go is kind of fun but sometimes leads to poor decisions.

Another thing that I have been doing on the side is preparing some print fabric for another stitched shibori project. I brought back some soda ash with me from my last trip to Australia (I hadn’t been able to find a way here to buy it that didn’t involve industry-sized quantities). I dismantled a Vera Bradley toiletries bag that I no longer use…it’s too big! (this might give you a clue as to what led me to the bathroom shelf to eventually find those balls of cochineal silk) because the fabric is so pretty and I’ve been busy washing and scouring it. I’m only guessing that it’s 100% cotton as there isn’t a sewn-in label. A burn test seemed to indicate that it most likely is. I wonder how well I can expect dye to cover the print.

What’s next on the loom? Well, as you know, I am weaving only from stash and I still have a fair bit of this Mayan Hands cotton that my friend Kate gave me several years ago. This is the cotton that I used to weave the fabric for my cotton spinning bag that you see below. I also used it to weave the straps for the bag in this post. I wove them in the structure that I call Andean Pebble Weave in just one solid color and they are good and sturdy.
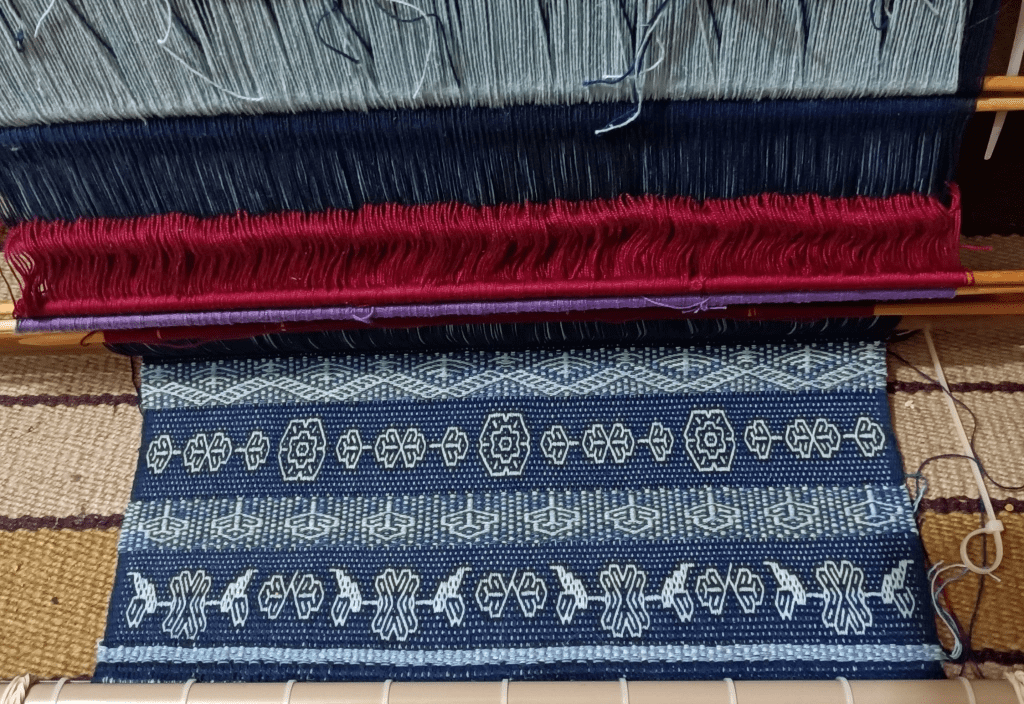
If I have enough yarn, I’d like to weave a very brightly colored tote bag for grocery shopping, mostly in plain weave and with a little bit of pick-up patterning. I take four cloth bags with me to the store, two slung over each shoulder and walk the seven blocks there and seven back. The bags and the straps in particular need to be good and strong and comfortable in order to support the weight of the groceries over that distance. The bags are not just riding from store to vehicle in a shopping cart. Some of my bags are weaving conference tote bags that are looking a bit shabby now. I still use the one from CNCH 2010! It has been the best of all the conference totes I have.

I’ll finish by telling you about the latest issue of Tiny Studio Creative Life magazine in which I have an article. The theme of the latest issue is Magic and I really enjoyed writing about the science of the craft and the magic of the art of creating cloth on a backstrap loom.

Editor Suzy Brown describes the magazine as being for spinners and yarn crafters and she does a beautiful job putting each issue together. Once again I have to thank her for laying out my article so nicely. The magazine is available in both digital and print formats and you can buy single issues or subscribe to receive them quarterly. It’s been wonderful watching Suzy build this business and create an international community of fans from her home in New Zealand.

Backstrap Weaving – Where is it?

The slooooow move back to Australia is presenting some problems. One of them could have been easily solved by simply making a list of things that I have taken over there so far. That would save me from having the annoying ”Where is it?” question occupying so much of my time.

For example, I can’t find the silk that I dyed with cochineal last year. I have a certain photography spot beneath the bedroom window and I remember removing from it the little zippered bag that holds all those silk cochineal-dyed balls of thread so that I could place an item to be photographed. Now where the heck did I put that zippered bag? If I can’t find it here, surely that means that I must have taken it to Australia. But that doesn’t make sense. I wanted all of my yarn stash to be here so that I have things to work on between trips to Australia.

Anyway, something good comes from combing through plastic bags and cupboards….you find other stuff. You get to say….”Ooooh, I’d forgotten all about you” and feel all warm and fuzzy with the memories that the unexpected item triggers.

The first example of this was the band woven from my own handspun llama fiber that I uncovered in the closet. That brought back memories of a trip to Bolivia’s amazing Uyuni salt lake way back in 2002. It was on that trip that I met a farmer who sold me bags of llama fiber. I was grateful to be able to take the fiber back with me to spin in the fiber-less tropical lowlands in which I live.

I wove a long band from the mill-spun wool singles yarn that you see in the photo, cut it in two and used it to flank the llama band. I joined the three pieces with the tiniest of seams and it has become the slip case for my pin loom. What can I say?…. I love to weave and anything that is not nailed down around here will eventually get its own woven pouch.

Here’s a look at just some of the black-and-white bags, pouches and slip cases that house all manner of things around my home. They showcase a variety of techniques. Top left is a two-color ikat with a little supplementary weft patterning at the bottom. Top right is a shoulder bag patterned in the intermesh structure with a little weft substitution at the bottom. Bottom left is a three-color ikat using my own handspun cotton. Bottom right is a laptop slip case patterned in a single-faced two-color warp-float structure.

I like that I can keep learning and practicing stitched shibori techniques and use the learning pieces to line my latest creations.

I never seem to decide on the lining until I have finished sewing the bag which means that I get a lot of practice installing drop-in linings. This third stitched shibori project taught me about the effect of different spacing in the stitches and now lines the llama-band bag.

Find Number Two: This was some cotton fabric that I had picked up from a give-away box at a guild meeting I had attended years ago. I had no plans to sew it into anything. I took it because I like to use fabric as backdrops for some of my photos and no one else seemed to to want it. This find gave me the idea of trying the stitched resist technique on print fabric rather than plain white. I gave the fabric a quick wash in hot water which was obviously not enough to truly scour it and make it ready-to-dye. This was just a sample and I wasn’t willing to go to too much trouble. It was okay for a quick experiment and I think this idea is worth pursuing. Ideally, I would have the surrounding print almost totally covered by the dark dye. I don’t know if that’s even possible but I will do some research and put more effort into the scouring next time.

Flower pattern idea for stitched shibori from the website of Townhill Studio where you’ll find lots of tips and tutorials.

Find Number Three: This was a ball of indigo-dyed reeled silk that a former English teaching colleague had brought back for me from Japan. Dear Sayuri (r.i.p) had totally surprised me with this thoughtful gift. She was about the only one among my many teaching colleagues here who showed any interest in what I do but even so, I had never expected her to bring back such a treasure for me. I remember that I had been initially disappointed because my fingers had been stained blue as I was winding the thread off the skein into a ball. I wasn’t sure how that would affect my weaving with it and that might be why I set it aside all those years ago.

I decided that it was time I did something with this gift. I wound some off into skeins and washed them over and over until all the blue had been released. The difference in color as it appears in the photo is subtle but is actually quite significant. I prefer the post-wash color. This silk and some pictures that I had seen of indigo-dyed clothing worn by Chinese minority groups gave me the idea to weave something using a motif that had a kind of eastern flavor. I set about designing one to be woven with supplementary weft.

I used several strands of two colors of silk on a base of 20/2 cotton for my sampling. I love how a backstrap loom allows me to whip up these small samples without wasting too much thread. It took a couple of attempts to get something I liked. That first one was wrong! I was happy with this and was just getting down to the number-crunching part of the preparation process (I like this part because I get to write in my weaving journal with its handwoven cover) when I got distracted by Find Number Four.

Many years ago, I had bought these two ply-split straps. They were made in Colombia by Wayuu artisans who generally use them as straps for their crocheted mochila bags. In this case, they were being sold online as guitar straps but did not come with any hardware. I had become fascinated with the mochila bags and the band weaving of the Wayuu people after buying Dutch weaver Mirja Wark’s book on the subjects back in 2011. My Dutch friend, Anna, (if you are long-time follower of my blog, you might remember “bicycle Anna”) had arranged to get this book from the Netherlands to me here in Bolivia. The following year, 2012, I actually had the opportunity to travel to the Netherlands and spend a day with Mirja Wark. You can see that my recent unearthing of these these two straps has also unearthed a whole string of lovely memories.

My friend Dorothy owns this Wayuu mochila bag with its ply-split strap.

I am usually pretty good at focusing on one weaving project at a time. I may take time out to spin some cotton, weave a pin-loom square or stitch some shibori cloth but once I have chosen a weaving project, I usually stick with it from start to finish. Not so this time. The “eastern” project has been set aside so that I can plan a bag around the darker of the two ply-split straps. I had the idea of using the strap as the sides and base of a plain black bag and weaving an ikat patterned outer pocket to complement the strap pattern.

Wrapping warp threads with tape to resist the first of the three dye colors.

And away we go. I planned a very simple ikat pattern to mimic the “M” shapes in the ply-split strap. I used 20/2 cotton. I have woven two ikat projects with this weight of cotton in the past. The first was the two-color drawstring bag that appeared in the photo near the start of this post. The second was this one in three colors….

These were the pieces that would help me make my calculations. In my latest project I would use four colors. I wrapped bundles of thread that were twice the size of those that I had used in the first two projects. That fact, together with the small spacing between the wrappings, meant that the dense bundles of threads emerging from the wrappings did not have much room in which to spread and evenly take up the dye all the way up to the very edges of the wraps. I spotted the problem after the first dye bath using the tan color but it was too late to fix. I didn’t want to throw it into a second tan bath because I figured it would darken the color too much. In the subsequent brown and black dye baths I worked on moving the threads (as much as I could with rubber-gloved fingers) so that the dye would penetrate all the way to the edge of the wrappings. Every project carries a lesson. I just have to make sure that I add that to my notes….don’t make the bundles too thick if the wrappings are going to be placed close together.

The completed pocket fabric. The tan areas have little fringes of white due to the problem mentioned above.

Sides and base of bag….done. Outer pocket…mostly done. I am deciding on whether it needs a zip. I am going to scrape together thread to dye black for the body of the bag (remember that I’m trying to work solely from stash and so that will mean over-dyeing some colors black). I know from past experience that I’ll most likely end up with various intensities of black color as a result but that could be interesting. As for the shape of the bag…that’s yet to be decided. I wonder if I can actually figure out the lining this time before I sew the bag.

I still haven’t found the cochineal-dyed silk. But I am sufficiently distracted now. It will no doubt turn up when and where I least expect it to. Looking for it has resulted in some beautiful memory trips, though!