Backstrap Weaving – Highland Holiday

From the town of Quillacollo just outside Cochabamba city we head straight for the mountains and in under an hour we had zig-zagged our way up to around 3700m leaving the city of Cochabamba a mere blur in the distance on the valley floor.
How such a wickedly steep street can look so mild in this photo is beyond me!
These rocky streets in town become slippery with mud after rain but dry up miraculously quickly.
Charqui (jerky) on the washing line in the patio in front of a nice view across the valley.
I mashed overripe bananas with Maxima and little Mayra for the indigo dye bath.
Maxima and daughter, Vilma, showing off the aguayo (carrying cloth) Maxima wove for a custom order from the USA. Indigo-dyed yarn from the first attempt can be seen in the stripes. This cloth is gorgeous! The colors are so rich and Maxima has included a stunning variety of figures. It’s all Maxima’s work except for the tubular edging.
A close-up view of a small section of the center of the aguayo where you can see some of the indigo-dyed yarn in the decorative joining stitch.
We made skeins. I’d never made skeins just on my hands before and was happy not to have mine end up in a tangled mess. The singles yarn immediately kinks back on itself when not under tension and can make things difficult to control.
Immersing skeins in the indigo dye pot with Dorinda, granddaughter Emily and little Mayra always there in the mix. We wore gloves but still managed to get the dye on places where it didn’t belong.
First results once again against that lovely backdrop. One of those skeins became mine 🙂
On the following days, Maxima continued experimenting on her own and tried over-dyeing some naturally-dyed yellow to produce that pretty green.
And yet more on another day. This time over-dyeing a cochineal-dyed skein.
Plying all this yarn will keep me busy for a while. As if I need even more stuff to lug back to Australia but who in their right mind could resist?
Back in 2017 I went to Huancarani and can be seen here with that long dark hair guiding Maxima’s sister Narciza through the steps to weaving a pattern from my More Adventures with warp-faced Pick-up Patterns book. It’s a motif from a Central Asian textile that I had adapted to the structure that I call Andean Pebble Weave. It had caught Narciza’s eye and she was keen to learn it and not let me go until she had conquered one repeat.
We just managed to get through one repeat before it was time to leave and I left wondering if she would ever use the pattern. I did leave behind a woven sample just in case.
Maxima and a group of weavers are seen here studying and discussing images in the book shortly after my visit.
It’s a belt that she wove for daughter, Vilma, to wear on festival days. It’s woven in the bright tightly twisted acrylic yarn that the weavers here love to use.
The ladies love to be able to show off “new” patterns in items they use for special occasions.
Maxima preparing a cotton warp for our first session together. The end of the warp is temporarily tucked into the waistband of her skirt while she uses two hands to make heddles, Later the end will be suspended on her index finger. Anything that happens to be lying close by such as this comb can be called into use to hold the cross.
Starting with a little plain pebble weave.
Meanwhile Mayra and Ana who seem to see all forms of household chores as play, were happily washing their toys. At one point I saw them playing chop-the-head-off-the-chicken-for-the-pot with the cat!
Starting with a fresh warp of respun acrylic thread for wider, more complicated patterns.
The young ladies on this morning were on chicken duty…..that is, keeping the chickens from wandering from the yard into the kitchen.
One of the four running-horse patterns that creator Deanna Johnson calls Elmy’s Mustangs, is almost complete.
She also selected the viscacha pattern from my book. I’d charted that pattern from a fragment of pre-columbian cloth that I’d seen online. I’d been able to track down the owner of the fragment and get him to send me close-ups so that I could decipher it.
This is what I was doing in the evenings to entertain myself. I was using Alison Irwin’s idea for weaving letters in the structure that I call Andean Pebble Weave to make a key fob for the lady who ran the hotel in which I was staying. Inti means sun in the Quechua language and Wasi means house.
I think she liked it!
Squeezed onto the balcony of the hotel, I showed the ladies any woven thing that I happened to have. Here they’re examining my double weave belt with its Bedouin patterns which are completely foreign to them.
I brought out my cotton spinning bag and everyone fell in love with the tiny takli spindle and wanted to take it home. Only Justina was “brave” enough to try spinning cotton with it and she did a great job.
Gathered the next day in Vilma’s sewing workshop with Justina deciding that she had enough time to teach me if I could bring some yarn. So, out came the crochet cotton again to the rescue…not ideal, but good enough for learning.
Creating a fresh ñawi awapa warp while Maxima went out to look for a forked twig to use. It holds the cross….more about that later. On the floor you can see another stick that is used to save one of the picked-up sheds for later use. The weavers here call this stick “el muchacho“.
Justina guiding me. Yes, I learned it! Maxima and Vilma looked on. I wonder if Maxima absorbed enough by watching to be able to do it on her own. Wouldn’t surprise me. I offered to let her sit in my place and try but she declined.
When I got home of course I had to weave one straight away. I still have lengths of fabric that I bought from the ladies back in 2019 and I used some of Verna’s cloth to make a little pouch that I could edge using the Huancarani set-up and color-changing method.
A closer look. You can see that the color arrangement in the tube along the base of the pouch is different from that along the side. This is a much nicer photo of the beautiful natural dye colors used by the ladies in these textiles. I used commercial wool from my workshop stash for the edging.
Got my nose burned on day one in the high altitude sun and so did not go out hatless ever again after that.
We all got filthy. The quiet sleepy group of passengers up to this point turned into a happy chatty group after successfully getting the van out of the mud and back on its way. How was I going to get on a plane with my feet in this filthy state? Never mind, there were flooded streets to walk through further along once we hit the outskirts of town and had to get out and walk due to the roadblocks. Feet were squeaky clean by the time I got to the airport.
The top left bunch of thread was dyed in the indigo pot. At bottom right you can see a tiny pouch I made using the Dosapey pattern. That tiny bag holds a tiny booklet and mini pencil. Now to decide how to combine colors in a new project. Roció, my Ayoreo teacher, contacted me for a class while I was away. I’ll have to let her know that I’m back.
This is the start of a larger Dosapey pattern that I finished just before traveling to Independencia. I dyed the black for this project.
I just had enough garabatá thread to create one face of a pouch. I wove the other face in cotton and sewed the two together. This pouch held my passport, tickets and money purse and went with me on the trip. I used the edging stitch used by the Weenhayek artisans along the top.
Using the Moisy technique which is one of the two pick-up patterning structures that the Guaraní weavers use. I set this up all ready to go before I left on the highland holiday.

Backstrap Weaving – Time and Time Again

Panel 1: Within These Walls, a pandemic project.

My relationship with Time seems to be changing. I know that I am not the only one who got lost during these last two strange years, overcome by the feeling that time was speeding by… weeks and months merging into a hazy uneventful blob. Even now I struggle to separate 2020 from 2021. But I just recently realized that the passage of time is slowing down for me and starting to resemble something like normal, something recognizable from the pre-pandemic days. The calendar map that I have always carried in my mind’s eye is starting to reappear.

I resist the urge to go back and try to account, in terms of productivity, for the 24 months that have passed since we first went into lock-down here in Bolivia. Today marks the anniversary of the confirmation of the first known Covid case here. That any of us achieved anything meaningful at all is cause for celebration. And now I am talking as if it is all over. Of course, I know it isn’t, but there is definitely a change in my state of mind.

Three-panel wall hanging: Textile Trails

On the theme of Time, I am reminded of a question that I am very often asked when I show my woven work….. “How long did it take to weave that?”

I am trying very hard to think back to a time before I started weaving to see if perhaps I would have asked this question myself to a craftsperson and what might have motivated me to do so. Would it be because I was thinking of trying to make the object myself and needed to see if the time involved was worth my effort? Or perhaps I would want to know if the asking price for the object reflected the amount of time that had gone into creating it.

In any case, I find it a very difficult question to answer. How long does it take?…As long as it takes! I honestly don’t keep track. I don’t sell my work and so I need not consider time in order to fairly price an item. I am not weaving to a deadline. There is usually no exhibit for which the work has to be completed…the three pieces above were an exception as I had woven them for an exhibit at the ANWG conference in 2015. I would probably have to go back to my blog posts if I wanted to give an accurate answer in terms of the number of weeks on which I worked on a project. However, I would be at a complete loss when it came to the total number of hours.

I met a craftsperson some years ago and witnessed his response to the question…

“How long did it take to make that?”

His response:

A    l  i  f  e  t  i  m  e

I can only imagine that he very rightly considers that a lifetime of his accumulated knowledge, experience, skill and inspiration went into this and every piece that he has completed. I love his response.

So, I am willing to pour as much time and effort as is required into every piece I weave. There have been a couple of times, though, when I just wanted to get the thing done! One such time was when I had volunteered to weave six lanyards for a conference. The long piece of half-inch band with its small repeated motif did not excite me at all when the time came to weave it. I installed eleven sets of string heddles to move it along. I didn’t have to do any pick-up and that rather unique experience suddenly made the project very interesting as I came up with ways to remember which heddle came next in the sequence.

What I don’t like, is making silly mistakes and wasting time. Okay, I will admit that a mistake is always a learning experience and valuable for that reason but sometimes you just turn around and do the same old thing again!

A circular warp for a cotton scarf

Like the time I was using a coil rod for the first time on a circular warp many years ago. The coil rod (sometimes called rolling stick) is the uppermost stick in this cotton circular warp and I was using it because it seemed like an important part of a circular warp set-up. At the time, I didn’t fully understand its purpose. One of my aims for using it in this project was to figure that out.  While trying to move the rod as weaving progressed, I mishandled and broke the coil rod. I did it once…I learned something. I did it a second time…I cursed…but then I learned some more. The third time I broke it, it got flung to other side of the room and I continued without it. It was then that I started understanding its purpose because it was very much aware that it was a different experience weaving without it. And so I was happy to sit patiently and install it once again. 

(Note that I am talking about circular warps here. I do, however, continue to use the coil rod on both circular and single-plane warps if I am doing plain weave with cotton or silk (materials that have little to no stretch). I have written a lot about this tool in blog posts over the years. If you are interested in learning more, you could start here.) 

Maybe this is something that we don’t consider when we ask the craftsperson how long it took to complete the project. Do we want them to include the time used to fix “oopsies”? After all, the fixing of the oopsies adds to that lifetime of experience about which my craftsman friend was speaking.

The first six inches of this warp were woven and unwoven twice before I found just the right weight of material for the supplemental patterning weft.

While the amount of time needed to weave a piece is not important to me, I am always interested in learning about techniques that weavers have developed to help make the whole process more efficient, like the use of multiple string heddles and pattern storage sticks, for example. However, there is one thing that I have always been a bit stubborn about and that is the use of sizing.

In weaving, sizing is a substance that is used to coat warp threads that are hairy or “sticky”, or have other characteristics that make it difficult to achieve clean sheds. Basically, it smooths the threads. I resist using it purely because of the “ick” factor. That is, I hate to think of the mess of dunking my warp into a bath of starchy goo and I don’t think I would enjoy the feel of the stiffened coated threads as I weave. Keep in mind that my hands are usually in almost constant contact with the threads as I weave pick-up patterns. Of course, it all washes off in the end and you are left with the original softness of the yarn but yech, I just don’t like the sound of it. I prefer to stay away from the sizing and just adjust my loom-operating methods instead.

Adapting my methods to the materials in use: I was able to weave with Knit Picks Palette….a soft, loosely-plied wool and create a four-selvedged piece.

My approach when working with sticky materials is to adapt the way I operate the loom…take a lot of care when opening sheds by working the threads in sections, using my finger tips to help release the grip a thread may have on its neighbors. I advance the warp more often so that sticks and heddles are not sitting on and abrading any one section for too long, causing it to shed and pill. Yes, it does slow things down but, as I said, I am not in any hurry. I suspect that using a sized warp on a floor loom is a different experience in that the weaver isn’t necessarily handling the warp threads during the weaving part of the process.

Another way to avoid using sizing might be to add extra twist to commercial wool yarn to make it smoother. My weaving teachers here create relatively smooth hand-spun yarn by using a high amount of twist. They also add twist to the synthetic thread that they buy in the market. This kind of yarn creates a certain kind of cloth. The thing is that I don’t always want that kind of cloth.

Two wool lap-size blankets that I wove using Mora yarn. It’s worsted spun which helps somewhat with the stickiness issue. I didn’t add any extra twist.

My latest project has been with mill-spun wool singles….sticky stuff. I could get a tiny heddle shed which I would then proceed to open further with my fingers. I didn’t want to use sizing. I didn’t want to ply it or add extra twist. I love the way it feels. The supplementary weft is my own plied hand-spun wool.

From the 27-inch warp I got 21 1/2 inches of cloth and my string heddles came up remarkably clean.
I always love the way the back of these supplementary-weft patterned pieces look.
There was a small amount of curl in the cloth at its opposing corners. Folding it to make a pouch for my phone and edging it with a patterned tubular band took care of that.

The fresh warp in the above photo was for a small closure tab. I used my plied hand-spun for that. I used a dense structure of three-span floats (intermesh) to produce a sturdy band…hence the two sets of string heddles.

The finished pouch.

I wet-finished the small piece on the right under the sword. The warp threads shifted slightly closer together, I took measurements, but I didn’t notice any real difference in the feel of the cloth. I didn’t wet-finish the pouch piece as I was a little concerned about color run in the supplementary weft. I had bought that roving already colored. As the supplementary weft is tightly wedged between the two layers of warp in several places, I don’t think that even a color-catcher cloth would stop the color from bleeding onto the grey wool. If wet-finishing had made a significant difference to the way the cloth felt, I may have reconsidered.

I hope that I get a chance to show this, the first of many projects in the mill-spun wool singles, to the farming couple whose sheep provided the fleece. My original plan had been to use this yarn for a shoulder bag project. I would dye the yarn to match the three-color strap that I had already woven…

I used my plied hand-spun wool for this strap. I don’t feel that I was heavy-handed in the amount of twist I used. The strap lies perfectly flat and the yarn was beautiful to weave with.

However, now that I have seen the cloth that this yarn produces, I can’t bring myself to dye it. I love all the subtle color variations from this blend of natural white and black. I’ll be using it as is perhaps for a pillow cover and will add color with supplementary weft instead.

So, I will turn once again to my Mora yarn for the bag project. I over-dyed a pale green color that I didn’t particularly like to get a dark blue that is close to the strap color. It will be mostly plain blue and with a very narrow strip of three-color pattern in the center. I have used Mora for a bag project before and know that it performs well on the loom as well as with use.

Fabric for a bag with built-in pocket woven with Mora wool.
If you are curious about the Mora yarn, here it is. It’s 20/2 worsted spun and I know that both Vavstuga and Eugene Textile Center carry it in the USA.

One skein of Mora goes a long way. It gives me material to work with for dyeing with cochineal for other projects. It’s taken two years but I finally got some alum. Just before the pandemic I had been out and about looking everywhere for the “precious” stuff…precious only because I suddenly could not find it anywhere. The usual pharmaceutical supply stores weren’t carrying it any more. The little hardware stalls in the market (there are dozens of them) didn’t have it. I tried the Mennonite market because I know that they can and pickle but they told me to go to the pharmaceutical places. The little McCormick jars of alum are not available here either. I am guessing that the Mennonite folk have a massive supply of it at home and are possibly not yet aware of it no longer being available. My friend Dorinda sent me some from Cochabamba a couple of weeks ago.

I have used cochineal in the past to dye my hand spun llama yarn. With an alum mordant I get the crimson color you see in this image.

The stones you see are a mineral that goes by the Quechua name millu. Dorinda sent it along as a bonus. It is not something that is required for dyeing with cochineal but she thought that I might enjoy experimenting with it. In the co-op, they use it to darken colors. It is also sold as a home remedy and it is in those stalls that it is found in the street markets. Now that I know what it is, I will most likely be able to find some here in Santa Cruz although I suspect that the amount Dorinda sent me will go a long way. Maybe I will also dye some silk with cochineal for an ikat project.

These are all time-consuming processes. I am not concerned about the amount of time it takes. If you have ever tried ikat, you will know what I mean by time-consuming. Slow processes are just perfect for someone who is working with dwindling stash!

When I told a friend of mine about having finally got hold of some alum via Cochabamba, he took on the challenge of hunting it down in Santa Cruz and came up with this in a very upmarket store of natural vegan-friendly cosmetics. One large chunk came contained in a cloth bag inside a fancy carry bag as if it were something terribly precious…and yes, the price was precious. The accompanying card shows someone applying it to their armpits. So I guess supplies, at least here in Santa Cruz, have been entirely diverted to the cosmetics industry.

Another “slow” project is my learning to spin cotton on a takli spindle. Version One didn’t have enough twist. Version Two had…you guessed it… what I suspected was too much twist. Version Three, which is in progress, is bound to have some other problem. And on it goes. I love the little takli spindle! And Joan Ruane’s video class on it has been so good. I’ll never forget the time I was with Joan at the Mannings. I had set up a backstrap loom and she had wanted to see what that was all about. I was doing pick-up and her reaction was “Oh my god, it’s slower than tapestry!” This from a woman who spins her own cotton for weaving! She made me laugh. I guess we all have our own feelings about Time.

As for Version Two with it’s crazy amount of twist, I decided to see if it was possible to set the twist on my singles (because that’s how I want to eventually use this thread…as singles) and did some reading about that. I have Stephanie Gaustad’s book on cotton, flax and hemp and there are also online resources about simmering and immersion. The trickiest part was having to immerse the thread under tension. My solution for that is a bit wacky. It worked for these small samples.

The thread went into the pot tightly wound around these metal mesh pencil caddies. I do want to use this thread as singles so that I can once again try to weave something approximating the sheer cotton cloth that is woven in the Alta Verapaz region of Guatemala. I want the thread to be finer than the hand-spun that I used last time in this piece…

Woven with hand-spun cotton singles that I had bought in Guatemala.

And this is where that icky topic of sizing comes back into it. I will probably give in and size the thread. I wove the above piece using a bamboo reed to maintain sett. The weavers in Alta Verapaz don’t use one and I am curious to know if the stiffening of the thread from the sizing is one of the factors that enables them to maintain the sett without the aid of the reed. I stress ONE of the factors because, of course, their supremely high level of skill gathered from years and years of work is going to be the main contributing factor. In videos, I have been able to hear the sound of their picking stick on the threads. The weavers are in the habit of slowly scraping the pick along the warp threads from selvedge to selvedge right at the weaving line as if, I am guessing, to encourage the threads to remain separated and not drift into warp dominant positions. That sound is not one that I would expect to hear from naked hand-spun cotton. The sizing that is used gives the threads a coating that produces that sound. Perhaps I will need to use sound as my guide when I try this myself.

All time-consuming stuff. But I am not here to just consume time. Hopefully, I will be using it to continue learning. When I recently explained to someone my plans for my own hand-spun cotton, they asked how long it would take before I would be ready to start the weaving. I sensibly replied….years.

Until next time…..

Backstrap Weaving – Star Gazing

Every night when no one is around I go up onto the terrace of my condo block and walk about star gazing for half an hour or so. It’s a peaceful, quite extensive space that covers the top of eight apartments. I don’t need to wear a mask up there and in spite of the light pollution from the inner city area in which I live, I can enjoy looking at some of the stars and planets while getting in some stretches and exercise. The air is fresh after a steamy summer’s day and I often wish that I could string up a hammock and sleep up there.

I remember one of the few times I was able to enjoy a night sky that was completely devoid of man-made light. It inspired me to weave stars into what I call my ‘Starry Night” wall hanging. I remember stepping outside my little room on Taquile Island on Lake Titicaca in Peru to go to the bathroom on a clear and bitterly cold night and being stunned and almost knocked over by the brilliance and abundance of the stars in the black, black sky over that dark, silent island. Kurt Laitenberger wove this motif with tablets and and I asked his permission to transpose it into the Andean Pebble Weave structure.

It’s interesting that it was this very same motif that caught my teacher Maxima’s eye the last time I was with her up in the highlands. I had taken many woven samples to show the ladies in the weaving cooperative and Maxima had chosen this one. Her first attempt to copy it on her own was not successful. Actually, she had started out very well but suddenly got stumped and stopped. She asked if she could watch me weave it so that she could learn. 

This image has an empty alt attribute; its file name is with-max-at-leaning-loom.jpg

I wove one motif and that was enough. Maxima was then able to continue just by following my woven example.

This image has an empty alt attribute; its file name is maxima-star-band-central-boloivian-highlands.jpg

Up on the terrace In these early months of 2022, it’s been nice greeting Orion on its return to the 8pm night sky on my side of the world and I am currently waiting on the Southern Cross to complete its circle low in the south and once more climb high enough to reveal itself above the light pollution and buildings.

An invitation in one of the online weaving groups to show-and-share star patterns prompted me to write this post. I actually wrote about this same topic about ten years ago but there has been quite a lot to add to it since then. Back then, I was able to share the Andean Pebble Weave strap on which I combined motifs woven by the Guaraní people here in the lowland part of Bolivia in which I live…

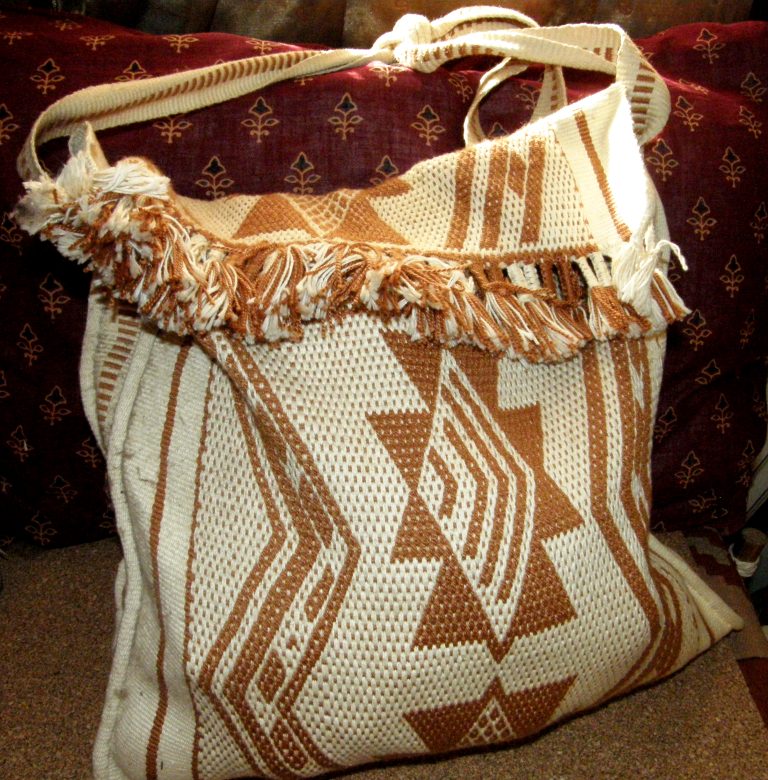
The Guaraní weavers use two types of complementary-warp structures in their cotton cloth. In the structure that they call Moisy, they represent all the natural beauty of their surroundings in large, bold renditions of trees, butterflies, birds, plants and flowers. However, in the pebble structure that I used above, they only ever weave two motifs – a snake and stars –  and there are an endless number of versions of these two items. You can see one such version on the woven bag.

My teacher told me that it was a snake that came to the first weaver in her dreams to teach her the patterns. The Guaraní people who live along the Parapetí River here in Santa Cruz also use the snake motif to represent that life-giving water. The stars are important guides in their agricultural cycle.

I found a story translated from Guaraní to Spanish in a book published by Artecampo, which is a craft cooperative store here in Santa Cruz, about a legend behind the use of the star motifs in Guaraní weaving…..it says that…

One day the children were taken and placed  like stars in the heavens and this is why women cry out about stars in their weaving. The stars not only speak of the sky but also about the richness of nature because one woman, in an attempt to stop her child from being taken, grabbed hold of a finger (or toe, it is not clear in the Spanish translation which). As she pulled on the finger, unfortunately, a piece broke off and this piece was buried. From the burial of this piece a corn plant sprouted. In this way, weaving symbolizes abundance which comes from the piece of the child. And this is why food crops are not only considered elements that feed and sustain men, they are part of Man himself just as the stars are part of Man and Society. Songs name those who are living in the sky and those that sing wear woven cloth to show that they are still with them even though they are distant.

Dionicia added these stars to her pattern repertoire after my visit. She wove them into a bench cover that she sells locally. Being able to include a “novel” pattern gives her a little advantage over other weavers who might also be selling their woven bench covers. 

This image has an empty alt attribute; its file name is dioniciac-1.jpg

The star patterns above are charted in my book More Andean Pebble Weave Patterns. And, speaking of the ladies up in the highlands, Dorinda has just written a new blog post on her most recent visit now that she is back home in the States. Dorinda had been away in the USA for going on two years and I can only imagine the happy reunion when she visited in November. 

In the Bolivian highlands, stars are woven into cloth by the weavers of the community of Tinkipaya. According to Veronica Cereceda in her book which catalogs the designs on these textiles, these ch’askas, stars, are a representation of the world above known as janaq pacha.

The small band in cotton that I wove to test the pattern is pictured above with a couple of wooden tools I got in a market in Potosi, the province in which Tinkipaya is located. I was told that the tool on the left is used to push down the warps behind the heddle rod when the weaver is opening the heddle shed. I have never seen a weaver actually use one of these and I have never seen another one like it. The one I have has a red stain on it and I like to think that it might be cochineal from one day when its owner was preparing to dye. The other tool, of which you can only see the tip, is used for beating and strumming and I have seen tools like this in use in several places in Bolivia and Peru although they are more typically made from a llama leg bone.

The structure used in this piece is yet another style of complementary-warp. The warp floats that surround and fill the star motif are aligned and arranged in a certain way that distinguishes this style from others. Below you can see the same star motifs woven with my hand spun llama fiber into a band that I wear as a wrist cuff. 

This image has an empty alt attribute; its file name is wrist-cuff-in-handspun-llama.jpg

And here it appears yet again in wool on a little bag I made when one of the online groups held an “orange challenge” several years ago.

This image has an empty alt attribute; its file name is 194951393_6181681991845586_2057187051893150363_n_medium.jpg

I published the chart for this pattern in my More Adventures with Warped Faced Pick-up Patterns book and Susan Torntore, one of my new Zoom weaving friends who refreshed her Andean Pebble Weave skills via a Zoom class with me, transposed it into the Andean Pebble Weave structure and then went on to create something like fifteen beautiful variations. Here are a couple of them. She plans to use this band as a bell pull.

This image has an empty alt attribute; its file name is susan-torntore-stars-crop.jpg

The Andean Pebble Weave structure has the advantage of having two regularly repeating rows which can be produced automatically by enclosing those arrangements of threads in heddles. Some weavers choose to do that because motifs can be woven much faster this way. Others prefer not to fuss with heddles and weave the patterns using pick-up for every row. In the structure used for the traditional Tinkipaya pattern, there’s no choice. Each “row” is unique and the threads for each must be picked up manually.

Wikipedia tells me that the stars on the flag of the United States represent the fifty States in the Union. Well, I knew that. I was hoping to find out why exactly stars had been chosen as opposed to some other figure but I guess there doesn’t have to be a reason. I am sure that we could all come up with some kind of symbolic meaning for a star. I swear that some of the indigenous weavers with whom I have studied have made up things about the motifs they are using just to please or else have a bit of fun with me…I have seen the twinkle in their eyes and the way they look sideways at each other!

Gail wove this very patriotic collar for her dog on her inkle loom many years ago and I have seen this pattern and variations of it show up in the various online Inkle Loom groups many times over the years around the fourth of July. Gail was forever coming up with clever collar designs for what must have been the best-dressed dog in New York.

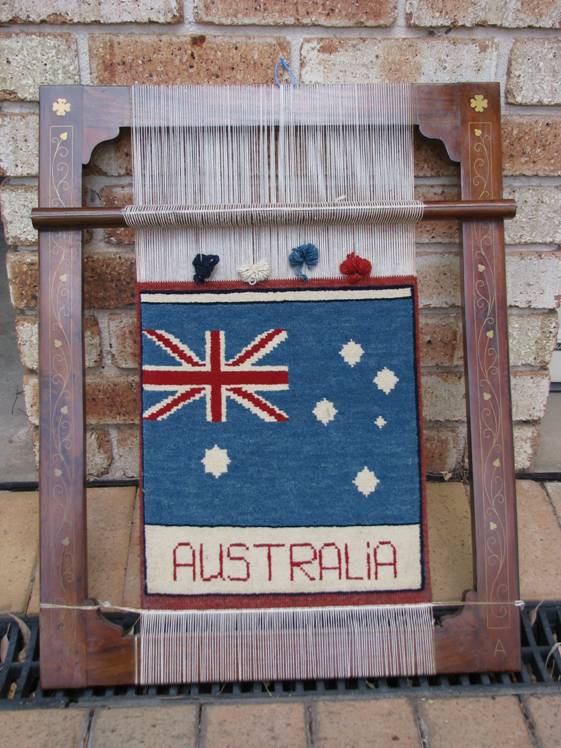
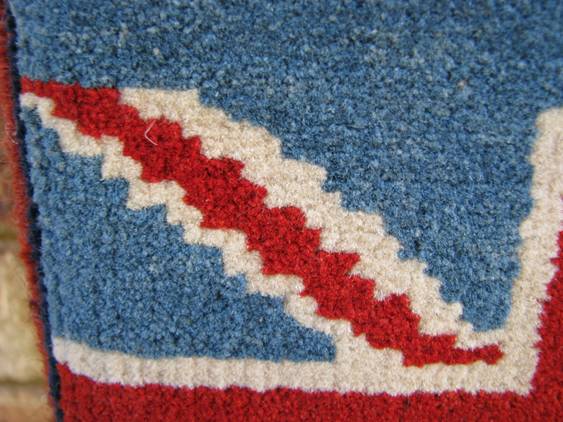
Speaking of flags and patriotic weaving, I assume that the next starry piece was made by someone who is proud to be Australian. I have this very cool cut-pile weaving of a representation of the design on the Australian flag…

The group of stars is the Southern Cross constellation which really is a sight to behold there in the southern sky. I am so happy to be able to see it low on the Bolivian horizon and it makes me feel somehow connected to Australia and  the people I know and love so far away. It is little wonder we so love stars and choose to use them in our cloth.

The large single star, which should only have seven points, represents the Nation’s seven states and territories. This cut pile piece on its beautiful frame is gorgeously dense and I would love to meet its creator.

It was given to my brother as compensation from the Indian owner of a furniture store who went out of business before he could supply all the chairs for my brother’s dining room setting. My brother then gave it to me. One day I will track down this furniture maker and see if I can talk to him about this weaving technique.

I don’t know if the weaver intended to continue with the design. There is so little space at this point and the tension on the warp is so high I can hardly imagine being able to do so.

There are a lot of representations of stars in Andean weaving. I took one small motif  and combined it with others to make the guitar strap below in colors reminiscent of the desert and canyons of the US southwest… a winding river, moon and stars. It took me back to clear, warm nights camping in the depths of Utah canyons with nothing between me and the stars. Moonlight bounced of red canyon walls and dozens of frogs singing away at the water’s edge. These were other precious occasions on which I could star gaze without man-made light pollution.

Combining several small motifs in this way is a nice stepping stone toward designing your own unique patterns. I teach the Andean Pebble Weave technique for those who use a standard inkle loom in my book Andean Pebble Weave on Inkle Looms which you can buy as a PDF or as a spiral-bound book from Taproot Video.

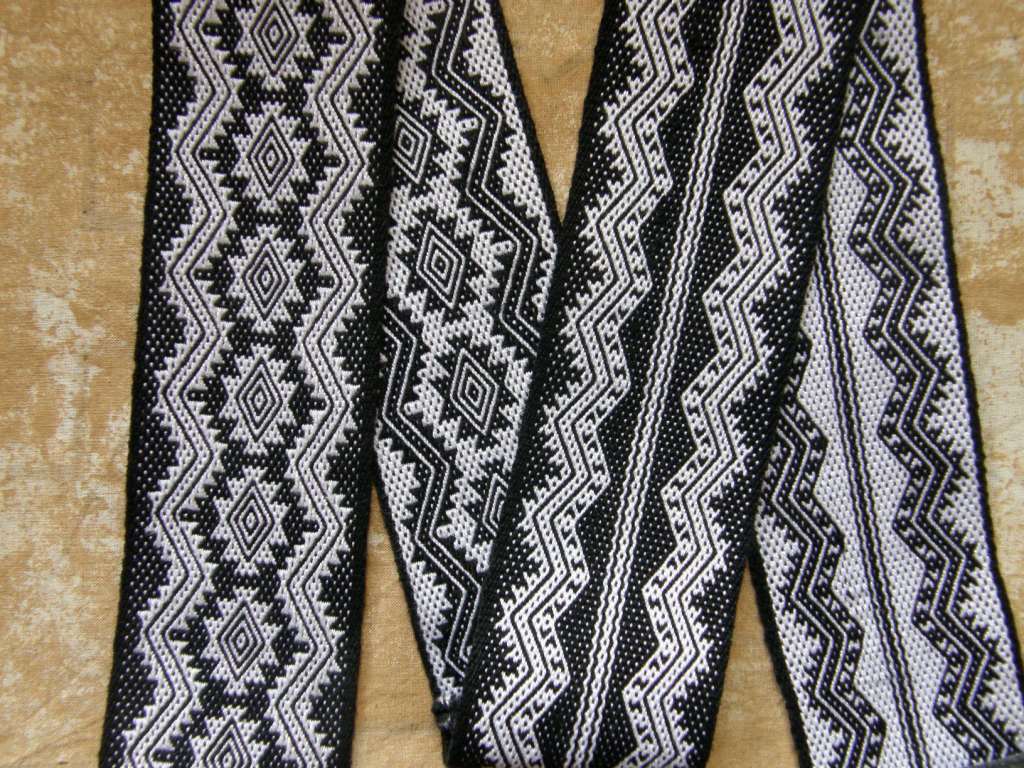
And then there are many motifs that look like stars to our eyes but which and perhaps represent something else all together. Maybe one day I will find out what exactly they mean to the weaver. There’s what I believe to be an Andean ch’aska  in Andean Pebble Weave on the left. In the center are the star-like motifs that I replicated from Central Asian yurt bands. A motif on a belt from Ecuador is on the right. Its star-like motif is woven using supplementary warp threads.

I chose a star motif for my first ever attempt at using 60/2 silk as warp on my backstrap loom. The motif did not have any symbolic significance to me. I simply needed to use something that was smooth-sided and symmetric. This was because I wanted to use a supplementary-weft technique in which the additional weft is not carried from selvedge to selvedge. I didn’t want the supplemental weft to thicken the cloth and so I used a technique in which the weft just travels back and forth from edge to edge of the motif itself. This only looks nice, in my opinion, when regular rather than irregular shapes are used. So, who knows why certain motifs ae chosen by weavers? It could be for what they symbolize or the choice could also just as easily be for purely practical reasons, as was the case in my silk piece.

There aren’t any stars on my current three-color Andean Pebble Weave piece. It’s all about flowers and hummingbirds. If you have been following me on Instagram (I go by my name: lavernewaddington there) you will have seen some of my progress. At some point I unconsciously stopped being concerned about my hand-spun wool being up to the challenge and have been simply enjoying how lovely it feels instead. But for now, I will stick with the Starry topic and wait to show you more of my three-color pebble in my next post here on this blog.

Let me finish by showing you some beautiful creations that were shared with me by another new Zoom weaving friend, Laurice Johnson. She has converted her pretty inkle-loom-woven bands into these gorgeous star ornaments by following online tutorials. There are several tutorials on Youtube for fabric stars that can be used for inkle bands. They are really stunning. My friend Jennifer Williams also has a tutorial on her blog for a different kind of star made from narrow bands.

I’ll be heading upstairs soon for another night of star gazing. See you next time.

Backstrap Weaving – Between Science and Magic

Between Science and Magic….I have copied the title of this week’s blog post from the title of an article by Maria Popova that my friend Susan sent me on a new publication about the amazing and magical hummingbird…a subject which has been dear to my heart as I weave my way through my series of panels called Within These Walls. The article is accompanied by beautiful pieces of artwork such as this one created by John Gould in 1861 and states that…

There is, indeed, something almost magical to the creaturely reality of the hummingbird — something not supernatural but supranatural, hovering above the ordinary limits of what biology and physics conspire to render possible.

The magically larger-than-life hummingbirds that I created for my first three panels played a fantasy role as messengers, friends, guardians and helpers as I wove my way through pandemic maze and, while poking around online, I found that it is not unusual to assign magical qualities to these little creatures.

I found an article which described the role of a single hummingbird in Andean textiles as being a messenger between the three levels of Andean existence…..the underworld, the heavens, and all that lies between. Hummingbirds are often depicted in pairs in highland textiles with their beaks connected and are said in this case to represent nurturing and new life.

Which makes me even happier when I think back to 1996 and the fact that the very first motif I was shown by my backstrap weaving teachers was a hummingbird….although I had not recognized it as such at the time. It also amazes me that I first came to see it as a individual figure flying straight towards me in its role as messenger and that only years later I was able to also recognize it as two mirror-image figures with beaks connected. I find it magical that this one figure can, at least to my eyes, be seen in both these ways.

In 1997, I returned to Peru where I learned to make sling braids with a gentleman in Yanque in the Colca Canyon. He later introduced me to a weaver friend of his in Cabanaconde. She taught this bird figure to me along with others in a supplementary-warp structure. This is the actual band that I wove with her. I wonder if this too is meant to be a hummingbird.

Here’s another excerpt from Maria Popova’s article…

Essential as pollinators and essential as muses to poets, hummingbirds animate every indigenous spiritual mythology of their native habitats and are sold as wearable trinkets on Etsy, to be worn as symbols — of joy, of levity, of magic — by modern secular humans across every imaginable habitat on our improbable planet.

In the first panel in my Within These Walls series the magical hummers are valiantly fighting their way through the chaos to bring me (caught in a window between worlds….do I try to get back to Australia or stay here in Bolivia?) messages of comfort and solidarity as well as practical items….yarn and sticks for my loom.

In the second, they help me build the walls of my safe space and create a new normal within, planting saplings as a way of bringing pieces of the natural world inside. They even warp my loom for me.

In the third, while I remain safe within the walls, they stand as guardians hard at work trying to maintain some kind of a connection between the four disjointed pieces.

Which brings me to the fourth and final panel in the series which the drawing at bottom right in the image represents.

This one is my vision of a post-pandemic world and one in which the hummingbirds’ work is done. I figured that they should shrink back to what could be called a “scientifically acceptable” size in this final panel.

I got out my sampling band to see if I could create a tiny, yet still recognizable, hummingbird figure. The tiniest that I could create was still the length of the little weaver figure’s face and that was okay because I read that the largest species of hummingbird, the Patagona gigas, grows to eight inches (in some reports 9.1″) in length and is native to western South America. Perfect!

In the fourth panel all the pieces are connected into one smooth shape. This shape, which I create using ikat techniques, is filled with a tree around which three tranquil backstrap weavers sit at their looms.

In my last post, I showed you the root system of the tree. It is unusual for me to weave a newly-created pattern without first having sampled it. I paid the price by having to un-weave and make several adjustments to those roots. I didn’t sample the foliage either but got luckier this time and only unwove to fix mistakes.

A big part of the challenge is fitting all the pattern into the ikat-created shape, not allowing any parts to overflow and disappear into the solid black areas. I wanted the shape of the foliage and the roots to still give the impression of the stair-stepped figures that I used in the other three panels without having them look like hard-edged confining walls.

I enjoyed designing a baby and placing it on the back of one of the backstrap weavers. The hummingbirds are yet to be seen in this image. They are flying high being normal hummingbirds doing hummingbird stuff.

I love how the sheen of the unwoven warp has been captured in this picture. I am again using doubled 140/2 silk for this one. Three threads broke this time…one mysteriously and the other two through my own carelessness. I am impressed by the way this fine silk stands up to this warp-faced structure on my backstrap loom.

Here’s the finished tree. You can see the hummingbirds in this one. I had been wondering just how high hummingbirds fly off the ground in their search for nourishment and read that they have been known to fly as high as the balcony of a 14th-floor apartment to sip at a feeder.

Pale-bellied Hermit Hummingbird. John Gould 1861.

This fourth panel is still on the loom as I have yet to weave the horizontal band of pattern across the top. Of course this leaves me wondering what comes next. First of all, I will get out the good camera and see what I can do to get better photos of these pieces. So far, I have been using my tiny iPod. My good camera has never much liked red so we’ll see how that goes.

My internet wanderings in search of information on hummingbirds have taken me to unexpected places. In one such place I found inspiration for a possible future project in three-color Andean Pebble Weave. If that materializes, I’ll tell you more. One of my online weaving contacts suggested I weave a wrist cuff with my hummingbird figures and the new backstrap weaver. That might happen too. Perhaps the hummingbird is becoming another signature pattern for me. It might be fun to combine my favorite leaf pattern (another I consider a signature pattern) and the hummingbird in one piece.

Thank you for following the progress of this project. I hope that you have enjoyed the developing story. I’ve been working on it for several months now and it is not something I would have considered taking on if I had still been traveling three times a year.

Until next time, I’ll leave you with this beautiful image by Australian-born photographer and filmmaker, Christian Spencer. You can see a whole ballet of his hummingbird photos if you chase him up online.

Backstrap Weaving – A New Book of Patterns and more!

I have three bits of exciting news to share with you in this post 🙂

I have been promising a new book of patterns for the last few weeks and am pleased to announce that it is now available at taprootvideo.com.

The second part of this exciting announcement is that this is the first time that I am releasing a new publication as a PDF as well as a printed book! Both are available at Taproot Video.

It’s called More Andean Pebble Weave Patterns. It contains the pebble patterns from my 2012 publication More Adventures with warp-faced Pick-up Patterns, plus six brand new ones. The Pebble weave patterns in the 2012 publication were drawn on charts that are made up of spots and lines. In my new book the same patterns have been drawn on the more classic block-style of charts that I use in all my other books.

The new book is aimed at two groups of weavers:

  1. All those who are fans of creating patterns using complementary-warp pick-up and/or Andean Pebble Weave and who don’t already own my 2012 publication, More Adventures with Warp-faced Pick-up Patterns. If you fit this group, you will have 132 new patterns to use in your bands and other projects.  
  2. All those who do own my 2012 publication, More Adventures with Warp-faced Pick-up Patterns, but who are not really in love with the spotted charting system that I introduced in that book. I have found that many people have overlooked those patterns in favor of those that are charted on the more classic block style of chart that I use in my other publications. I fear that they may never get to enjoy those patterns. So, in this new book, I present all 126 of those patterns again using the block-style charting system. Plus, there are 6 new patterns.

The new patterns….The new set of patterns that are included in this book came about because I became interested in the sweet dragon pattern, that you can see above, when ladies on Ravelry were talking about it in a tablet-weaving discussion. You can see an awesome hat created by Penelope Hemingway with nalbinding using Oslo stitch. She felted it down to size and edged it with a band she wove on her inkle loom using a chart I drew for her.  The motif is based on one from a tablet-woven band from a 10th century Viking find in Dublin. The pattern is often called “Little Dragons”. I have seen it online in pictures where it has been woven in several tablet-woven structures. I was able to easily adapt it so a version of it could be woven in Andean Pebble Weave, a complementary-warp structure.

Online searches showed me several sweet patterns woven with tablets that use the head of the little dragons and I adapted them for my latest book. Five of the six new patterns in the book use the little dragon heads. 

The other patterns include snake and star motifs that appear in various forms on textiles from the Bolivian lowlands, knot-work and historical patterns adapted from tablet-woven bands, motifs from belts of Russian origin, adaptations of motifs used in Komi knitwear, Kuba cloth of Central Africa, storage bags from Baluchistan and textiles of Central Asia as well as contemporary figures found in Andean textiles.

Snake pattern.

Star pattern with various filler designs.

Pattern adapted from a Central Asian textile.

Motif from a belt of Russian origin.

The printed book is spiral-bound and has 85 pages. You can read more about this latest publication, in both PDF and print form, as well as take a look at sample pages at taprootvideo.com.

The third piece of exciting news involves all my other English-language e-books that can be found in PDF form at Taproot Video.

They are all now available as printed books at Taproot Video! (Note: The complete version of the tubular band book is available in print form but not the abridged version).

You can see the full list of titles here. If you are unsure about which book best suits your level of experience, learning style and preferred loom, information on a page that I wrote here on my blog, may help you decide…or just drop me a line via a comment. I’ll be happy to advise.

A lot has been going on with my ikat experiments too. Experiment #5 is well underway in the finer 30/2 silk and I am really pleased with it. There’ll be more about that in my next post or, in the meantime, you just might catch a glimpse of it showing up on my Facebook or Instagram pages.

Happy weaving and a million thanks to all those who bought my new book following my announcement on Facebook a few days ago. THANK YOU!