I am seeing squares! I feel like I have spent the whole week charting. The yurt band design that I charted and wove into a cell phone pouch last week was pretty easy to pick out from a photograph. So I launched myself into a bigger yurt band design this week. A lot of the elements are similar so I figured it would be a piece of cake but, as it turns out – not so much.
Getting the main motif down was easy but filling in all the background floats was the hard part. Where exactly to place the five-span floats around the curves in the motif was the dilemma and the photo I was working with was no help at all. I really wish I could put the photo here but it is not mine to show. The original band has the main motif in orange on a slatey blue – it is gorgeous – but I have stuck with some old faithful colors for this first attempt.
The first few rows woven of a new yurt band design
The outer bands have a brown motif on beige and the main section beige on red. Anyway, I think I have finally got it down. I do have a drawing program for this kind of thing but I prefer the old fashioned way – sprawled on the floor with marker pens, corrector, pencil, eraser and scotch tape.
I have been trying to come up with a good name for this technique as a title for this post but all I have so far is warp floats galore – that doesn’t even come close to covering it – but try getting your mouth around this “offiicial” classification:
“simple alternating float weave with two color patterning with all the warp-floats on one face, colors exchanging function to create pattern” (Warp Patterned Weaves of the Andes – Rowe)
Thank goodness someone came up with the simple name “pebble” to describe my favorite pick-up weave as the description for that is even longer. I have been trying to find the origin of the name “pebble” but haven’t had luck with that. It is a name that seems to be applied quite loosely to a variety of weaves and I am wondering who first coined it and to which structure in particular they were referring. Imagine my surprise when a young weaver in the main plaza in Cusco used the term “pebble weave” to describe the band she was trying to sell.
The border design from Lisa's yurt band that I charted
But, back to my “warp floats galore”. I also charted the border design of Lisa’s yurt band so that I could do a tutorial based on that here this week and, fortunately, I can show you a photo of that, thanks to Lisa.
I wove it in a variety of yarns and color combinations to see which I liked best. The example on the yurt band uses three colors one of which is also used as a border.
So this is what I came up with…
Four versions of the yurt band border design. The one on the right is the most authentic as I used the same color to weave the O's and the borders.
So I decided to go with the one on the right as it most closely resembles the original and looks nicer in the finer yarn
Fabric for the cell phone pouch
and made another cell phone pouch. I have to tell you that I don’t even own a cell phone but I think these make great gifts. I usually take woven coin purses along on my travels as gifts for my indigenous weaving teachers. On a trip to Ecuador I was looking for a typical spindle whorl and asked a group of ladies who were embroidering skirts in the marketplace . No one showed much interest or enthusiasm for my request. I then offered one of my little coin purses to anyone who could get me a whorl. In the blink of an eye out came all the cell phones from deep inside the folds of their blouses! So I think that these little pouches may be appreciated and may make better gifts than the coin purses from now on.
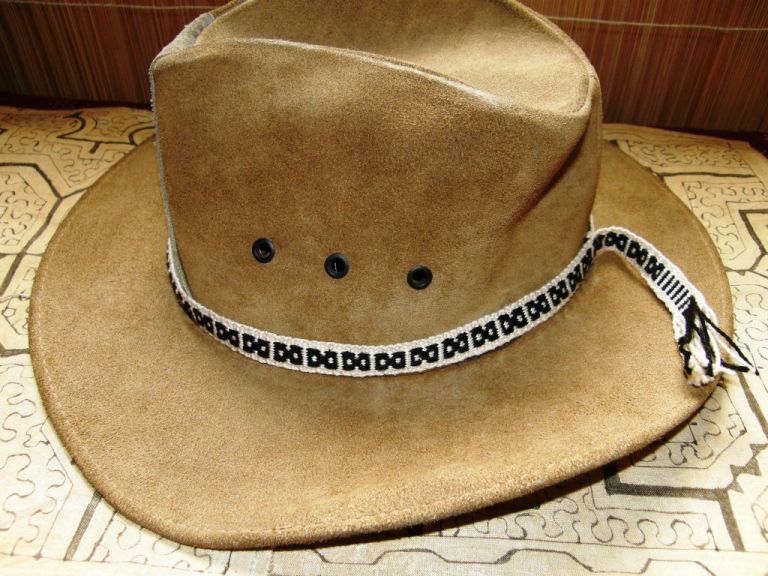
The cell phone pouch edged with a four-strand braidSimple X design warp floats on a hat band
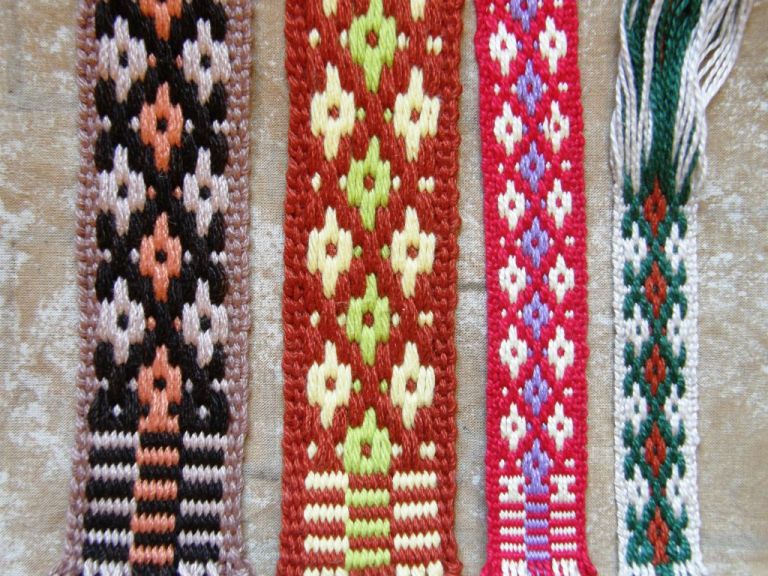
The border design from the yurt band comprises a series of what I call X’s and O’s. These are about the most basic designs you can weave in this simple float technique.
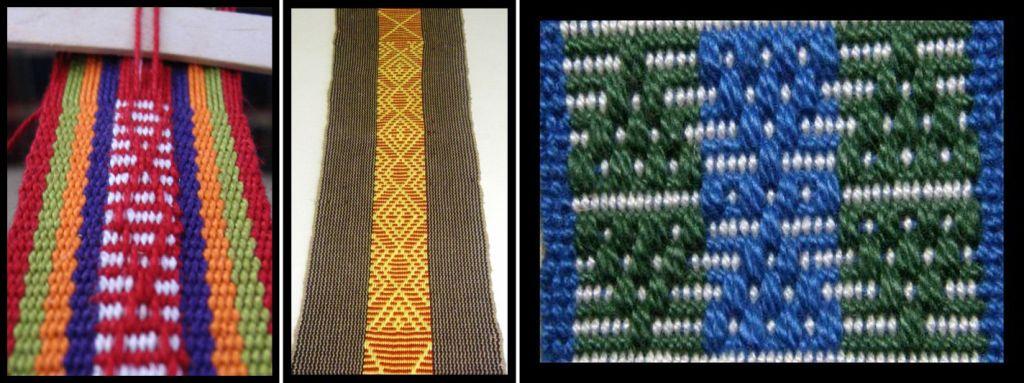
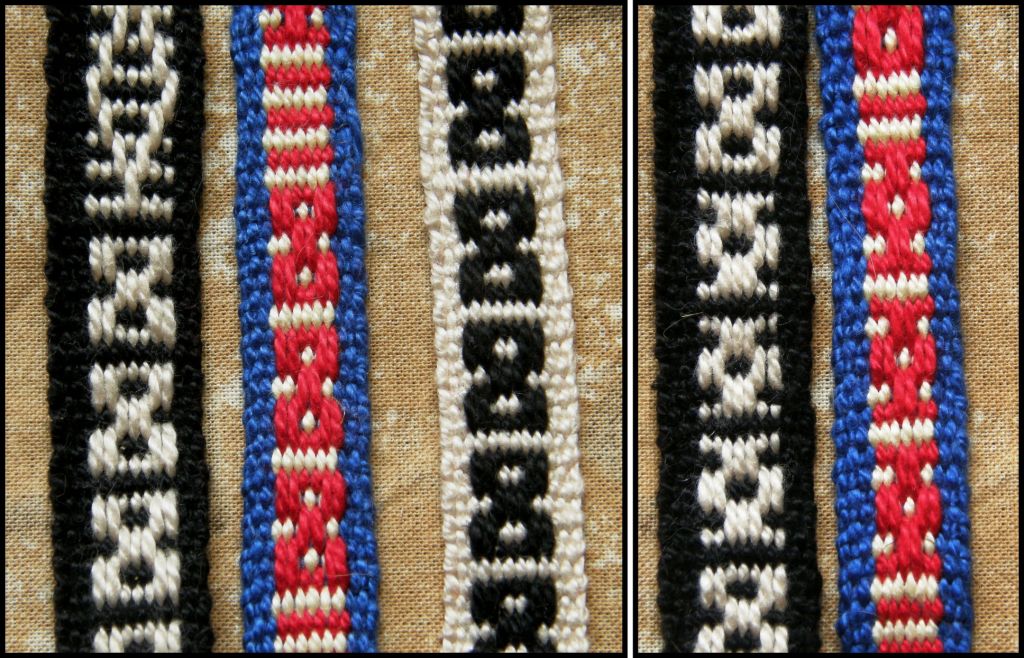
I used a series of X’s separated by a single stripe to make the hat band at left.
Starting off with black and white horizontal stripes, the black warps float over the surface to form the X motifs.
LEFT: X motifs... RIGHT: O motifsX's and O's woven in succession
In the above examples, the X’s and O’s are separated by a single stripe. If you put the X’s and O’s together on the one band and weave them in succession so that they overlap, they will look like what you see at left.
The example on the left has red X’s and yellow O’s. This is reversed in the example on the right.
Now it is just a matter of putting three columns of X’s and O’s together and, voila! you have the yurt band border.
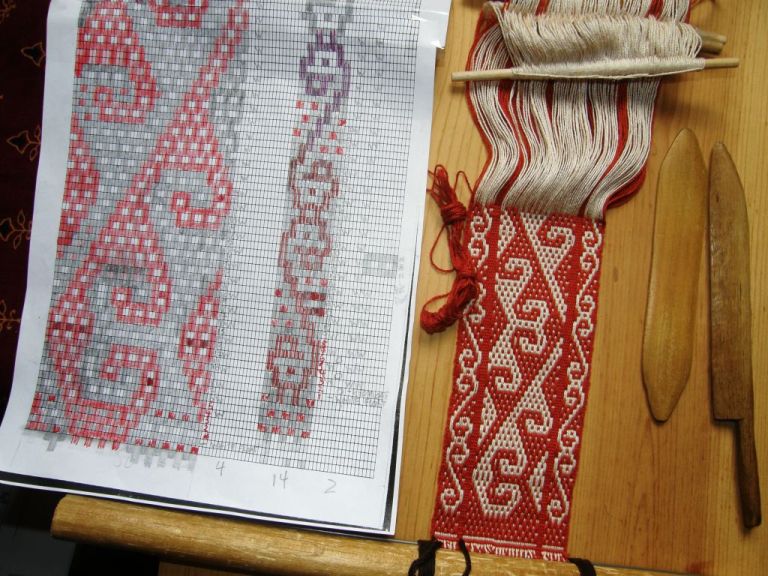
Here are the pattern charts for the X’s and O’s…
LEFT: X and O motifs; CENTER: X and O motifs overlapped in succesion; RIGHT: Three columns of X's and O's - the yurt band border.
I am going to give a step-by-step tutorial here now for the yurt band border.
For those of you who have never woven this simple warp float technique, there are step-by-step instructions here. The tutorial there guides you through warping, arranging the cross and weaving some simple patterns.
Once you have the hang of weaving this border design, especially the parts where the two motifs overlap, you will have the skills necessary to weave the yurt band design that I wove on the cell phone pouch last week – at left. But, I recommend starting small! Practice the small design in this tutorial and make something useful. Next week I will give the chart and instructions for weaving the border of the red cell pouch, pictured below.
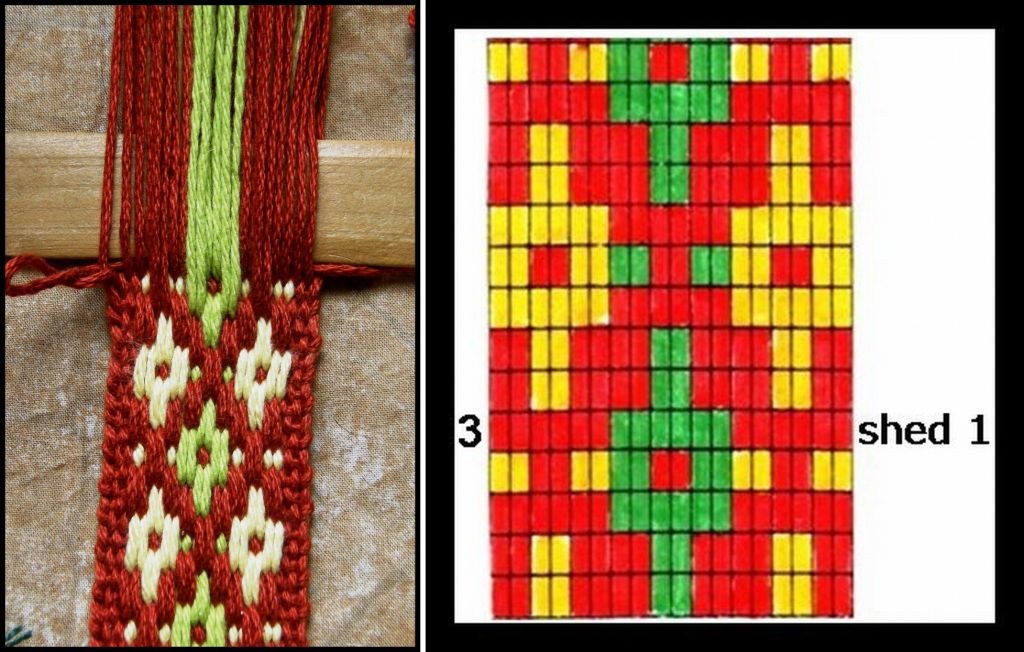
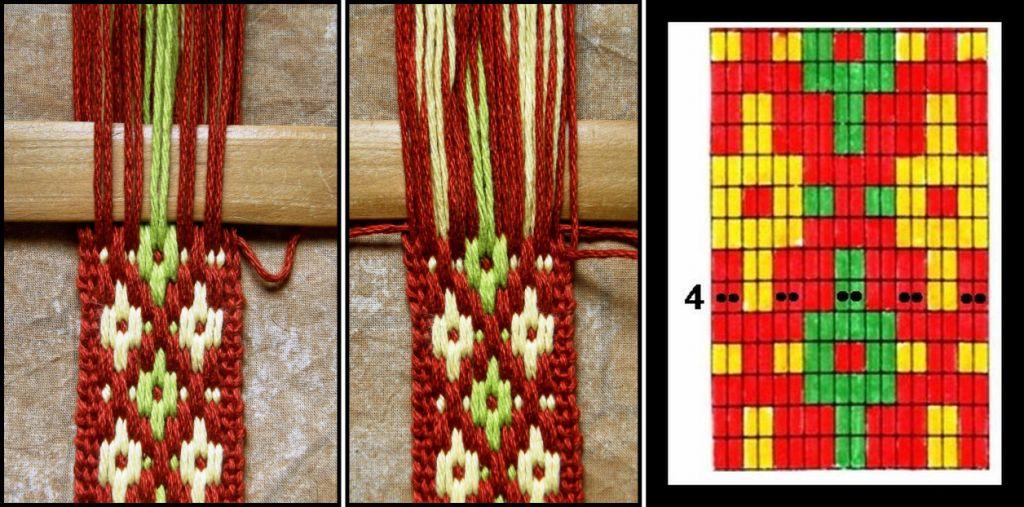
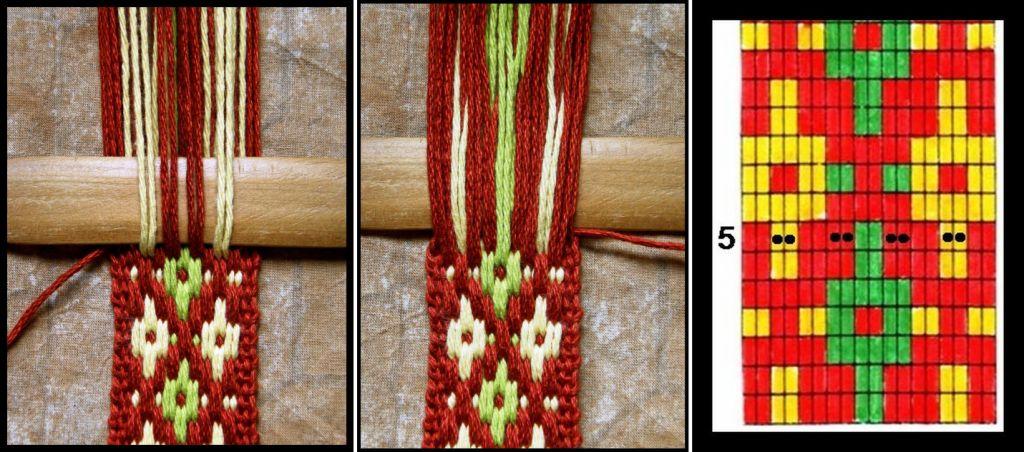
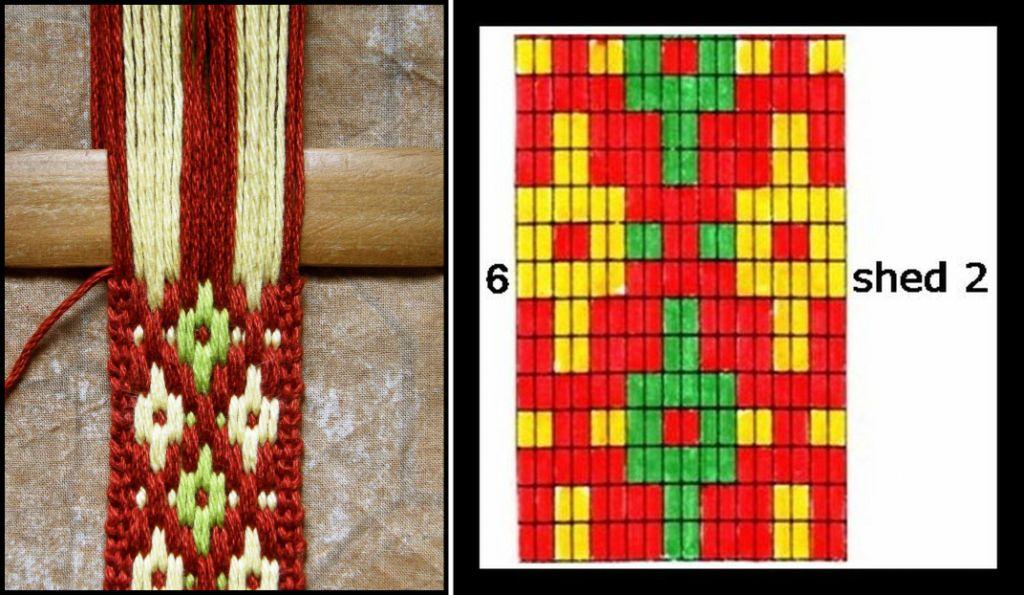
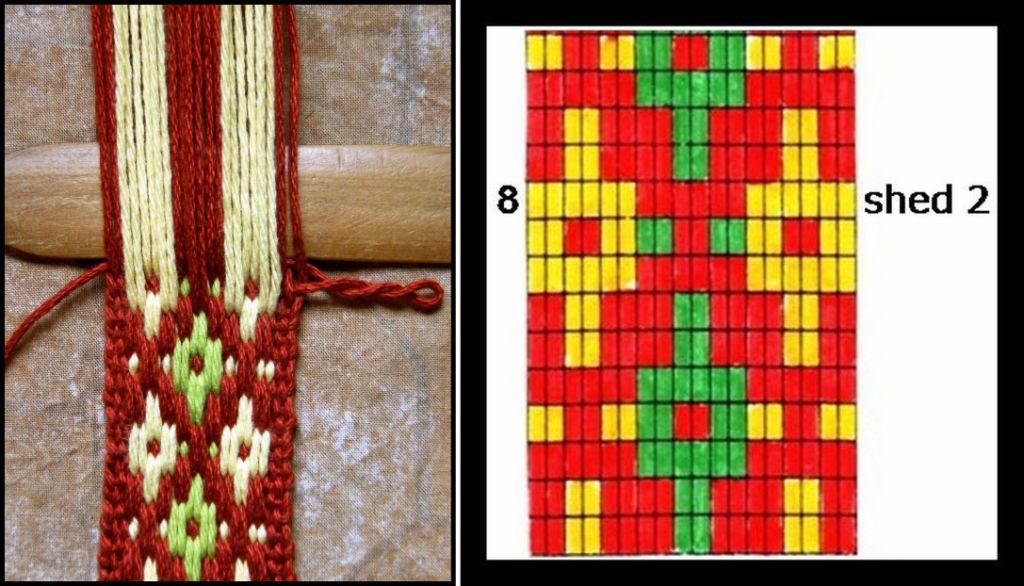
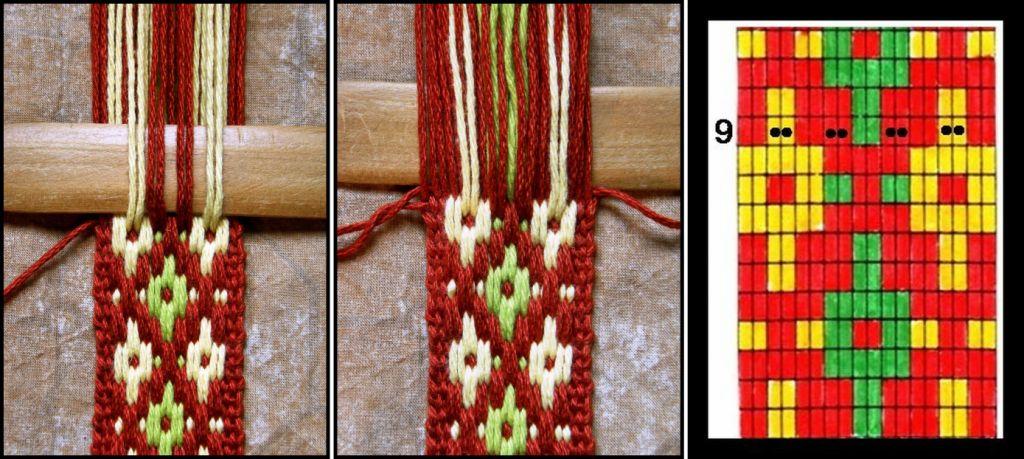
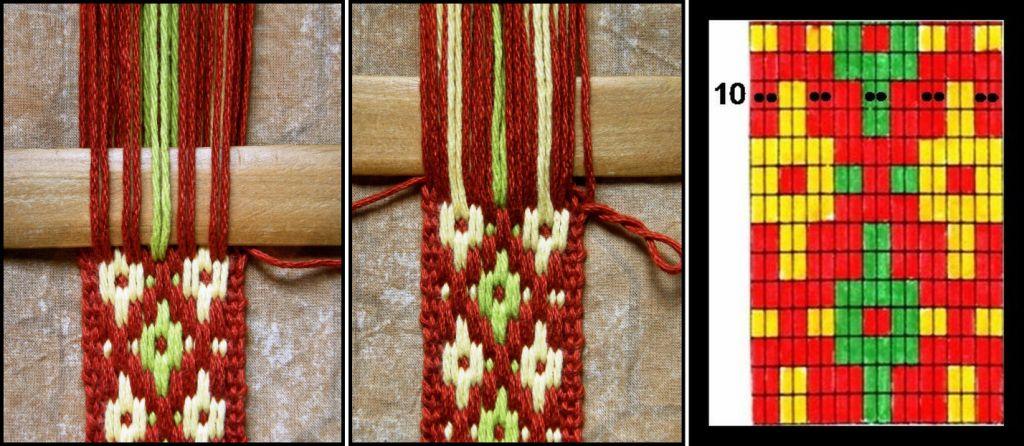
You need to wind a warp and rearrange the cross so that it looks like the picture at left. The warps in shed 1 will go in heddles and shed 2 will be controlled by a shed stick. I have 4 ends in each of my borders. I am working with 18 warps, or 9 pairs of warps in each shed. This tutorial gives instructions for weaving the first 10 weft passes. Start by simply passing the weft through sheds 1 and 2 and weaving a few rows of horizontal stripes. I recommend passing your weft from left to right in shed 1 to be in sync with these insructions.FIRST WEFT PASS: Start the design by passing your weft through shed 1. My weft is passing here from left to right through shed 1.SECOND WEFT PASS: Select the warps from shed 1 that will float. These are indicated on the chart as pairs numbered 2, 4, 6 and 8. Add these to all the warps in shed 2. Pass the weft from right to left. THIRD WEFT PASS: Pass the weft from left to right through shed 1. FOURTH WEFT PASS: Select the warps from shed 1 that will float and add them to all the warps in shed 2. Pass the weft through this shed from right to left. This is where the designs overlap so we need to float warps again for this weft pass and will be selecting them this time from shed 2. FIFTH WEFT PASS: Select the warps from SHED 2 that will float and add them to all the warps in shed 1. Pass the weft from left to right.SIXTH WEFT PASS: Pass the weft from right to left through shed 2.SEVENTH WEFT PASS: Select the warps from shed 2 that will float and add them all to the warps in shed 1. Pass the weft through this shed from left to right.EIGHTH WEFT PASS: Pass the weft from right to left through shed 2.NINTH WEFT PASS: Select the warps from shed 2 that will float and add them to all the warps in shed 1. Pass the weft through this shed from left to right.This is where, once again, the motifs overlap so we need to select warps to float again but this time from shed 1. TENTH WEFT PASS: Select the warps that will float from shed 1 and add them to all the warps in shed 2. Pass the weft from right to left through this shed.
And there it finishes. We are back to step 1 – the first weft pass.
The yurt band designs on my red cell phone pouch reqiure that you select warps to float for every single weft pass.
Some project ideas for using this technique and design: weave four or five columns of X's and O's together and make a bookmark; weave the design next to plain weave and make a cell phone pouch, coin purse or sewing kit purse. Even the smallest sample can be made into something useful. I sewed a zip into the little shadow weave sample I showed you last week and made a sewing kit purse.
A typical house in the rural settlements of coastal Ecuador and the home of my weaving teachers there
Removing the seeds from natural brown "mico" cotton
I thought I would finish this post by revisiting coastal Ecuador and the weavers there who taught me this simple warp float technique in the first place. I showed you all a little about their weaving here in another post so this time I will show a bit about their spinning. The weavers I stayed with are amongst the few in the area that still weave with their own homespun cotton.
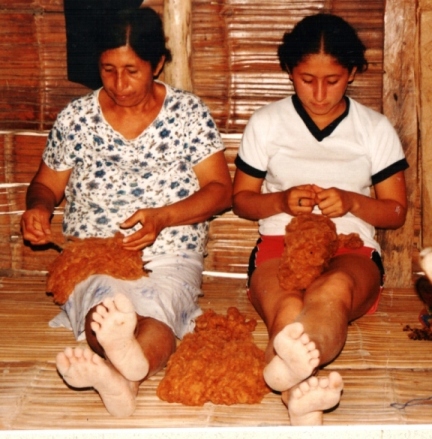
Although there are still a few wild cotton plants scattered about the settlement where these weavers live, they usually have to buy their cotton in the market. It needs to be deseeded, teased and beaten into a smooth even sheet before it can be spun.
While natural brown cotton is highy prized and expensive in Guatemala, it doesn’t seem to be considered anything special in Ecuador.
The cotton is draped on a wooden stand called the "rueca" for spinning. The "rueca" has a notch cut into its top which grabs the cotton and allows the spinner to draw out the fibers under tension. A small basket is woven from plantain fiber underneath on which the spindle sits when not in use. This is a miniature version of the "rueca' which I made with my teachers' help so that I could take an example back with me to Bolivia. The typical spindle can be seen at right with its wooden whorl. More often now you will see people using yo-yo halves and metal wheels as whorls.Here my teachers are spinning with their large ruecas-one hand twirling like mad while the other draws out the fibers. I am having a go. I found this a lot harder than spinning with a drop spindle. I taught Trini to spin with my drop spindle and she picked it up in seconds.The people in these settlements are basically farmers - up at 5am with the roosters and the donkeys to go out and work the fields so they can be indoors during the hottest part of the day. Then off to bed at 9pm. Here are some bead spindle whorls that they have unearthed while digging and turning the soil for planting. Mind blowing!!Some simple warp float designs from coastal Ecuador that I wove and have used as covers for my journal.And the spinning tradition lives on...the anthroplogist whom I accompanied on this trip has just gotten back from Ecuador and tells me that this little one is now up and spinning!
SIMPLE WARP FLOATS – a little less simple, a lot more stunning!
I have been playing around with simple warp float patterns this week looking for new designs in books and on weavings that I have bought in my travels. I found a nice one in a photo of a textile fragment from the north coast of Peru in Ann Pollard Rowe’sWarp Patterned Weaves of the Andes which I will show you later. I also pulled out a belt full of warp float patterned motifs which had been sadly neglected at the bottom of my box of Guatemalan textiles. I guess it had been ignored and forgotten as it is a simple black and white piece looking very humble and plain next to the wildly colored weft patterned pieces that are so typical of Guatemala.
What is strange is that I bought this belt in the same town where the women wear a particuarly wide and richly decorated hair sash – it is quite a contrast to see the two pieces together. I wonder if they are both woven by the same weavers.
Belt and hair sash of Aguacatan
As you can see, the belt does not have a continuous design, rather, a series of small motifs. No two motifs are exactly the same. As I pull the belt through my hands to examine the motifs, I can almost imagine the fun this weaver had deciding what motif to display next on her 9-foot 3-inch canvas! There are mistakes. There are motifs that obviously didn’t go quite the way she had planned but I get a feeling of playfulness from this belt that I just don’t get from the heavily ladened hair sash.
I have been thinking about what elements can make this simple warp float patterning more interesting and fun for weavers. I have written a tutorial for this technique herebut it is a technique that never seems to get fully explored – just a “stepping stone” on the way to the more advanced techniques.
Here are a few ways, for starters, to make a piece patterned with this technique a little more stunning.
Three pieces woven using a simple warp float technique.
On the left and in the center are two pieces made by members of the Backstrap Weaving Group at Weavolution. Historicstitcher used bands of bright and lively colors alongside her warp float pattern. She used single rather than paired floats to give a more delicate look. In the center, Jeannine designed her own sunny warp float pattern and wove it beside a more somber border of vertical stripes. I think it looks amazing! And on the right is part of a bookmark that I made using three colors across the width of the design rather than two as is more usual.
As the name implies, this is a simple technique. If you imagine looking at a warp in profile, you will see in the following diagram exactly what is going on in this technique as it is woven.
A profile view of a warp where green warps are “floated” over a base of red and green stripes to form the patterns.
Let’s take another look at the black and white Aguacatan belt and see the different motifs the weaver has created – from very simple to not-so-simple.
As you can see, it all starts on the left with a base of black and white stripes. Then the weaver can decide which color she wants to float over the surface to make her designs. Her first design has been made with black floats, the next design to the right has been made with white floats. Moving along, she has made a quick succession of black and white float designs.
On the left, the weaver is again swapping from black floated designs to white, and back again. The one on the far left has an almost three dimensional effect. On the right she has started to combine black and white floats within the one motif. This means that in one weft pass she will be floating black warps. In the very next weft pass she will float white ones. When I went to weave this it took me a while to get my head around it!
She is getting increasingly adventurous now with her combination of black and white floats all within the one motif. Those designs on the left really play tricks with my eyes!
But, of course, things don’t always go to plan. On the far left it looks like she was trying to combine single warp floats with pairs but ran ino a few problems. Next to that, she didn’t manage to get the white design centered. While I don’t find mistakes in my own work terribly amusing, I do like to look at these little mishaps in other weavers’ pieces and imagine what was going on to cause the lapse in concentration. Perhaps her husband was telling a funny story, a neighbor dropped by for a chat or one of her kids was swinging off her loom. In any case, my examination of this band makes me really want to meet this weaver!
On the right is a different band where the horizontal stripes in one part are not evident at all as the entire surface has been covered with black warp floats.
All of this finally led me to my project of the week…
Simple warp floats used to reproduce a yurt band design.
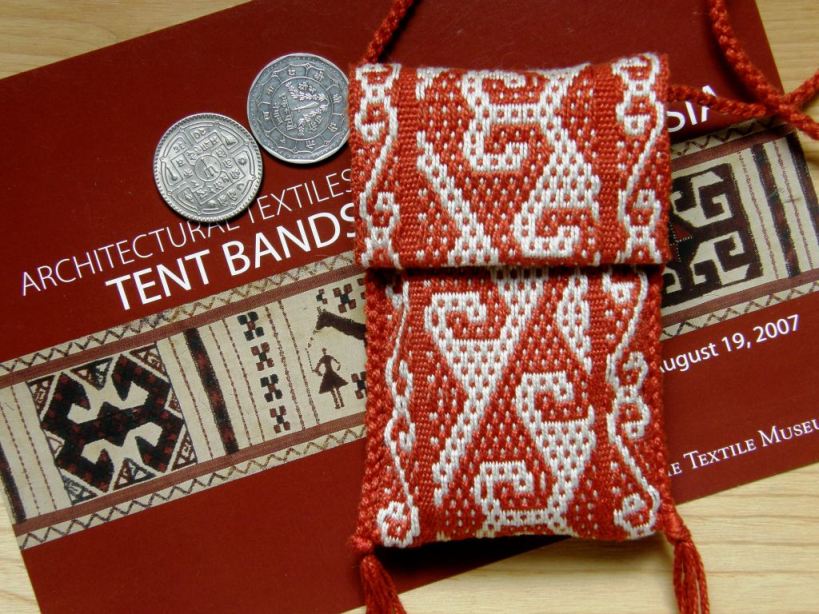
This piece has been woven with the simple warp float technique using floats in both colors in one continuous motif. The horizontal stripes cannot be seen as the entire surface of the weaving has been covered with warp floats – the same simple three-span floats shown on the Aguacatan belt. Where the outline of the design changed direction, I had to use five-span floats.
A cell phone pouch for Lisa
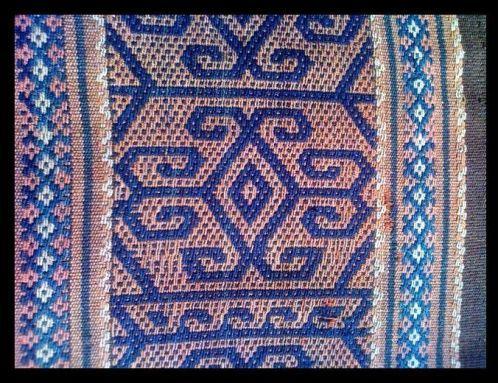
I charted the design from a photo of a yurt band that was sent to me by Lisa Matthews of North Carolina. Ever since Lisa and I met on Ravelry back in June last year, she has been sharing not only photos of Central Asian weavings with me, but also her love and enthusiasm for all the textile and fiber crafts of that region so I thought it would be a great idea to make this piece into a cell phone pouch for her.
On the turned edge of the flap you can just make out the horizontal stripes where I started this piece. From there on the stripes got covered by floats.
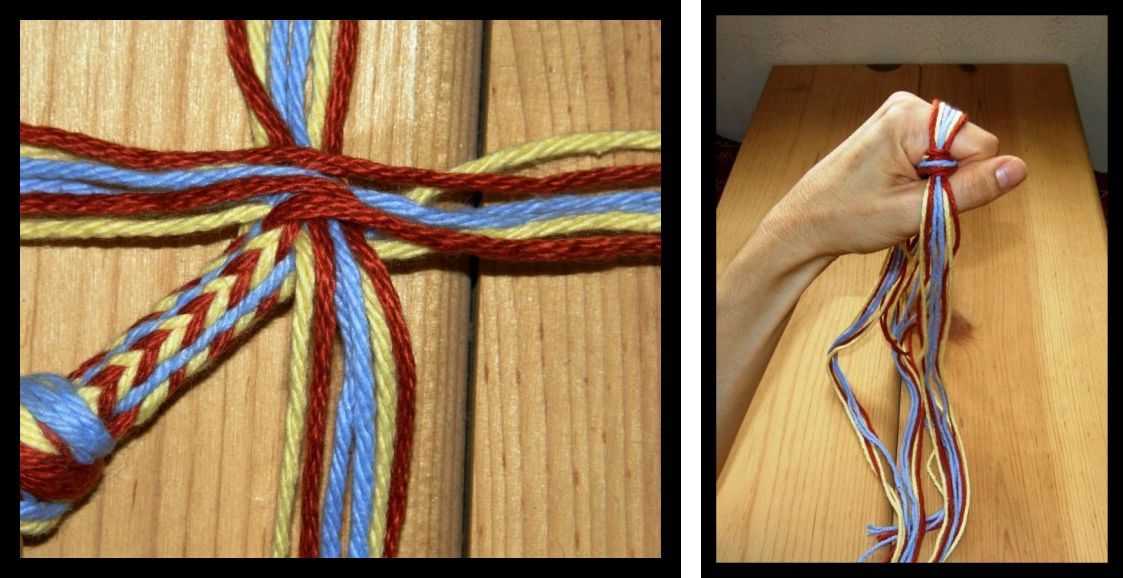
I edged the pouch and made a strap using a four-strand braid. Although I learned this braid a long time ago, my weaving teachers in Potosi taught me a new and really fun and quirky way to do it by looping the braid strands on my fingers. I have made a tutorial for this with step-by-step photos and a video which you can see here.
Lisa writes a fascinating blog about her explorations into the crafts of Central Asia and has kindly allowed me to use photos of her yurt band here. In her own words here she describes her passion:
“I’m extremely interested in the cultures of Central Asia both past and present. Within the context of the historical reenactment group I participate in I am attempting to learn how to portray the daily life of a 10th to 11th century Steppe Nomad. To do this I have been learning how to make yogurt, cook flat bread, camp in a yurt, felt, spin, and weave so far. I’m very interested in both felting and weaving and feel that weaving on the Nomadic ground loom brings the ability to weave fantastically patterned pieces to even the novice weaver with a very, very small outlay of cash to set up the loom and get weaving. The versatility of the ground loom is that you can weave anywhere you go and anything from fabric for clothing to tent bands to cut pile rugs and kilims on the same loom. Yurt bands are something that especially interest me and I am in the process of learning how to weave them. My husband and I were lucky enough to purchase a 48 ft long band thought to have been woven by the Krygyz and its handmade beauty has really inspired me.”
I love the simple border motifand I am thinking thatI may be able to do a tutorial on that here next week so you can all learn to do the two-color floats.
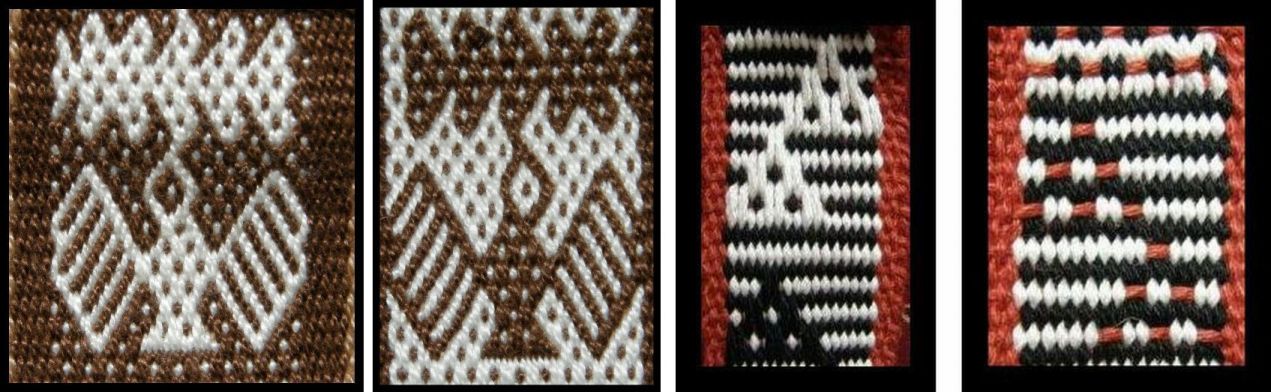
At first glance, you may think that this weave is Andean pebble weave, but a look at the back of the weaving will show you that it is not. Andean pebble weave is double faced, that is, the same warp float motif appears on the back of the weaving with its colors reversed. On a simple warp float piece, however, the warps that float on the upper surface create a gap on the lower surface through which the weft is revealed.
LEFT: The front and back of an Andean pebble weave motif. RIGHT: The back of a simple warp float motif reveals the red weft.
I was really fortunate to run into Lisa online but this wasn’t my first encounter with these Central Asian tent bands. I was lucky to happen to be in Washington DC when there was an exhibition of these pieces at the Textile Museum in 2007. This certainly made up for my initial disappointment at not finding any Andean weavings in their permanent displays. On top of that, I had a wonderful time sitting on the floor with a pile of books in their bookstore and spent hours in their library. Meeting Ann Rowe there was the icing on the cake!
The finished pouch on the Textile Museum’s post card. I still haven’t found a suitable closure for the pouch – open to suggestions!
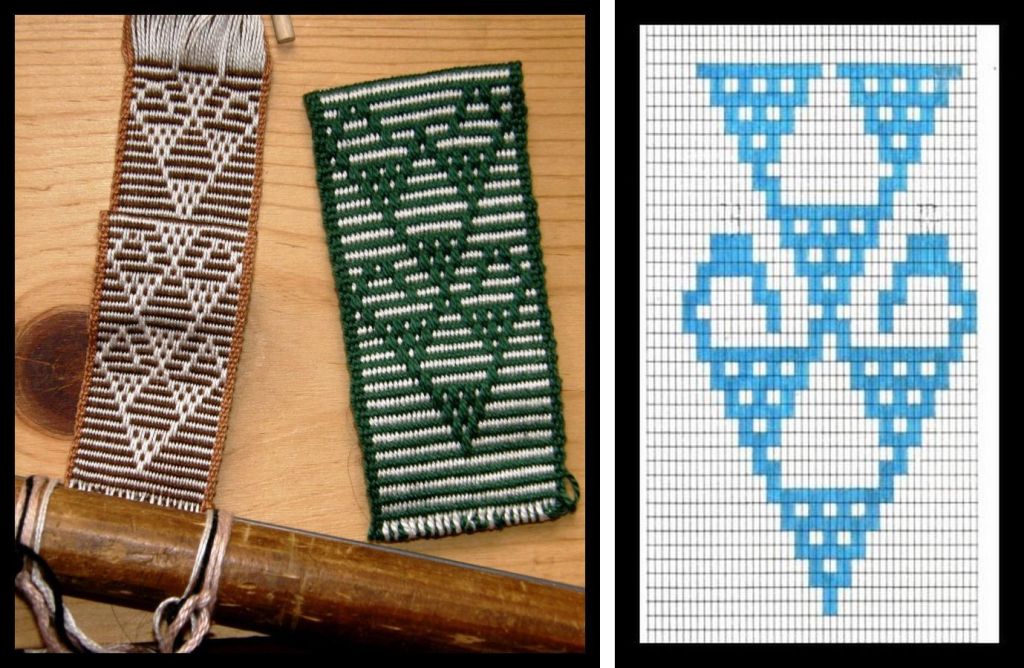
Here is the new pattern that I charted from the old Peruvian textile fragment. There are several woven versions here as the picture in the book was not very clear. I finally decided on the motif on the upper left hand side. A larger version of the chart is here.
Warp floats of brown and white cover the surface of the weave.
Above, the motif is woven on a background of horizontal stripes. If you were to cover the surface completely with floats, it would look like the photo at left.
According to Ann Rowe in Warp Patterned Weaves of the Andes, no archaeological examples of this two-color float weave have been found in the Andes although twentieth century ponchos have been made with this technique in Northern Argentina. There is a photo of one such poncho with bold geometric motifs in Ann Rowe’s book
A few bits and pieces to finish off…I received some comments from people last week about how difficult it is to find a suitable place to tie up their backstrap looms at home. I know what this is like! I am fine here at home, but when I go to visit my mother in Sydney (my backstrap loom goes everywhere with me!) there is nowhere to tie up my loom so I braid in the evenings when we are sitting about and chatting. My brother and sister-in-law have been kind enough to put some hooks into the side of a large dresser in their guest room in their home so that I can slip a dowel in and weave away.
Here are a few photos of some tie-up options…
LEFT: Tied to a STRONG doorknob. Not the best option for narrow warps as the warp will slip on the rods and cause the loom to tip from side to side. RIGHT: Hooks in a piece of heavy furniture.LEFT: The loom bar can be lashed to a heavy piece of furnture, a stair or porch rail, or the ladder on a bunk bed. RIGHT: The loom bar can be wedged behind a pair of clamps.
If you are at all into DIY, you should check out Sharon’s (aka Rose Goldilocks) blog where she has invented a nifty seat, footbrace and tie-up place all in one.
Sharon emailed me last weekend to tell me about a new Interweave publication – a magazine called Knitting Traditions 2010. Apparently it has instructions for Peruvian needle knitting, or cross knit looping, for making finger puppets. I would love to learn how to make three dimensional things with this technique. Well, that is definitely going on my shopping list for my up and coming trip to the US.
There are some gorgeous knitted finger puppets for sale in the craft markets here but they are made in regular two- needle knitting as far as I can tell. All kinds of animals are made and they are pretty hard to resist.
LLama and sheep finger puppetsFront and back of my “knit” pre-Columbian fragment
And while we are on the topic of knitting, I found some information about one of my pre-Columbian fragments, once again, in Ann Rowe’s book. Apparently these pieces, which are constructed with what look like knit stitches and which are very thick, were used as straps and belts by the Incas and were made using a 4-strand warp twining technique. No evidence has been found yet to explain how exactly this was achieved…but it’s nice to know at least this little bit about one more of the fragments on my little Chancay dolls.
At right I’d like to show you the pencil pouch that siseltikva, from the Weavolution group, wove on her backstrap loom and edged with cross knit looping. It’s a really nice project idea for a narrow band and , as always, I am thrilled to see my tutorials being put to use.
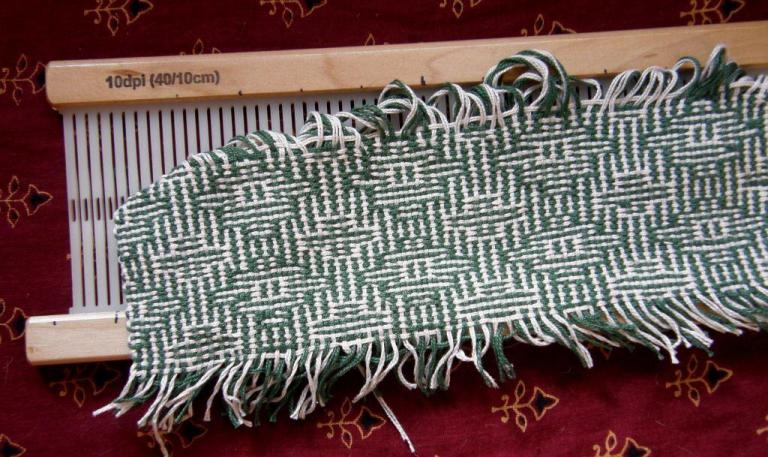
My shadow weave sample using a 10dpi rigid heddle on my backstrap loom
Let me leave you with this picture of my latest experiment with balanced weaves on my backstrap loom. I wove this tiny shadow weave sample using four sets of string heddles and a rigid heddle as a spacer. I can’t say that I am crazy about it! There are a few examples of careless heddle lifting there. I have been told that this looks great done in four colors – two contrasting colors for the warp and two tones of those colors for the weft. I really enjoy doing these balanced weaves – they are a nice change of rhythm and beat so I will choose my colors carefully and see if I can make something I like better from this weave.
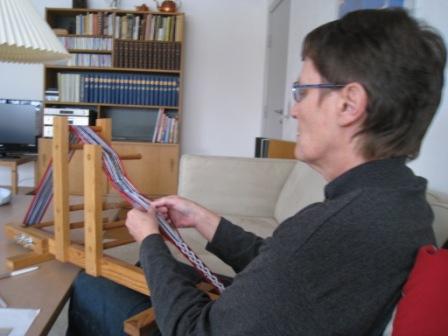
I set up my loom yesterday to weave a narrow band – just 28 ends. Once I had made my simple heddles, tied them in a bunch and added the shed loop I realized that my entire loom consisted of just two simple sticks – the two loom bars and that’s all – one attached to a bed and the other to me. My weft was tied in a butterfly – no sticks there. The only other stick involved was a wooden beater to prop open my sheds and beat in the weft. How much simpler can it get?
I filmed the entire process from warping stakes to ready-to-weave if you would like to take a look. (Donna, I made this especially for you!)
So, again I ask you, how much simpler can it get?
Actually it can get simpler! I was in Tarabuco recently and watched a weaver sitting on the ground deftly wind a warp around her hand and foot. She tied one end of the warp around her foot, passed a length of yarn through the end loops at the other end and secured it to her waist. Then she made simple heddles around her hand, added a shed loop and started to weave. Briiliant! All in a matter of minutes.
A weaver in Tarabuco using a “toe” loom
You are probably thinking: okay, a simple loom for a simple weave– but even very complex weaves can be done on a very basic set-up.
A weaver from Tarabuco creating a complex design on a simple loom
You may recognize Felicia above with her sleepy cat from the video in this previous post. She has a shed rod, a heddle stick and some bars between which to stretch her warp. She has just inserted a couple of thin sticks to help with the pick-up but look at the photo at left and see the complex designs that she creates on this simple set up.
Now what about those looms that you see in pictures on the internet and in those Youtube videos? Some of them are loaded up with sticks – all those mysterious sticks – what in the world do they do? Hopefully I can solve the mystery behind at least some of them here. I have to admit that there are Asian looms that I have seen online with a multitude of patterning sticks and that I still haven’t figured out how some of those sticks work.
An extra stick added in a second cross in Guatemala
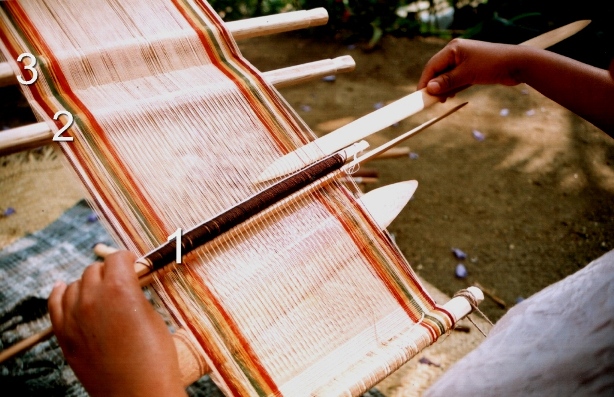
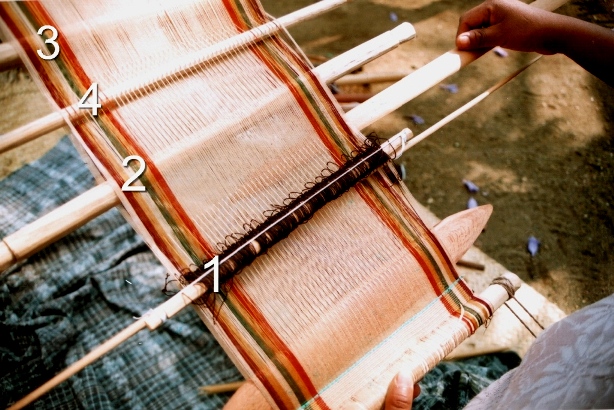
But at least I can let you know a bit about the sticks I have seen here in my travels in Central and South America and what they do. In the picture at right, number 1 is the heddle stick and number 2 is the shed rod. We are familiar with these. But what about number 3? This is an extra stick to hold a second cross. A lot of weavers wind a second cross as they warp. I don’t. I find that the fewer twists and turns I make on the warping board, the easier it is to wind a warp with good even tension. I only use a second cross on narrow warps to stabilize my shed rod which tends to slip from side to side and be a thorough nuisance. Making a second cross and putting a stick within will lock the shed rod into position. It is very easy to create a second cross once your warp is already on the loom. Here are the steps…
LEFT: Your loom is set up with heddles and a shed rod. RIGHT: Open the shed rod shed, place your beater within and draw it down to the weaving line. Remove the shed rod. It is important that the beater not fall out at this stage as it is saving your shed rod shed. Use a back up safety string if necesary.LEFT:Open the heddle shed and place an additonal stick within. RIGHT: Tilt the beater to open the shed up beyond the heddles and place your original shed rod within. Tie or tape the shed rod and additional stick together.You have created your second cross.Another Guatemalan loom with a second cross installed. The shed rod is pvc pipe which is often used as it can be thick without being heavy. Notice the orange safety string – if disaster strikes (and it most probably will with those 3 little guys hanging about!) and all this weaver’s sticks fall out, the safety string will save her cross. Even the experts use them! Look at the little future weaver there on the left. She is wearing the typical long “corte” skirt and even has her own woven belt.
Some looms have a mind boggling amount of sticks but the reason can be very simple!!
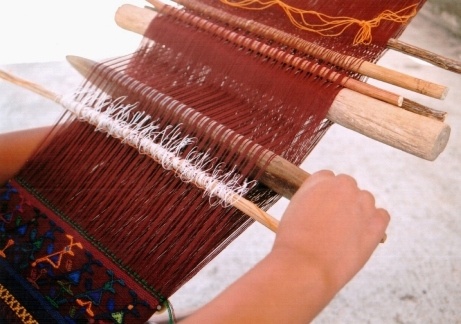
LEFT: The 11 sticks on this upright loom in Ecuador will become heddle sticks. The 22-row design, which is horizontally symmetrical, will be programmed into these 11 heddles. RIGHT: This is one of my own warps set up on my Navajo loom in Chile. As I am using 4 colors in my pebble weave I have extra sticks to separate and keep the colors in order for the pick up.Miguel Andrango’s granddaughter poses with one of the looms. You can see the two shed rods above the heddle stick. The space for the extra shed rod is programmed into the warp by using an extra stake during the warping process.
In Ecuador I saw the use of an extra stick which I have not noticed anywhere else. This is especially useful for wide warps or particularly fine yarns but I saw it being used on warps of all widths and yarn sizes in Ecuador. It is an extra shed rod. I know from my own experience that the shed-rod shed on a wide piece with fine yarns is really difficult to open. It was a very slow and tedious process on my Abba Yohanni piece, for example. The extra shed rod in Ecuador holds every second warp that passes over the main shed rod. This means that half the number of warps can be raised using the extra stick. Then it is very easy to use the main shed rod to raise the rest of the warps.
This is one of Miguel Andrango’s looms. He is a very well known weaver from Agato, a small town near Otavalo. You can watch a video of his work here. Fifty-seven seconds into the video you will get a very nice close up of the two shed rods. You will also see the typical white woven alpargatas he is wearing. I spent some time with an alpargata weaver and hope to blog about that some time. Miguel Andrango is not a large man and, although the piece above is not particularly wide, he weaves some of the widest backstrap woven pieces I have ever seen!
A weaver near Otavalo is preparing to make her string heddles. She is using the extra shed rod on her loom. This rod has a dual purpose as it also serves to stabilize the main shed rod.
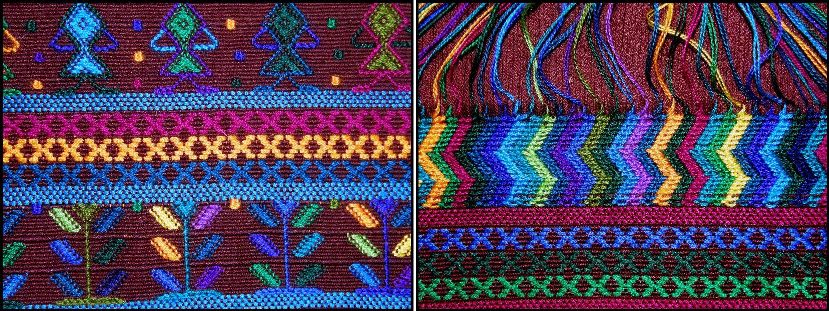
Now we come to the patterning sticks that are used by weavers in Guatemala to create designs using supplementary wefts. The supplementary wefts are either laid in to form block patterns or wrapped around warps to form little figures.
It is not my intention here to teach you how to insert and use these sticks. So, don’t worry if you don’t quite get it. No doubt, I will be doing a tutorial on this in a future post. I just want to take a little bit of the mystery out of it so that when you are looking at weavers and looms in books and on the net you may have a better understanding of what all those sticks do. For now, read on and just enjoy the beautiful textiles!!
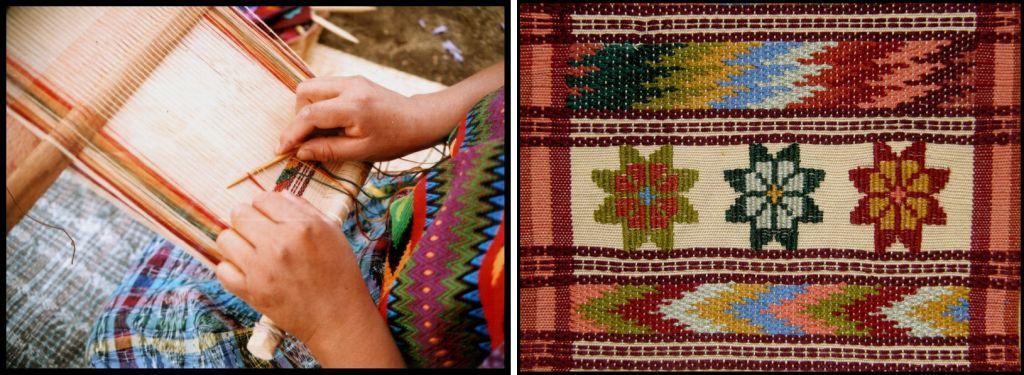
Typical designs of Santa Catarina Palopo.LEFT:Supplementary wefts have been laid in to make designs like the X’s in the center or wrapped around warps to form figures, like the stem of the plant below and the arms of the woman above. RIGHT: The upper design has been woven using the technique employed in making the typical huipil of this town.LEFT: Bands woven using patternig sticks and offered to toursits. RIGHT: The typical huipil of Santa Catarina Palopo. These colors are a relatively recent introduction. Old huipiles in crimson and white can be seen in paintings by Carmen Pettersen. My teacher told me that only the very oldest women in the town may still have the old huipiles.Carmelita is teaching me on this loom in Santa Catarina Barahona. Number 1 is her heddle stick, number 2 her shed rod, number 3 the stick in the 2nd cross and number 4 is her newly introduced patterning stick.
These patterns are created by adding two extra sticks to the loom – the patterning sticks. In Santa Catarina Barahona, the weavers open the shed-rod shed and pick up every fifth warp. They store these warps on a stick – the patterning stick that sits up behind the shed rod.
The heddle shed is then opened and, once again every fifth warp is picked up but in such a way that each picked up warp sits between two that were picked up on the first patterning stick. The warps are stored on another patterning stick which sits behind the shed rod but, this time, under the warp.
Here is how the loom looks with both patterning sticks installed.
Number 1, heddle stick. Number 2, shed rod. Number 3, stick in 2nd cross. Number 4, 1st patterning stick and number 5 the 2nd patterning stick. The patterning sticks are simply drawn down towards the heddles to create sheds for laying in the supplementary wefts.This diagram shows a loom in profile with the positions of the patterning sticksLEFT: Lydia is laying in a supplementary weft in one of the patterning sheds. RIGHT: The patterns at top and bottom were made with the aid of the two patterning sticks.
Sometimes a second pair of patterning sticks is inserted when the weaver wants to change the design. These are only temporary and will have to be removed when she wants to return to the original design.
Take a look at the photo below…can you name all the sticks?!
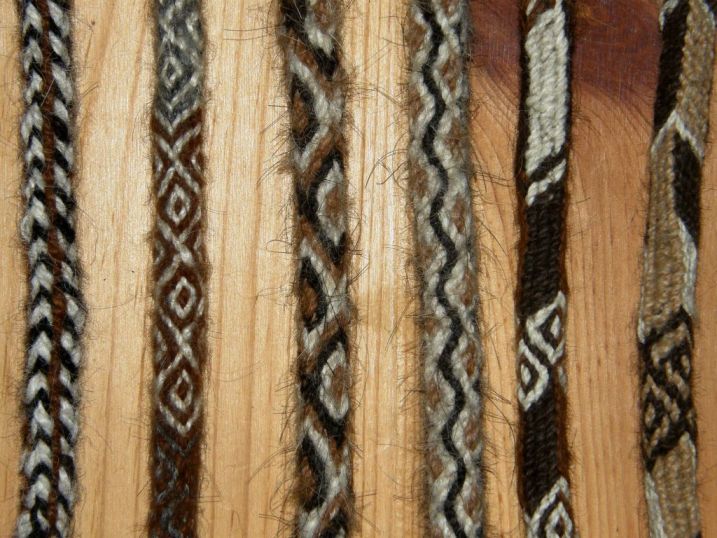
A sling braid made from llama fiber from the Colca Canyon area of Peru. It comprises a braid with a finger loop in one end and a cradle in which the stone to be hurled sits.
Now to return to the simplicity with which I started this post…………some braiding and edging techniques with few or no tools required.
After having done the tutorial on cross knit looping last week, I remembered another interesting edging that I learned with my sling braiding teacher in Yanque, Peru. We used it to edge the cradle section of an Andean sling braid.
I made one sling with him and he taught me to make three different braids. Men in Peru braid their slings holding all the braid strands in their hands – no other equipment is required – and can quite happily stroll along the road while braiding. Two of the braids I learned had twenty-four strands and the other twelve. I was told that the main use of the slings these days is to hurl stones in order to keep control of animals straying from the herd.
LEFT: The single cross two-color edging that I was taught on my sling. RIGHT: A double cross two-color edging on an Andean sling that I bought.A few of the braids used for Andean slings. Named from left to right…PALMA, MARGARITA (2nd and 3rd),SALSA and CAJAMARCA (5th and 6th)
When making an Andean sling, first, one half the braid is made. The strands of llama fiber are measured from the tip of the nose to the toes and then doubled. The first section usually includes the finger loop. More strands are added to weave the cradle in tapestry technique and then work the braid for the other half.
The cradle is woven on a backstrap set-up tying the braid to the waist while the strands which serve as warp are tied to a fixed point. Then the second half is worked in two braids – first a thick one and then a thin one to finish.
Decorative tassels and edgings are the last things to be put in place. Some of the tassels can be quite flamboyant. My teacher didn’t care at all for the more extravagant decorations!
I love these slings as there are several skills involved. Without even realizing it, this was my very first taste of backstrap weaving and with this one teacher I learned so much. He taught me the Palma and Margarita braid styles and a thin version of the Palma which didn’t seem to have a name, a little tapestry weaving by backstrap as well as tassel making and decorative edging.
LEFT; The very start of the Palma braid with the 4 sets of 6 strands used to make it. RIGHT: My hand in the braiding position. Two opposing sets of strands are interchanged. The braid is then rotated 90 degrees so the other two sets can be worked.
Zacarias was a marvelous teacher with a lot of patience. He would get me started on my work and leave me while he harvested the barley crop – plans were afoot to make some alcohol – moved the animals from one field to another and generally took care of things on his property.
LEFT: My sling braiding teacher, Zacarias on his property near Yanque, Peru. RIGHT: A woman by the shores of Lake Titicaca shows me how to hurl a stone with a sling braid.
I know that backstrap weaving isn’t for everyone and I am so glad that people are still able to make use of the instructions here and at Weavolution and use the techniques and designs on other looms. Ellen Turner, in Denmark, has woven a double weave band on her inkle loom using my tutorial at Weavolution.
She made a celtic design inspired by something she saw on the internet.
I also ran into Jessica’s blog where she has been experimenting with double weave on an inkle loom too. Check it out.
Kristina in Germany wove a double weave band on her inkle loom using her own handspun llama fiber. She commented that it put a lot of stress on her inkle loom so that is one important thing to take into consideration.
So if you have been enjoying the designs and have found the tutorials interesting and tempting but are still hesitating about getting strapped in, remember that you can adapt these techniques to other looms. I have set up warps on my rigid heddle loom and woven bands with string heddles rather than with the rigid heddle.
I have to tell you, though, that for me the backstrap loom wins hands down for the ease with which I can adjust tension with the slightest of body movements.
And, finally, I mentioned above the paintings of Carmen Pettersen. Check if your library has a copy of “Maya of Guatemala-Life and Dress”. Her paintings of Guatemalan people in traditional dress are stunning.
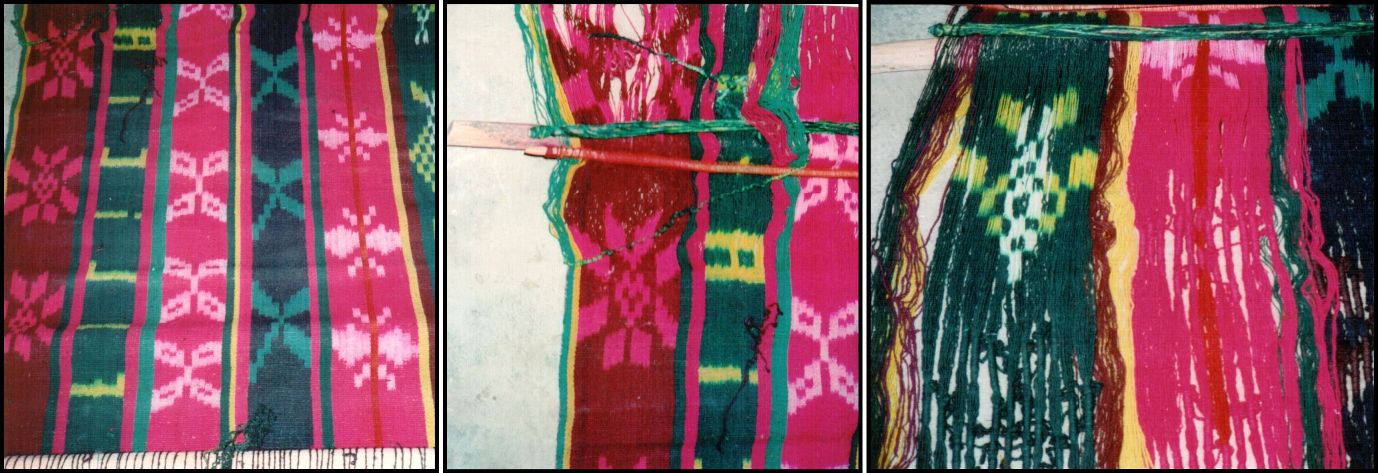
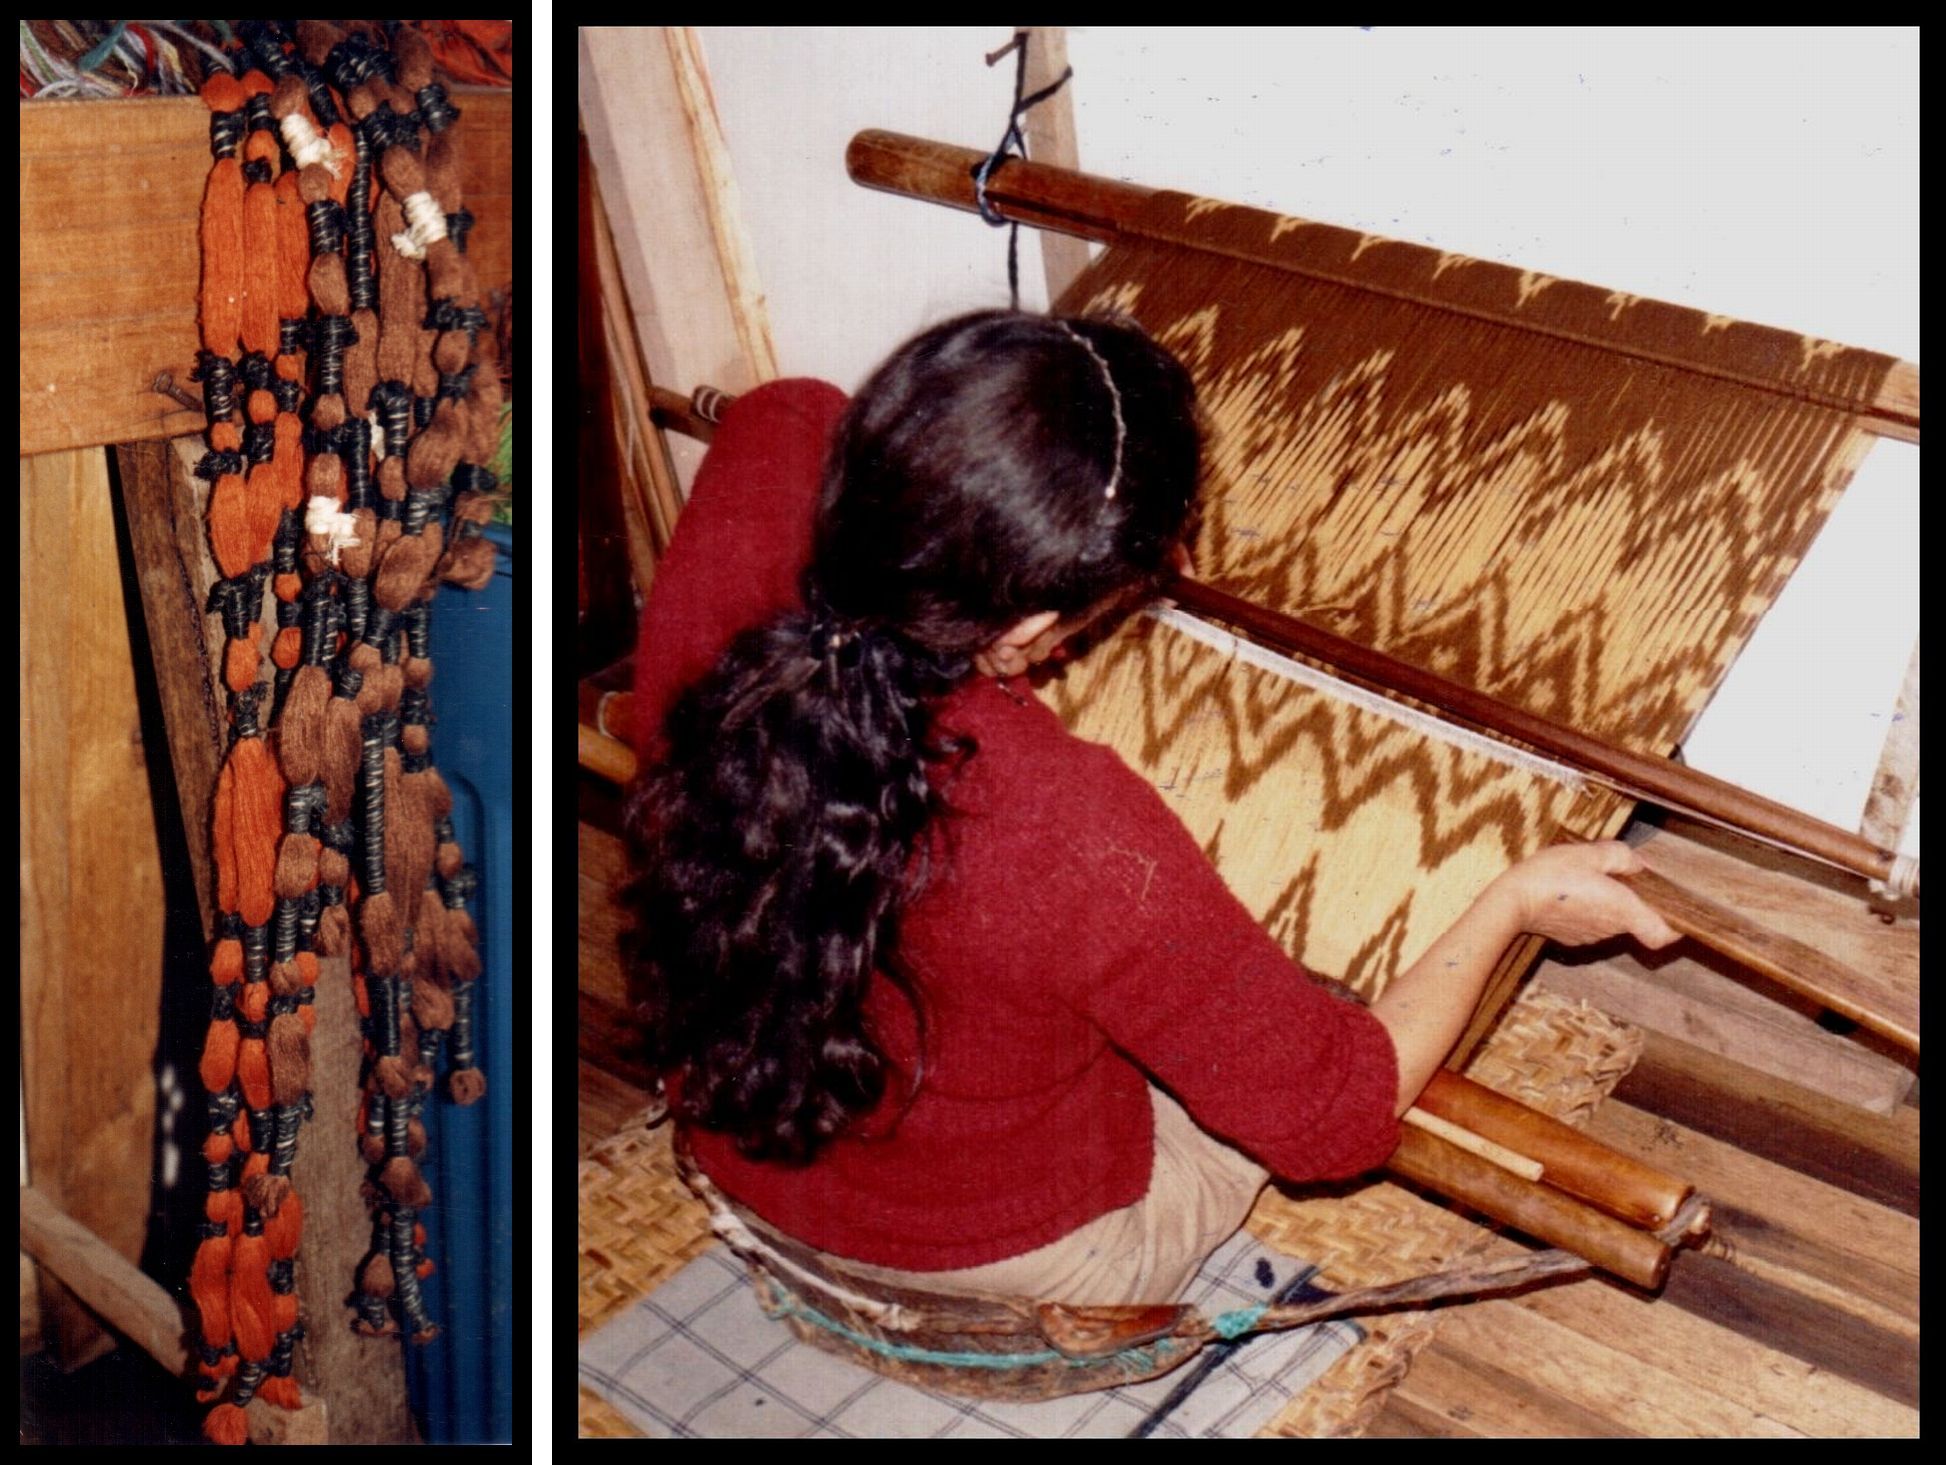
########################################## IKAT!-Tying and dyeing warps to make patterns before weaving.
Two woven ikat table runners fom Bali
One of my old school friends recently went to Bali and, knowing about my weaving interest, sent me a couple of ikat pieces that she had bought. Gorgeous! This, of course, reminded me of the rolled up warp in a plastic bag that has been sitting in the back of the closet since 2006 – my ikat experiment. I have to admit that I never used to be a big fan of ikat. I didn’t much care for the “bluriness” of the designs-it all just looked like something that had gone horribly wrong.
Mapuche poncho
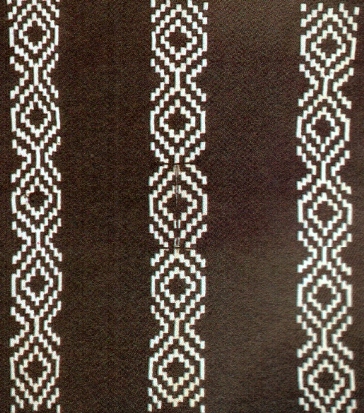
I like clean, crisp, sharp designs which is why I like double weave so much. Then I discovered in books the ikat woven ponchos of the Mapuche people of Chile and Argentina with their big, bold white geometric designs on black. From a distance they didn’t even look like ikat and I wondered how they managed to get those warps to stay so nicely in place and not blur the image.
It was only after going to Ecuador in 2005 and seeing and touching ikat pieces, meeting their creators and learning a bit about the process that I began to appreciate that the bluriness that I had found so unattractive was the very charm and appeal of ikat designs. It changed my whole way of looking at ikat and this was further reinforced when I went to Guatemala in 2008.
A length of ikat patterned woven cloth that is used for the “corte”-the typical long wrap skirt used by Guatemalan women
In Guatemala I was surrounded by ikat but, unfortunately, didn’t get to sit with any ikat weavers. I always seemed to be in the wrong place at the wrong time but I have made that my goal for my next trip to Guatemala.
I actually met my frst ikat weaver right here in Bolivia. When I stayed with Felicia in Candelaria, she was weaving complementary-warp chuspas and hangings which were to be sold in the museum in Sucre. For herself, she was weaving an enormous ikat bed cover incorporating hers and her husband’s names. She had started it shortly after the birth of her first son and, as he was already four years old at the time of my visit, it is obvious that she had little time to devote to her own weaving.
Felicia’s ikat bed cover in progress. You can make out her name in ikat-yellow letters on a green background.
There is a lot of ikat weaving being practiced in the small towns around the city of Cuenca in Ecuador. Various studios sell their pieces to locals and tourists. They are all very competitive, and understandably, are not so willing to share their weaving “secrets”. I spent a morning with Carmen in the town of Bulcay. She explained the warp tying process, showed me the natural dye samples that she uses and allowed me to stay and watch her weave. I was pleased to hear that they wrap the warps with cabuya fiber which is agave, as I had bought several skeins of handspun cabuya fiber earlier in my trip. The idea to try this when I got back home was already forming in my mind. As it turned out there was a secret to the cabuya fiber which I hadn’t been told! I was hoping that she would sell me one of her warps that was ready to go on the loom to avoid the difficult wrapping process but she couldn’t be persuaded.
orolling stick
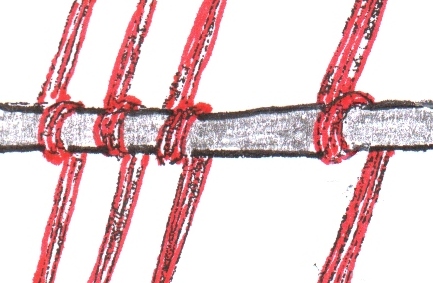
One thing I noticed on her loom is the “rolling stick” or “coil rod”which you can see in the above photo just below the upper loom bar. The warps are wrapped around this stick in groups of ten and “locked’ into position. This is a tool that is often used on circular warps on backstrap looms whether the warp has ikat pattern or not. It might also serve in this case to stop the warp threads from slipping and excessively blurring the design.
I bought one of Carmen’s scarves and then headed to the museum in nearby Gualaceo.
An ikat scarf made by Carmen posed with another craft of the region-figures made with ‘paja toquilla”.
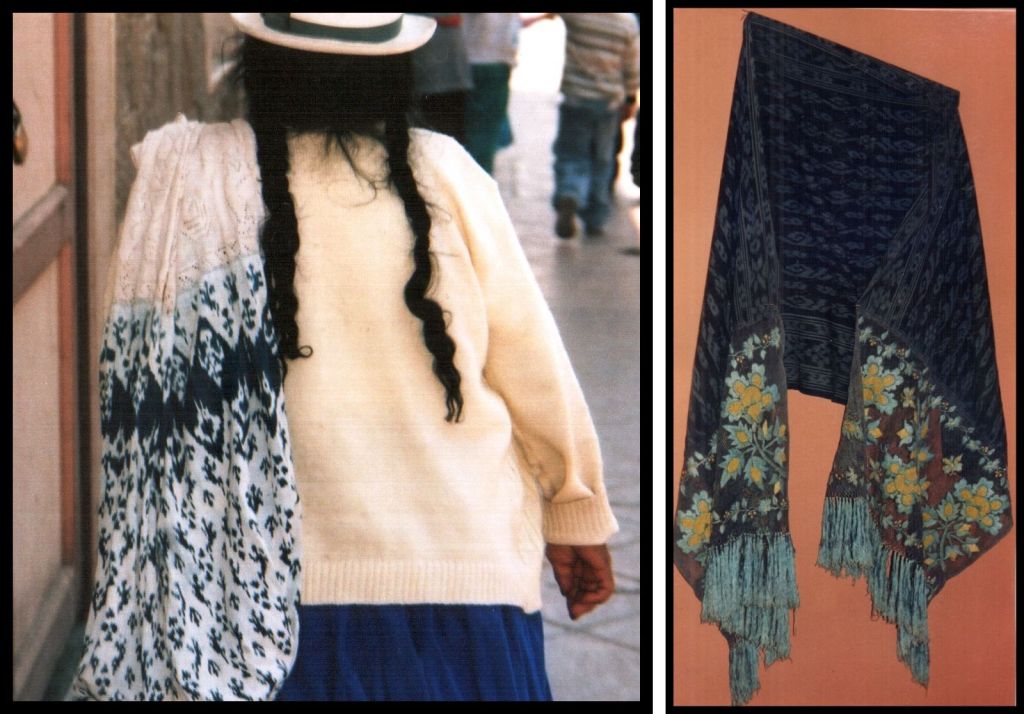
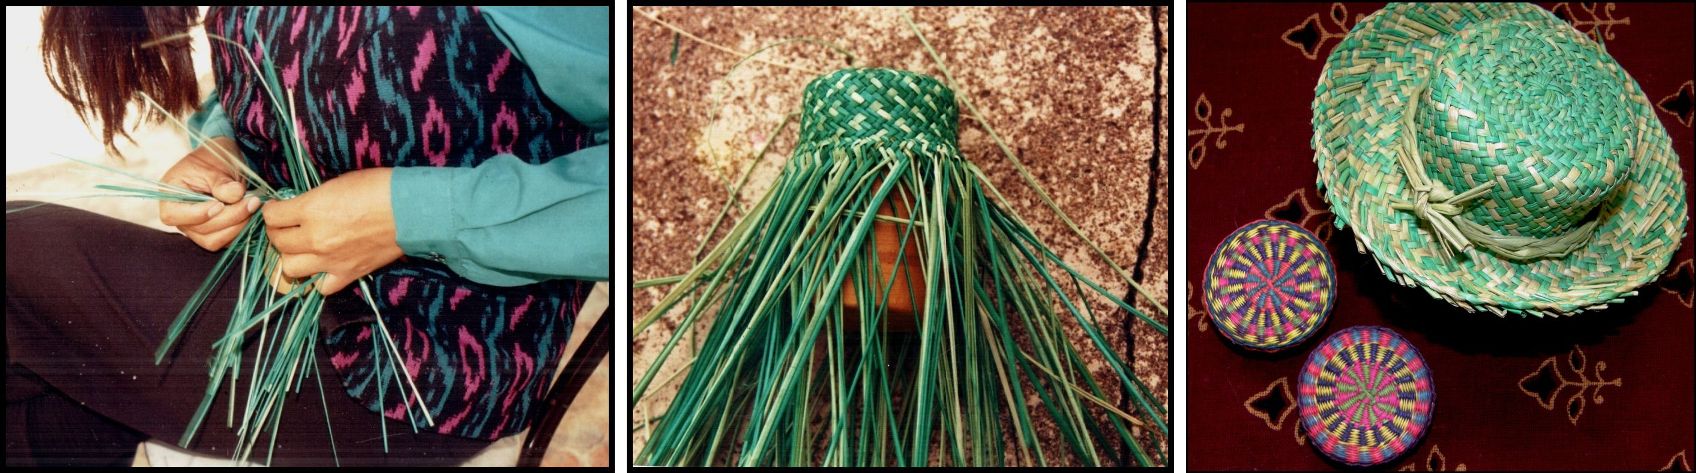
It seems that this museum is not high up on the typical tourist itinerary as it was completely deserted. Anita, who attends to visitors was in the patio enjoying the sunshine and weaving a placemat from paja toquilla. This is the straw that is used to make Panama hats and, in order to explain the process to me, she allowed me sit with her in the afternoon while she wove a miniature hat for me and told me about the typical ikat shawls of Cuenca called paños. These are worn by the group of people called cholos who fall between indigenous and whites in the social-economic hierarchy.
To me what is most outstanding about these shawls is the fringe which is often almost half as long a the shawl itself. The fringes are knotted into a network and the knots are spaced in order to form motifs – birds, flowers, even words, all formed with knots. Sometimes embroidery is done on the knotted network or the spaces between knots are filled in with thread to form patterns. The fringe is starched hard so that the designs can be appreciated when the shawl is worn.
LEFT: A woman is carrying a rare old cotton ikat shawl in Cuenca. RIGHT: An ikat shawl with embroidery on a knot network fringe at the Gualaceo museum.
Original shawls were made in cotton with indigo patterns and I had only managed to find two in antique stores in Cuenca until one day I was surprised to see the lady pictured above walking down the street with one draped over her shoulder and managed to snap a photo. Now cotton and especially indigo have become too expensive and shawls are made from wool with synthetic dyes. A few weavers, like Carmen in Bulcay, are working with natural dyes.
Anita, wearing a beautiful woven ikat patterned vest is weaving a miniature hat for me from toquilla straw. It is shaped by weaving it around a wooden mold. The finished hat sits with two tiny pill boxes also made from this straw.
Heading north from Cuenca I saw that men in the town of Cañar wear ikat patterned ponchos when they are out and about in their best clothes on Sunday market day.
The weavers of Cañar make incredibly fine warp faced belts in sewing thread with a complementary warp technique. Many men at the market were proud to show off their belts to me but were shy to be photographed. Eventually I was directed to the prison which is right in the middle of the town amongst the shops and there I bought belts from the inmates. One gentleman wove motifs by copying the designs from old belts that had been photcopied and he kindly allowed me to go across the street and make copies of those sheets for myself.
Cañari men on market day and the typical belts of the region. One belt has animals and the other, which unfortunately is hard to make out, has farming implements.
But, back to ikat. In 2008 I went to Guatemala and enjoyed seeing beautiful ikat designs on the typical skirts all around me in the streets. In Sololá, near the shores of Lake Atitlan, the market was full of ikat fabric ready to be used as skirts.
Ikat stalls in Sololá.
And there I found what I was looking for!! Apparently I am not the only weaver who would like to weave an ikat piece without the tedious task of wrapping the warps and the messy process of dyeing them.There was table after table of pre wrapped and dyed ikat warps ready to go on the loom. It was a bit of a lucky dip as you had no idea what design you were going to get although I had the stall owner spread out part of my chosen warp to show me more or less what I could expect.
Ikat warps on sale at Sololá ready to go on the loomHere is my cotton ikat warp. You can see that I haven’t mustered the courage yet to put it on the loom and weave it.
Between my trip to Ecuador in 2005 and the one to Guatemala in 2008, I experimented a bit with ikat at home. I had my cabuya fiber, I made a warp and was ready to wrap for a very simple design based on the Cambodian silk piece pictured at left that I had bought in Australia. Things didn’t go exactly smoothly.
Firstly, I don’t know what possessed me to use my own handspun llama fiber for this experiment-uneven spinning, uneven stretch on the loom. Secondly, my cabuya fiber was hard and wiry and absolutely refused to stay put. There was no way I could make it hold a knot. It was then that I discovered one of those crucial bits of information. You need to use cabuya nahui – nahui meaning “soft”. A different kind of agave or, perhaps, agave that has been treated a certain way-I have yet to find this out.
Determined not to give in, I experimented with other material and then discovered that cassette tape makes an excellent wrapping material. You can pull it really tight and it won’t snap and it holds knots beautifully. The question was, and still is, how would it stand up to being boiled during the dyeing process? Well that question remains unanswered as I got hold of cold water dyes from Australia. Unfortunately, what was labeled Mexican red and promised to be a rich chilli pepper color turned my llama fiber Barbie pink! Well, you can see the results below.
Barbie band below and cassette tape wrapped warp ready to be dyed above
The cassette tape worked perfectly in cold water, by the way. It was really exciting removing the warp from the dye bath and undoing the first tie to reveal the white yarn. The warp in the plastic bag that is stuffed in the back of the closet is the one pictured above still wrapped in its cassette tape. Don’t even ask how long it took to wrap all those warps! This is a Navajo wool warp and I am waiting to get hold of more Dylon cold water dye which seems to be no longer available in the craft stores in Australia.
Edited to add…have since learned that the dye I used was meant for cotton…not wool. So much to learn!
So this is where I stand with my ikat experiment so far. I am sure that once I have wrapped, dyed and woven a complete piece on my backstrap loom all on my own, I will have an even greater appreciation of this intriguing technique.
By the way, the cabuya fiber didn’t go to waste and was put to good use.
A crocheted mat, cosmetics bag and tool case made with cabuya fiber.
I wove the cosmetics bag in the middle with a cooperative of women who work with this fiber in the Intag Valley which is on the western slopes of the Andes of Northern Ecuador. This is in an area of cloud forest-a spectacular region! I dyed the handspun fiber that I brought home and wove the tool case on the right in pebble weave on my backstrap loom – talk about sticky warps! I bought the round crocheted mat from the cooperative. I have a lot to tell you about this fiber and my stay in the Intag Valley and will do so in a future post.
CROSS KNIT LOOPING TUTORIAL
You may remember in this previous post that I showed you the cross knit looping that I was taught in Potosi and which my teacher and I used to edge a woven chuspa. I have made a tutorial page for this technique which you will find here.
When I lived in southern Chile, I had access to a lot of sheep wool so I spun some and knitted a vest which I edged with a woven band and cross knit looping. I have used this technique to edge woven bags as well.
This technique is useful for weavers, spinners and braiders as well so, if you know someone who might be able to use it, pass it on! 🙂






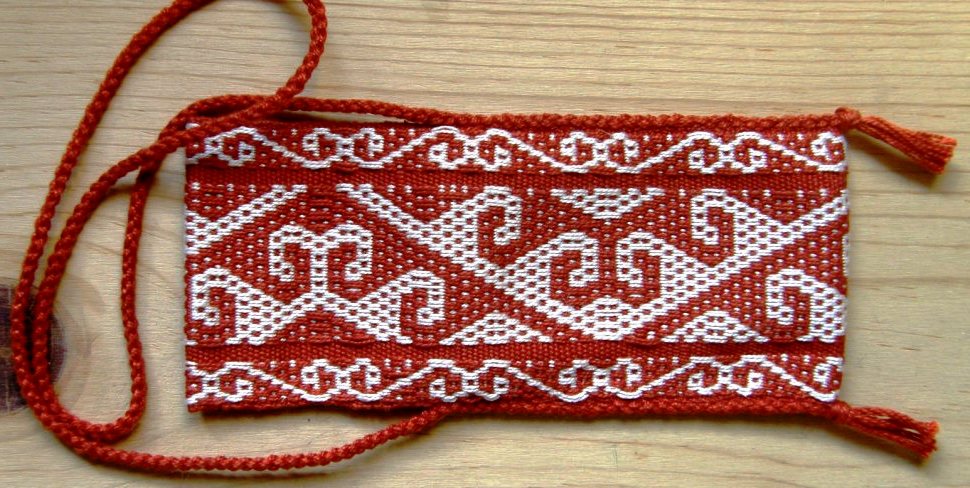 Once you have the hang of weaving this border design, especially the parts where the two motifs overlap, you will have the skills necessary to weave the yurt band design that I wove on the cell phone pouch last week – at left. But, I recommend starting small! Practice the small design in this tutorial and make something useful. Next week I will give the chart and instructions for weaving the border of the red cell pouch, pictured below.