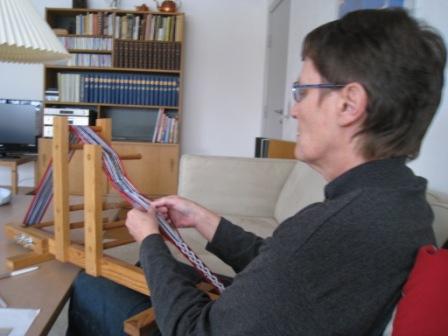
A short post this week as I get my sticks, strings, shuttles and spindles together for another trip to the US flying out tomorrow (Friday the 16th).
Andean Pebble Weave is now in print! It will also be available for purchase in its e-version on the WeaveZine site. (UPDATE: Now it is available in 4 languages at Patternfish.com along with the follow-up book, only in English.)
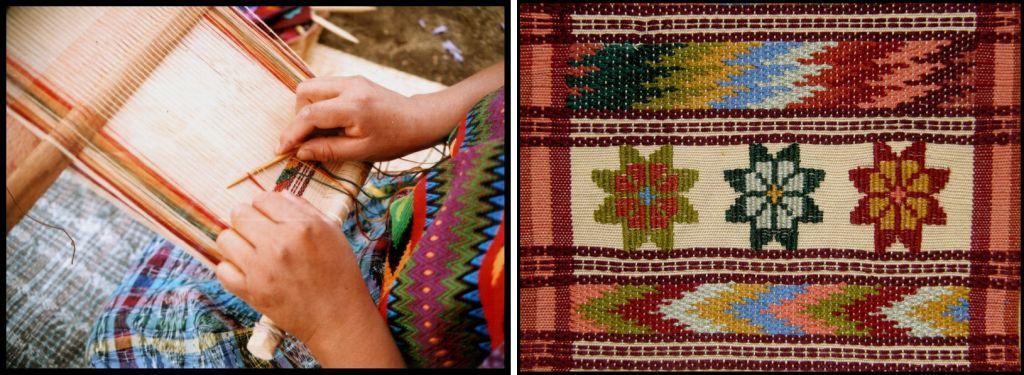
With all the loose ends that needed tying up and the time spent working with Syne Mitchell to get the print version of my monograph ready, I didn’t expect to get any weaving done this week. But then I had an idea and ended up weaving a bunch of keyfobs. I thought it would be fun to give a keyfob away with the first 20 copies of Andean Pebble Weave. So I sat with my basket of cotton thread and had a great time combining all sorts of colors to make the 20 keyfobs to accompany the books. I combined several small pebble weave motifs and now I can definitely see the benefits of weaving the same design over and over as some indigenous weavers do. I could probably weave this with my eyes shut now!! As long as there were new colors to combine it never got boring. Only one or two color combinations are repeated as I made tiny warps and wove one at a time.
And I didn’t stop at twenty as I thought that these fobs would make nice gifts all year round. I will be weaving these where ever I can find a spot to tie up my loom – in the Vendor Hall and probably to my bunk bed in my hostel!! as I am packing my mini warping board and crochet cottons.
I am also taking my wobbly Bolivian drop spindle and some of the alpaca fiber that my friend Janet gave me on my last visit. I just spun a little to get it started on the spindle and it is so so beautiful to spin! This is not the first alpaca I have ever had to spin. I bought some many years ago in Peru and it was in a dried-out, brittle and filthy state. I lost a good third of it in the cleaning process and I knitted rather than wove with it. Now I have this prepared smooth luscious fiber to work with – what a dream! It almost feels like cheating! I’ll be spinning it to weave with on my backstrap loom.
I am hoping to squeeze some of my smaller weavings into the backpack to show people who drop by the Weavolution booth at Convergence. I am also taking them to show some folks in North Carolina. I found out about a group of Montagnard people who have a small community in North Carolina. This is wonderfully convenient as North Carolina is on my trip route on my way home after Convergence. My good weaving buddy Lisa lives there and we have been invited to go visit the Montagnard community as there are backstrap weavers among them. What’s more, it seems that they have been recently joined by Karen and Nepali weavers. We hope to share our textiles and backstrap techniques and I am so excited about this opportunity. You can read a bit about the Montagnard people here and watch a video on one of the weavers in the North Carolina community here.
Betsy Renfrew who has been working with the weavers, and who extended the invitation to me after my initial enquiries, has started a blog about the group’s activities.
My backpack will also be full of sticks as I will be staying with one of the Weavolution founders in Washington and she may have some friends over to weave. I have loom bars and backstraps for several people so we can all weave together.
So…come and visit me at Convergence!! I will be with Weavolution founder Alison at the Weavolution booth or wandering about most likely with a bunch of sticks protruding from my tote bag. I would love to meet you and show you my weavings and loom. You can check out the new print version of my book. I hear that there will be a weaver from the Textile Center in Cusco demonstrating backstrap weaving too so I will definitely be there watching her.
Hopefully next week’s post will be full of Convergence events to report and stories of all the wonderful weavers I have met.
I set up my loom yesterday to weave a narrow band – just 28 ends. Once I had made my simple heddles, tied them in a bunch and added the shed loop I realized that my entire loom consisted of just two simple sticks – the two loom bars and that’s all – one attached to a bed and the other to me. My weft was tied in a butterfly – no sticks there. The only other stick involved was a wooden beater to prop open my sheds and beat in the weft. How much simpler can it get?
I filmed the entire process from warping stakes to ready-to-weave if you would like to take a look. (Donna, I made this especially for you!)
So, again I ask you, how much simpler can it get?
Actually it can get simpler! I was in Tarabuco recently and watched a weaver sitting on the ground deftly wind a warp around her hand and foot. She tied one end of the warp around her foot, passed a length of yarn through the end loops at the other end and secured it to her waist. Then she made simple heddles around her hand, added a shed loop and started to weave. Briiliant! All in a matter of minutes.
A weaver in Tarabuco using a “toe” loom
You are probably thinking: okay, a simple loom for a simple weave– but even very complex weaves can be done on a very basic set-up.
A weaver from Tarabuco creating a complex design on a simple loom
You may recognize Felicia above with her sleepy cat from the video in this previous post. She has a shed rod, a heddle stick and some bars between which to stretch her warp. She has just inserted a couple of thin sticks to help with the pick-up but look at the photo at left and see the complex designs that she creates on this simple set up.
Now what about those looms that you see in pictures on the internet and in those Youtube videos? Some of them are loaded up with sticks – all those mysterious sticks – what in the world do they do? Hopefully I can solve the mystery behind at least some of them here. I have to admit that there are Asian looms that I have seen online with a multitude of patterning sticks and that I still haven’t figured out how some of those sticks work.
An extra stick added in a second cross in Guatemala
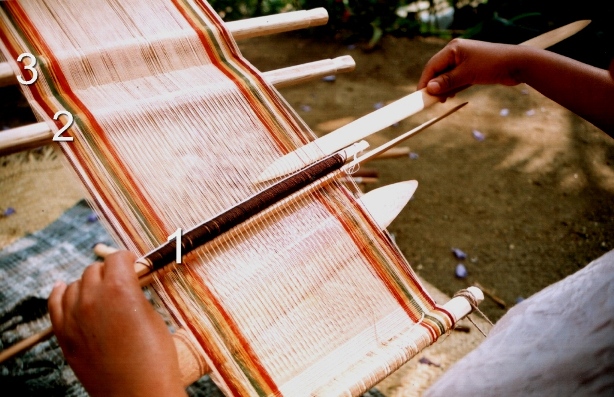
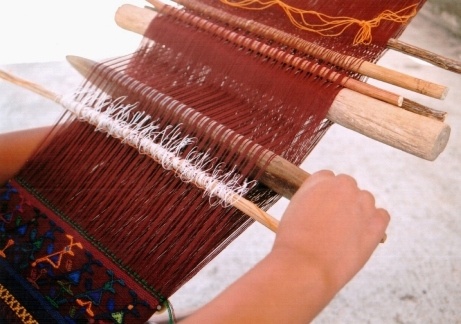
But at least I can let you know a bit about the sticks I have seen here in my travels in Central and South America and what they do. In the picture at right, number 1 is the heddle stick and number 2 is the shed rod. We are familiar with these. But what about number 3? This is an extra stick to hold a second cross. A lot of weavers wind a second cross as they warp. I don’t. I find that the fewer twists and turns I make on the warping board, the easier it is to wind a warp with good even tension. I only use a second cross on narrow warps to stabilize my shed rod which tends to slip from side to side and be a thorough nuisance. Making a second cross and putting a stick within will lock the shed rod into position. It is very easy to create a second cross once your warp is already on the loom. Here are the steps…
LEFT: Your loom is set up with heddles and a shed rod. RIGHT: Open the shed rod shed, place your beater within and draw it down to the weaving line. Remove the shed rod. It is important that the beater not fall out at this stage as it is saving your shed rod shed. Use a back up safety string if necesary.LEFT:Open the heddle shed and place an additonal stick within. RIGHT: Tilt the beater to open the shed up beyond the heddles and place your original shed rod within. Tie or tape the shed rod and additional stick together.You have created your second cross.Another Guatemalan loom with a second cross installed. The shed rod is pvc pipe which is often used as it can be thick without being heavy. Notice the orange safety string – if disaster strikes (and it most probably will with those 3 little guys hanging about!) and all this weaver’s sticks fall out, the safety string will save her cross. Even the experts use them! Look at the little future weaver there on the left. She is wearing the typical long “corte” skirt and even has her own woven belt.
Some looms have a mind boggling amount of sticks but the reason can be very simple!!
LEFT: The 11 sticks on this upright loom in Ecuador will become heddle sticks. The 22-row design, which is horizontally symmetrical, will be programmed into these 11 heddles. RIGHT: This is one of my own warps set up on my Navajo loom in Chile. As I am using 4 colors in my pebble weave I have extra sticks to separate and keep the colors in order for the pick up.Miguel Andrango’s granddaughter poses with one of the looms. You can see the two shed rods above the heddle stick. The space for the extra shed rod is programmed into the warp by using an extra stake during the warping process.
In Ecuador I saw the use of an extra stick which I have not noticed anywhere else. This is especially useful for wide warps or particularly fine yarns but I saw it being used on warps of all widths and yarn sizes in Ecuador. It is an extra shed rod. I know from my own experience that the shed-rod shed on a wide piece with fine yarns is really difficult to open. It was a very slow and tedious process on my Abba Yohanni piece, for example. The extra shed rod in Ecuador holds every second warp that passes over the main shed rod. This means that half the number of warps can be raised using the extra stick. Then it is very easy to use the main shed rod to raise the rest of the warps.
This is one of Miguel Andrango’s looms. He is a very well known weaver from Agato, a small town near Otavalo. You can watch a video of his work here. Fifty-seven seconds into the video you will get a very nice close up of the two shed rods. You will also see the typical white woven alpargatas he is wearing. I spent some time with an alpargata weaver and hope to blog about that some time. Miguel Andrango is not a large man and, although the piece above is not particularly wide, he weaves some of the widest backstrap woven pieces I have ever seen!
A weaver near Otavalo is preparing to make her string heddles. She is using the extra shed rod on her loom. This rod has a dual purpose as it also serves to stabilize the main shed rod.
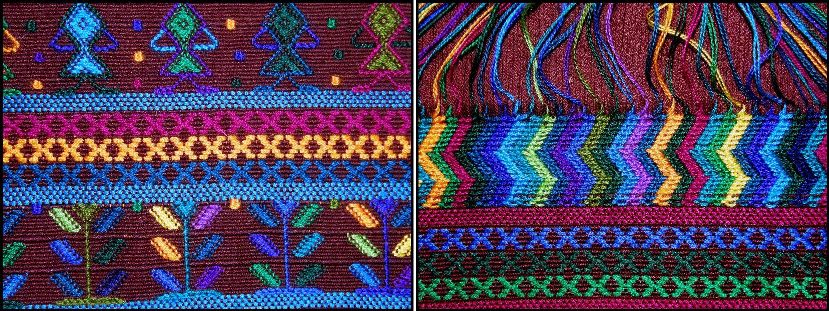
Now we come to the patterning sticks that are used by weavers in Guatemala to create designs using supplementary wefts. The supplementary wefts are either laid in to form block patterns or wrapped around warps to form little figures.
It is not my intention here to teach you how to insert and use these sticks. So, don’t worry if you don’t quite get it. No doubt, I will be doing a tutorial on this in a future post. I just want to take a little bit of the mystery out of it so that when you are looking at weavers and looms in books and on the net you may have a better understanding of what all those sticks do. For now, read on and just enjoy the beautiful textiles!!
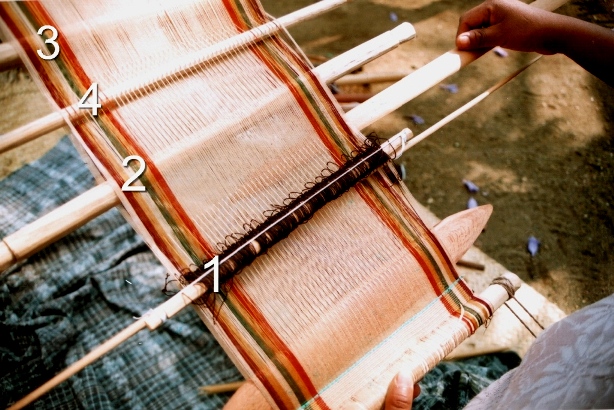
Typical designs of Santa Catarina Palopo.LEFT:Supplementary wefts have been laid in to make designs like the X’s in the center or wrapped around warps to form figures, like the stem of the plant below and the arms of the woman above. RIGHT: The upper design has been woven using the technique employed in making the typical huipil of this town.LEFT: Bands woven using patternig sticks and offered to toursits. RIGHT: The typical huipil of Santa Catarina Palopo. These colors are a relatively recent introduction. Old huipiles in crimson and white can be seen in paintings by Carmen Pettersen. My teacher told me that only the very oldest women in the town may still have the old huipiles.Carmelita is teaching me on this loom in Santa Catarina Barahona. Number 1 is her heddle stick, number 2 her shed rod, number 3 the stick in the 2nd cross and number 4 is her newly introduced patterning stick.
These patterns are created by adding two extra sticks to the loom – the patterning sticks. In Santa Catarina Barahona, the weavers open the shed-rod shed and pick up every fifth warp. They store these warps on a stick – the patterning stick that sits up behind the shed rod.
The heddle shed is then opened and, once again every fifth warp is picked up but in such a way that each picked up warp sits between two that were picked up on the first patterning stick. The warps are stored on another patterning stick which sits behind the shed rod but, this time, under the warp.
Here is how the loom looks with both patterning sticks installed.
Number 1, heddle stick. Number 2, shed rod. Number 3, stick in 2nd cross. Number 4, 1st patterning stick and number 5 the 2nd patterning stick. The patterning sticks are simply drawn down towards the heddles to create sheds for laying in the supplementary wefts.This diagram shows a loom in profile with the positions of the patterning sticksLEFT: Lydia is laying in a supplementary weft in one of the patterning sheds. RIGHT: The patterns at top and bottom were made with the aid of the two patterning sticks.
Sometimes a second pair of patterning sticks is inserted when the weaver wants to change the design. These are only temporary and will have to be removed when she wants to return to the original design.
Take a look at the photo below…can you name all the sticks?!
A sling braid made from llama fiber from the Colca Canyon area of Peru. It comprises a braid with a finger loop in one end and a cradle in which the stone to be hurled sits.
Now to return to the simplicity with which I started this post…………some braiding and edging techniques with few or no tools required.
After having done the tutorial on cross knit looping last week, I remembered another interesting edging that I learned with my sling braiding teacher in Yanque, Peru. We used it to edge the cradle section of an Andean sling braid.
I made one sling with him and he taught me to make three different braids. Men in Peru braid their slings holding all the braid strands in their hands – no other equipment is required – and can quite happily stroll along the road while braiding. Two of the braids I learned had twenty-four strands and the other twelve. I was told that the main use of the slings these days is to hurl stones in order to keep control of animals straying from the herd.
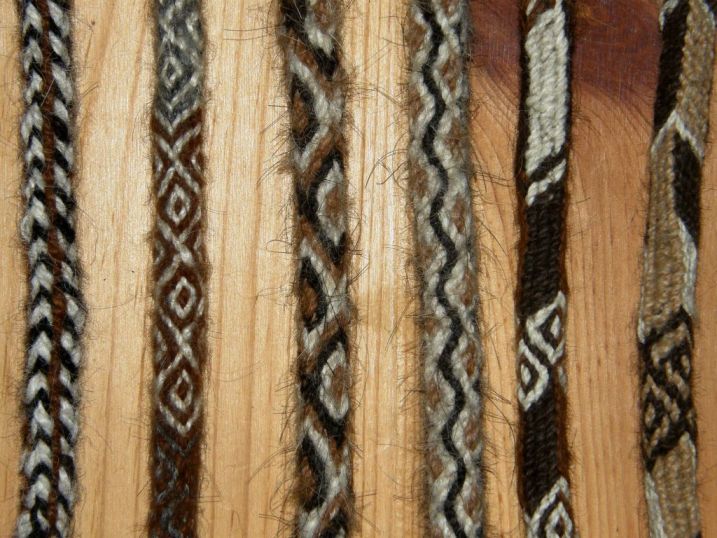
LEFT: The single cross two-color edging that I was taught on my sling. RIGHT: A double cross two-color edging on an Andean sling that I bought.A few of the braids used for Andean slings. Named from left to right…PALMA, MARGARITA (2nd and 3rd),SALSA and CAJAMARCA (5th and 6th)
When making an Andean sling, first, one half the braid is made. The strands of llama fiber are measured from the tip of the nose to the toes and then doubled. The first section usually includes the finger loop. More strands are added to weave the cradle in tapestry technique and then work the braid for the other half.
The cradle is woven on a backstrap set-up tying the braid to the waist while the strands which serve as warp are tied to a fixed point. Then the second half is worked in two braids – first a thick one and then a thin one to finish.
Decorative tassels and edgings are the last things to be put in place. Some of the tassels can be quite flamboyant. My teacher didn’t care at all for the more extravagant decorations!
I love these slings as there are several skills involved. Without even realizing it, this was my very first taste of backstrap weaving and with this one teacher I learned so much. He taught me the Palma and Margarita braid styles and a thin version of the Palma which didn’t seem to have a name, a little tapestry weaving by backstrap as well as tassel making and decorative edging.
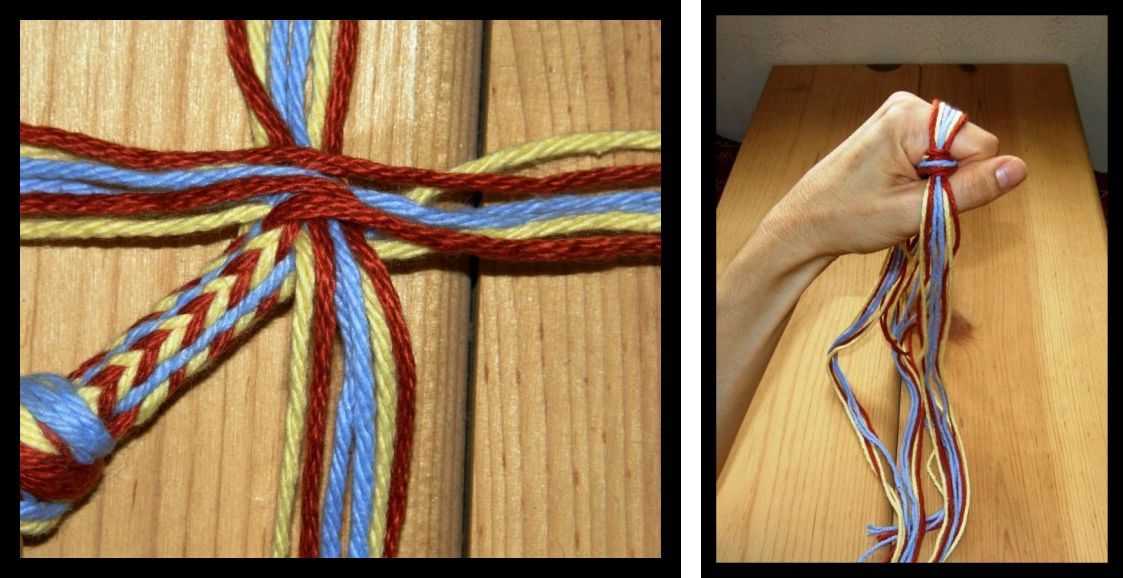
LEFT; The very start of the Palma braid with the 4 sets of 6 strands used to make it. RIGHT: My hand in the braiding position. Two opposing sets of strands are interchanged. The braid is then rotated 90 degrees so the other two sets can be worked.
Zacarias was a marvelous teacher with a lot of patience. He would get me started on my work and leave me while he harvested the barley crop – plans were afoot to make some alcohol – moved the animals from one field to another and generally took care of things on his property.
LEFT: My sling braiding teacher, Zacarias on his property near Yanque, Peru. RIGHT: A woman by the shores of Lake Titicaca shows me how to hurl a stone with a sling braid.
I know that backstrap weaving isn’t for everyone and I am so glad that people are still able to make use of the instructions here and at Weavolution and use the techniques and designs on other looms. Ellen Turner, in Denmark, has woven a double weave band on her inkle loom using my tutorial at Weavolution.
She made a celtic design inspired by something she saw on the internet.
I also ran into Jessica’s blog where she has been experimenting with double weave on an inkle loom too. Check it out.
Kristina in Germany wove a double weave band on her inkle loom using her own handspun llama fiber. She commented that it put a lot of stress on her inkle loom so that is one important thing to take into consideration.
So if you have been enjoying the designs and have found the tutorials interesting and tempting but are still hesitating about getting strapped in, remember that you can adapt these techniques to other looms. I have set up warps on my rigid heddle loom and woven bands with string heddles rather than with the rigid heddle.
I have to tell you, though, that for me the backstrap loom wins hands down for the ease with which I can adjust tension with the slightest of body movements.
And, finally, I mentioned above the paintings of Carmen Pettersen. Check if your library has a copy of “Maya of Guatemala-Life and Dress”. Her paintings of Guatemalan people in traditional dress are stunning.
Recently I found myself in the unusual position of having run out of loom rods.
This is because since joining Weavolution in June, I have been completely soaked in new ideas and inspiration for projects that I can adapt to my backstrap loom. Rather than adding them to my woefully long ”to-do” list, I prefer to at least warp up the project, get it started by weaving a few rows and then put it aside so that at any time when the urge hits me, I can just throw on the backstrap and continue weaving. This has resulted in a closet shelf full of loom rods with brightly colored warps attached. The days of one-project-at-a-time are long gone. Fortunately, this is one of the many wonderful things about backstrap weaving-you can warp up a project, roll it up and put it away.
So when I found myself needing to make up several warps for some tutorial pictures, there were no more loom rods to be had. I don’t like borrowing loom rods from unfinished projects so a new set had to be ”found”.
A quick scan of the halls and terraces of my apartment block did not turn up any abandoned brooms or mops whose handles make marvellous loom rods. So I actually had to go out, for the first time, and buy dowels. While doing so, I was reminded of my students and the new weavers in my Backstrap Group who go looking around the house, garden shed or hardware store for bits and pieces to make their first looms and was prompted to write a little piece about putting together a backstrap loom.
I showed the parts for the backstrap loom in my WeaveZine article but space did not allow me to cover the topic in detail and there are a few refinements and tips that I have always wanted to add and a lot more photos that I would love to share. So now that I have woven up some of those closet projects and have loom rods to spare, I have been able to put together a short photo tutorial on the backstrap loom.
First the loom rods……..
loom rods
From right to left….
A pair of my recently purchased 1” dowels;
A pair of 3/4” broom handles;
The next three sets are from Guatemala. The middle set was bought at the stall at the Chichicastenango market pictured above. The other two are the loom rods from the weavings I worked on with my teachers in Guatemala. I brought these back to Bolivia with the unfinished weavings attached.
I weave happily with my broom sticks and mop handles. I simply cut them down to 19” length and I use these as my standard loom rods-even for the tiniest of bands. The shortest of the Guatemalan rods are 14” and these work well for me too although I prefer the longer length. The main feature of the Guatemalan rods is that they have grooves cut into their ends.
grooved loom rods
Personally, I don’t find these grooves particularly useful but my Guatemalan teachers do as they tie up their looms like this……………
tying up the loom in Guatemala
The grooves on the far end loom rod will stop the cords from which the loom is suspended from slipping in to the center of the rod.
So, you can experiment with the ideal length of your loom rods and decide if you like them with or without grooves. In any case, you will need two loom rods.
Cross sticks, heddle rods and shed rods………….
It’s nice to have a good collection of thin dowels and sticks of varying lengths depending on the width of your project. Pencils work well as do chopsticks and kebab skewers and then you can always go out and buy dowel rods. Packages of thin, round craft sticks are ususlly available at the dollar stores and are probably the most useful things I have. These sticks have all sorts of uses-as cross sticks when you are warping, heddlerods, shed rods, their ends can be sharpened so they can be used as pick up sticks and they can be slipped under pesky warps that have gone slack to take up tension.
Those used as shed rods need to be thicker depending on the size of your project. I don’t use anything thicker than 3/4″ for the very biggest projects. I even have a set of cheap touristy pan pipes which are abundant here. This I have dismantled and the hollow bamboo pipes in their different lengths are lightweight and handy for all kinds of things-my apologies to the music lovers!
Above is a random selection of my thin sticks-one, as you can see, even gets used to stir the dyepot. It is very handy to cut grooves in these sticks eventhough my grooves are not exactly pretty.
grooved thin sticks
The grooves will help you tie your sticks togethers securely in the cross on your warping board and loom. They will allow you to secure your shed rod in the shed. Anyone who has had sticks drop out of their loom will know just how important this is!
So, where are we now in our loom construction?
Let’s see our rods and sticks in action!
At left you can see the warp on its loom rods with cross sticks in place. These cross sticks are just that little bit too thin for grooves-I have snapped too many already trying to put in grooves-or maybe I am just not that good with the tools! Anyway, these are simply secured with adhesive tape.
The loom rod on the left with the knotted “start” and “finish” warp ends will be attached to a fixed point-a heavy piece of furniture or a tree (more about these options in a future blog post), while the loom rod on the right will be attached to you by means of your trusty backstrap – speaking of which……..
The backstrap…………….
a selection of backstraps
This is all a matter of personal preference, but for me, the broader the backstrap the better. Those of you who have read my article on WeaveZine will remember the simple homemade backstrap shown there made from a pillow slip and will also recognize the red strap above. The straw one next to it is my all time fave-made for me in Peru and much chewed by my cat. Moving left, you see another one that I wove and, finally, a leather beauty that I bought in Guatemala. Weave your own backstrap-a wonderful first project to go with your homemade loom. Check out my instructions on WeaveZine.
Swords and beaters………..
I collect swords and beaters in my travels and have a ridiculously large collection of them but here are just a few……
The sword acts to prop open your shed so that you can pass your weft. It can also double as a beater to beat the weft into place once you have changed sheds. The bottom sword is my favourite for wide projects-a homemade job, can you tell?! Above it you can see an adapted ruler and, above that, my favorite small beater for bands-this one was made for me in Peru.
Bevel one of the long edges of your flat sticks as well as the ends and round them off as shown so that they will enter the shed easily. The upper stick at left was once a long shuttle for my Navajo loom, hence the “v” cut into its end-this is not necesary for your sword/beater.
I generally prefer to put a lot of tension on my warp and push the weft into place with a pointed stick in addition to some moderate beating and so I have never felt the need for a big heavy beater like those shown in the above photo. Everyone has their method. There is no one ”right” way to do it.
Let’s see another “”sticks-in-action”” shot……
almost ready to weave
“Almost” ready to weave?………What’s missing?
a shuttle and a weft "butterfly"
Shuttles………..
These carry the weft through the open sheds. I have the above home made wooden job made with the help of someone who is handy with tools and a simple “butterfly” of weft. I would love to have a small wooden shuttle too but have been making do with a cardboard cut-out version these last fourteen years! My indigenous teachers simply wrap the weft around and around and up and down a long stick.
Now we are on our way-the string heddles have been made, the shed rod is in place. I have added an extra stabilizing rod from my collection of small dowels. This will stop my shed rod from rolling about in the warp and is placed in a second cross behind the shed rod. I have even managed to weave a few inches. This is where the final part of the loom comes into play-the roll up stick. This should be, preferably, the same size as your loom rod and will enable you to roll up your weaving as you progress so that you are always in easy reach of your heddles, shed rod and weaving line.
By the way, if you have been looking for pick up sticks in these photos, you won’t see any. Pick up sticks are used to lift and hold the warps when you are weaving design motifs in your cloth. My fingers are my nifty pick up sticks although I have a lot of bone and wooden tools for this purpose in my collection.
And now, a few final words from someone who has been watching this whole photo taking process with much interest and who insisted on being in the final picture………..
The Backstrap Loom
Just remember that, although the basic elements are the same, backstrap looms take many different forms in different cultures around the world. There is no one ”correct” way to set up your loom and I have based these descriptions on the looms that I have seen and used with my indigenous teachers here in South America and Guatemala.
Now to finish this green band, make it into something useful and free up another pair of loom rods for the next project!
I hope you have enjoyed this little article and have found it helpful. If you have, let me know-I love to receive your comments.:-)
IN CASE YOU WERE WONDERING………….
The red woven piece on which I posed the loom parts for many of the above photosis a weaving of the Jalq’a people of Potolo in Bolivia. Their weavings are almost exclusively done in red and black and have a chaotic display of figures called khurus, a word which means ”wild” or ”untamable”. Every space on the cloth is filled with strange figures. There are even creatures within creatures and I watched weavers forming the myriad of figures without reference to other weavings or swatches for help or inspiration. Incredible!
A weaving from Potolo, Bolivia
The weavers use a simple oblique frame loom and a long wire to pick up the hundreds of warps which form the patterns in each row. Rather than using a beater, a wichuna-a bone tool fashioned from the leg of the llama- is used to push the wefts into place. The designs are woven into the woman’s axsu-a tunic cinched at the waist with a woven belt.
The typical loom of Potolo
I learned this warp-faced complementary warp technique with my teacher in Potosi, where it is used for a completely different design layout. I have never used the technique to create anything anywhere near this level of complexity!
A weaver working at the ASUR Museum in Sucre, Bolivia
This Jalq’a woman is weaving a piece that will be sold at the ASUR (Antropologos del Surandino) Museum in Sucre.


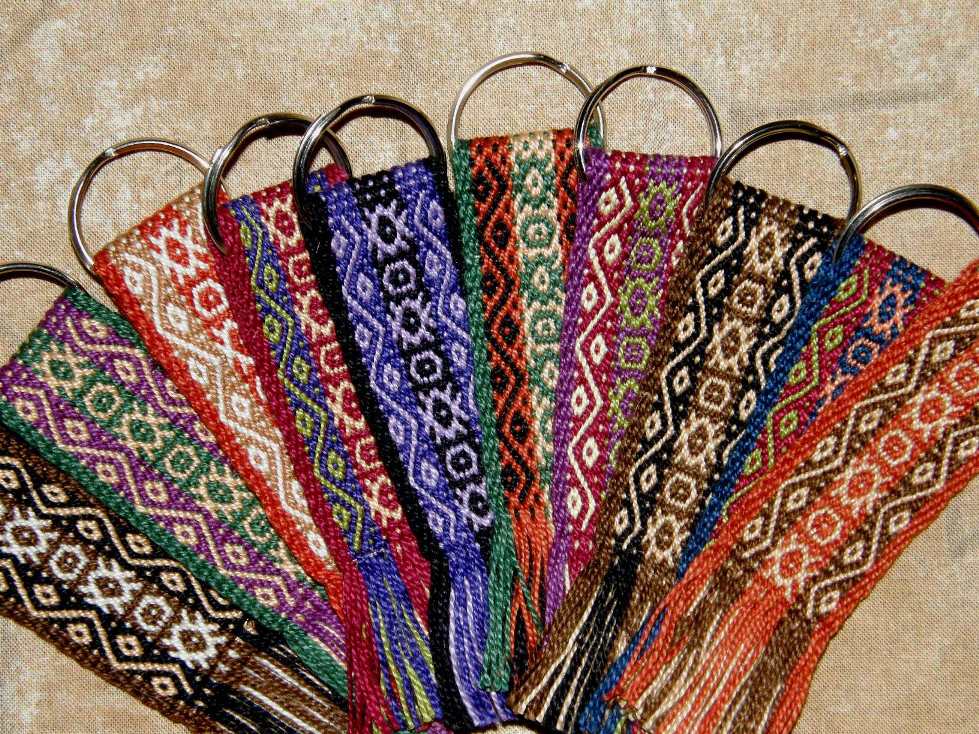 With all the loose ends that needed tying up and the time spent working with Syne Mitchell to get the print version of my monograph ready, I didn’t expect to get any weaving done this week. But then I had an idea and ended up weaving a bunch of keyfobs. I thought it would be fun to give a keyfob away with the first 20 copies of Andean Pebble Weave. So I sat with my basket of cotton thread and had a great time combining all sorts of colors to make the 20 keyfobs to accompany the books. I combined several small pebble weave motifs and now I can definitely see the benefits of weaving the same design over and over as some indigenous weavers do. I could probably weave this with my eyes shut now!! As long as there were new colors to combine it never got boring. Only one or two color combinations are repeated as I made tiny warps and wove one at a time.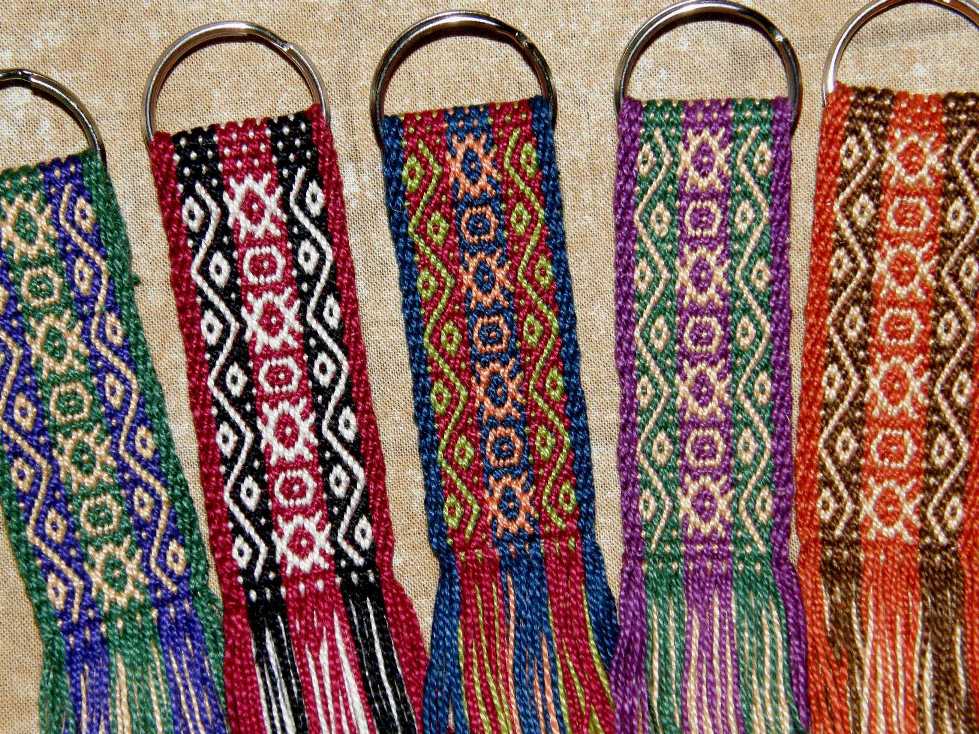


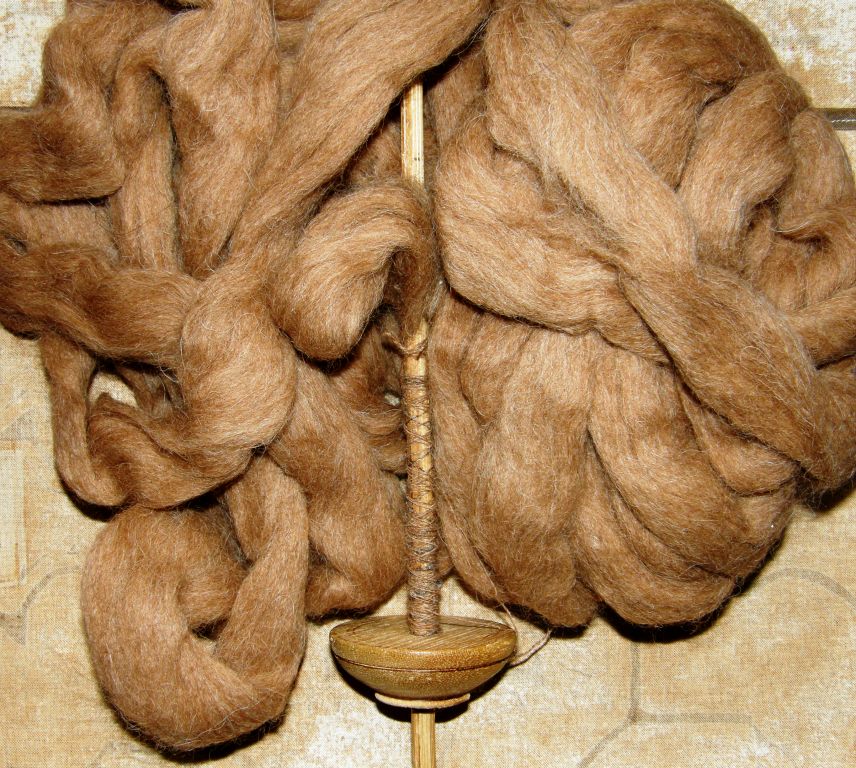 I am also taking my wobbly Bolivian drop spindle and some of the alpaca fiber that my friend Janet gave me on my last visit. I just spun a little to get it started on the spindle and it is so so beautiful to spin! This is not the first alpaca I have ever had to spin. I bought some many years ago in Peru and it was in a dried-out, brittle and filthy state. I lost a good third of it in the cleaning process and I knitted rather than wove with it. Now I have this prepared smooth luscious fiber to work with – what a dream! It almost feels like cheating! I’ll be spinning it to weave with on my backstrap loom.