
Backstrap Weaving – The Simple and the Complex

Every now and then when I am sitting at my loom, I am reminded of the years that I spent teaching English here in Santa Cruz, Bolivia. The institute had received a visit from a teaching consultant from the U.S State Department who introduced us to the concept of what she called “barefoot teaching”. She had developed this after having spoken with many teachers, especially those living in countries of the developing world like Bolivia,  who had convinced themselves that they simply could not teach effectively without flashcards, computers, interactive boards and all other kinds of audio-visual aids. The barefoot teaching idea basically involved setting yourself the challenge of leaving all the tools at home and going into class with nothing more than a lesson plan and a piece of chalk (as well as a lot of enthusiasm and creativity)…in other words “barefoot”.

Then I get to thinking about Maxima, my favorite weaving teacher in the Bolivian highlands, and what simple tools one really needs to get started in backstrap weaving…basically your back, some thread/yarn and a toe! (and instruction or guidance, be that in person, or virtually via books, blogs, video or a multitude of other ways to connect online). Real barefoot weaving! Maxima doesn’t even use a backstrap.
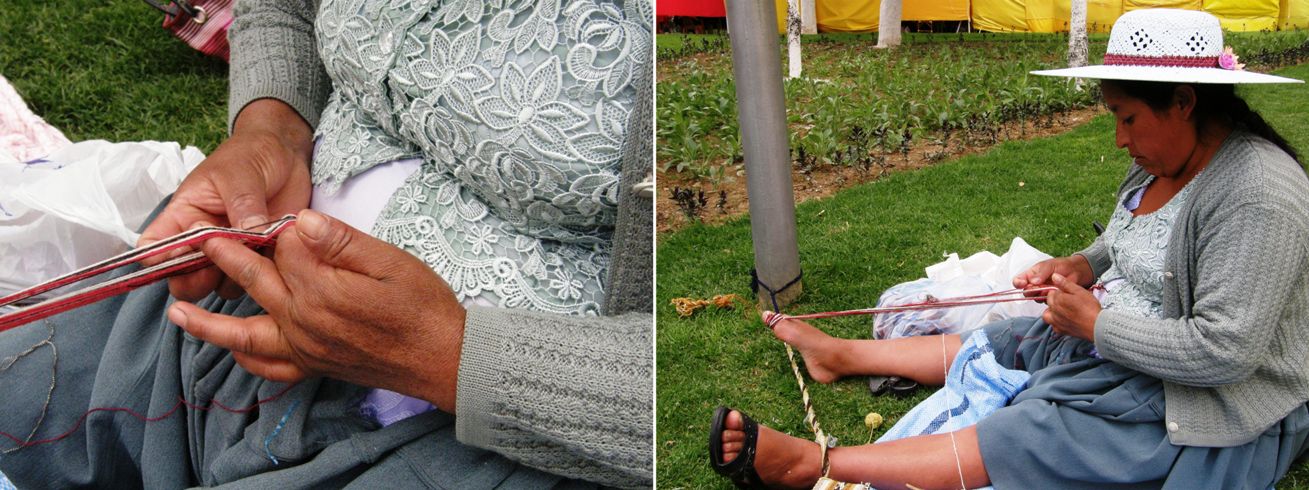
Maxima has made a picking cross and is selecting the warps from each side of the cross for her design. Her warp is attached to her toe and for a while so was mine. Then I also attached my warp to her toe when mine had had enough! Finally we moved to the post to tie my warp up and later Maxima did the same.

There’s not a single stick in use.

Ten-year-old Peruvian weaver Juan Miguel, above, has a stake driven into the ground to which his warp is attached – his only real piece of equipment. If it were a shorter warp, he could use his toe. (Maxima deals with longer warps by wrapping the warp once around her toe to securely grip and tension it. A string passed through the end loops of Juan Miguel’s warp goes around his waist and acts as his “loom bar” and “backstrap”. He is using a string loop for one shed and string heddles for the other. He isn’t even using a beater or sword. His hands do the trick. After passing the weft, he opens the other shed and pulls the upper layer of threads up while pulling the other down in order to squeeze the last weft shot into place.

A warp can be wound in a figure-eight around a finger and a toe. The thumb and a finger of the free hand are used to gather up the cross when the warp is complete while the weaver uses the other hand to tuck one end of the warp into the waist-band of her skirt. The other end stays on the big toe. A length of yarn is inserted to hold the cross leaving two hands free to make string heddles.

My weaving friends in the Bolivian highlands were excited about the opportunity to try out cotton that had been donated by Cotton Clouds.

Don’t get me wrong, I won’t be tossing out my loom bars. I like using them even for the tiniest of warps but it is nice to think back to how I got started. We used pencil-width sticks about five inches long for loom bars, slightly longer ones for cross sticks and we had a beater. My teacher tied a cord around my waist and lodged the stick under it. Cord was passed through the other end of the warp which was attached to a bush so we could weave tiny pebble weave bands.

Twenty-six years ago, I sat on that pillow between my mother-and-daughter teachers to take my very first “watch and do as I do” lessons in weaving on a backstrap loom. They were lessons not only about the pebble weave structure, but also about how to use your body to operate the loom. Most importantly of all, they were lessons in how to learn by simply watching.

Last year was the twenty-fifth anniversary of that very first experience and I wove a piece as a representation not only of my vision of a post-pandemic world, but also as a recognition of the twenty-fifth anniversary of the happy scene above. The very first pattern that these ladies showed me was a hummingbird (although it took me several years to recognize it as one!). Hummingbirds, therefore, also became a part of the piece that I wove. In it, we are together again. The bush has grown into a tree with strong and extensive roots and although our warps have widened, the simplicity of the tools remains the same.

Panel 4 from the Within These Walls series.

Even something as simple as long thumb nails can be very useful. I appreciate them most when I am making string heddles. Sometimes I am unaware of the part they play in other stages of the process and only realize when I have had to cut them. Then I really miss them.

I love the simplicity in this picture….one’s entire weaving kit rolled up and neatly stored away.

And I wish that I could be organized enough to create a simple, clear weaving space like this…

My teacher Felicia’s weaving space…sticks, a bone tool, a bit of plastic-wrapped wire, and a sheep skin on which to sit. Simple tools don’t necessarily need to be made from natural materials. Hat and cat are optional. She was weaving for a museum’s gift shop and needed to adhere to precise pre-agreed measurements…hence the measuring tape.

I have an out-of-sight-out-of-mind way of operating and so my weaving space is strewn with things that serve to remind me of ideas for future projects as well as samples and works in progress. Yes, I now have a lovely weaving journal in which to jot down those ideas but it’s not the same as being constantly reminded of them when I have to step over and around them every day..

The thing that really motivated me to write this post was the completion of the simple fabric with which I will, hopefully, construct a bag….a simple blue bag to go with the highly decorated and comparatively complex reversible three-color strap. I even opted out of adding a motif to the cloth here and there using supplementary weft. One of the joys of supplementary weft is that you can treat your base cloth as a blank canvas and just add pattern wherever you please. The cloth can be covered with pattern from edge to edge or just show a few scattered motifs here and there. I used both options in this scarf…

60/2 silk fabric for a scarf on the loom with the simple tools that were used to create it.

One of the other many joys of using supplementary weft is that if you decide that you don’t like the motif you have woven, you can simply cut it out. Your base cloth will remain intact. I started adding a motif to the cloth for my bag, decided it was too much, and removed it. I actually unwove to remove it rather than cut it out.

Having got the urge to decorate the cloth out of my system, I sailed along enjoying the simplicity of the “dance” of just rhythmically operating the two basic sheds on the loom and passing my shuttle. Well, “sailed along” might not quite be the right way to describe it. It was a sticky wool warp and required a slower pace, stopping to advance the warp more frequently and performing strumming and other operations a lot more gently than I normally would….but I so enjoyed weaving it!

A wool warp of 776 ends.

And here’s the contrast between the simple and the complex in the finished cloth and strap….

The cloth is in industrially-spun wool and the strap is in my own spindle-spun wool.

I am showing the string heddles because they are almost perfectly clean despite the stickiness of the wool warp. There is the faintest film of blue fluff on their tips which makes it look like the tips have been dyed.

I will leave you now with this lovely hummingbird piece that showed up in my Facebook feed from the Museo Chileno de Arte Precolombino. I visited that museum many a time when I was living in Chile but haven’t been there since its major renovation some years ago. They were even selling my woven bookmarks in their gift shop at one point…wow, that was so long ago!

Backstrap Weaving – At the Bottom of the Tool Box

Last year I decided that something had to be done about my collection of backstrap weaving tools. This picture was taken back in 2016 and I can assure you that between then and 2019, the collection had grown with the bins being replaced by larger ones and the addition of yet another. My smaller tools were getting lost at the bottom, things I hadn’t used for a while were getting dusty and one of the bins was top heavy and inclined to topple over. It was time to make a change.

I bought a four-drawer chest. I won’t show it to you because it was kind of cheap and nasty. It did the trick. The top drawer holds all the beams…the round ones, the square ones, the split beams and all the shed rods and heddle rods in their various lengths and girths. Some of the beams have carved ends. Some don’t, and just have rubber bands at their ends to hold the backstrap in position. The beams that support the two ends of the warp are pretty much all around the same length. It’s the sticks that go between that vary greatly depending on the width of the piece I am weaving.

The second drawer that hold the swords and shuttles is my favorite and it’s in that drawer that I can often get lost in nostalgia. One of my favorite parts of the set-up process for a new project is selecting just the right swords for the job. Sometimes, I’ll need two or three. Sometimes they need to be hefty, other times slim. Sometimes I like to have them in two distinctly different colors of wood. It’s easier to select and pick up dark threads when they are sitting on top of a light sword and vice versa. I love projects that require multiple swords as I enjoy the clack-clack sound that they make as they bump against each other in the warp or when I remove them and place them in a pile by my side.

The red, black and white project at left, which I wove some years ago, was woven in a fairly dense structure in 8/2 cotton which meant that I got to use one of my heftier swords.

The teal silk project was the first I had woven in a width that was too great for my standard beams. I got to use an extra long rod that I happened to have for the near beam (it had been a particularly long shed rod in a Guatemalan loom that I had been given) and cut some dowel for the other end.

That long beam came in handy again when I wove these two wool panels that were sewn together to make a lap blanket. The structure was less dense which meant that I chose to use lighter swords. I needed several because I was working with multiple sets of heddles.

Here are some swords in vastly different sizes for different kinds of projects…Above, you can see two swords that are the biggest and smallest in a collection of six that make up the standard set used by my weaving teachers in Salasaca, Ecuador. Below, you can see one of the big boys alongside the very first band-weaving sword that I was given to me to use by one of my teachers in Peru. That sword has become bent out of shape with use over the twenty-four years that I have owned it.

While selecting tools for my current project, I found myself sitting on the floor surrounded by swords and shuttles enjoying trips down many memory lanes as I recalled the places I had been when I had acquired a certain piece, the people I had been with, or the person who had made the tool or given it to me. If there is anything good to be said about the times in which we are currently living, it is that I allow myself the time to do things like this.

I laid out just some of the pieces for a photograph before they got returned to the pile in the drawer.

There are swords that I have bought from, or have been given by, my weaving teachers. Others were given to me by my weaving students. There’s a lovely collection of five band-weaving swords on the left that came to me via two of my Australian students and which are made from different woods that are native to Australia. The tool with its label still attached is some kind of spatula made from sassafras wood from Tasmania. One of these days I will bevel the edge and use it as a sword.

The sword with the pretty carved pattern was made by Allen Berry and given to me by my students. You will see a shawl pin (another gift) and a hair stick that are being repurposed as pick-up sticks along with others in wood and bone. Some of these came from trades that I made with my indigenous teachers in the highlands and lowlands. A lovely fine sword in olive wood sits above the hefty one and was made and given to me by a student. There’s one very fine sword in that lot that came with a Guatemalan loom I was given. I treasure that one when I am weaving a piece with four selvedges.

I love my ice cream-stick shuttles and there’s a quirky little shuttle-like thing near the spatula which is actually supposed to hold fishing line. I found it in an antique store while on a road trip in Australia with a weaving friend.

This is just a basic outline of the “wheres” and the “whos” behind those pieces.. Of course, all the pieces hold stories and fond memories that go much deeper than these brief descriptions.

This piece sitting on top of one of my ikat experiments from years back, is the one that started the whole nostalgia trip! It was well and truly lost at the bottom of the drawer. This is my oldest home-made tool. It is ugly, grubby and unimpressive, right? It started its life at three times this length as my attempt to make a shuttle for the Navajo-style tapestry pieces that I was weaving back in 1995. Once I discovered backstrap weaving, I knew that I was unlikely to continue making tapestries. The shuttle got cut down and roughly beveled and started its new life as a sword and beater. I love it. You can see the darkened ends where my hands have grasped it to beat the weft into place. I wish it were long enough to use in my latest project. It’s been hidden away for far too long.

The third drawer in the chest holds many of my weaving samples and some of the finished pieces. The last one is full of all those odd bits and pieces….cable ties, turn buckles, cord, backstraps, reeds, rigid heddles, band clamps, umbrella ribs, bicycle spokes, rubber bands, dpns….you get the idea.  I can reach over and open it while still seated at my backstrap loom and dig out just the right little piece of equipment that I need.

As for progress on my latest project, I washed the finnweave sample that I showed you last week and was happy with the way it looked and felt. I figured that the sett I had used had been good. I have two pre-colombian balanced-double-weave textile fragments and it’s amazing how these two pieces that both have exactly the same pattern are so different in appearance. It’s almost like one got washed and the other never did…

Cloth that is woven using the finnweave structure has a very distinctive look on the back. A comparison of the back of the sample that I wove a few years ago as a replica of these fragments and the backs of these very fragments confirmed that I was using the same balanced-double-weave structure that the weavers who produced this cloth had been using in pre-colombian times.

Here’s my washed and pressed sample alongside the new finnweave warp and my selection of tools. I later added a light-colored sword to that set when I realized that picking-up black threads on a dark background wasn’t going to work for me.

Backstrap loom warps are often left just lying on the ground while the weaver is off doing something else. In their limp state they can often look like a freaky mess…

Place the backstrap around the hips, place tension on the threads and everything immediately looks friendlier!

And friendlier still once the heddles are in place…

I often read comments in online groups from people who wonder what happens to the warp on a backstrap loom if you have to get up and do something. They think that surely all the sticks must fall out once you relax tension. No, they don’t. The kinds of heddles that I make grip the sticks to which they are attached. I can tilt and shake that warp about knowing that those sticks are going nowhere. Nor is my shed rod which is tied to a second cross stick. My far beam is lashed to the bottom of my bed and the near end of the warp is safely lashed to its beam. It might look like an ugly mess on the floor but it’s all under control!

Probably the worst that can happen is tripping on the weft as you walk away. That’s like pulling on a drawstring which totally rumples up the fabric.

For that reason. I am now in the habit of parking my shuttles, in this case two, on top of the fabric at the base of the warp before I remove my backstrap and place the near beam gently down on the floor. You can see the nice light-colored sword that is sitting under my black threads. And, there nestled between the two swords is the sweetest little tool that I am using to help pick-up the threads. My student, Claire, made that and gave it to me when I was visiting in Tasmania. It was cut from a stick from an apple tree. You might know that Tasmania is often referred to as the “Apple Isle”. 

#########################################################

You will notice that I have managed to get through this post so far without any reference to my books! Until now!! Those who have been following my blog over the years will realize that my travel-to-teach lifestyle can no longer be. Fortunately, I can continue teaching and showing you things through my blog posts. I try to illustrate with as many pictures as possible. I know that not everyone wants to read all the text and that just being able to scroll through some eye-candy is also nice.

And, there’s also teaching via my books which gives me an income. So, I will leave you here with a little bit about my latest books and hope that you may feel inspired to make a purchase. And to all those who already have….THANK YOU!


One of the features of my most recent publications is the inclusion of supplemental instructional video clips.

I know that some people like to have movements and steps frozen in images. Others like to have detailed written instructions that help them to visualize the process. And others like to hear the instructions while watching the movements on video. Some people tell me that they hear my voice in their heads as they weave.

I like to include all three options so that I can satisfy a variety of learning styles. Apart from the instructional video clips, I include some “just weaving” clips so that you can also watch the movements in silence without interruption.

All my books are available at Taproot Video as PDFs. The titles in English are also available as spiral-bound books.