Backstrap Weaving – Seasons

I wove this with handspun cotton singles that I’d bought in Guatemala back in 2008. I used my bamboo reed to achieve the sheer open look and used the same cotton as supplementary weft to weave in patterns. It’s a style that I had been wanting to try ever since I bought a sample from the Coban area of Guatemala.
While I love spinning with a drop spindle, I can’t say the same for plying. I find it downright tedious and I just wanted the task to finish. I’d ply at my craft group gatherings, on the train, at the Arts Society gatherings, at the spinning and weaving group….it just seemed to go on and on.
I managed to squeeze in some time at the loom between hiking trips. It took two attempts to wind a warp to my liking from all those fabulous natural dye colors but I had to face the fact that I just wouldn’t be able to get them all into the one piece.
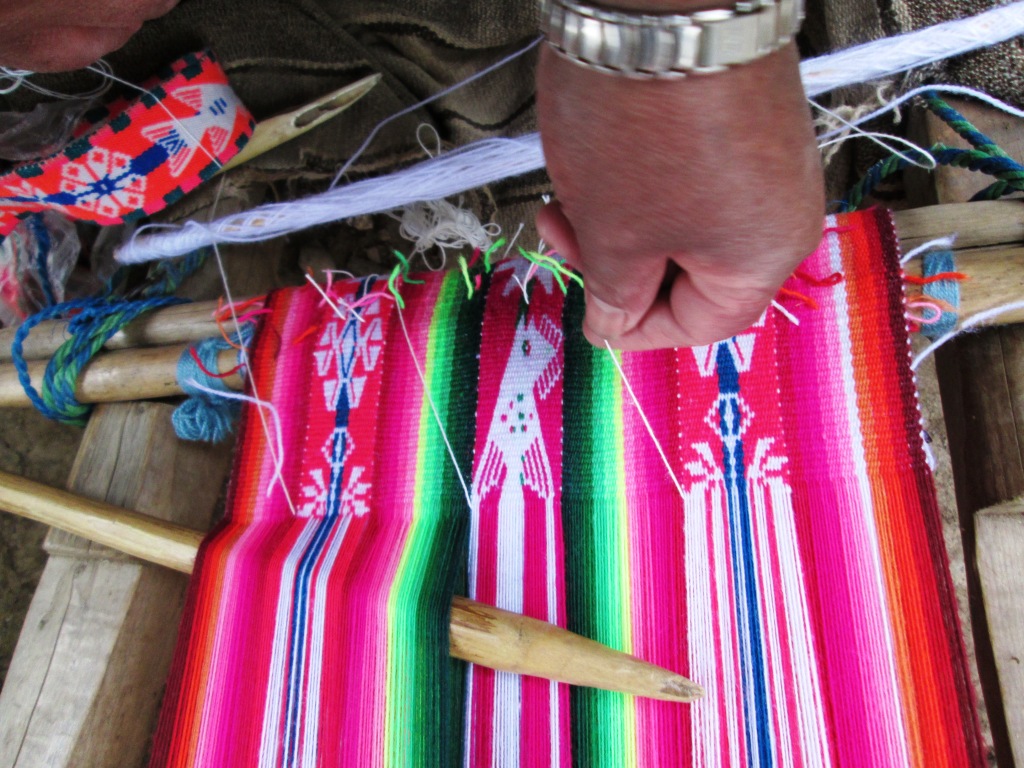
Four seasons motifs in progress. The heddle arrangement may look awkward but it works well. I had seen weavers in Bolivia use similar arrangements for their double weave pieces.
The figures as well as the colors are meant to represent the four seasons. The yarn I had dyed with cochineal just didn’t belong here. It can wait along with the greens for another project.
I didn’t want to use the handspun wool as weft for either of these pieces and used instead some unidentified soft and very loosely spun ”stuff’ that a friend had given me. It worked well except for the fact that it was somewhat slippery and wanted every now and then to slip out of the shed at the edges rather than lie there snugly. I’d had that very same experience with luscious alpaca yarn that I’d spun once upon a time.
The two faces.
I somehow always find myself on the floor at the planning stage. I didn’t have a choice in Bolivia but I’m in a bigger place now with table space. I still end up on the floor.
I’m in a couple of hiking groups and get to go out at least twice a week.
The “real” project will be much wider than this.
I couldn’t believe that after having admired the Indonesian ikat textiles for so many years, particularly the ones from Sumba, that I should run across these in an op shop?!
This photo was taken after one week. It has developed even further since.

Backstrap Weaving – My Books!

If you’ve purchased the PDFs that come with supplemental video clips, you don’t need to do anything either. You will continue to have access to the videos by clicking on the link to the folder of clps that you’ll find in the chapter titled Videos. Access to the clips will continue after the Taproot Video website closes.

ACTION NEEDED FOR THE FOLLOWING:

  • Clck on the link.

This a celebration of connections made in what I’ve left behind and where I now find myself. The images depict the four seasons considering that now that I live in a place that truly experiences all four. We had two at best in my tropical home in Bolivia! I’m going to make this into a bag so I can carry those connected memories with me.

Bye-bye Taproot Video and thank you.. Thank you to all those who have purchased my publications over the years and supported me through following my blog as well as leaving me kind comments and reviews here and on my other social media pages.The blog will continue. I have a lot saved up to post! You’ll be hearing again from me soon.

Backstrap Weaving – The Flip Side

Lots of people ask me about how the pandemic is affecting me here in Bolivia and there is plenty to say about all the negative ways in which lives have been changed. But, there’s also a flip side…at least there is in my case…and there are some positive things going on as well as a direct result of not being able to travel and being obliged to stay in one place. I was thinking about it and this is the longest period of time I have stayed here in Bolivia since 2005! There was a period prior to that during which I hadn’t left South America for nine years but, after 2005, I seemed to be regularly picking up and flying away.

This long period at home has my Ideas Notebook crammed with planned projects and leaves me with plenty of time to play with those things that do require more sampling, planning, charting and trial-and-error which, for me, is best done over one long uninterrupted period of time. I have lots of uninterrupted time.

I showed my finished Finnweave sampler in my last post and am pleased to tell you that I found a use for it beyond just being a sample to which I can refer for future projects. It makes a wonderful cowl. Having worn my hair long for most of my adult life, I am very much aware of my bare neck and how cold it can get now that I have cut my hair short. I was very conscious of that on my winter visits to Australia and New Zealand last year.

Yes, I had a moment of frustration the other day and took it out on my hair in the form of yet another DIY haircut. At 10:30 pm with toothbrush in mouth this suddenly seemed like a good idea. While we are certainly not in cowl-wearing weather here south of the equator, the time will come when I can be back visiting the USA in the spring and fall, and hopefully Australia in the winter months, when the air can get a little nippy.

Quite a few people have been curious about the Finnweave I have been doing. I explain that I chose this structure simply because the pre-columbian textile fragments that I have were woven this way. There are of course other kinds of double weave pick-up structures that can be used to weave figures and the figures will have a certain appearance on the front and back of the cloth. Weavers can choose the look that they prefer. As always, I refer to the Doramay Keasbey article in Handwoven Jan/Feb 2011 in which she compares the front and back of bookmarks that she wove using five different doubleweave pick-up structures. 

So, what about the flip side of my Finnweave? The Keasbey article includes Finnweave and I can show you the two sides of a motif on a piece that I wove some years ago using 8/2 cotton which I think is much clearer than trying to show you the example in the finer 20/2 cotton that I just wove.

You can see that smooth horizontal lines on one face look like toothy lines on the other . This particular motif does not have any fine vertical lines but a fine vertical line on the “good’ face looks like a column of small disconnected horizontal dashes on the back. Occasionally, I prefer the way a particular motif looks on the back in that from a distance it resembles blurry ikat with those toothy edges. It’s a softer look. The upper face has a much smoother and sharper appearance.

So, I will keep my Finnweave cowl on hand as I think about my next project using this structure. There’s not much chance of it being used as a cowl any time soon as we have temperatures in the high 90s with one day at 100 degrees forecast for the next eight days. The tropical “winter” is over!

What has been keeping me busy lately is refreshing my memory on three-color reversible pebble weave. It’s another one of those things that grabs my attention every few years. I showed you in my last post the sample I wove in tencel using this technique some years ago in which I used yellow and white on a blueberry background.

I can’t find that sample anywhere now but, thank goodness, I am better at keeping tabs on my notes. However, my notes could have been better and it was frustration with trying to interpret them that led to the late night hair-cutting incident! After a good night’s sleep, I got the notes all sorted and I chose primary colors in 8/2 tencel once again to test whether I had indeed understood the steps.

Examples from Peru shared with me by Mary Spanos with the red, green and yellow sections of three-color pebble..

I am using my backstrap loom with string heddles as you know. If you are a tablet-weaver, three-color double-faced pebble weave is apparently quite straightforward. I have read about people doing it by using triangular tablets but also square tablets that have holes in the sides. So, if you are in a great hurry to learn this, you might want to go with tablets. I’ll leave you to investigate that further.

I will be writing a tutorial on this eventually for those who use string heddles. “Why don’t you just use tablets?” you might ask… I am more interested in the string heddle process as that is the way the technique is woven here in South America.

I have examples of three-color pebble weave in pieces I bought in Peru on my very first visit in 1996. These particular pieces were relatively expensive and I had to think long and hard about investing in them back in my do-it-on-a-shoestring backpacking days. They blew my budget for the following ten days. I am so glad I bought them, though. My weaving friend Mary also sent me pictures of some similar pieces that she owns.

The three-color pebble weave figures in these particular pieces are not identical in appearance on the back of the cloth.

Here you can see the back of one that I wove myself many years ago in a non-reversible technique….

I haven’t yet had the chance to sit with a weaver who knows how to do the double-faced version and so my efforts have been guided by the writings of Adele Cahlander and Marjorie Cason in The Art of Bolivian Highland Weaving and a lot of trial-and-error of my own. Just by chance I was able to pick up a small piece of cloth that was woven using the double-faced three-color version. It was being used as the cover of a small photo album that I found in a souvenir store right here in Santa Cruz. I grabbed it! Thankfully, it had only been glued to the photo album along its edges and I could easily remove the cloth.

Bolivian cloth with pattern in double-faced three-color pebble.

The cloth is so very tightly woven as is the way here in Bolivia, that it is impossible to separate the warp threads to perhaps get some clues about how it was woven. In any case, I am using a series of  steps for my own experiments and am getting the results I want. I feel that I could replicate the pattern on this cloth if I wanted to.

I would, however, love to be able to spend time with the Bolivian weaver of this piece of cloth and see if she has some other less laborious and more efficient way of achieving this which will no doubt have me slapping my forehead and exclaiming “Of course!” On the other hand, perhaps I am doing it just the way she does….I would love to know! Bolivian weavers think nothing of what may appear to us as extremely laborious weaving tasks….think of what they go through every time they finish a piece of warp-faced cloth with four selvedges, or the thread-by-thread pick-up that goes into weaving pieces like the red and black one you see here….

A weaving of the Jalq’a people of Potolo, Bolivia.

So, here is the piece in tencel that I wove to practice creating patterns using all three colors as outlines, background and fillers. My sample motifs got smaller and smaller as I gradually centered my focus on just some very specific aspects. These patterns are charted in my Complementary-warp Pattern Book.

The idea was to refresh my memory about this technique and, as it turned out, improve my notes for next time. But it was also about wanting to weave something using the wool I had started spinning during the Tour de Fleece. My spinning output is quite sad. I simply can’t manage to motivate make myself to devote that much time to it. I am more interested in charting and weaving. In any case, I have some yarn to use and after sampling in tencel, I was ready. I had originally planned to sample in some industrially spun wool but everything I found in the closet was either too heavy or too stretchy. I do have some Knit Picks Palette but I didn’t want to push my luck with that. The method I use has a lot of heddle action and I wasn’t sure how well the Palette would stand up to it.

A couple of wrist cuff projects seemed like a good way to start….

I used a little leaf motif that I had created for my Complementary-warp Pattern Book (slightly modified here) as well as part of a larger flower motif that I had created for the same book in the Garden-themed section.

One of the challenges for me when using this three-color technique is finding three colors that will work well together on both faces. I have a light color -white, a very dark color – black and a medium color- let’s call it tan. These three work well together. Other combinations may not. If, for example, I use two medium colors like purple and green, I can have them sit on either side of the  lightest color on one face, but they will have to sit right next to each other on the other face. In that case there may not be enough contrast between the two for the pattern to be easily distinguishable.

You can see that  tan and black sit right next to each other in the leaf motifs on the upper face and are separated by white on the lower face. I played with the outline color in the flower motif using both white and black as shape outlines and tan and white as the fillers.

My hand spun yarn stood up well. Admittedly, this is only a very short and narrow piece but I can tell thatf it will do well even in something much larger.

I added an eye-patterned tubular band in the same colors and then played around with different buttons for the button-and-loop closure. I love this cuff! 

Next on the loom, was another cuff project using the green and purple that I mentioned above. I didn’t do any outline color-flipping in this one. Here it is getting its tubular edging. I love weaving and sewing that edging! (Check out my book if you would like to learn how to weave this patterned tubular band to use independently as jewelry, for example, as well as weave and sew it as an edging).

These are the buttons that I eventually chose…a flower one for the garden-theme and an interlocking shape to match the interlocked motifs which are charted in my pattern books.

The last thing is to braid and sew on the loops that go around the buttons to close the cuffs.

So, what’s next? While I am in wrist-cuff mode, I might make one in Finnweave. I do like to have examples of the various structures that I use in my wrist-cuff collection. I also feel motivated to spin some of the colors that I am least likely to use and then dye them so I that I can continue to play with three-color pebble. If you have suggestions for three colors that would work well together no matter how they sit in relation to each other, please let me know. I wove this wool three-color pebble some years ago in which the orange and green played well together when placed right next to each other….….and look just as good on the other face where they are separated by white.

Finally, I would like to promote my publications…in this case, the one I produced on the eye-pattern tubular band which you have seen along the edge of the cuffs I made. My ability to earn has been greatly reduced with my inability to travel to teach and book sales help to keep me afloat. Perhaps you would like to try weaving an eye-pattern tubular band. I have two versions of the book. One, which is only available as a pdf, teaches how to weave the band as an independent tube which can be used in jewelry and other accessories. Ideas are given in the book.

In addition to this, the other extended version shows you how to weave and sew the band to the edge of cloth as I have done. It also goes on to teach two other decorative finishing techniques that are used by some of my Bolivian weaving teachers. This extended version is available as a pdf and as a spiral-bound book.

Both the short and extended versions, in either pdf or book form, give access to supplementary instructional video clips and are available at Taproot Video.

I’ll be donning my masks and venturing out a bit more in the next week or so as I need to re-stock the pantry before our national elections this month. I plan on staying in and well out of the way during and after that event.

Take care and please stay safe.


Backstrap Weaving – Forehead Slaps

handspun llama fiberI have a small zip lock bag full of left overs of my handpun llama fiber.

There’s less yarn in those balls than you might think as I remember having wound the thread around clay beads. What to do with them?

For me, combining them all into one project won’t work as I don’t feel I have enough dark colored thread to create a decent amount of contrast. Maybe I could darken some of the colors by over-dyeing with tea, or I could come up with some small projects to weave using just two or three colors.

And then I remembered the beautiful handwoven cuffs I had seen on the Peruvian Connection website…

peruvian connections

Aren’t these gorgeous?! When I first saw these pictures I longed to try making a cuff with my own handpsun and edging it with a tubular band. Then I got distracted and carried away with other projects. I did make cuffs in the end…several of them, in fact…but in silk without tubular edgings.

Now I could finally get around to trying this with my handspun. The reason I was looking for small projects like these is that I really needed frequent breaks from tying plastic strips around warp threads for my latest ikat experiment. I like to be able to weave every day. Even taking a whole day off from warp tying was most welcome…talk about tedious! So, it was very nice to be able to take a break and pick up a small project and weave away.

cuff with handspun yarnHere’s the second cuff I made which is the one with which I am most pleased. I used the Tinkipaya star pattern that I recently used on a wool bag project.

handspun cuffs and wool bagThat’s the first one I made on the right. It’s a little rough and I wish I had put more thought into the layout. The pick-up pattern in the center would have looked better if it hadn’t been bordered by red, I think. I guess I wasn’t very confident about it being a success and was a little careless as a result. Both are edged with tubular bands. The red one has an X and O pattern that I saw being used for a tubular band by a weaver in Pitumarca, Peru. The other has the eye pattern that I learned in Chinchero, Peru.

I didn’t manage to make any sweet yarn buttons like the Peruvian weavers have in their beautiful cuffs. I used buttons made from tagua nut that I had bought in Ecuador many years ago.

tagua nut buttonsOne end of the cuffs that I wove is a selvedge and the other end is raw. I turned the raw edge over, sewed it down and then stiffened it with diluted white glue. This enabled me to then securely apply the tubular edging. I wove and sewed it to the edge at the same time.

The tubular band does a pretty good job of covering that turned edge. As always with these tubular bands, you can start with a selvedge but then have to get creative with the finish where you are left with a bunch of unwoven warp ends to somehow hide away. When edging a bag, this is easy. All sorts of things can be hidden on the inside of a bag. You can see the place where the end of the tubular band meets the beginning in the picture above. Like I said, you just have to get creative. If you can’t see it, that means that I did a pretty good job ;-).

Of course, I had already woven three cuffs before I realized that it would have been wise to position and hide the join in the tubular band under the button! Forehead Slap #1.

tinkipaya design cuffA braid at one end of the cuff loops over the button to secure it around my wrist.

3 cuffs from handspunI made three and each is edged with a different tubular band. The third has the Chauaytire style of tubular edging. The pattern does not show up so well due to the lack of strong contrast in the colors.

The third one has a pattern that I adapted from a belt made by the Tarahumara weavers of Mexico.

3 cuffs with handspun yarnSo, the cuff weaving was a welcome distraction that got me through the tiresome process of applying ikat ties on my larger project. I have seen pictures of young ladies in Uzbekistan seated around a horizontal frame and tying bundles of warp together for ikat. It could be fun as a group activity. It doesn’t really require concentration if the design has been already marked on the warp threads.

ikat circlesI had originally intended having four circles on this warp….two on the front of what will hopefully be a slip cover for my laptop and two on the back. But, after two, I was done! I am still in the experimental stage and I figured I could learn plenty from just two circles…and indeed, I did. I already have new strategies planned for the next attempt.

ikat circle filled with pick-up patternOne of the big lessons…Forehead Slap #2…is that the original tied shape will contract considerably lengthwise if it is being filled with patterning. So, I have a squat circle underway. You can see my original cardboard template on the floor nearby. I hadn’t even noticed this happening when I wove the block-like patterns in my Bird ikat project. However, I don’t mind this squat circle too much.

But, one of the best things I learned this week was the value of having time to let my mind wander freely. This is probably why I seem to solve all my weaving problems when in the shower! When traveling, I have plenty of time to do that…all the airport waiting time and bus trips give me lots of opportunities to let my mind wander and I get my best ideas that way. Once I am home, I spend all my time implementing those ideas, very focused and concentrating on pick-up patterns….a wandering mind leads to mistakes.  All the time I spent standing at the ikat frame and a few hours spent sitting at the doctor’s office this week (where I was surprised to find that I was the only one without an electronic device) have allowed my wandering mind to bring me a whole new set of fresh ideas.

I am going to leave you this week with a couple of videos. The first is a 14-year old Peruvian girl singing Michael Jackson’s The Way You Make Me Feel in Quechua. I love it! This was produced as an effort to promote young people’s pride in their native Quechua language. A word of warning…I have had this song in my head for the last three days.

This second video was produced in Argentina and the song is about Doña Ubenza who, according to this web page, is a shepherdess who spins while she tends her grazing sheep. Inspired by the spinning and sheep, the producer applies the fiber theme to stop motion animation with felt figures to tell the story. It is adorable as is the song itself. Unfortunately, Doña Ubenza is not spinning in the video but you can see here there with her sheep.

ENJOY!


Backstrap Weaving – Braiding and Thinking

llama fiber and charque

spinning alpacaNo,  haven’t been spinning. I have been braiding and thinking about projects new and old. I am aware from my visits to Ravelry that the great annual Tour de Fleece is underway and, while I am not participating, I was motivated by all the excitement connected with the event to dig through the cupboard and pull out some old handspun projects which I have woven with the alpaca and llama fiber you can see above. If you are wondering what’s in that bowl, it’s llama jerky.

anna-spinningI had bought that llama fiber while wandering around a tiny country settlement in Uyuni, Bolivia back in 2002. It was coarse, dry and brittle but I knew no better.  I was thrilled just to have it as it is impossible to obtain down in the jungly lowlands where I live.

I had already learned to spin but I think that spinning that rough llama fiber was the best spinning training I could have had. It was awful to card. I had a wheezing attack each time I pulled the dusty stuff out of a bag and the memory of the smell of that dust still turns my stomach. The first things I wove with that spun llama fiber still sit framed on my wall. It had been such a business that I never thought I would do it again!

Later, when my friend Janet in the U.S gave me some prepared alpaca fiber, I couldn’t believe how easy it was to spin. It felt like cheating. Here’s one of the alpaca projects on the loom…

alpaca-project-on-loom

natural_dyes_medium2I dyed some of my yarn made from the llama fiber with cochineal and plants.

OLYMPUS DIGITAL CAMERAI ended up making quite a few pieces of coth which I sewed into shoulder bags and pouches. These are the things that I have been pulling out of my closet. They were obviously made in the days before I started weaving tubular bands and embellishing my pieces …there is not a single tubular band or tassel to be seen!
chahuaytire tubular bandThe long pouch had some forgotten tools in them. It was nice to unzip it and discover those. I decided that this whole lot needed some sprucing up. The black bag will get a new strap and have its flap edged with something decorative. The brown bag could also do with a more interesting strap.

I decided to edge the long zippered pouch with a tubular band. This would be my chance to apply the band that is used to edge cloth in the community of Chahuaytire. Although I have sewn this kind of tubular band to pieces of cloth in samples as you can see above, I had never used it in a real project and I had not woven it with wool.

Cloth from Chahuaytire, Peru edged with a tubular band in beautiful natural dye colors
Cloth from Chahuaytire, Peru edged with a tubular band in beautiful natural dye colors.

When I visited Marijke van Epen in The Netherlands in 2012,  I worked with her on figuring out this band from a picture. Almost immediately after that visit, I went to Peru and was lucky to be able to watch one being woven and buy a warp in progress to see how it was set up.

chahuaytire and chichero bandsWhile I have seen the patterned tubular band on the right, which I learned in Chinchero Peru, also woven here in Bolivia, I have never seen what I will call the ”Chahuaytire style’,’ on the left, here in Bolivia at all.

Maxima at the Tinkuy in 2913...photo by Dorinda Dutcher
Maxima at the Tinkuy in 2913…photo by Dorinda Dutcher

One of my weaving teachers in Bolivia, Maxima, has an older sister, Narciza, who knows how to weave the Chinchero style of tubular band and frequently attaches it to the edge of her woven coca-leaf bags.

Dorinda, who works with Maxima, recounted one of Maxima stories in which she told of how her mother did not know the figure on the tubular band to teach them and so bartered corn to have a neighbor teach her oldest daughter, Narciza. The neighbor had recently moved to the area from Oruro (also in Bolivia).

Maxima was not interested in asking her older sister to then teach her the pattern as Narciza was in the habit of giving her a smack when she made a mistake. I always wondered if my weaving teachers sometimes had the urge to give me a wee slap when I was learning! I can remember their frustration with me back in 1996 when I broke my warp threads while trying to operate the heddles.

Maxma is currently weaving items for her husband in his new role as Mayor of Hucarani. There are several items that he and Maxima, as the Mayor;s wife, are required to have. Here Maxima is weaving a ch'uspa with columns of figures in double weave. The woven pieces need to be bright and festive and so she is using store bought acrylic rather than her own handpsun and naturally dyed wool.
Maxma is currently weaving items for her husband in his new role as Mayor of Huancarani. There are several woven items that he and Maxima, as wife of the Mayor, are required to have. Here Maxima is weaving a ch’uspa for her husband with columns of figures in double weave. The woven pieces need to be bright and festive and so she is using store bought acrylic rather than her own handpsun and naturally dyed wool.

And so, it was only in 2013 when Maxima had the chance to attend the Tinkuy de Tejedores in Cusco, Peru, that she had the opportunity to learn to weave the ñawi awapa pattern in much the same way I had in 2010.

However, Dorinda has since told me that Maxima seems to have forgotten how to weave the ñawi awapa band since returning to Bolivia.  She sends her weavings to her sister if she wants them to be edged with a ñawi awapa.

As with everything new like this, if it is not immediately put into practice, it can easily be forgotten. Ask any of my students!

One day I hope I can go out to Independencia and help refresh her memory.

I have had so much fun with the ñawi awapa since learning it, attaching it to so many things and, most recently, using it for jewelry.

nawi awapa jewelryBut, back to the ”Chahuaytire style”. I enjoyed weaving and sewing it to the edge of the pouch. It came out beautifully in wool.

pouch edged with chahuaytire tubular bandI added a braid to the zipper and I think the bag looks a lot more interesting now. There you can see all the swords and shuttles that I will be storing in it.

Not all tubular bands need to have pick-up patterns. I have often woven and attached them in just one solid color and have also used ”threaded-in” patterns, that is, ones that are created by the order of the colored threads in the warp rather than with pick-up.

These two pouches have solid color plain-weave tubular edgings.

The blue and green piece has a tubular edging with a simple thread-in pattern.
The blue and green piece has a tubular edging with a simple thread-in pattern. The pattern was warped off center to appear on the upper face of the fabric and show as solid green on the reverse.

Maxima often uses simple Andean Pebble Weave patterns in her tubular edgings using two sets of heddles and I have also seen weavers in Pitumarca weave tubular bands with the pattern set up in multiple heddles.

A weaver from Pitumarca weaving and sewing a tubular band edging
A weaver from Pitumarca weaving and sewing a tubular band edging.

Having learned the discontinuous-warp, or ticlla, technique with weavers from Pitumarca, I used the particular tubular band pattern used by weavers  in their community to edge my workshop piece when I got home and finished it. You can see how the edges of my cloth rolled when I took it off the loom. This was due to the high amount of twist in the handspun alpaca yarn that we were given to use. The cloth lay flat once the tubular band was applied.

discontinuous warp with tubular bandOf course, I didn’t spend my entire week on this one tubular band. As the title of this post implies, I was braiding and thinking…..braiding the enormous number of ends on my wall hangings at four minutes per braid. There are still plenty more to go.

And I was thinking about the shapes I want to weave on my next ikat ”sample”. Yes, I don’t feel ready yet to dive into the real project. I think that just one more sample with curved shapes needs to be done.

I also thought about the new slip cover I need to for my new laptop. This new one is slightly bigger than the notebook I have been using these last five years and so a new cover is needed.

Here’s the one I have been using so far with its pattern taken from Central Asian textiles…

central asoan design backstrap weaving

notebook-coverIt has been on many trips with me.

And, while I think, I pull out books, look online and make sketches. While going through the cupboard, I also pulled out a lot of fiber crying out to be spun. Maybe I will also set myself a wee spinning goal for the next months.

I will leave you for this week with this final picture of an event which is creating a lot of excitement here in Santa Cruz.

11698916_10153439643714530_8322870495067486430_nWe are on holiday today as the Pope is in Santa Cruz where he is celebrating his only Mass during his Bolivian visit. BoA, the Bolivian airline that transported him, has been posting pictures of the visit on Facebook and kindly gave me permission to show one here. Pope Francisco was presented with a handwoven souvenir of his visit when he landed and walks hand in hand with a boy who is dressed in the typical green and white outfit of Santa Cruz with his sombrero de sao.

See you next week…..