Backstrap Weaving – Putting it All Together.

The button-and-loop closure that I used for the first folder. I’d like to use two such closures on the new folder, one on each of the plain weave side panels, as this second folder is going to be quite stuffed full of charts.
In my last post I showed you how different the two faces of this cloth turned out…both attractive in their own way. I eventually decided on using this bolder face for the folder project.
First things first…finish the main pattern fabric. At this point I was celebrating passing halfway.
I prefer to weave the two strips separately rather than as one long band which I then cut in two. That saves me having to set up to accommodate the longer warp in my limited weaving space. It does result in a bit more waste, though.
These will be the fan-folded pieces that make the expandable sides of the folder. I use two for each side…one for each half… and join the two halves together as the very last step of the process.
You can see the line in the middle of the fan-folds where the two halves are eventually glued together.
The four fan-folded pieces are then sewn to the inside of the folder. The first folded section in each is sewn down flat along the the edges of the folder. That piece of cardboard is only there for the photo to help distinguish the folded pieces from the background lining cloth.
Think of the side pieces as being folded into a series of valleys and mountains. The dividers extend across the folder from mountain peak to mountain peak. There are two mountain peaks on each half of each side.
I hope this photo gives you the idea. This isn’t the tricky part, by the way!
You can see the center join which forms another mountain. The interfacing tabs on the last cardboard divider are glued in and sandwiched between the two sections.
All I need to do now is braid some loops and find two nice silver buttons.

Backstrap Weaving – Hitting the Ground Running

Arriving in Sydney in the early morning, I had hours to kill before my afternoon train up north. I put my luggage into storage at Central Station and went down to the harbor on what was an absolutely glorious day.
Flying into Sydney at day break reminded me of the colors I had chosen for my woven piece named Sunrise, Sunset.
My expandable folder project has a woven wool cover with three-color patterning. It holds my various styles of blank pattern charts.
I used some fabric that I happened to have to line the cover and make the expandable sides.
At this stage, all the leaf shapes have been stitched and I am pulling and tying off the threads to prepare the cloth for dyeing. The folds of cloth in the tightly gathered areas will mostly resist the dye. I completed this task and took the piece home ready to go into the dye pot.
Sleep was denied me the first couple of nights. That along with the fact that day time temperatures have been outrageously and unseasonably high (and I don’t have air conditioning), had me dyeing the cloth in the wee hours and attempting to remove the stitches. That was the only time that I could bear to use the stove. It was lovely sitting and working on it in the quiet and relative coolness of 3am.
I’ll probably use one face for the lining and the other for the sides because I simply can’t decide which face I prefer.
This was what was waiting for my return so that I could hit the ground running. I’d separated the threads onto two sticks for the two sets of heddles and left the heddle making itself as the task that would get me straight back into the groove on my return.
I got some smart and wonderfully thin black cable ties while in Australia for my unconventional way of lashing my warp to the beam.
Approaching halfway and rolling up the woven cloth around beams and paper.
Woo hoo!….past halfway and time to reverse the pattern. No more broken threads. I’m really pleased with the new pattern I created.
My favorite Bolivian weaving teacher, Maxima, stands here on the left with one of her daughters and a granddaughter…..three generations of weavers! Her granddaughter proudly shows her first ever weaving that has been accepted for sale by the co-op of weavers in her community. It was woven on the traditional leaning frame loom using handspun and naturally dyed wool. Dorinda, who works with these ladies to transport and help sell the products made from this beautiful cloth, has just written a blog post showing all that she has available to ship now from the USA (until Dec 6) if you are looking for Christmas gifts.

Backstrap Weaving – One Method doesn’t Fit All.

This is the mill-spun wool singles yarn that I bought from a farmer while weaving with friends in Petaluma, California.
Two of the plain-weave projects that I’ve completed with this wool….a travel documents pouch on the left and mobile phone case on the right.
Taming the mill-spun singles into a three-color pattern in the structure that I call Andean Pebble Weave.
Using 8/2 Tencel in the same structure.
The camera strap in which I could play with changing the background color, the hummingbird outline color and filler color. It was a bit brain bending but fun.
A little further along with some cloth already rolled up.
Now to decide on whether to join the three pieces without overlapping them using one of the decorative stitches that I’ve learned from my teachers here, or join them with the tiniest of seams.
The heddles from the two warps remained pretty much fluff-free. The one on the left is from the pattern warp and is discolored. I’m guessing that a fine film of fluff has discolored it.
This little pouch for my pin loom is made up of three pieces joined together with a tiny seam. The center is a piece I wove from my own handspun llama yarn that I was rescuing from an old project. I added sides made from the mill-spun wool singles.
A subtle joining stitch in cotton connecting two panels that don’t overlap. I’d woven a very long band on a circular warp and Karen-style backstrap loom that had been given to me. I cut the band into five pieces and joined them to make a table square.
The completed table square.
The stitch can be decorative as well as functional when worked in a contrasting color. I used it to join the panels of this wool lap blanket that I wove.
Another kind of stitch that my Vietnamese backstrap weaving teachers use. I used it to connect two bands and make a tool bag.
Sometimes the joining stitch can be one of the main features. I used this stitch which was shown to me by one of my teachers in the Bolivian highlands to join two cotton panels that I had woven. Maxima stitches it in many bright and lively colors.
Picture courtesy of PAZA Bolivia shows Maxima’s carrying cloth with its colorful joining stitches.
Natural brown handspun cotton singles waiting to be washed. I use these metal mesh pencil cups to hold the thread under tension in the pot.

Backstrap Weaving – The Simple and the Complex

Every now and then when I am sitting at my loom, I am reminded of the years that I spent teaching English here in Santa Cruz, Bolivia. The institute had received a visit from a teaching consultant from the U.S State Department who introduced us to the concept of what she called “barefoot teaching”. She had developed this after having spoken with many teachers, especially those living in countries of the developing world like Bolivia,  who had convinced themselves that they simply could not teach effectively without flashcards, computers, interactive boards and all other kinds of audio-visual aids. The barefoot teaching idea basically involved setting yourself the challenge of leaving all the tools at home and going into class with nothing more than a lesson plan and a piece of chalk (as well as a lot of enthusiasm and creativity)…in other words “barefoot”.

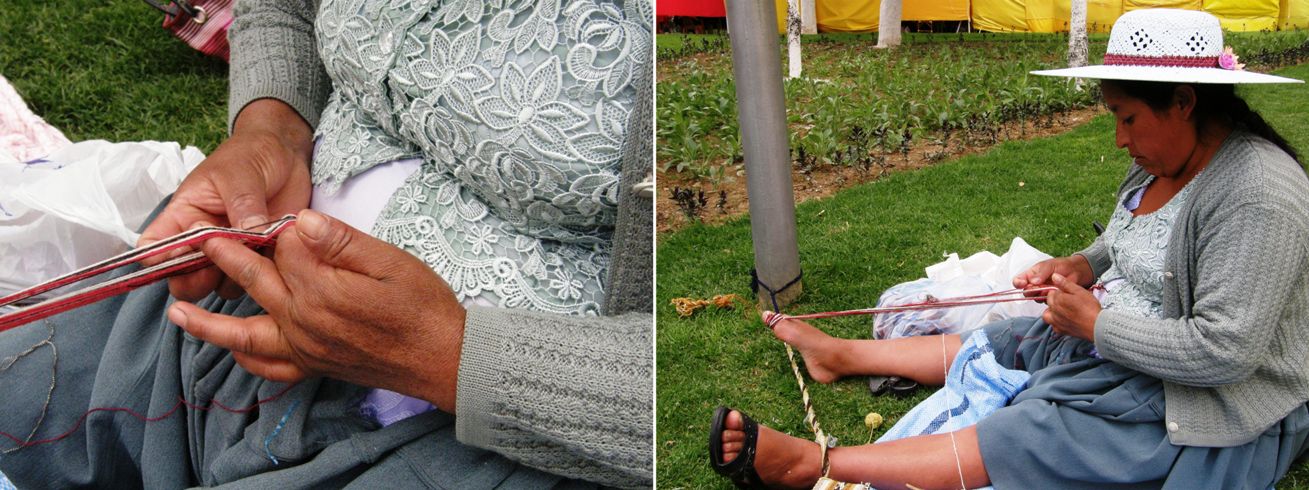
Then I get to thinking about Maxima, my favorite weaving teacher in the Bolivian highlands, and what simple tools one really needs to get started in backstrap weaving…basically your back, some thread/yarn and a toe! (and instruction or guidance, be that in person, or virtually via books, blogs, video or a multitude of other ways to connect online). Real barefoot weaving! Maxima doesn’t even use a backstrap.

Maxima has made a picking cross and is selecting the warps from each side of the cross for her design. Her warp is attached to her toe and for a while so was mine. Then I also attached my warp to her toe when mine had had enough! Finally we moved to the post to tie my warp up and later Maxima did the same.

There’s not a single stick in use.

Ten-year-old Peruvian weaver Juan Miguel, above, has a stake driven into the ground to which his warp is attached – his only real piece of equipment. If it were a shorter warp, he could use his toe. (Maxima deals with longer warps by wrapping the warp once around her toe to securely grip and tension it. A string passed through the end loops of Juan Miguel’s warp goes around his waist and acts as his “loom bar” and “backstrap”. He is using a string loop for one shed and string heddles for the other. He isn’t even using a beater or sword. His hands do the trick. After passing the weft, he opens the other shed and pulls the upper layer of threads up while pulling the other down in order to squeeze the last weft shot into place.

A warp can be wound in a figure-eight around a finger and a toe. The thumb and a finger of the free hand are used to gather up the cross when the warp is complete while the weaver uses the other hand to tuck one end of the warp into the waist-band of her skirt. The other end stays on the big toe. A length of yarn is inserted to hold the cross leaving two hands free to make string heddles.

My weaving friends in the Bolivian highlands were excited about the opportunity to try out cotton that had been donated by Cotton Clouds.

Don’t get me wrong, I won’t be tossing out my loom bars. I like using them even for the tiniest of warps but it is nice to think back to how I got started. We used pencil-width sticks about five inches long for loom bars, slightly longer ones for cross sticks and we had a beater. My teacher tied a cord around my waist and lodged the stick under it. Cord was passed through the other end of the warp which was attached to a bush so we could weave tiny pebble weave bands.

Twenty-six years ago, I sat on that pillow between my mother-and-daughter teachers to take my very first “watch and do as I do” lessons in weaving on a backstrap loom. They were lessons not only about the pebble weave structure, but also about how to use your body to operate the loom. Most importantly of all, they were lessons in how to learn by simply watching.

Last year was the twenty-fifth anniversary of that very first experience and I wove a piece as a representation not only of my vision of a post-pandemic world, but also as a recognition of the twenty-fifth anniversary of the happy scene above. The very first pattern that these ladies showed me was a hummingbird (although it took me several years to recognize it as one!). Hummingbirds, therefore, also became a part of the piece that I wove. In it, we are together again. The bush has grown into a tree with strong and extensive roots and although our warps have widened, the simplicity of the tools remains the same.

Panel 4 from the Within These Walls series.

Even something as simple as long thumb nails can be very useful. I appreciate them most when I am making string heddles. Sometimes I am unaware of the part they play in other stages of the process and only realize when I have had to cut them. Then I really miss them.

I love the simplicity in this picture….one’s entire weaving kit rolled up and neatly stored away.

And I wish that I could be organized enough to create a simple, clear weaving space like this…

My teacher Felicia’s weaving space…sticks, a bone tool, a bit of plastic-wrapped wire, and a sheep skin on which to sit. Simple tools don’t necessarily need to be made from natural materials. Hat and cat are optional. She was weaving for a museum’s gift shop and needed to adhere to precise pre-agreed measurements…hence the measuring tape.

I have an out-of-sight-out-of-mind way of operating and so my weaving space is strewn with things that serve to remind me of ideas for future projects as well as samples and works in progress. Yes, I now have a lovely weaving journal in which to jot down those ideas but it’s not the same as being constantly reminded of them when I have to step over and around them every day..

The thing that really motivated me to write this post was the completion of the simple fabric with which I will, hopefully, construct a bag….a simple blue bag to go with the highly decorated and comparatively complex reversible three-color strap. I even opted out of adding a motif to the cloth here and there using supplementary weft. One of the joys of supplementary weft is that you can treat your base cloth as a blank canvas and just add pattern wherever you please. The cloth can be covered with pattern from edge to edge or just show a few scattered motifs here and there. I used both options in this scarf…

60/2 silk fabric for a scarf on the loom with the simple tools that were used to create it.

One of the other many joys of using supplementary weft is that if you decide that you don’t like the motif you have woven, you can simply cut it out. Your base cloth will remain intact. I started adding a motif to the cloth for my bag, decided it was too much, and removed it. I actually unwove to remove it rather than cut it out.

Having got the urge to decorate the cloth out of my system, I sailed along enjoying the simplicity of the “dance” of just rhythmically operating the two basic sheds on the loom and passing my shuttle. Well, “sailed along” might not quite be the right way to describe it. It was a sticky wool warp and required a slower pace, stopping to advance the warp more frequently and performing strumming and other operations a lot more gently than I normally would….but I so enjoyed weaving it!

A wool warp of 776 ends.

And here’s the contrast between the simple and the complex in the finished cloth and strap….

The cloth is in industrially-spun wool and the strap is in my own spindle-spun wool.

I am showing the string heddles because they are almost perfectly clean despite the stickiness of the wool warp. There is the faintest film of blue fluff on their tips which makes it look like the tips have been dyed.

I will leave you now with this lovely hummingbird piece that showed up in my Facebook feed from the Museo Chileno de Arte Precolombino. I visited that museum many a time when I was living in Chile but haven’t been there since its major renovation some years ago. They were even selling my woven bookmarks in their gift shop at one point…wow, that was so long ago!

Backstrap Weaving – The Sounds of our Craft

It’s been a while since I last heard the scritchy sound of hairy warp threads releasing their grip on each other as I open sheds on my backstrap loom. I am hearing it now because I have taken on the challenge of weaving with mill-spun wool singles that I bought from a farm while traveling in California. I don’t really know what I had in mind when I bought that yarn. I had just wanted to buy something as a souvenir of that part of my travels from the lovely people who had allowed my friends to gather and weave in their barn.

Because traveling to far off places to buy yarn like this is off the table at the moment, this is another case of my exploring my dwindling stash and enjoying the new challenges that this presents. My idea is to use this yarn to weave the body of a bag that will go with the strap I just finished. I used a three-color reversible Andean Pebble Weave structure for this strap and the wool yarn that I had been spinning and plying on a drop spindle during pandemic Zoom gatherings.

Despite the dark colors, I think it’s a happy garden scene of flowers and hummingbirds.

I did start off with the idea of creating an orderly, cohesive pattern layout but the temptation to play with the three colors and pop those hummingbirds wherever I wanted took over and I had a lot of fun doing just that.

One thing that I had wanted to do was use one color for the pebble spot that represents the hummingbird’s eye and another color for all the other pebble spots that sit within the figure’s body…but you know, I forgot to do that every single time! Well, almost every single time. I was determined to remember to do two things before I eventually finished the band…take a picture of myself at the loom working on it and get those colored eye spots in!

I once met a bird photographer that told me that it is really important to capture the little spot of white light in a bird’s eye in order not to have it appear lifeless. I have looked for it in every bird photo I have seen since. In the same way, I think the different colored eye spot on these last two hummers makes an enormous difference.

I didn’t hear any woolly scritchy sounds while working with this hand spun of mine. I had been concerned about how well it would stand up to this rather dense structure but realized after a while that I had completely forgotten all my concerns and was able to enjoy how friendly it was and how lovely it felt.

I remember the first time I wove with my hand spun. It was with some rather nasty dry and dusty llama fiber that I had bought from the animals’ owner up in the highlands. At the time, the scritchy tearing sounds were freaking me out and the yarn I had spun was anything but soft and lovely to handle. I had put a tremendous amount of twist into it so that it would stand up to warp-faced weaving. I don’t do that any more.

And now, there is a new experience…weaving with these mill-spun singles. This is a first for me. Yes, there’s some “scritchiness” but I am actually finding it pleasant…almost like the warp is whispering to me. That llama fiber had seemed to be screaming at me in that first-ever experience. I made adjustments to the way I was spinning it, it became friendlier, and I was able to enjoy weaving with it more. 🙂

This is my sample for the bag fabric that will follow. I wound a warp of 27″ length and 160 ends. The idea was to weave and allow it to settle into a consistent width so that I could then make calculations for the bag fabric. I most typically start off too narrow with new-to-me yarn and have to let the piece gradually widen and settle. Once I am happy with that, I put it aside and work on the real project. This time, however, I was enjoying working with this wool so much, I decided that this piece really needed to be something and I figured that my cell phone, which currently sits in a case, could do with a pouch. So, I unwove a good 3″ of fabric so that I could start over at the correct width. The fact that I was able to unweave the warp-faced cloth woven with wool singles yarn without losing my mind, tells me that this yarn and I are going to have a happy weaving relationship.

And I decided to use some of my plied hand spun as supplementary weft to weave in a pattern. This is some of the thicker “Zoom” hand spun that I first created and used to weave a wrist cuff before deciding to try and go finer. It is making a very nice supplementary weft. I am using the outlining technique of supplementary-weft patterning in which the weft does not travel from selvedge to selvedge. I can make my hand spun yarn go further that way. It is precious to me and I don’t want it to be just hidden away between the layers of warp as it travels to the selvedge. I can’t tell you how much fun I am having with this!

Wrist cuff with the initial run of hand spun.

A couple of observations: There had been a tendency for me to think that the action of the heddles against the wool would be the cause of most of the abrasion and subsequent pilling or shredding. Lately I have found that with good loom-operation technique, this isn’t so. There is actually a point of layer exchange that sits between the heddle and the shed rod where most of the abrasion is occurring for me. This exchange happens when the threads that lie on top of the shed rod are lifted and brought down through the heddles to the weaving line. (I keep my shed rod stationary and don’t slide it forward to the heddles as some backstrap weavers do which explains why the point of layer exchange on my particular warp is in that position.) That abrasion point is the one I need to watch and I notice that a little bit of fluff accumulates there. I am particularly gentle there and tend to spread the threads with my hands and lift them through that point in sections. It is also important to advance the warp as often as possible so that the abrasion point is constantly changing position.

I love the multiple tones in the warp and its rustic look. I had considered a hummingbird pattern but decided that this one better suits these natural earthy colors.

But despite all that gentle handling, the warp does continue to whisper to me in its scritchy voice, possibly just as a reminder not to get cocky and careless when I open the sheds. This talk of sound playing a part in our weaving, reminded me of some thoughts I had posted way back in 2013 that I thought I would revisit and share with you.

tools01

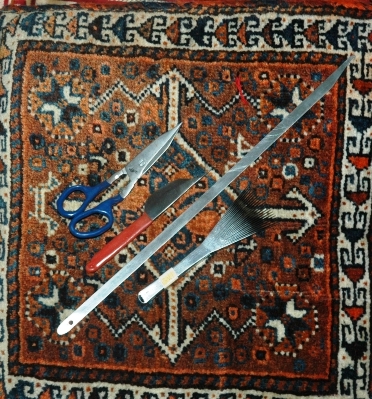
Back then, something a weaver had posted on the Weavolution website had resonated with me. An Australian gentleman, Hakim, was learning to make cut pile knotted rugs with an Iranian teacher in Australia. He said that when he is at home working on his practice piece, he can tell that the tension of the warp threads is correct if they make the same sound  when he handles them as they do when he is working on his learning piece with his teacher in class.

What a piece of priceless knowledge!

(At left you can see an example of a set of tools that Hakim was able to get for me from his teacher for the day when I try this technique. It’s on that long, long to-do list).

Hakim’s comment made me think about the different sounds that are connected with weaving on simple looms and how much I enjoy them.

I am not one for placing things in my ears and listening to music while busy with something else. I can’t stand that. I like to be in touch with the sounds around me. They form a very important part of my memories of places and experiences.

In my skiing days, I would wonder at people who skied with headphones on. I would never give up the pleasure of hearing the wind and the swish of the skis on the snow, or the sudden change of sound as snow turned to ice giving me time to react and adjust position. Back then, no one wore helmets. I am told that the helmets being worn now don’t affect the skiers ability to enjoy those sounds.

I learned to fly a glider when I was 19. There is nothing like the sound of an engine-less craft rushing through the air. There was so much with which to be occupied while learning (especially for someone like me who was so utterly un-coordinated at the time!) but I could always simply rely on my ears for certain information. For example, if the sound of the rushing air suddenly disappeared it was a sure sign that I had the nose up too high and that told me that I had better do something quickly before the glider stalled!

When we first went into pandemic lockdown here in Bolivia, I remember finding the sudden absence of sound really disturbing and almost frightening. Then I realized that what was missing were familiar sounds of human activity and that they had been replaced by much more pleasant ones…bird song and the sound of leaves being blown across the cobbles…sounds that normally were drowned out by the hum of city living.

As for sounds while weaving, I love using multiple big swords. I so enjoy the musical tok tok sound they make as they knock together in the sheds. And I love the chuckling chatter of all the sticks on the loose as they fall together when I release tension and roll up the warp at the end of the day. Below, you can see the sticks I used in a wall-hanging piece….many different kinds of wood making interesting sounds. It can become quite a collection.

O

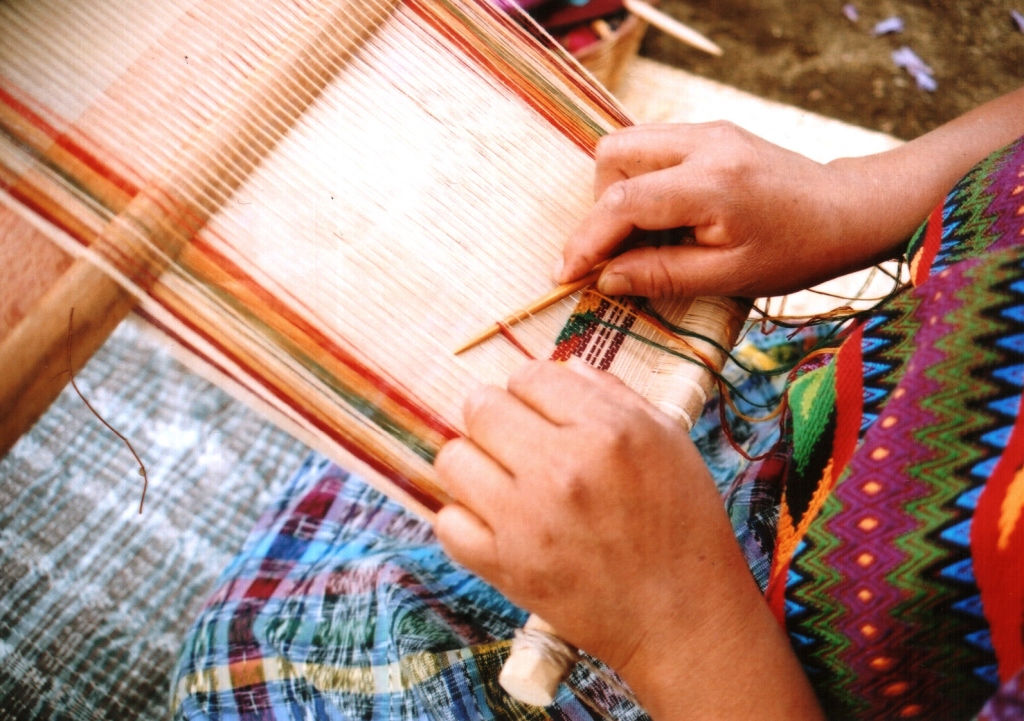
Then there’s the plink plink sound as the tip of a delicate Guatemalan pick-up stick slides from one taut warp to the next as the weaver counts out threads for supplementary-weft inlay.

weaving-tijera

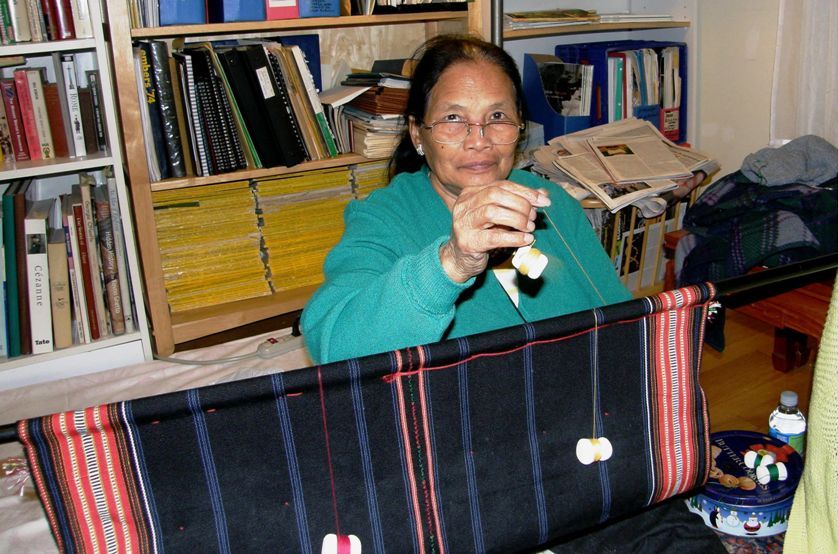
The dancing dangling bobbins used in weft twining go clackity clack as they twist and jiggle.

final-twining-session

And they enable my teacher to create such beautiful work as this:

Examples of kteh work by my Montagnard weaving teachers.

I loved the opportunity to drag the llama bone tool across the strong highly-twisted wool threads that my teachers in Peru had prepared below…scritch, scritch, as I strummed to help separate the warps. Only warp threads with certain characteristics will tolerate this.

O

Listen to my teacher doing it…

If you stroll around a  village of weavers in a certain part of the central highlands of Bolivia, you will know in which houses a weaver is at work by the LOUD THWACK!! THWACK!! of the llama bone hitting the sword as the wefts are slammed into place. That sound is one that is not really pleasant, at least not to my ears, when I am seated right next to my teacher. Here is one of my teachers in Candelaria at work at her loom:

When I stayed in the stilt-house home of my weaving teacher in Ecuador, I was often awoken at dawn by the muffled thump, thump and accompanying vibrations as Trini drew down her heavy beater while working at her vertical loom. This was combined with various house shaking and creaking sounds as the loom was connected to floor and ceiling beams…a part of the house itself. You can see that big sword/beater lying across Trini’s leg below and get an idea of the muscle that goes into operating this particular set-up.

trini-opening-shed1

The sound of threads in a warp-faced weaving rubbing past each other as a shed is opened can range from a soothing smooth swish to a seemingly painful tearing protest depending on the yarn being used and how it has been prepared.

When weaving with new backstrap weavers, we even learn to be amused by the constant clatter of swords jumping out of their sheds and hitting the floor. Each sword has its own musical tone…nowhere near as much fun on a rug! A cement floor like the one in this picture greatly enhances the melody.

Joan following a pattern chart at the Mannings.

By the way, I am in charge of picking up the fallen swords….gives me something to do. It is funny that as time goes by we have people weaving in silence. What happened to our musical accompaniment? Well, new weavers, without even realizing it, get a feel for the right amount of tension and the sweet spot in the warp where the sword will sit happily upright and not leap to the floor. Or…they just get rather good at catching the sword on its way down!

Maybe one of the nicest sounds for me is the fwip fwip fwip fwip in rapid succession as I pull my heddle string quickly but carefully (or else it will tangle miserably!) off its heddle stick. This means that the piece is finished.

And with that soft, happy sound in your head, I will leave you.

Until next time.