Backstrap Weaving – Putting it All Together.

The button-and-loop closure that I used for the first folder. I’d like to use two such closures on the new folder, one on each of the plain weave side panels, as this second folder is going to be quite stuffed full of charts.
In my last post I showed you how different the two faces of this cloth turned out…both attractive in their own way. I eventually decided on using this bolder face for the folder project.
First things first…finish the main pattern fabric. At this point I was celebrating passing halfway.
I prefer to weave the two strips separately rather than as one long band which I then cut in two. That saves me having to set up to accommodate the longer warp in my limited weaving space. It does result in a bit more waste, though.
These will be the fan-folded pieces that make the expandable sides of the folder. I use two for each side…one for each half… and join the two halves together as the very last step of the process.
You can see the line in the middle of the fan-folds where the two halves are eventually glued together.
The four fan-folded pieces are then sewn to the inside of the folder. The first folded section in each is sewn down flat along the the edges of the folder. That piece of cardboard is only there for the photo to help distinguish the folded pieces from the background lining cloth.
Think of the side pieces as being folded into a series of valleys and mountains. The dividers extend across the folder from mountain peak to mountain peak. There are two mountain peaks on each half of each side.
I hope this photo gives you the idea. This isn’t the tricky part, by the way!
You can see the center join which forms another mountain. The interfacing tabs on the last cardboard divider are glued in and sandwiched between the two sections.
All I need to do now is braid some loops and find two nice silver buttons.

Backstrap Weaving – Length!

LENGTH!

Finally, I am doing something with the third of my three current weaving goals: 1. go wider, 2. use finer materials and 3. go longer. I have been working this week on the long warp… the yellow 60/2 silk scarf.

yellow silk warp backstrap weavingAfter finishing the bands of supplementary-weft patterns at the start which had me sitting in the same spot for days, I am now on to the faster mostly plain-weave part. I slow down every now and then to add a little flower motif with silk supplemental weft.

first scattered flower motifSometimes, it is a solid flower, like the single flower you can see above, and sometimes an outlined one. This does not have me sitting still for long. There is a regular need to sometimes move forward as I roll up the woven cloth and then move back as I unroll the unwoven warp from the far end. The cushion on which I sit is glued to a polished piece of wood which allows me to dig my heels into the floor and slide myself forward and back as needed. It’s a lot easier than having to get up and push that cushion across the rug or wiggle it forward or back. It also allows me to make finer adjustments while seated.

rolling u excess warp backstrap weavingI used sheets of paper to roll the unwoven warp to keep everything neat and even. It’s a lot of fun unrolling the warp from the far end and having one of the sheets of paper drop out…progress! I then use that same sheet of paper between the layers of rolled woven cloth. I don’t know if you ever played ”pass the parcel” as a kid at birthday parties. It reminds me of that. Each time I unroll, it’s like removing one layer of the wrapping on the parcel only to find that there are still more layers underneath.

If I had a nice grassy backyard in which a sturdy stake could be implanted, I would enjoy sitting outside in some shade and having my warp stretched out to its full length…

single plane backstrap warps PeruHowever, I do find there are certain advantages to having the unwoven warp rolled up. I think that it is easier for me to maintain a consistent tension on the warp if I am always seated at more or less the same distance from the end of the loom.

Backstrap weavers who use circular warps are able to do that. They weave around the circle of warp without having to change in any major way their seated position. My teacher, below, can always be seated the same distance from the wall and brace her feet against a wooden block. You can see how her finished woven piece is circular.

fluffing the woven fabric with thistles EcuadorI can’t resist unrolling my work all the way every now and then to see how it is going and to make sure that the scattered effect of the flower motifs is working.

silk scarf on loom There will be a small celebration when the final piece of paper drops off the end beam and I can see the end of the warp. But, I know that event will mean that soon I will be slowing down to a crawl to duplicate the bands of patterning that I wove at the beginning of the piece. I have managed to be disciplined, not measure, and keep the motifs truly scattered.

scattered flower motifs on silk scarf

silk bandanna backstrap weavingThe cloth is a little on the stiff side now but I know, having worked with this 60/2 silk before in the teal bandana at left, that it will soften beautifully after wet-finishing and pressing. The sheen of the silk will be more obvious then too.

The patterns I chose for the bands are loosely based on those I saw on a Mexican rebozo, or shawl. I made quite a few changes to the original to include my own flower motif. My weaving friend, Franco, shared a lovely video of a parade of Mexican rebozos…the variety is astounding and I love the ways the models wear them. There is a white one and a black one there that I am totally in love with!

My erratic internet can handle this video and so I am sure that you will all be able to enjoy it….Thanks, Franco!

One day I will have a warp for a rebozo on my backstrap loom.

While on the topic of length, I guess the longest pieces of warp-faced weaving I have seen are the Central Asian yurt bands. My friend Lisa owns one and hers is 48 feet long….makes my scarf length seem ridiculous!

lisas-band-rolledHere it is wrapped around her yurt…how gorgeous!

lisas-yurtThey are not woven on backstrap looms. This is the loom set-up in Kyrgyzstan posted on the site of Little Foot Yurts

kyrgyzstan-208The heddle stick is attached to the tripod which keeps it permanently raised. We saw a similar system being used by a Turkish weaver in a video I shared here recently.  The shed rod is a flat piece of wood which is most likely turned on its side when needed. At the weaving line you can also see a small stick holding the warp threads that will float to make the pattern.

Here’s another beauty that my friend Yonat and I found in a store in California when we were out and about. We can only imagine how long it is.

I got pretty excited the first time I encountered these pieces via my friend Lisa online. I thought…Wow, the Andean Pebble Weave structure in Central Asia! But, on closer inspection, I could see that it wasn’t the same structure. It is not a complementary-warp structure at all. Complementary-warp weaves have two structurally identical faces. The colors are reversed on the two sides of the cloth as you can see in my piece below.

Chinchero both facesI call the structure that is used to create the yurt bands, Simple Warp Floats…this my dull structural name for it. ”Simple” because the floats appear on only one face. In Kyrgyzstan it is known as terme.

You can see how different the two faces look in this picture of a piece I wove replicating some yurt band motifs. The face on the left is the ‘good” face. The face on the right has spaces where the black weft is exposed. You can also see this difference in the first picture of Lisa’s rolled up band above.The same motifs can be easily woven as double-faced ones but they are not woven that way traditionally.

terme simple warp float structure

I made this piece into a case for my small laptop…

notebook coverThis became a favorite structure of mine for a while. Yurt band motifs adorn my favorite belt…

I went a bit wider too and made a zippered pouch…

yurt band design…but I’ll never go as long as those yurt bands!

It was even more exciting to find that the structure is used here in South America, in the tropical lowlands of Peru, for example. I have seen it on pieces from Iran and Mexico as well. These were inspiration for a set of place mats I wove using this Simple Warp Float structure.backstrap weaving placemats simple warp floatsIt’s all based on a basic warp of two colors. One shed holds all the light threads and one shed all the dark. If woven as plain weave, you would produce a band of dark and light horizontal bars. You could then choose to create three-span floats with certain light threads in order to make a pattern. Or, you could do the same with just the dark threads. Or, you can alternate as seen at right….one motif with dark floats followed by another with light floats The horizontal bars act as a sort of background.

simple warp floatsBelow, you can see a variety of patterns on a belt from Aguacatan, Guatemala. This is a very long piece for a belt…ten feet. The dark and light floats are sometimes used together within one motif. The horizontal bars, again, act as a sort of background to the motifs. The bars really dominate in this belt.
aguacatan beltIn this next band that I wove a long time ago, dark and light warp-floats working together form the motif on a base of horizontal bars…

simple warp floats light and dark floatsYou can also choose to float  threads in a way that has the horizontal bars appearing to be part of the design itself rather than just being a ”background”. This is a piece I wove after returning from Ecuador where I had stayed with cotton weavers who use this structure in their work.  Only the dark threads are forming floats in this piece and, to me, it feels like the horizontal bars are forming their own pattern of large ‘X’s.

And then, you can go all the way and create so many floats with both colors that you completely cover the horizontal bars as in my next example….

shipibo pattern in simple warp floatsThis is the terme structure that is used to create the yurt bands I showed. I used it to weave this place mat with a motif from the Peruvian tropical lowlands.

You can see a picture of a weaver in Kyrgyzstan (from the Little Foot Yurts site) saving the dark warp threads on a small sword. These are the threads that will float to form the pattern.

kyrgyzstan-211More information on these structures can be found in my tutorials here, here and here. I will be transferring this information to my Structures and Terminology page soon.

I think I was wise to choose a project that included lots of plain weave for my first venture into this kind of length in backstrap weaving. There are times when I am happily zooming along….opening a shed, beating, passing the weft and so on….and only slowing down to weave a little flower, the pattern for which I have by now memorized. I can imagine the time and concentration required to weave those 48-foot long yurt bands with all that pick-up every single step of the way! I wonder how many such bands a weaver in Kyrgyzstan makes in lifetime.

Here are some projects from weaving friends…

two pebble weave wall hangings julia t julia wTwo Andean Pebble Weave projects from two very talented Julias…

Julia T wove the wall hanging at left. It has a mixture of motifs from my books and those of her own. The maze pattern is her own and she has cleverly combined a traditional Andean pattern with her own ideas. The piece recalls time she spent with a team of friends creating a labyrinth in a park surrounded by beautiful bird-laden Australian bush. Julia W’s piece is her adaptation of a Japanese sashiko embroidery sayagata motif to the Andean Pebble Weave structure. The gold twining, hanger and stripes are such lovely touches. She has done several beautiful pieces inspired by Japanese embroidery patterns which she cleverly adapts to Andean Pebble Weave.

Both Julias came up with clever ways to hang their pieces.

Julia W’s wrapped ring and bamboo stick are beautiful in their simplicity. She has created two very different faces by having not only the pebble weave but also the intermesh borders in reversed colors. This way, the piece can be hung on either a dark or light-colored wall. Julia T wove a stick into the last few inches of her weaving so that she can change the face that is being displayed simply by flipping the end and fringe. That’s the thing with these double-faced structures. You want to be able to enjoy both beautiful faces.

kathy and mariekeAnd then, there are some bands. Marieke has been working with the double weave technique from this tutorial. I learned it as a two-shed technique which means that it can be easily adapted to the inkle loom on which Marieke prefers to work. Kathy and I got to weave together a couple of years ago and she continues to enjoy Andean Pebble Weave on a backstrap loom using patterns from my books. I love her jolly ”saver cord” but mostly, I love the fact that she is using one. Not everyone falls in love with it as I have.

I could see from my stats that there were an enormous amount of hits on my link to the site with the triangle purse tutorial last week. I hope that many of you go ahead and make one and show me the results. The link to the tutorial along with other goodies can be found on my RESOURCES page.

So, it’s back to my long project. I think there are only two more pieces of paper left on my rolled-up warp. I can’t wait to wash and press the piece and feel its liquid slinkiness slide through my hands. yellow silk scarf on backstrap loom


Backstrap Weaving – Small and Silky

A small post for a few small fun projects.

backstrap weaving toolsIt is nice being back home and in my spot on the floor with the full range of my backstrap weaving tools on hand.

I did some twining and got the three Bird hangings off their looms at last. Then, I rounded up all the sticks and bits and pieces that had been lying about in my ”studio” and put them back into their bins…loom bars, cable ties, heddle sticks, cross sticks, coil rods, metal selvedge rods, beaters, swords, spacers, needles, pick-up sticks, warping stakes and shuttles.

I photographed and made notes on the tiny samples that were too small to be made into anything and then threw them away, and got my notebook up to date. That all felt great. Now I can confidently say that I can put my hand on just the right stick when needed and I am ready for a new session of sampling and weaving.

Those big ikat projects are on my mind and I will soon be tackling those…getting out the frame, the ikat tape and dye, ready for days and days of tying little strips of plastic around warp threads.

But, for now, it is nice to have a variety of small pieces to work on.

silk bookmark and cuffs

wrist cuff in silk backstrap weavingI finished the bookmark in 60/2 spun silk that I had promised a friend and, finding that I had plenty of warp left over, I made another wrist cuff for myself.

I really enjoyed wearing the little cuffs I had made before I left for  my US trip earlier this year. I used an Andean Pebble Weave motif that I charted for my second book.

It is so much more comfortable doing pick-up with this 60/2 silk in this cooler weather. Working with silk with sweaty hands is quite horrible. It is amazing how much the black-and-white one has softened with wear.

Having my basket of silk out of the cupboard with all those lovely little skeins at my fingertips, I got on a bit of a cuff-making roll. I had bought some buttons while in the US and decided to weave another cuff or two using the patterns on the buttons as guides. I want to sew the buttons to the cuffs purely as decoration. One button had a knot pattern and I decided to use a design that I had charted for my second book which was based on motifs found in Kuba cloth.

silk cuff on loom backstrap weavingThat one is still on the loom and there will be plenty of warp left over to try another using the second button. I will use the intermesh structure for that one.

And, while all that was going on, I summoned up the courage to cut into that reeled silk piece that I showed you last week. This is the warp that Sara Lamb let me have to weave…her hand dyed and hand painted colors and her fabulous color arrangement. I figured that I could get two pouches out of that piece. I had measured my friend Betty’s cell phone while I was staying with her and so I was ready to cut the first piece to suit. It wasn’t easy to take the scissors to this piece! It was so lusciously smooth and slinky. I had been enjoying just holding it and letting it slip from one hand to the other.

So, here is the first of the two pouches finished…

reeled silk pouch backstrap weavingI wove and sewed a plain-weave tubular band to the edge and also used that edging to stabilize the cut and shaped flap. One of the buttons I had bought found its place. I am really happy with this little pouch and only slightly disappointed that a lot of the ”slinkiness” has been lost within the confines of the quite rigid tubular band. It does, however, feel lovely to stroke!

I made the second pouch much simpler…a squared off flap and no edging. This one retains its liquid-like characteristics and is free to slink about as it pleases. Sara had given me a small ball of the reeled silk and I was able to make a four-strand braid with it for a strap.

two reeled silk pouches backstrap weaving

So, that’s all from me for this week. I will be setting up to sample some more curved ikat shapes soon. And when I am not doing that, or weaving silk cuffs, or planning maybe something bigger, like a silk scarf, I will be braiding and braiding and braiding. There are several hundred braids to be made on the ends of the three Bird hangings….plenty to keep me out of trouble.

Until next time….


Backstrap Weaving – Working the Quirks

Welcome 2015!  I just realized that I can now say that I have been weaving for ‘decades’. I have been weaving with a backstrap loom since 1996 but I started weaving with tablets and Navajo-style tapestry in 1995.

Once again, I shout out a million thanks to Gladys Miller in Colorado who picked up this backpacker hobbling about on crutches in Grand Junction, Colorado back in 1995, took her to her home and then to the Navajo reservation to meet her teacher’s family, and sent her back to Chile armed with Navajo weaving tools, yarn, books and just enough know-how to get started.

tapestry laverne waddington So, what am I doing on this first day of 2015 two decades down the track? I am sitting with pencil and ruler trying to figure out how to achieve just the right angle so I can split my newest weaving diagonally into two contrasting colored sections.

I remember sitting and doing something similar back in 1995. I was preparing to weave the tapestry piece at left on my Navajo loom in which I needed to have lines traveling at just the right angle so that they met up with others in just the right place. As I plugged away at my calculator, my boyfriend at that time asked me if that was how the Navajo weavers figured out their patterns!

The piece was meant, believe it or not, to be red, black and white but there had been a mix up in my order from Wilde and Woolly in the US which had been brought down to Chile for me by a friend, and I got this pink-ish color instead. Apparently my red, black and white obsession goes way back.

I spent the last couple of weeks of 2014 working on the ikat piece that I mentioned in my last post. I made a new frame on which to stretch the warp for applying the plastic ties and stood it up so I could be seated in front of it for tying. In past experiments I have had the frame lying flat, bending over it to tie, which was rather hard on the knees.

??????????????????????The good ol’ simple wooden bed frame that I bought here in the street market has more than the one obvious use. It is the anchor of my backstrap loom and now also serves to hold my ikat frame. I wanted to tie some big block-like motifs to practice and improve my wrapping technique. What I really want to work on, once I am pleased with my wrapping, is circular shapes and odd angles. I want to create shapes with ikat which I can then fill with pick-up patterns… shapes beyond horizontals and verticals and angles that are fixed and determined by the structure of the weave. Before I get into that, I need to iron out some of the quirks of working with ikat tape and need to figure out the best way to handle wrapping long and large sections of warp.

So, here is the finished piece…

???????????????????????????????I am not there yet with this whole wrapping business. The dye seeped a lot in this experiment so much so that I didn’t even want to photograph the warp when I had removed the ikat wraps. It was a bummer! This would have looked awful if I had woven it off in plain weave. However, I used Andean Pebble Weave in the un-dyed sections and somehow the staining that resulted from the seeping dye is barely noticeable amongst the two and three-span warp floats and hardly shows up in the pictures of the finished piece. It’s there, believe me.

new-techniques-for-weavingAs for the ikat tape, I was given enough for a lifetime, as you can see, by my friend Betty. Someone was asking about places to buy it in one of the forums and a link to a source was provided by one of the members and is much appreciated.

I used to use cassette tape and like the fact that it is opaque. I used cassette tape on the green band at left. The advantage of the ikat tape is that it is very wide and tears beautifully into perfectly straight strips of any width you like.

Now I am wondering how I can ‘work with the quirk’, so to speak. I am thinking that seepage at the edges of the wraps and the resulting staining could give an interesting effect, as if the design that I weave within is emerging from a mist….soft and blurred at the edges and moving gradually into focus….hmmmm….I have some ideas about that.

I edged the horizontals with a cross-knit loop stitch as the typical blurriness of misaligned warps at the edges of ikat motifs, that is so beautiful in plain weave, is not so nice when you are working with two and three-span warp floats. While I really don’t have that much difficulty doing pick-up in black, sewing black on black was a killer! I am lucky in that I don’t yet need glasses for reading and other close work. I figure I should do this stuff while I still have the eyes for it!

So, I am supposed to be moving on to another ikat project but…. I got distracted. I was so pleased with the bird pieces that I decided to do a series of birds. I don’t need to do ikat to be able to create these large block-like shapes and so I warped up for Andean Pebble Weave and started another double bird motif. You can see the spotty pebbled look in the white background. The pick-up design looks rather crazy and confused right now. Hopefully it will start to make more sense when I get to a wider section where the various small scattered elements can come together.

I want to create the same bird motif as on my ikat piece but split the two birds diagonally. That way, I will have white pebble pattern on black on a white background for one bird and then the reverse for the second bird.

bird motif in pebble diagonal line dividing bird motifsAnd that’s where the pencil and the figuring that I mentioned earlier comes into play. The Andean Pebble Weave structure gives me diagonals that are too steep to divide the birds smoothly and so I have to come up with a stepped diagonal instead at just the right angle. I sewed a line between the two birds on the ikat piece, which I will remove later, to help me figure this out.

So, there will be three pieces in this series. I will have one bird piece that is all solid black with a black on white motif….that’s the ikat one that I have just about finished. The second, that I have just started, will be pebbly and half black, half white. The the third will be another ikat one in solid white with a white on black motif….basically, the opposite of the first. This third piece will be the big challenge as I will have to put ikat ties all over a white warp leaving only the bird motif exposed to the black dye.

Textiles that have been created this way, with larger wrapped areas than unwrapped, have always boggled my mind even more so than other kinds of ikat I have seen…all that tying!

blue on white ikatIn the above piece from Tacabamba, Peru, I am guessing that most of that white warp was wrapped to expose a multitude of tiny spots to the indigo dye. You can see the shawl weaver with the many mostly white shawls on display behind her.

ikat shawls tacabambaI think the bird series will be interesting and I am excited about it. I hope I can make it work! Then I will get back to those circular ikat shapes and now have time to think about just what kind of interesting shape to fill with pick-up patterns.

So, a second decade of weaving closes and a third begins. It is fun to look back at the beginnings, although, sadly, I wasn’t as camera-happy back then as I am now and I have little show for it. Lots of things had to get left behind in Chile.

red and green card weaveAt left, is one of the tablet weavings I made while I was waiting for my Navajo loom to be built back in 1995. The rest stayed in Chile when I moved to Bolivia. I like the red and green. I had no idea about any kind of clever way to set this up. I had one end of the warp tied to the leg of the desk in the corner. The warp went over the double bed and was tied to the door knob at the other end of the room. I wove and wove starting standing at the door, and then moving across the bed while adjusting for take-up. I made some samples and a strap for my boyfriend’s binoculars and that was that.

Finally, the Navajo loom was made in time for my birthday in 1995, and I threw myself into that for a while until that order of Wild and Woolly yarn ran out and there was no one to bring me more. I dyed all my left over scraps red for the bottom piece to use up just about everything. You can see all the different tones of red I got from having over-dyed so many different colors.

navajo collageAnd then I went off to Peru in 1996 for that first learning experience with Peruvian backstrap weavers. Below, is the first thing I made when I got back. It was the worst warp ever wound! The stakes leaned inward terribly but I managed to angle the far loom bar and somehow compensate. I combined the two structures that I had studied with my  Peruvian teachers…Andean Pebble Weave and supplementary-warp…it seems that I had a thing for red and green in those days.

first pebble weave warpI didn’t have the confidence to go wider than this with a backstrap loom at that time and so made good use of the Navajo frame for the wide things I wanted to weave. I found some good local wool (how I wish I could find that stuff again…this was in Chile) to use, as well as some of my left over Navajo warp which I dyed…

wool warp faced on navajo loomThe Navajo loom had to be left behind when I moved to Bolivia in 1998 but my backstrap sticks and tools came with me. And now, 20 years on, the loom remains the same, it is all still so very exciting and I struggle to keep up with my ideas. I have come by a few more sticks, a shuttle or two, some swords and reeds.

And it has been nice to come back into contact with Navajo weaving again over the years through a friendship with Navajo weaver DY Begay. Funnily enough, we met in Peru in 2010 and again there in 2012 and I spent time with her in Santa Fe last year where I could a last see her at work at her loom…so inspiring. She did a bit of backstrap weaving too during my visit…

dy-weavingAs for the tablet-weaving, I am happy to watch my weaving friend Cheryl’s adventures in this new-to-her technique and hope to be able to show you some of her work soon.

I look forward to a wonderful new weaving decade and wish you all a Happy New Year.

Backstrap Weaving – Bookmarked

I am in that odd sort of limbo time just before I leave on my trip to the US. There’s not enough time to really get my teeth into a new project, yet too much time to sit about idle. I finished the two red panels that will accompany my black and white ikat piece and couldn’t resist mounting all three panels on beams to see how they look together.

???????????????????????????????You should just be able to make out the red-on-red warp floats in the panel on the right. The pattern resembles the stepped pyramids and stepped diamond in the center of the ikat motif.

A bevy of backstrapped bookmarks

So, between packing, cleaning and tidying up, I roam the internet taking advantage of the fact that I paid for a whole month of internet and can use my entire monthly allotment of megabytes in half the amount of time that I would normally have. I look at sites and videos and bookmark the pages which give me inspiration and ideas for future projects.

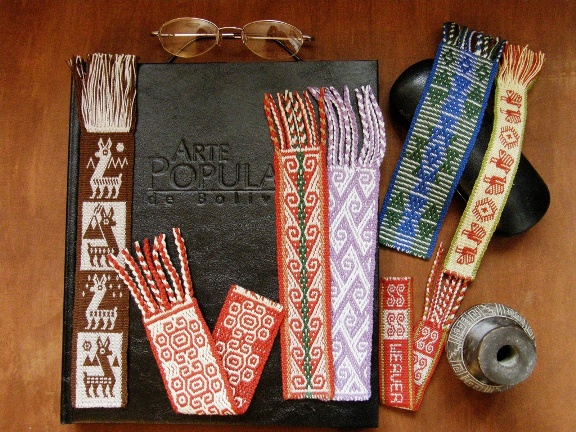
And, because I really cannot stay away from the loom, I have been weaving some small gift projects. You will guess what from the title of this post…bookmarks.

Bookmarks are fun fast projects. If you have a way of creating really short warps, they provide a nice way to use up small odds and ends of yarn. I had some DMC thread left over from my Shipibo-inspired wall hanging and so, I wound a short warp and decorated the bands with silk supplementary weft.


Warping for short bands with a board and nails in Huancayo.
Warping for short bands with a board and nails in Huancayo, Peru.

I had some clear plastic sleeves that had been included in a weaving conference goody bag and slipped my woven bookmarks inside. White bookmarks, afterall, wouldn’t stay clean and white for long and could use some protection…

???????????????????????????????At first I thought that the plastic might look tacky but I am actually quite happy with the finished result. The plastic sleeves have a hole punched in the top through which I could thread a pretty blue braid. Now I want to get more of those sleeves into which I can place the Guatemalan pattern bands that I made ages ago. You can also see in the above picture the silk bookmark in double weave that I made for my nephew. This has become a sample as I want to redo it with the phrase all in one line rather than split into three.

In years past, when I made long trips through Bolivia and Peru, I would take along bookmarks that I had woven to give to fellow travelers and to people who had been kind and helpful. They were a big hit and people wanted them even if they didn’t intend to use them to mark the pages in a book.

yanque ladies with bookmarksThese ladies and the little fellow are members of the family of my sling braiding teacher in Peru. That little guy holding his bookmark must be a young man in his late teens by now I would imagine. I wonder what became of his little woven bookmark.

I would like to get back into the habit of having a collection of bookmarks on hand when I travel to give away. I think I should set myself the goal of weaving two a week . These will make nice on-the-road weaving projects.

I have all kinds of sample bands lying about here at home that would make decent bookmarks…ikat experiements, supplementary-warp bands, double-weave pieces as well as complementary-warp samples made with sewing thread. I still have the good ol’ llama band. That little llama motif appears on some double-weave belts that are sold in the central highlamds here in Bolivia. I adapted and embellished it for my bookmark.

???????????????????????????????Wider experiemental bands or those that are too thick to make practical bookmarks can be folded and made into coin purses…

OLYMPUS DIGITAL CAMERAOne of the many reasons I like using double weave is because it allows me to easily weave letters, words and phrases. One of Weavolution’s founders asked me to weave the following bookmarks as gifts to celebrate the site’s first year online…

??????????????????????Andean Pebble Weave can be cleverly used to create letters as well although not with as much flexibility as double weave. Father Kyriakos just sent me a picture of his latest rendition of what I have named the Kyriakos Kangaroo. He has modified the motif and woven it into a bookmark along with the name of its new owner…Ilya.

kyriakos roo  cropHe’s also using a pebble weave backstrap, the design for which was created by Julia.

Starting with a fringe.

Father Kyriakos has chosen to have fringe at both ends of his bookmark.

My latest bookmarks in their plastic sleeves also had fringed ends but I didn’t like the way the fringes lookedwithin the plastic sleeves.

I cut the fringes right off and painted the edges of the fabric with diluted white glue. I was then able to turn the edges over. The glue-soaked cloth was stiff and it was like folding paper. It gave a nice crisp, neat crease.

Other times, I have chosen to start the bookmark with a selvedge.

I place a fine metal rod…as fine as a “0000” size knitting needle for fine thread…within the warp and lash that to my loom bar. This enables me to start weaving right at the very start of the warp.

Later when I remove the needle, I can fill the gap that it leaves by threading the tail of the first weft shot onto a needle and feeding it into the gap. Weavers in South America, of course, do not use any kind of metal rod…that is just one of my own quirky things.

Using a fine knitting needle at the start of the band and finishing by passing the weft tail on a tapestry needle to fill the gap.

As for finishing the other end of the bands, I usually choose to braid the ends. A four-strand round braid is my favorite. This secures the last weft shot. If I want fringe, I hand sew across the woven end making sure that I catch the last weft. Hand stitches can be pulled and embedded so that they are virtually invisible.

Another way to finish with fringe and secure the woven edge is best shown in pictures…

finishing the band step 1I have just passed the weft for the second last time. It has been passed through the shed from left to right. I have placed a tapestry needle within the shed.

???????????????????????????????I have opened the next shed, beaten, and passed the weft from right to left. This is the final weft shot.

finishing step 3Now I need to secure the weft. I have threaded the needle with the weft and will pull it through the shed. I take it about three-quarters of the way across and then pull it out of the back of the band. The tail can then be cut.

finishing step 4I have beaten well again in the last open shed so that you can’t tell that there are two shots of weft together in the second last shed. You will see the odd weft turn on the left hand side where the weft has traveled “backwards” into the shed on the tapestry needle. If my weft color matched the border, as it normally does, you would not notice this at all. For this demo, I have chosen a contrast color for the weft. To finish, I like to open one more shed and beat just to enclose that final weft shot within its shed.

I’ll copy this little tutorial to a new FAQ page.

So, I have just under a week to weave some more bookmarks. I have lots of fine thread and will weave them with all kinds of structures. Having them in the plastic sleeves will be a nice way to showcase the different structures  I have studied in South America and Guatemala. I am looking forward to trying some of the fine Guatemalan naturally -dyed cotton that I got at ANWG last year.
This will most likely be the last post before I hit the road. I will try to write short postcard-y  posts as I go and not let things accumulate too much.

See you again soon…