Backstrap Weaving – Pieces

I am still working on the bag project! But I do believe that I have just warped the very last piece of the puzzle. Then I will be hand sewing everything together. I’ve already made what I feel is a good start on that. While sewing, my mind will be free to start thinking about which project comes next.

The last piece is a band that goes around the mouth of the bag to cover the small pleats that will be in the main body. I really wanted a bag that is less box-like than the usual things I put together with my woven cloth. Using pleats seemed like a way to create a slightly more interesting shape.

Here you can see the warp for the 1 3/4″ band that will encircle the bag. I haven’t yet put in the two sets of string heddles for this sturdy intermesh structure. It’s a dense (complementary-warp) structure of three-span warp floats that can sometimes fool the viewer into thinking it’s plain weave. I might edge it with plain-weave tubular bands when I am done. If I decide to do that, well, I guess that means that this isn’t the final piece after all. There’ll be two tubular bands to warp and apply. I love those tubular edgings and am always looking for an excuse to use them.

The odd-looking thing to the left of the band warp is the left-over warp from the three-color flap piece. I had given myself a bit more comfort room than was necessary in the length of the warp and I am finding it hard to throw this away. I guess I will put it in a bag with the idea of maybe using the yarn for tassels, extra fringe etc. some day. Six months down the track I will discover it in the closet, realize that I am over my attachment to it, and throw it out. Surely I am not the only one who does this kind of thing!

Wide 3-color pebble weave warp.

This is what the warp for the flap looked like on the loom. I was setting up for 3-color Andean Pebble Weave using 1476 ends of 20/2 wool spread over 12 inches…dense! I enjoyed creating the warp but once I was sitting at the loom I couldn’t help wondering what on earth I had let myself in for. I had used the same 20/2 wool for the front, back, and sides of the bag and knew to expect it to be challenging in this warp-faced structure. It is certainly nothing at all like my hand-spun wool that I used for the strap. It had behaved so beautifully! Still, I tend to forget and it’s always a bit of a shock when I attempt to open the very first shed. It was a beast! but I know how to adapt and soon there was a rhythm and I forgot all about the beastliness and just enjoyed watching the little hummingbirds appear.

I didn’t break any warp threads. Dust bunnies appeared on the floor beneath the warp where they caused no harm, but not in the heddles. I used DMC #12 cotton for the heddles.

Bag flap in progress.

I plan to cut the end of the flap into a curved shape. It’s easy to say that now and we will see how I feel once I am hovering over it with scissors in hand. I have to tell you that I am loving fusible interfacing. It helped me to bravely cut away at the gold lining fabric that I wove. However, this flap fabric with its three colors is super dense and I am not so confident about the interfacing’s ability to hold everything together. I don’t know if it is considered a “cheat” using the fusible interfacing in this way. I am just making this up as I go along! This is another piece of the bag that I plan to edge with a plain-weave tubular band. It will reinforce and cover the cut edge. I have used it before on shaped pieces like this in cotton.

Curved flap edged with a tubular band.

I have a tutorial on this blog for doing this kind of thing.

The last repeat before weaving the pattern that will appear on the back of the bag.

Quite a lot of people have been asking me about the reversible three-color pebble weave…

Reversible 3-color pebble weave. The lighter reverse shows up a mistake that the dark side hides petty well. Oops!

I don’t plan to write a tutorial until I have had a chance to teach it in person several times. I find that kind of experience absolutely invaluable when deciding on which aspects I need to focus when writing it all down. I feel that I need to be able to see it through a student’s point of view and feedback from a wide variety of students who have different learning styles is golden. It is quite a step up from the basic two-color structure to the reversible three-color version that I have been doing. What I will say for now is that I have spent YEARS happily exploring the basic two-color version. There’s much that you can do to turn a piece with just two interacting colors into something that looks spectacular and complex. Clever use of color can make it seem like there is just so much more going on. For example, let me show you the beauty that Fenny in the Netherlands has created using the basic method…..

By Fenny in the Netherlands.

I really don’t believe that weaving that pattern in the three-color method could possibly improve on what Fenny has created. The block-style pattern chart for this pattern is in my More Andean Pebble Weave Patterns book. It was my attempt to replicate the very first piece of weaving that I had purchased in Peru back in 1996. It was a scrap of band that was being sold on the street and had been woven in natural wool colors. It is not a faithful replica because I hadn’t fully understood all the possible structures at the time. Still, I liked it enough to include it in the book and I continue to weave this version rather than the entirely faithful one which I have also charted in a different publication.

And if that hasn’t convinced you, I will also pull out this example again with its clever use of color because I love it so much!

By Priscilla Cardon Bradburn

Priscilla has taken several of the most basic shapes that are charted in my Andean Pebble Weave on Inkle Looms book to create her own unique pattern. Her beautiful use of color makes this band even more eye-catching. Again, I can’t imagine the three-color technique being able to improve on this and I love the fact that she has taken these basic building blocks and used them together so creatively.

I will leave you here with a reminder that the following are my two “gateway” books to this technique. The one on the right is for those who weave their bands on standard inkle looms and includes access to video clips. The other one is for those who use ANY kind of loom to weave their warp-faced bands. You should be able to competently weave plain-weave warp-faced bands on your loom of choice before attempting this. There are detailed descriptions of the books on the Taproot Video website as well as a chance to “look inside” at some sample pages. The books are available as PDFs or as spiral-bound books.

LINKS: Andean Pebble Weave on Inkle Looms Complementary-warp Pick-up

Complementary-warp is the name of a category of woven structures in which the two faces of the cloth are structurally identical with colors reversed. Andean Pebble Weave is a complementary-warp structure and just one of the varieties that sits within this category.

Until next time, when I will hopefully be able to show you my finished bag.

Backstrap Weaving – The Sounds of our Craft

It’s been a while since I last heard the scritchy sound of hairy warp threads releasing their grip on each other as I open sheds on my backstrap loom. I am hearing it now because I have taken on the challenge of weaving with mill-spun wool singles that I bought from a farm while traveling in California. I don’t really know what I had in mind when I bought that yarn. I had just wanted to buy something as a souvenir of that part of my travels from the lovely people who had allowed my friends to gather and weave in their barn.

Because traveling to far off places to buy yarn like this is off the table at the moment, this is another case of my exploring my dwindling stash and enjoying the new challenges that this presents. My idea is to use this yarn to weave the body of a bag that will go with the strap I just finished. I used a three-color reversible Andean Pebble Weave structure for this strap and the wool yarn that I had been spinning and plying on a drop spindle during pandemic Zoom gatherings.

Despite the dark colors, I think it’s a happy garden scene of flowers and hummingbirds.

I did start off with the idea of creating an orderly, cohesive pattern layout but the temptation to play with the three colors and pop those hummingbirds wherever I wanted took over and I had a lot of fun doing just that.

One thing that I had wanted to do was use one color for the pebble spot that represents the hummingbird’s eye and another color for all the other pebble spots that sit within the figure’s body…but you know, I forgot to do that every single time! Well, almost every single time. I was determined to remember to do two things before I eventually finished the band…take a picture of myself at the loom working on it and get those colored eye spots in!

I once met a bird photographer that told me that it is really important to capture the little spot of white light in a bird’s eye in order not to have it appear lifeless. I have looked for it in every bird photo I have seen since. In the same way, I think the different colored eye spot on these last two hummers makes an enormous difference.

I didn’t hear any woolly scritchy sounds while working with this hand spun of mine. I had been concerned about how well it would stand up to this rather dense structure but realized after a while that I had completely forgotten all my concerns and was able to enjoy how friendly it was and how lovely it felt.

I remember the first time I wove with my hand spun. It was with some rather nasty dry and dusty llama fiber that I had bought from the animals’ owner up in the highlands. At the time, the scritchy tearing sounds were freaking me out and the yarn I had spun was anything but soft and lovely to handle. I had put a tremendous amount of twist into it so that it would stand up to warp-faced weaving. I don’t do that any more.

And now, there is a new experience…weaving with these mill-spun singles. This is a first for me. Yes, there’s some “scritchiness” but I am actually finding it pleasant…almost like the warp is whispering to me. That llama fiber had seemed to be screaming at me in that first-ever experience. I made adjustments to the way I was spinning it, it became friendlier, and I was able to enjoy weaving with it more. 🙂

This is my sample for the bag fabric that will follow. I wound a warp of 27″ length and 160 ends. The idea was to weave and allow it to settle into a consistent width so that I could then make calculations for the bag fabric. I most typically start off too narrow with new-to-me yarn and have to let the piece gradually widen and settle. Once I am happy with that, I put it aside and work on the real project. This time, however, I was enjoying working with this wool so much, I decided that this piece really needed to be something and I figured that my cell phone, which currently sits in a case, could do with a pouch. So, I unwove a good 3″ of fabric so that I could start over at the correct width. The fact that I was able to unweave the warp-faced cloth woven with wool singles yarn without losing my mind, tells me that this yarn and I are going to have a happy weaving relationship.

And I decided to use some of my plied hand spun as supplementary weft to weave in a pattern. This is some of the thicker “Zoom” hand spun that I first created and used to weave a wrist cuff before deciding to try and go finer. It is making a very nice supplementary weft. I am using the outlining technique of supplementary-weft patterning in which the weft does not travel from selvedge to selvedge. I can make my hand spun yarn go further that way. It is precious to me and I don’t want it to be just hidden away between the layers of warp as it travels to the selvedge. I can’t tell you how much fun I am having with this!

Wrist cuff with the initial run of hand spun.

A couple of observations: There had been a tendency for me to think that the action of the heddles against the wool would be the cause of most of the abrasion and subsequent pilling or shredding. Lately I have found that with good loom-operation technique, this isn’t so. There is actually a point of layer exchange that sits between the heddle and the shed rod where most of the abrasion is occurring for me. This exchange happens when the threads that lie on top of the shed rod are lifted and brought down through the heddles to the weaving line. (I keep my shed rod stationary and don’t slide it forward to the heddles as some backstrap weavers do which explains why the point of layer exchange on my particular warp is in that position.) That abrasion point is the one I need to watch and I notice that a little bit of fluff accumulates there. I am particularly gentle there and tend to spread the threads with my hands and lift them through that point in sections. It is also important to advance the warp as often as possible so that the abrasion point is constantly changing position.

I love the multiple tones in the warp and its rustic look. I had considered a hummingbird pattern but decided that this one better suits these natural earthy colors.

But despite all that gentle handling, the warp does continue to whisper to me in its scritchy voice, possibly just as a reminder not to get cocky and careless when I open the sheds. This talk of sound playing a part in our weaving, reminded me of some thoughts I had posted way back in 2013 that I thought I would revisit and share with you.

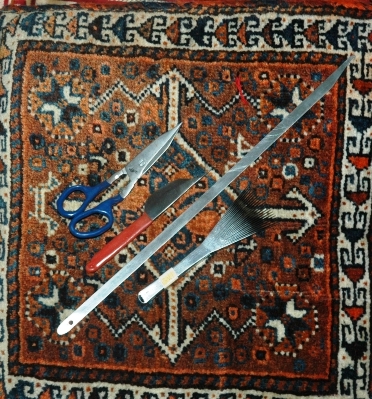
tools01

Back then, something a weaver had posted on the Weavolution website had resonated with me. An Australian gentleman, Hakim, was learning to make cut pile knotted rugs with an Iranian teacher in Australia. He said that when he is at home working on his practice piece, he can tell that the tension of the warp threads is correct if they make the same sound  when he handles them as they do when he is working on his learning piece with his teacher in class.

What a piece of priceless knowledge!

(At left you can see an example of a set of tools that Hakim was able to get for me from his teacher for the day when I try this technique. It’s on that long, long to-do list).

Hakim’s comment made me think about the different sounds that are connected with weaving on simple looms and how much I enjoy them.

I am not one for placing things in my ears and listening to music while busy with something else. I can’t stand that. I like to be in touch with the sounds around me. They form a very important part of my memories of places and experiences.

In my skiing days, I would wonder at people who skied with headphones on. I would never give up the pleasure of hearing the wind and the swish of the skis on the snow, or the sudden change of sound as snow turned to ice giving me time to react and adjust position. Back then, no one wore helmets. I am told that the helmets being worn now don’t affect the skiers ability to enjoy those sounds.

I learned to fly a glider when I was 19. There is nothing like the sound of an engine-less craft rushing through the air. There was so much with which to be occupied while learning (especially for someone like me who was so utterly un-coordinated at the time!) but I could always simply rely on my ears for certain information. For example, if the sound of the rushing air suddenly disappeared it was a sure sign that I had the nose up too high and that told me that I had better do something quickly before the glider stalled!

When we first went into pandemic lockdown here in Bolivia, I remember finding the sudden absence of sound really disturbing and almost frightening. Then I realized that what was missing were familiar sounds of human activity and that they had been replaced by much more pleasant ones…bird song and the sound of leaves being blown across the cobbles…sounds that normally were drowned out by the hum of city living.

As for sounds while weaving, I love using multiple big swords. I so enjoy the musical tok tok sound they make as they knock together in the sheds. And I love the chuckling chatter of all the sticks on the loose as they fall together when I release tension and roll up the warp at the end of the day. Below, you can see the sticks I used in a wall-hanging piece….many different kinds of wood making interesting sounds. It can become quite a collection.

O

Then there’s the plink plink sound as the tip of a delicate Guatemalan pick-up stick slides from one taut warp to the next as the weaver counts out threads for supplementary-weft inlay.

weaving-tijera

The dancing dangling bobbins used in weft twining go clackity clack as they twist and jiggle.

final-twining-session

And they enable my teacher to create such beautiful work as this:

Examples of kteh work by my Montagnard weaving teachers.

I loved the opportunity to drag the llama bone tool across the strong highly-twisted wool threads that my teachers in Peru had prepared below…scritch, scritch, as I strummed to help separate the warps. Only warp threads with certain characteristics will tolerate this.

O

Listen to my teacher doing it…

If you stroll around a  village of weavers in a certain part of the central highlands of Bolivia, you will know in which houses a weaver is at work by the LOUD THWACK!! THWACK!! of the llama bone hitting the sword as the wefts are slammed into place. That sound is one that is not really pleasant, at least not to my ears, when I am seated right next to my teacher. Here is one of my teachers in Candelaria at work at her loom:

When I stayed in the stilt-house home of my weaving teacher in Ecuador, I was often awoken at dawn by the muffled thump, thump and accompanying vibrations as Trini drew down her heavy beater while working at her vertical loom. This was combined with various house shaking and creaking sounds as the loom was connected to floor and ceiling beams…a part of the house itself. You can see that big sword/beater lying across Trini’s leg below and get an idea of the muscle that goes into operating this particular set-up.

trini-opening-shed1

The sound of threads in a warp-faced weaving rubbing past each other as a shed is opened can range from a soothing smooth swish to a seemingly painful tearing protest depending on the yarn being used and how it has been prepared.

When weaving with new backstrap weavers, we even learn to be amused by the constant clatter of swords jumping out of their sheds and hitting the floor. Each sword has its own musical tone…nowhere near as much fun on a rug! A cement floor like the one in this picture greatly enhances the melody.

Joan following a pattern chart at the Mannings.

By the way, I am in charge of picking up the fallen swords….gives me something to do. It is funny that as time goes by we have people weaving in silence. What happened to our musical accompaniment? Well, new weavers, without even realizing it, get a feel for the right amount of tension and the sweet spot in the warp where the sword will sit happily upright and not leap to the floor. Or…they just get rather good at catching the sword on its way down!

Maybe one of the nicest sounds for me is the fwip fwip fwip fwip in rapid succession as I pull my heddle string quickly but carefully (or else it will tangle miserably!) off its heddle stick. This means that the piece is finished.

And with that soft, happy sound in your head, I will leave you.

Until next time.

Backstrap Weaving – What if?

When I last posted, I had just wound this warp using my “Zoom” hand spun, that is, the wool that I had been spinning and plying on a drop spindle during the various pandemic Zoom sessions that I have been attending. It took a while for some participants to get used to my sitting there with my arm raised as I attempted to get maximum drop distance for my spindle. I was often asked if I was signaling my desire to ask a question. I hope I wasn’t too annoying!

I dyed the blue and tobacco colors so that I could have three colors that would work well together on both faces of this three-color warp. Basically, I wanted to work with a dark, a medium and a light color and the challenge was finding a medium color that contrasts well with both the light and dark.

I am not sure why I always seem to find myself working with wool at some point in the hot, steamy summer months we have here. It kind of made sense when I was traveling a lot as these summer months used to be the longest period of uninterrupted time I would get to spend at home. I would work on as many different projects as possible before having to think about workshop prep, packing and traveling again. But now I have all the time in the world as I play it safe at home and can be more selective about which project I tackle, and when. I suppose stash limitations may have something to do with my choices now.

In my last post I told you that I had bought Joan Ruane’s video class on Spinning Cotton on a Takli from Taproot Video. I am using Joan’s spelling of the word takli. I am only 30 minutes in on her 2-hour 20-minute class and have already learned so much. I get to spend a little time with Joan via Zoom as she is part of the Taproot Video team and I was once her roommate at the Mannings. However, I had never seen her in teaching mode and I can tell you that it is no surprise that she is fabulous.

The blue and brown above are my early attempts with the takli from a few years ago. The white is the remainder of what I bought from a spinner in Guatemala back in 2008. It’s what I used to weave the little sheer-cloth sample that you can see in the photo.

I got some lessons in spinning cotton with Trini and her mother, Luz in coastal Ecuador in 2007.

Now I just need to figure out a way to use the takli comfortably while participating in the Zoom gatherings. I had a few wool plying mishaps when I got too engrossed in what was happening on the Zoom screen. I expect I will be presenting a furrowed brow of concentration to everyone as I try to put what Joan is teaching me into practice. I have a wooden mortar that I could clamp between my knees to use as the platform for the takli. Joan says that using something wooden has the advantage of being virtually noiseless although she does say that it is better if the bowl does not have high sides. I’ll see what I can figure out.

What to do with the cotton? Well, I guess that I would like to use singles in another sheer cloth piece using one of my bamboo reeds. This is what I wove using the hand-spun singles that I brought back from Guatemala. This is part of a scarf that I wove.

But of course I am getting way ahead of myself! I know that I need to put in lots of miles of practice before I can produce something with which I am satisfied.

As for my current hand-spun wool project, I have always said that warp-faced weaving really flatters my hand spun. It’s a very forgiving structure for those thick and thin bits in my yarn. When the threads are all pressed up close together they look wonderfully even. I am pleased to say that my yarn is holding up beautifully. I don’t have to think anymore about the possibility of it being abraded to the point of breaking and am focusing on the colors and patterns instead now.

Which is where the “what-if” comes into it. I have given up any thought of creating an orderly and cohesive design on this strap because I simply can’t resist the urge to explore the what-ifs. What if the hummingbird is outlined in white with a tan filler, for example….what if I reverse that…what if the body and wings are two different colors…what if I change the pebble spot color…how many variations can I create? And so on!

5 hummingbird varieties.

I have a nice assemblage of tools by my side…swords, pick-up sticks and a tool I use to press the weft extra-firmly into place. I have to add my long thumbnails to that group. They really are my favorite tools! I am blessed with having nails that grow as hard as rock. I usually have to cut them back now and then to a socially acceptable length.

You’ll also see some leafy what-ifs here.

This is destined to become a bag strap. I have some lovely wool singles that I bought from a co-op farm while in California. The owners used to allow my group of backstrap weaving friends to gather in their barn. It will be nice to weave something with fiber from their sheep that they had sent out to be spun. I guess I will dye it dark blue and use it for the body of the bag. I am thinking plain dark blue with perhaps a three-color edging to which I will add this fancy strap. And what if I add some lines of color in weft twining to the body of the bag? I love those what-ifs!

Wool singles from the farm.
Fond memories of weaving in the barn.

Maybe I’ll have some of my hand-spun cotton efforts to show next time. And before I forget, you may remember my mentioning, Allen Berry as the maker of beautiful swords for backstrap weavers (allenrberry on Instagram) when my weaving friends gifted me two of his gorgeous pieces a few years ago. Here’s one…

An Allen Berry sword with some of my wrist cuffs.

He doesn’t have a website and so you will need to go to Instagram to see his work. You can contact him via a direct message there. I am not sure if he still making the swords but the reason I am telling you this is because he has added, along with his many other wooden spinning and weaving tools, ADORABLE dishes for supported spindles. Here’s just one example. Go check him out on Instagram (allenrberry).

And while you are there, you might like to follow me. I am on Instagram as lavernewaddington. I post quite a few things there between my blog posts. See you next time.

Backstrap Weaving – Outside the Andean Box

backstrap weaving at ANWGI came back from Santa Fe with a different mind set…time to CREATE!

I told myself….Enough of the endless sampling and experimenting and getting distracted with new structures and designs from here, there and everywhere.

Use all the things you have been studying all these years and create some large pieces to hang. Perhaps it was because I was still so thrilled by how well my wall hangings had been received at the ANWG conference or perhaps I had soaked up some of that special sort of arty atmosphere in Santa Fe….

In any case, it seems that I just can’t help myself. I am back to sampling, sampling and playing with structures. Meanwhile, the ideas for those large pieces that I am talking about stack up in my head. I’ll get there.

I spent the whole week playng with the three-color reversible pebble weave. Slow going but fun….LOTS of fun. And that is why I keep coming back to experimenting like this.

And so, another band takes its place in the sample basket, mistakes and all…many lessons learned.

 3 color pebble weave 1

3 color pebble weave 2And yet another gets under way…

3 color pebble weave in tencelThis one is in tencel and was a lesson in the selection and placement of three colors  that would work well together in this structure on both sides of the fabric. I didn’t manage it. The reverse of this piece has a yellow background with the design outline in light blue and the design gets rather lost due to the lack of contrast between those two colors. This motif has a small element of a two-color  pebble weave piece from the Colonial period that I had seen in a book.  I added several of my own ideas to it, expanded it and inserted a third color.

I am really happy with this motif as I want to try to start thinking more outside what I call the “Andean box”. I would like to create designs using the structures that I have studied here in South America that are more and more my own and which do not necessarily have anything to do with traditional Andean patterns. The second motif that I have just started will be an original – a butterfly. Let’s see how that turns out. And then I have a few leaf motifs and some flower ones that I need to sample.

The plan is to weave something using the three-color technique in this color scheme…

tencel and color influenceThe base color will be navy blue and then I will need to choose two of those three tencel colors which will interact on the two faces.

And, speaking of thinking outside the Andean box, here is Julia’s latest pebble weave creation…

julia riverJulia calls this River with Eddies. She used four shades of blue for the river and I love the various browns that border it…pebbles along the shore.

Of course, Julia has been venturing outside the Andean box for some time now. Once she got the hang of the Andean pebble weave technique, there was no stopping her.

julias workFrom an adaptation of a tablet weaving pattern on the left and back to a traditional Andean one on the right…all her work is beautiful.

I am happy to see that Jennifer is back at the loom. We have missed her in the backstrap group. Summer tends to take people away.

Her latest warp is lovely. She says that it is going to be plain weave but I don’t know what the final product will be yet. Perhaps she is like me and doesn’t decide that until the piece is finished!

black_and_purpleAnd, for something completely different, Bethan in France sent me a picture of the twill tartan piece that she made on a backstrap loom using her own handspun wool. She will weave another identical piece and sew them together for a shawl. Spinning for the second panel is underway.

bethan (1)Janet handed her young granddaughter a pencil and had her “connect the dots” on the pebble weave charting paper that I use in my second book to create her own design. She chose the colors and  Janet wove the piece which Celia will have for a bag.

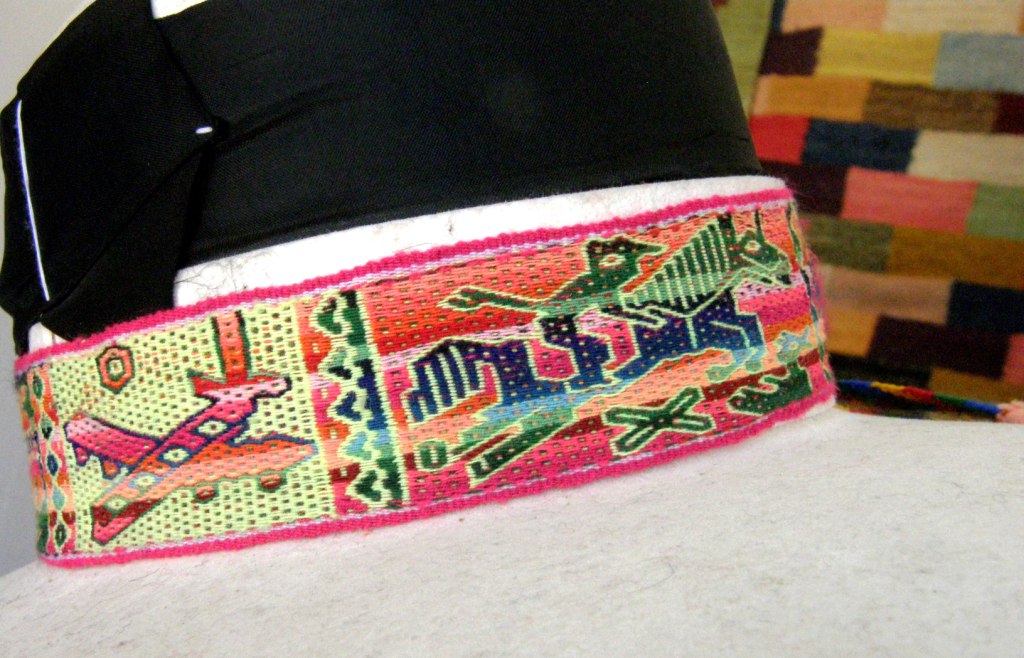
more_backstrap_stuff_011_mediumThinking outside the Andean box…this idea first requires a definition of what exactly I mean by “Andean” . That may become harder and harder to define as Andean weavers these days look at their surroundings and often weave “non-traditional” patterns for themselves. Take a look at this Bolivian hatband…
??????????????????????It has three colors in play  and I SO want to see what’s on the other side! Don’t you?

PS….This showed up in my Facebook newsfeed the morning after writing this post. Just had to throw it in here!

971803_694998987181254_775445196_n