
Backstrap Weaving – Building the Bag

The good news is that I FOUND IT! If you read my last blog post, you’ll know what I’m talking about….the lost balls and skeins of silk that I had dyed with cochineal bugs. It had been a quite a task dyeing that silk as I slowly learned by trial-and-error about just some of the mysteries of dyeing with cochineal. It had got me through the tedium of being stuck indoors during the 36-day general strike that we had here last November. I had tucked all the thread away in a small zippered pouch and then misplaced it. The thing is that my apartment is tiny and its pretty hard to lose anything here. That made it all the more frustrating.

As expected, it turned up in a very unexpected place at a time when I wasn’t even looking for it. It was in a different zippered bag on a shelf in the bathroom of all places. It was safely tucked away in a very sweet zippered bag that I had got for a mere $3 at a used clothing store while visiting Washington State in the US. I had been thrilled with this find. It’s made of backstrap-loom-woven cotton cloth that was woven by the Women’s Skills Development Project in Pokhara, Nepal. I often use it as my toiletries bag when I travel. I can’t think of anything more perfect for me with its little label displaying a weaver at her backstrap loom. It’s beautifully put together and was in brand new condition when I bought it.

In this picture it sits on another piece of backstrap-loom-woven fabric that my aunt brought back from a trip to India. It’s an interesting combination of warp-float patterning, supplementary weft and weft twining. I’ve been twice to Nepal but never as a weaver. I would love to return and trek with a spindle and loom and see how I can connect with women along the way.

I look at my little bag from Nepal and wonder how long it took the weavers to construct it. I know, I know….I’m not a fan of the “how long did it take?” question but I can’t help wanting to compare their construction process to mine. The black bands around the mouth and base finish it so beautifully. You can barely make out the seam where they start and finish. Only the base is lined and covers the seam where the base meets the sides. I watch Handymum’s videos on Facebook and marvel at how she cuts and prepares all the parts for her bag projects. She then methodically sews everything in place and just leaves a small opening through which she eventually pushes all the fabric to reveal the finished bag right side out with everything in place ready to go. It’s like magic to me!

I tend to just make things up as I go and admit that I really don’t have much idea about what I am doing as I hand-stitch my bag projects. I look at pictures that I see online and take it from there. I am not looking for speed. I love sitting and slowly hand-stitching but I can never truly be sure about the success of a project at any point in the process. There’s almost as much time spent de-constructing as constructing and this project was no exception. But when its finally done, it’s very satisfying!

As you know, it started with uncovering the ply-split strap in my closet and deciding that it would look nice as the sides and base of a bag. How I was going to sew this rather thick and stiff strap to my backstrap-loom-woven fabric, I had no idea. That’s all part of my make-it-up-as-I-go style. I’ll just figure that out later. In the meantime, I’d go to all the trouble of weaving an ikat patterned piece to use as the outer pocket. There was wrapping and unwrapping of ikat tape and three dye baths. And then onward to the bag itself. After all that effort I’d just have to make it work.

Two hundred and sixty-eight heddles later came the black fabric for the body of the bag. I scraped together several colors of yarn and dyed them all black. Surprisingly they all came out with the same intensity of black color.

Construction underway….or should I say, construction, de-construction, re-construction. Still unsure at this point if I was going to be completely wasting my time.

Let me tell you that when you cut a ply-split band, it goes completely bonkers. I sewed back and forth across the band to secure it before cutting. All the twisted cords immediately unraveled and splayed out wildly in all directions. Help! I remembered that I had a leather backstrap that had been given to me by a guild. It had been part of one their deceased member’s estates. It was in just the right shade of brown. It would often be the first backstrap that I would put my hand on when I leaned over from my seat on the floor to open the bottom drawer and it got quite a lot of use. I hope that its former owner wouldn’t have minded my cutting it up in order to rescue this project by covering and protecting the end of the cut ply-split band.
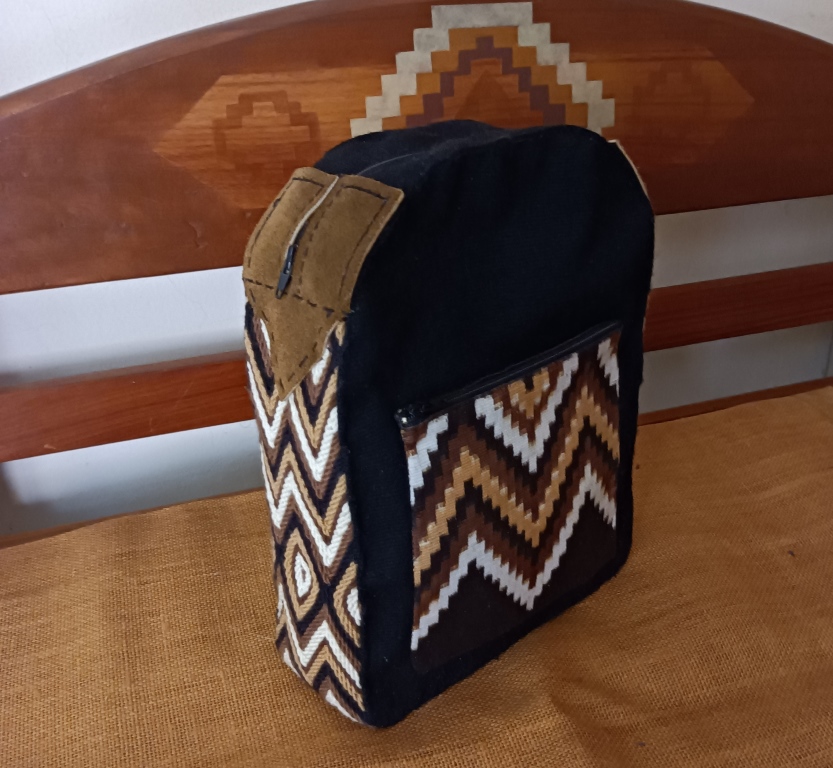
With the leather in place and the bands for the zippered top woven and sewn into place, I was starting to think that maybe this project was going to be a success after all. I only then prepared the lining. It had to be lined. The wild ends of the ply-split band on the inside needed to be hidden! Where would the straps go? No idea at this point. I was still just making it up as I went.

This is basically a mini backpack that is designed to be slung over one shoulder. I haven’t yet been able to find a one-inch length-adjustment buckle and so I had to improvise. The strap can be attached on the left or right depending on the shoulder I want to use. The leather backstrap yet again came to the rescue.

Done! It’s ready to use now but I’ll keep looking for that length-adjustment buckle so that I can change from double d-rings to a hook. I just had to get this finished because I know that if I left it until I found the buckle, it would never get done. If I were to do it over, I’d have the zipper go down another couple of inches. Making it up as you go is kind of fun but sometimes leads to poor decisions.

Another thing that I have been doing on the side is preparing some print fabric for another stitched shibori project. I brought back some soda ash with me from my last trip to Australia (I hadn’t been able to find a way here to buy it that didn’t involve industry-sized quantities). I dismantled a Vera Bradley toiletries bag that I no longer use…it’s too big! (this might give you a clue as to what led me to the bathroom shelf to eventually find those balls of cochineal silk) because the fabric is so pretty and I’ve been busy washing and scouring it. I’m only guessing that it’s 100% cotton as there isn’t a sewn-in label. A burn test seemed to indicate that it most likely is. I wonder how well I can expect dye to cover the print.

What’s next on the loom? Well, as you know, I am weaving only from stash and I still have a fair bit of this Mayan Hands cotton that my friend Kate gave me several years ago. This is the cotton that I used to weave the fabric for my cotton spinning bag that you see below. I also used it to weave the straps for the bag in this post. I wove them in the structure that I call Andean Pebble Weave in just one solid color and they are good and sturdy.
If I have enough yarn, I’d like to weave a very brightly colored tote bag for grocery shopping, mostly in plain weave and with a little bit of pick-up patterning. I take four cloth bags with me to the store, two slung over each shoulder and walk the seven blocks there and seven back. The bags and the straps in particular need to be good and strong and comfortable in order to support the weight of the groceries over that distance. The bags are not just riding from store to vehicle in a shopping cart. Some of my bags are weaving conference tote bags that are looking a bit shabby now. I still use the one from CNCH 2010! It has been the best of all the conference totes I have.

I’ll finish by telling you about the latest issue of Tiny Studio Creative Life magazine in which I have an article. The theme of the latest issue is Magic and I really enjoyed writing about the science of the craft and the magic of the art of creating cloth on a backstrap loom.

Editor Suzy Brown describes the magazine as being for spinners and yarn crafters and she does a beautiful job putting each issue together. Once again I have to thank her for laying out my article so nicely. The magazine is available in both digital and print formats and you can buy single issues or subscribe to receive them quarterly. It’s been wonderful watching Suzy build this business and create an international community of fans from her home in New Zealand.

Backstrap Weaving – Taking Flight

The Jaunty Bag is finished and will be taking flight with me tomorrow night to Australia. It’s stuffed full of Upland white cotton sliver, my mortar spinning bowl, and takli spindle. I don’t plan to spin on the flight although I wish I could. I don’t think my fellow passengers would appreciate having my extended arm in their faces.

It’s one heck of a trip…60 hours from door to door. There’s a reason why some tickets are less expensive than others! At least I arrive at my brother’s place in the evening and can go straight to bed. A million thanks to my weaving friend Emerald who will help me out with my 150lbs of luggage (this is Phase 1 of my eventual move back to Australia) while waiting in Sydney for the train up north. The hardest thing about traveling alone with so much luggage is queuing to buy food and then somehow finding a hand free to carry it away, and going to the restroom.

As for the Jaunty Bag, here’s where I left it in my last post…

The bag had been constructed and I was weaving the strap. I used the structure that I call Andean Pebble Weave in only one color rather than two for the warp-faced part of the strap. I turned Andean Pebble Weave sideways and wove it using weft for the little figured squares. I had planned to weave the strap with four selvedges but overestimated the amount of take-up. With four selvedges the strap would be too long. But I am crazy and created the four selvedges anyway because it’s good experience! As I mentioned in a previous post, I find it much easier to fill the gap between the two ends of weaving with weft-faced weaving rather than warp-faced.

I cut off the excess length of band and sewed it onto the bag. It doesn’t have its lining yet but I did buy a book on stitched shibori which is the technique I would like to use for the lining. When I looked online again for that thirty-five-dollar Stitched Shibori book, it had magically become twenty-six dollars. I’ll have plenty of flight time in which to read it. Even without its lining the Jaunty Bag will go traveling with me.

I haven’t been back to Australia in three and a half years and I haven’t been there in the summer months since 2014. I’m not teaching on this trip because I have no room for any workshop equipment but I will meet up with a weaving friend or two just to have some fun weaving together. I wonder if I’ll be able to attend the guild meeting in Sydney.

I’ll be back in March. There’ll be lots of thinking time on flights to plan my next project. I’m not going to bring back any yarn (Ha! Lets see if I stick to that plan). Working with dwindling yarn stash throughout the pandemic and these last years has been a really good experience and I’d like to keep that going. I will however, bring back some acid dyes.

I guess I’ll see you when I get back to Bolivia. I’ll be posting Aussie things that catch my eye on my personal Facebook account.

Backstrap Weaving – The Odd-shaped Bag

I once created what I called the “yurt-shaped” bag from woven cloth. The hand-dyed and painted reeled silk warp had been given to me by Sara whose weaving and dyeing studio is a yurt. It seemed appropriate to weave cloth from her warp and shape into a yurt!

Sara’s yurt-shaped studio in the woods.
Sara gave me the warp ready to go and I adorned it with a pattern in the structure that I call Andean Pebble Weave. I am sure that many of you will recognize Sara Lamb’s color palette.

It wasn’t a terribly long piece of fabric but it turned out to be just long enough to form the walls of a cylinder with circular base. Adding a drawstring at the top completed the yurt-ish look.

The circular base with tubular edging challenged my limited sewing skills. Cutting into the fabric was stressful!
I added tassels and a braided strap. I’ve never been happy with that strap and one of these days I’ll weave another.

The reason I am looking back at this old project is that my current project….a bag for my cotton-spinning tools was meant to be the same shape. I chose that shape because the mortar that I use to support my takli spindle is round-based and so a round-bottom bag seemed like a good idea.

However, once the fabric was off the loom with circular base sewn in place, I decided that I would lose too much height with a draw-string top. I added a band of fine cotton to the mouth of the bag. I figured I could sew a channel along its center to hold the drawstring but even so, I felt that I was sacrificing too much height. I wanted to be able to fit a good amount of cotton sliver in the bag along with my tall mortar and spindle. And so, the “odd-shaped” bag was born! I have been trying to find something to which I can liken this shape so that the bag can have a better name. I haven’t come up with anything. If you do, let me know, please. I am thinking that once it has its strap and is being carried cross-body wise, it may look less odd.

My bag for cotton spinning tools awaits its strap.

You’ll see that I went with a zipper in the end. The cotton band that I added at the top is woven from 30/2 indigo-dyed Guatemalan cotton that I got from Mayan Hands at a conference many years ago. It’s lovely stuff and I have used it in the past to weave covers for books. It was the perfect color for this project.

Weaving cloth from Guatemalan cotton to cover a small journal. My friend Claudia’s initials, CS, were placed to sit on the spine of the book.

That indigo-dyed cake of thread has sat on a shelf far away from windows for years. It’s amazing how much the color has faded. I had to pull thread from the center to find the original rich blue. However, I do love the unevenly faded stuff too and will definitely use it in a project one day.

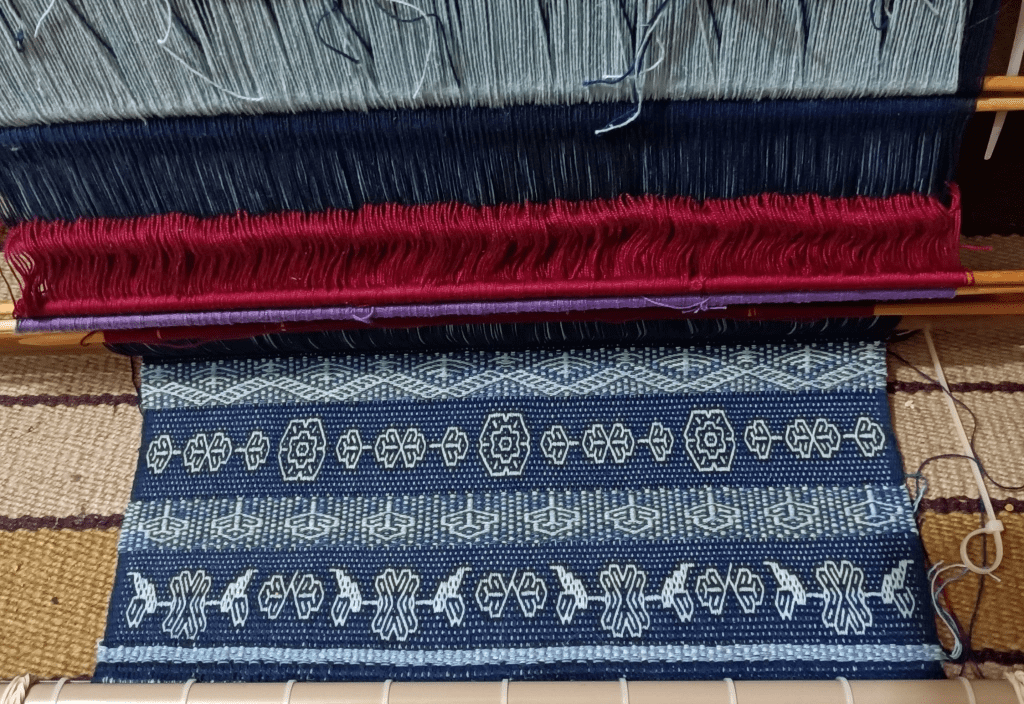
In my last blog post, I showed you my progress with the spinning-bag cloth on the loom. Here’s a slightly different view of it resting on the floor.

This was just before I added the final band of patterning which would be made up of woven words. The darkest blue sections that you see in this piece are warp-faced….a complementary-warp structure that I call Andean Pebble Weave. The other horizontal bands in various shades of blue are weft-faced. I have basically turned the Andean Pebble Weave structure on its side and woven it as complementary-weft instead. This means that I can weave it in any color I like. I chose to use various shades of blue and teal in this piece.

The woven words that I chose to use are “Spinning Cotton” and ” Hilando Algodon”. This is the first time that I have woven letters using the structure that I call Andean Pebble Weave. I showed you many others structures that I have used for lettering in my last post and I wonder if any of you were inspired to try them. I used the letters that Alison Irwin designed and published in the latest issue of Little Looms magazine. Letters in Andean Pebble Weave are naturally quirky. The nature of the structure doesn’t allow them all to sit along the one line. That makes them seem to dance jauntily along the warp. Because I wove them as complementary-weft rather than as complementary-warp, the words I wove run width-wise across the warp rather than along the length as Alison has woven them in her article. I think they perfectly suited my jaunty little bag. Okay….I’m liking that…The item formerly known as The Odd-shaped Bag will now be called The Jaunty Bag.

I altered a couple of Alison’s letters to better suit my layout.

I always love the moment when the cloth is off the loom and I get to see the detail on the other face. In this case I don’t have to try to decide which of the two faces I prefer because of course the words are backwards on the reverse. Still it’s nice to enjoy looking at it before I sew and it gets hidden forever inside the bag.

I was able to continue weaving once the lettering was done and the bag cloth finished because I had enough warp left to enable me to weave a piece that could be cut into the circular base of the bag. I stabilized it with heavy interfacing before cutting and that gave me a nice sturdy base for the bag.

I hadn’t planned on adding a strap to the original draw-string bag idea. It was just going to be a storage bag for my spinning tools that would go into another bag when I was out and about. However, I felt that the jaunty bag was asking for a strap. No problem. I was happy to have a reason to continue practicing combining warp and weft-faced structures in the one piece.

I wound a warp for the warp-faced strap using only one color instead of the two that I would normally use for Andean Pebble Weave projects. The warp-faced sections would be one solid color and I could play with weft colors for the small weft-faced sections. That way, the strap would not be too loud next to the rather busy bag.

I’ve been conservative in my color choices in this project. Perhaps in the next I’ll weave a solid black band with a variety of lively weft colors for the weft-faced patterns.

Take a look at this colorful warp-faced hair sash below from Jacaltenango in Guatemala. The weaver has made good use of the fact that she is free to change the color of her supplementary weft at will. Complementary-weft doesn’t allow that much freedom but I could still create some quite lively spots of weft-faced color along the length of a warp-faced band in which the weft is normally completed hidden.

Speaking of hair sashes of Jacaltenango, Carol Ventura will be giving a free Zoom lecture on them on Friday the 11th. Follow this link to register.

And now the thought has crossed my mind that perhaps I can line the Jaunty Bag…but not with my handwoven cloth. I’ve been thinking that I would like to try stitched shibori. For those who don’t know what that is, it is a resist dye technique for patterning cloth in which stitches are used to pull and shape cloth before it is dyed. The stitching creates areas that resist the dye and remain the original color. I’ve never done it before but was lucky enough some years ago to be in the area when Kris Nardello (and another dear lady whose name, forgive me, I have forgotten) were giving a workshop on it at the Textile and Fiber Arts Guild of Santa Cruz in California.. I wasn’t able to attend the whole thing but did bring home the kit which was made up of three sheets of scoured cotton cloth, needles, beads, thread and other bits thinking that one day I will take it up. The day has arrived.

The only things I have found from the kit so far are the sheets of cloth. I can decorate and line my bag with them and try something new…and if I make a mess of it, well, it will be hidden inside the bag, or I can just over-dye the whole thing. By the way, Kris kindly left a very helpful comment on my blog for me when I puzzling over my cochineal dyeing experiments a while ago. She is an expert in natural dyeing techniques.

This book cover will give you an idea of what stitched shibori can look like in expert hands….don’t expect to see anything like this in my next post!

The initial knee-jerk plan of action was to go looking on Youtube for instruction. But then it occurred to me that there will be highly experienced people who have devoted time and effort to writing books on the subject and that it would be nice to support them. As I have written a number of how-to books myself I know what it’s like to be in their shoes. Trust me…no one is getting rich from writing these kinds of books. The Kindle version of the one I have looked at is $35 and so I will need to give that some thought. If you own a book on the topic and can recommend one, please let me know. I have only just started to look. It will have to be a Kindle edition, though.

I hope in my next post to show you the finished jaunty bag with its accompanying sedate strap…and maybe my beginner attempts at stitched shibori. It will be one of those “mess or success” projects and no doubt, much will have been learned.

Backstrap Weaving – Proud!

I have woven a lot of things that have made me very happy but my latest piece is something of which I am particularly proud. That might sound a little obnoxious…but I can’t help it. The little cross-body purse that I just hand-sewed has me grinning from ear to ear. I guess it’s because I remember my school days when I was convinced that I was a total klutz when it came to any kind of craft project. In the end I even stopped handing in the work all together and my report cards would say “No work presented”, “Assignment incomplete”, or “Disappointing result”. I remember having a friend’s mother take pity and rescue and do

the sewing part of an assignment for me. My mother was also convinced that she had no craft-related skills or talents and I guess I just assumed I would be the same.

One of the 60/2 silk ikat pieces that I wove last year.

Not that this latest project is any great feat of sewing. It holds together and looks like what I had in mind and that is enough to please me. There aren’t any zips or fancy pockets. I took sewing skills that I had learned in my recent shoulder bag project and got to apply and improve on them. I took the ikat skills that I had learned in all the silk projects that I had woven during the worst of the pandemic and applied them to cotton.

In my last post, I showed you my ikat warp on the loom, heddled up and ready to go.

Almost all heddled. There are 880 ends in total of 20/2 cotton.
A coil rod in place on one of my older cotton scarf warps.

I had been deciding n whether it would be worth inserting a coil rod. I did go ahead and use one. Next time I will insert the rod right at the far end of the loom and leave it there. This time I inserted it, as is my habit, within reach just beyond my shed rod which meant that I had to roll it along the warp each time I advanced the warp. The rod will pick up the tiniest looseness in tension in any particular thread, take it up, and sort of push it along and away to the far end of the warp where it remains trapped. This is all very well unless you are trying to keep your ikat threads strictly aligned. In this case, it is preferable to have any tension differences gradually even themselves out as you inch your way along the warp in such a way as not to be noticeable at all. Each time the coil rod pulled a thread out of alignment, I had to take hold of the thread and ease it back into place. Lesson learned.

It’s amazing how fast the weaving goes after all the wrapping and dyeing that had taken place before I could even get the warp on the loom. Of course, it is only a meter of cloth which was the amount I had calculated as being necessary for my purse. I did not have a pattern for the purse and made up something very simple that is not all that different from my shoulder bag shape, except for the absence of pleats.

Rapid progress on the loom. The coil rod, unfortunately, is out of shot.

All my weaving friends will understand the reluctance to take scissors to a piece of your hand woven cloth and so it won’t surprise you that I had to let this cloth just sit about for a few days. In the meantime, I had to scale down the paper pattern I had made for my shoulder bag.

The finished one meter of ikat cloth.

I sewed a dummy purse, minus flap, to see if the shape I had drawn worked. I felt that it did and was able to use that dummy piece as the drop-in lining. It’s chocolate brown and I guess I was influenced by these naturally-dyed quilting pieces from Threads of Life in Ubud, Bali when I came up with my combination of colors. I have also seen ikat work in Guatemala that combines natural indigo blues with chocolate brown.

Hand-spun, backstrap loom-woven cotton pieces from Threads of Life…swoon.

Sadly, I neglected to take in-progress shots of the sewing part of this project. I wove three bands, one of which became the sides and base of the purse. The other is the strap and the third is the tubular edging on the flap. I was pleased that the pattern on the flap lined up quite nicely with that on the body of the purse and I used a magnetic clasp for the flap.

Feeling proud…can you tell?
Finished cross-body ikat purse.

These are sloooow projects but I find the slow hand-sewing so very relaxing. I posted my cloth in an online weaving group and one member responded with something like….”That looks like so much work!” I was kind of surprised. That’s the kind of thing that non-weavers say when I do a demonstration of backstrap weaving at an event. I have always felt that weavers, on the other hand, just get it!

A benefit of slow projects like this is the value you get from a relatively small amount of yarn! It has certainly kept me out of trouble for a good while. It never fails to tickle me that the bits that you see below can be transformed into a patterned purse.

20/2 mercerized cotton thread, dye for cotton, and ikat tape.

Next up…an attempt to make a small zippered coin purse in warp-faced fabric as a way to test my hand-spun Sea Island cotton. My teachers in coastal Ecuador used hand-spun cotton singles doubled rather than plied, and not sized, for their warp-faced weaving. My singles have stood up well to a balanced structure in an early test sample. Warp-faced will be a different story all together with all that added abrasion. Why am I using singles? I guess it’s only because I want the thread to be that fine. I may be completely misguided in this but we shall see what comes out of this next small experiment. I don’t think I will be wasting too much thread while learning these lessons. If my single thread stands up to the abrasion it just might be because I have put in too much twist and perhaps robbed it of its rustic hand-spun qualities. There are so many lessons to learn!

Mariana weaving warp-faced fabric for a double-pocket saddle bag using doubled hand-spun cotton singles, coastal Ecuador.

In my next post, I’ll have photos and information that my online weaving friend Christina has shared with me on her experience studying with ikat weavers in Mexico in 2019 as well as some images by another online friend who was in Ecuador interacting with ikat weavers in the 1970s. There might be a little something to report on my cotton coin purse project. I might even get to use my cochineal and alum.

And speaking of the red color of cochineal, here’s a teaser from next week’s post as the weavers in Mexico remove an ikat wrap to reveal one tiny part of the overall pattern…just in case you have seen enough blue for today! (Note that these weavers were using synthetic dye for their large production runs of 90-meter warps but use cochineal for their single unique backstrap-loom-woven pieces).

Photo courtesy of Christina Palafox.

Until next time…