I have been washing all the pieces I have made with the cotton my friend Betty brought back from Guatemala. Two of the pieces were recently made and two were made quite some time ago. Why have I waited? Well, the Guatemalan cotton was around 30 years old and that might explain why the color was coming off the thread as I wove. The most serious case was the purple thread in the spring scarf I made. It is flecked with white where the color had completely come off in places while I wove giving the cloth a sort of denim look. To tell the truth, I really liked that denim look. But, I was afraid to wash the piece thinking that it would lose a lot of color and that perhaps the purple would bleed into some of the silk supplementary weft.
I suppose that people who have more experience with fiber and dyeing would have told me that that wasn’t likely but, what did I know? I didn’t want to take the risk. And so I waited.
I had been hearing about Color Catcher cloths in one of the online groups and my friend Claudia got some for me when I was visiting her in the U.S. They work like a dream. You throw one in the wash with the garment and it magically takes up all the color that is released and is roaming about loose in the water. So, I washed all the pieces and there were no disasters. I can’t tell you how happy I am with the results after giving all four pieces a good press. They feel so wonderful!
The purple scarf doesn’t look any dfferent for having lost what seemed like a lot of color in the water.. I was worried that it might end up looking quite worn. It looks as bright as ever and feels gorgeously soft.
Four pieces got washed and three of the four were a great success. The fourth piece was the subject of a mini disaster. It taught me how the use of different kinds of silk supplementary weft in the same piece can effect the way the fabric shrinks.
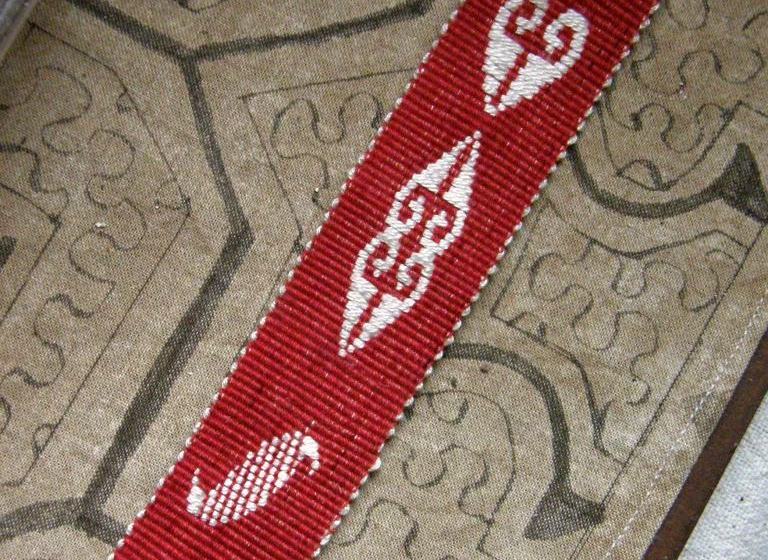
Let me show you the red ”leaf” piece that I recently made. This is one of the successes.I finally got around to hemming and finishing it with a wash and press.
It’s sitting on top of the two brown panels that I showed you last week that are now off the loom. I used the same kind of silk throughout this piece and all went well.
As soon as the brown pieces were cut off the loom, I couldn’t resist placing some of my small woven samples on them to see how they looked. As you will know from my previous posts, I want to sew the two panels together into one piece using decorative stitches to cover the join. Here they are fresh off the loom. I haven’t even tidied up the broken warp threads yet.You can see the replacement threads still pinned to the cloth.
And now you see them, tidied and hemmed….
At this point, I was a little unhappy with the fact that the brown color wasn’t nice and solid. The off-white supplementary-weft was showing through in several areas where the warp threads were spaced slightly further apart than in others. I could have called that a ”denim” look and been happy with it but I didn’t want that denim look in this piece.
What I was really pleased with were the edges…good and straight. That is something that I have under control. Once I have figured out the width a piece wants to be, I easily manage to keep it there and don’t need to fuss with it. The two panels were going to join up beautifully. I was excited. I was also happy that the motifs on both pieces lined up nicely. Although I didn’t have to measure and check on width as I wove, I did have to check and compare the length of the two pieces as I finished each motif to make sure that my picks per inch were the same on both.
I washed and pressed the two panels. The Color Catcher cloth drank up the significant amount of brown dye that was released into the water….yay.
The good thing: as the piece shrank, the warp threads smooshed together and gave me a much more solid brown piece of cloth.
The bad thing: my edges got messed up.
I had used three strands of one kind of off-white silk as the supplementary weft to make the double hook pattern and four strands of another kind, in yellow, to weave the diamonds. The parts with hooks pulled in more and now my edges are scalloped. The scalloping is so regular….the fabric draws in for the hooks and out again for the diamonds…that it almost looks like it was planned! My two panels are not going to join together as neatly as I had hoped. I will have to come up with another plan and perhaps sew the tiniest seam possible. I read somewhere that the strips of Kente cloth that are sewn together are connected with 1/8” seams. Maybe I can pull off something like that.
Above, you can see the even edge of the red piece next to the wavy brown edge.
I so love the way the red piece feels and looks now. The floats of supplemental weft in the leaf pattern are quite short and now, after pressing, the patterns have really become embedded and it looks as if they were printed on the cloth rather than created with supplemental threads. The patterns on the brown piece don’t quite look that way as the floats, particularly in the hook pattern, are considerably longer.
I hope I can get more of this Guatemalan cotton. I love working with this weight of thread and there are empty loom bars asking to be filled. In the meantime, I will continue with my curved ikat experiments and see where they take me. Now to see how I go with my decorative sewing.
Facebook has started reminding me that it was five years ago that I opened my account. Every few weeks I get a Facebook Memories reminder showing me a picture I posted on that day five years ago with the option of sharing it with the public. It seems they consider five years the period of time that should pass before a person can look back on an event with nostalgia.The first one I got was this:
This was taken the day before my birthday five years ago. I was in North Carolina and went to visit some ladies from Vietnam – Montagnard, or hilltribe, backstrap weavers – to look at their textiles and watch them weave. They dressed me up in one of their traditional skirts. The skirts are made of two panels which are woven on backstrap looms. The panels are sewn together and the join is covered with decorative stitching. The entire piece is then placed on a frame so that it can be edged with weft twining. They also gave me one of their shoulder bags to carry for the picture.
The following day I returned to watch Ju Nie prepare her warp. I learned a lot about her use of the coil rod on a circular warp and heddles that are applied during the warping process. It was a perfect way to spend a birthday. I was lucky to be able to return to visit Ju Nie and Ngach again a few months later and study their weft twining technique.
I went home and wove something to put into use some of the things I had learned and seen…a patterning technique using warp floats, patterning with supplemental weft and weft-twining.
I can’t believe it has already been five years since I did this. It takes me back to the time of my beginnings in the online weaving communities, the purchase of my first digital camera and the start of this blog. So much has happened since then in my world of weaving and even more had happened prior to that. I am in my 20th year of backstrap weaving now.
I can’t believe that it has already been eight years since I went to coastal Ecuador to study cotton spinning and weaving with Trini and her family.
This has been on my mind because my friend, Janet, has just returned from time spent with this same family and it has been amazing seeing some of her pictures. Trini’s nieces and nephew have grown and one even has a child of her own now. I am waiting for Janet to send me pictures so I can show you. She has been busy practicing the simple warp float technique that she learned there…the patterning technique that you see on the piece in the above picture. She also came back with the confidence to warp up a 10-foot long piece using a dovetailed warping system (see below) on a large vertical frame to make a plain-weave panel for a hammock.
She will weave and sew two panels together to make the complete hammock in the same way that my Vietnamese hilltribe teachers sew panels together to make their skirts and blankets. The dovetail warping system allows a weaver to work her way around the circle of warp and then open out the cloth once it is off the loom without having to cut the warp ends. Stick D in the above drawing is simply removed and the intact end loops of the warp can be used to form the ends of the hammock.
Guaraní weavers here in the Bolivian lowlands where I live also use this system. They use vertical frames and cotton thread and weave their hammocks with pick-up patterns all in one piece.
Picture courtesy of Aude Rossignol.
It’s been thirteen years since I first met my Guaraní teacher, Angela, pictured above warping for a hammock, here in Santa Cruz. She left shortly after to return to her community. It was only in 2010 that I found her again back in the city.
I have had the joining of woven panels on my mind lately which is partly what has been responsible for all these thoughts about my past experiences with this practice and the weaving teachers who showed it to me. My latest project is about weaving two identical panels and then joining them using a decorative stitch.
I have done this in the past using narrow pieces which gave me a chance to put to use one of the decorative stitches that my Montagnard backstrap weaving teachers use. Below, you can see how I joined two bands to make a tool bag…
You can see the stitching down the center. I also joined a long belt that I started weaving on a floor loom at a friend’s house and finished at home on my backstrap loom. This is the piece that I used to put together my instructions for Andean Pebble Weave on a four-shaft loom.
I cut the long strap in half and sewed the two pieces into a backstrap. It has been used by many people who come to weave with me and is a favorite. I used the same stitch as the one I used on the tool bag for this project.
I came across some belt weavers in Peru who sew their pieces together to make satchels to sell to tourists. They create neat joins which they do not cover with embroidery.
I decided to be moderate in the width of this project rather than fill my loom bars up completely with thread. Weaving two very wide pieces with pick-up patterning and joining them is my ultimate goal. These panels are just under 12” wide with 1100 ends of Guatemalan cotton in each. I am weaving a pattern using silk supplemental weft along the four edges and leaving the center blank as I hope to sew large stitches over the seam where the two pieces will be joined.
The project has progressed with all the challenges that I had anticipated and then some more!
Firstly, I wrongly assumed that this brown cotton from Guatemala was the same as the red cotton I used in the project I showed you in my last post. I calculated to get a 30cm width based on measurements taken from the red piece but, once I started weaving, the piece clearly did not want to be that wide. So I unwove and started over at 27.5cm.
Both panels have exactly the same number of ends and are the same width yet the one on the left is exposing more of the white supplemental weft than the other. I have three broken warp threads in the one on the left and several others are looking kind of sad. Meanwhile, the threads on the one on the right are in excellent shape. I am scratching my head about that. I also have to be on the lookout for the need to adjust my beat as the picks per inch on one panel tend to outnumber the ones on the other. So far, it is pretty much under control. I expect the embroidery over the join will be another challenge and I think I will practice on other cloth before I attempt it it on this piece.
I have the idea that creating identical panels in plain weave in this fine thread may be more difficult than doing so using a warp-float structure. I think that finishing this project will place me in a good position for a second one in Andean Pebble Weave.
I played around a little with supplementary-weft designs before starting this piece. I had seen a picture online of a flower motif and wanted to try something new in the way I used the supplementary weft. The image was so tiny that it was impossible to see any kind of detail by enlarging it, but it gave me ideas.
One of the limitations of the single-faced supplemental-weft patterning technique that I use a lot is that you can’t really create and fill in large solid shapes. You are limited by the length of the weft floats. This is simply because very long floats are not practical. They won’t lie flat and can get caught on things and pulled. One of the supplementary-weft threads around the buttonhole in this bag that I made got pulled right out of the shed. It got caught on a finger nail as I fastened the button. It was too long and placed in a high-traffic area.
Naturally, the finer the thread you use, the more detailed the patterns can be. With fine thread, the weft could float over 15 warp ends, for example, and not cause any problems, whereas heavier yarns might make anything more than a 5-span float impractical. This means that if you want to fill in a large shape with supplemental weft, you need to break the weft floats into several short segments.
This is the picture I saw online…
I am not even sure if this is a handwoven piece of cloth or what the technique is but I like the idea of having the shapes of the leaves and petals broken into those regular diagonal sections. It gives the shapes the look of being solid without being heavy. It is a lovely delicate look and I would love to create something like it.
At the bottom of this red band you can see my first rather clumsy experiment with this idea. I wasn’t pleased with this and will definitely keep working on it. In the meantime, I decided to go with something more Andean-like for the current project and wove a couple of samples to test design proportions.
My Guatemalan weaving teachers have their ways of dealing with large shapes. I took out my Guatemalan samples pieces and journal to refresh my memory and, again, I had to pause in disbelief at the realization that it has already been 7 years since I went there to study.Below, you can see one of the patterns that is typical of San Antonio Aguas Calientes. You can see that the large shapes, that look quite solid when viewed from a distance, are made up of several short weft floats. Three short floats take the place of one long one which would simply not be practical on a woman’s blouse.
The weavers of San Antonio Aguas Calientes use both single and double-faced techniques when patterning with their supplementary weft threads. The double-faced technique allows them to create truly soild looking shapes without the sort of ”speckled” effect created by the exposed warp ends that you can see in the single-faced method above,
The bird and flower motifs that I wove above are made with the double-faced technique. The motifs look exactly the same on both faces as you can see below. Although the figures actually comprise a series of several short weft floats, they look solid.
Here’s a brief explanation of how the double-faced method works. This is not meant to be a tutorial as I have not gone into details of thread weight and how to actually start and end a pattern. I just want to give you an idea of how the solid look is created as I have been asked many times about this especially by my backstrap weaving friend, Eladio, in Mexico. I hope he is reading this!
The ground cloth is warp-faced plain weave. The next shed in the weaving sequence is opened and the band is beaten. Then, blue supplemental weft is worked over and under the warp ends on a closed shed, that is, the weft goes over and under all the threads rather than just the threads in any one shed. The supplemental weft goes over and under groups of four warp ends…two ends are taken from the upper layer of threads and two from the lower layer to form this group of four threads.
In the first picture, you can see the weft going from right to left over, under, over, under four groups of threads. The weft then turns around behind the last group and passes from left to right (see the second picture above) going over, under, over, under. The supplemental weft needs to be laid quite loosely in the shed. The original shed is then reopened and the main white weft is passed.
The next shed in the sequence is then opened and the band is well beaten. The two passes of supplemental weft will pack to look like a solid line. After beating, it is time to use the supplementary-weft again on a closed shed to build up the pattern as you can see below. The supplemental weft shows on both faces of the band.
Below, you can see the little bee motif which was the first one that I was taught by my Guatemalan teacher. The weavers often use sheets and booklets of cross stitch patterns for design inspiration. Lidia took me yarn shopping and the little stores had many cross stitch magazines and individual pattern sheets. One of Lidia’s wishes was to to find patterns to which no one else in her community had access. Competition to sell weavings is fierce.
You can see how I have chosen to chart the bee motif. Each filled square represents four passes of the supplementary weft (my two explanatory photos above show how to make two passes). A half-filled square, therefore, represents two passes. What is critical to the success of this technique, as with all work with supplemental weft, is finding the right balance in the weight of the ground weave material and the supplemental weft. That is a matter of trial and error. Supplemental weft that is too light will not provide enough coverage. The opposite will make it difficult to maintain a horizontal weaving line.
One of these days I will make this a complete tutorial, take much better pictures than the blurry ones I took in low light this morning and fill in all the details.
However, I have to tell you that this is the slowest and most tedious technique I have done so far! I wove my large piece with the quetzal birds (at left) when I got home as well as a couple more samplers, and I have not done anything with the double-faced technique since!
I used the quetzal piece as my journal cover which was not such a great idea as you can’t see the other side and appreciate the double-faced nature of the technique. However, the Guatemalan weavers’ double-faced work is also hidden on the inside of their blouses.
It’s time to get out some cloth and start practicing my stitching for the join in my two panels. I want my sewing to be as neat and pretty as my teacher Maxima’s is. I hope to sew triangular shapes, as she has, and I chose the supplementary-weft motif that I am weaving, with its sort of triangular base, with that in mind.
Picture courtesy of PAZA Bolivia and Dorinda Dutcher.
I will leave you with a couple of hat bands that Anne wove using the intermesh technique that we wove together on one of my visits. My teachers in Huancayo 19 years ago, taught me the intermesh structure with a two-heddle set up which makes it partly loom-controlled. You can see Anne’s two heddles and sticks holding her picking cross below.She has used the lettering that I include in my second book in which I also teach this structure. The other design is charted in my second book and was adapted from a Mexican tapestry motif. Anne started the hatband as part of a weaving get-together we had on one of my trips. It is lovely to see it finished. I think her hatbands have come out beautifully.
I have been weaving my way through the yarn jungle that is my living room while I prepare warps.Yes, it’s that time again….yarn on every surface and many warps to prepare. But, I am now looking forward to a relaxed couple of weeks at my big loom, weaving for myself.
I was hoping to have my red Guatemalan cotton warp off the loom to show in this post. I got so close! I really dedicated myself to warping these last two weeks with just a few moments snatched here and there to sit at my big warp.
Now I am at the end and I am just weaving some plain unpatterned rows to fold over into a hem.
One of the many things I love about the backstrap loom is the fact that there can be very little loom waste, if you wish, although I admit that it isn’t a whole lot of fun trying to open sheds, prop them open and feed shuttles of weft through tiny openings when there is a mere four inches in which to work.
I don’t usually choose to be so frugal with my thread. The problem is that I was not sure of having enough red cotton to create this project in the dimensions I wanted and so I had to calculate for take-up and warp the bare minimum length. As I am using a 60/2 weft at the end for the hem, progress on this last inch or so isn’t exactly fast.
I so enjoyed weaving this piece. As I said in my last post, I love having the loom bars filled with thread and really enjoy using the big swords. Warp-faced plain weave is so gorgeous and fun to weave in fine thread. This thread is rather grippy and I had to work hard to clear sheds, especially the stick shed for which I had to strum to break each thread’s sticky grasp on its neighbors. I broke one of my pick-up sticks with zealous strumming. Don’t use your finest and favorite pick-up stick for strumming. My weaving teachers use strong llama bones for strumming for a reason and, goodness knows, I have a bunch of those. One thing to which I paid close attention in this project was strumming evenly and smoothly in both directions.
A backstrap weaver from Pitumarca, Peru with her llama bone tool in her lap ready to pick up at any time and use for strumming, beating and selecting threads.
I have one large skein of brown left in this particular Guatemalan thread. I would like to use it to weave two identical wide panels that I can join with bright decorative stitches. I gaze at Maxima’s beautiful aguayo and would like to use the kind of stitches that she has used to decorate the join. You can see the row of colorful triangles where the two pieces come together.
Picture courtesy of PAZA Bolivia and Dorinda Dutcher.
However, I will not attempt to give my panels four selvedges….not with this fine cotton! I am not ready for that yet and probably never will be. My successes with four selvedges, so far, have only been with wool and alpaca yarn and once with fine acrylic with the guidance of my teacher in Potosí. The difference is that the wool and acrylic are stretchy and that helps a lot when trying to squeeze in those last passes of weft.
A wool plain-weave runner with four selvedges that I decorated with supplemental-weft patterns.
I wove the red piece of cloth because I wanted to use it on display tables when I show people my smaller weaving…..a nice splash of color. I can pose all my small woven samples on it. A brown one won’t exactly provide the eye-catching spot of color that I want but, if I decorate it with supplemental-weft patterns and make the joining stitches bright and cheery, I think it will look very nice.
I have tried one kind of decorative stitch to cover joins on some wool bands made by ladies in Maxima’s cooperative (see the example on the right). I will need much more practice before I will be able to have them as neat and beautifully even as Maxima’s.
Not all the weavers here are as precise in their stitching as Maxima. The piece below from Calcha, Bolivia is well used and the stitches are quite worn and the thread faded. In this picture you can also see the ”terminal area” of this four-selvedge piece where the weaver had to stop creating the warp-float pattern and use plain weave to finish. The last few sheds would have been created without the aid of heddles or sticks with every other warp thread picked up using the blunt end of a needle. The weaving, apart from being a little moth eaten, doesn’t show signs of wear. It looks like the long decorative stitches are the first things to break down on these pieces.
Well, it’s back to the loom for me to weave off that last inch or so and then plan the brown thread project. I will leave you here with pictures of my Facebook friend, Oscar Armando Vazquez in Mexico, weaving on his backstrap loom. He says that there aren’t any backstrap weavers where he lives and so, lacking a teacher, he has been studying techniques on my blog instead. Here he is doing warp-faced double weave using this tutorial and creating patterns of his own. Wonderful!

 I had been hearing about Color Catcher cloths in one of the online groups and my friend Claudia got some for me when I was visiting her in the U.S. They work like a dream. You throw one in the wash with the garment and it magically takes up all the color that is released and is roaming about loose in the water. So, I washed all the pieces and there were no disasters. I can’t tell you how happy I am with the results after giving all four pieces a good press. They feel so wonderful!
 It’s sitting on top of the two brown panels that I showed you last week that are now off the loom. I used the same kind of silk throughout this piece and all went well.
 And now you see them, tidied and hemmed….
 At this point, I was a little unhappy with the fact that the brown color wasn’t nice and solid. The off-white supplementary-weft was showing through in several areas where the warp threads were spaced slightly further apart than in others. I could have called that a ”denim” look and been happy with it but I didn’t want that denim look in this piece.
 Above, you can see the even edge of the red piece next to the wavy brown edge.