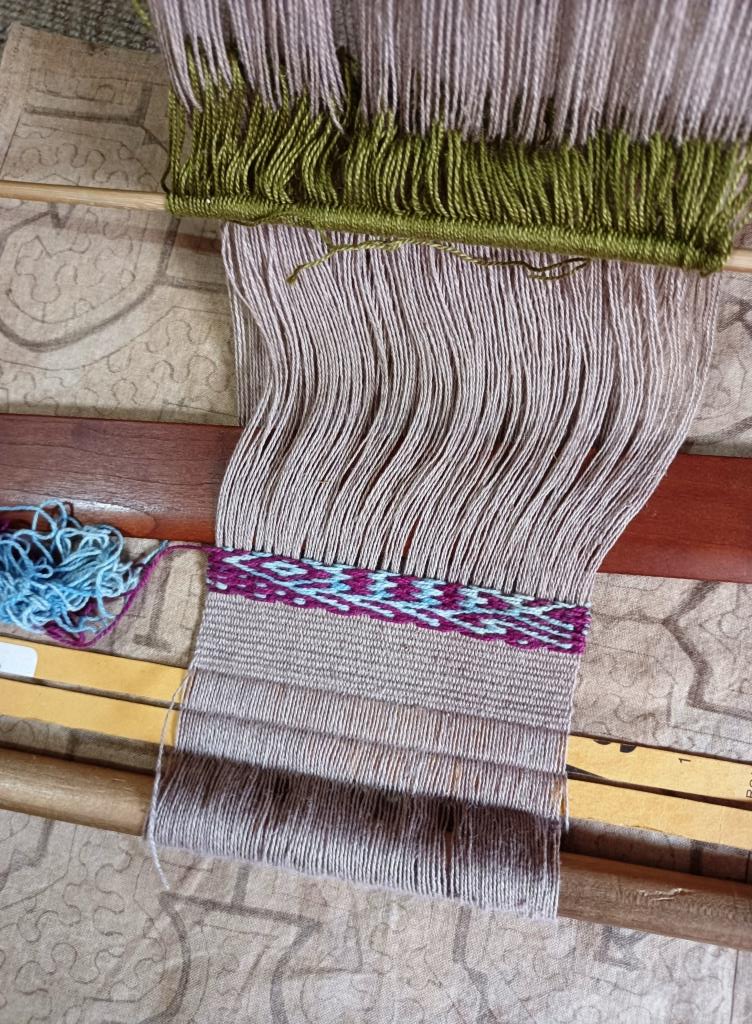
It’s just a short one this week as I’ve had other projects going on lately that have limited my time at the loom. I’m giving myself a bit of time off to write this post and then I’ll be back at them.
My stash of weaving materials has been reduced pretty much to one drawer now, most of it lovely silk in various sizes. I really didn’t have an idea of what I wanted to weave next. As you’ve probably figured out, my projects are born from a desire to just be at my backstrap loom weaving rather than a need for any kind of product.
I opened the drawer to see what would leap out at me and this is where I ended up…
This is the naturally-dyed cotton from Mayan Hands in Guatemala that Kate had given me many years ago. It was what she had left over from a towel weaving kit that she had purchased. The beautiful light blue thread was dyed with indigo. I love the washed-out look it has like a very faded old pair of jeans. The other colors were dyed by me using synthetic dyes….a variety of blues that I had used in other projects.
The light indigo-blue features in this bag for my cotton spinning tools and supplies along with the other shades of blue that I’d dyed myself.
Because my supply of this light blue thread was now so low, I’d need to come up with a smaller project than the tool bag. I decided on a belt using the same structures that I’d used for the bag fabric above.
That fabric was woven using both complementary-warp and complementary-weft structures, a combination that I’ve only quite recently been sampling and using. The darkest blue and light blue sections use the warp threads for making the patterns. In the other horizontal bands of pattern in other shades of blue the weft threads create the figures.
I used the structure that I call Andean Pebble Weave for both. I turn the Andean Pebble Weave structure sideways in order to be able to weave it as a weft-faced rather than a warp-faced structure.
I started experimenting and sampling with this a bit over a year ago, first by alternating bands of weft-faced pattern with warp-faced plain weave….
I really enjoyed the way it allowed me to change colors at will. Then I decided to combine complementary-warp and complementary-weft in the one piece, rather than just doing plain weave between the weft-faced sections.
The orange and white sections are complementary-warp and the burgundy and yellow are complementary-weft.
The first challenge was to adjust the way I wove the warp-faced sections so that their width matched those of the wider weft-faced ones.
Then I was able to go on to weave the fabric for the tool bag….
Because both structures are complementary ones, both faces of the cloth show the same figures except that their colors are reversed.
The strap for the bag uses the same two techniques except that I didn’t weave any figures into the warp-faced sections. Using only one color instead of two in the warp-faced sections made the strap less “noisy” against the busy bag fabric.
Using a complementary-warp-float structure, even though it’s just in one solid color, between the weft-faced sections gives a thicker, sturdier band than I would otherwise get with just plain weave.
Now after all that introduction, we finally get to the latest belt project. I wove it in much the same way as the strap above….solid light blue warp-faced sections with no pattern alternating with patterned weft-faced sections. I had to alter the way I did the weft-faced sections so that my little hummingbird figures would be well proportioned. That meant passing my weft over and under groups of fewer warp threads so that the figures wouldn’t turn out stretched and “flattened”.
The little hummingbird figures that I designed in the structure that I call Andean Pebble Weave normally sit on my bands aligned like this, looking like they’re about to fly off the edge…
Weaving them sideways in the weft-faced structure meant that they would be flying along the length of the belt and be seen the right way up when the belt is worn. (BTW, I did actually try to design a different hummingbird aligned sideways on my charting paper but couldn’t come up with anything that I liked).
And there it is off the loom.
The first little fella’s beak was too short. I don’t think he’ll be able to get at much nectar with that. The split in the band at one end will allow me to accommodate the belt buckle’s “tongue”. This is the first time I’ve woven a belt and thought far enough ahead to weave that split. It certainly makes things easier when adding the buckle later. The other end is a nice selvedge, something that my backstrap loom allows me to easily create, so I don’t need to worry about hemming or otherwise stabilizing it.
I took a walk down to a local store called Hebilandia, which translates to Buckle Land. It’s in the narrow chaotic streets near my home which are packed with fabric and upholstery stores. I’m always glad that that the gentlemen there tolerate my requests for just one of this and one of that. They really are geared up to selling in bulk to professional belt makers.
There I got a buckle, a thingamajig to hold down the excess bit of strap, a metal tab to go on the end (although, it isn’t quite wide enough….not a problem because that end is a selvedge anyway) and some webbing that I used as backing. I always back my belts, even the heavier double weave ones, because I like them good and stiff. After having tried different things with belts over the years, I just go with gluing on the backing. Oh, and while there, I also got the holes punched. It’s such a great little store to have just a few blocks from my home.
Buckle, thingamajig, end tab and holes.
Now I’m pondering this….
Both of these are gifts from Australian fiber friends. Susan gave me that skein of silk many years ago and it caught my eye as a nice thing to dye to combine with the variegated silk that Will gave me on my last visit. I think they might both be 20/2. Now, I’ve never used variegated thread as warp before and I am not quite sure about the best way to use it. Many years ago I was given some stunning Just Our Yarn variegated tencel that I was using as supplementary weft. Most of it got used by my students in workshops and it was absolutely gorgeous as supplementary weft.
I love the mother-of-pearl colors in the thread that Will has given me and am thinking that perhaps I could combine it with a matching solid color in rep weave. But, I don’t know….does anyone use silk for rep weave? It seems like that chunky structure doesn’t suit the delicate nature of silk.
I’ve only ever done two rep weave pieces before in cotton.
But then there’s ikat. I think that dyeing a solid color over an ikat pattern in variegated thread could be interesting. You can see that the last thing I’m thinking about right now is the product! I really don’t need anything. Maybe it could be fabric for a pillow cover? I might have enough thread for the front, or at least part thereof, of a pillow cover which can be backed with something else.
Going through old photos the other day, I saw this one which reminded me that this silk ikat piece is sitting at the bottom of a drawer. The finer patterning is in supplementary weft.
Pillow cover came to mind for this piece too, something for when I am living in Australia, although I’m determined not to get into home decorating when I’m there. I’ll be starting from zero as far as furnishings go and want to keep things as minimal as possible. After clearing out so much stuff from my place here, it’s nice to see how little I need in the way of furnishings….as long as I have something to which I can anchor my backstrap loom!
I’ll keep pondering that variegated silk and let’s see where it takes me. Until next time….
The Jaunty Bag is finished and will be taking flight with me tomorrow night to Australia. It’s stuffed full of Upland white cotton sliver, my mortar spinning bowl, and takli spindle. I don’t plan to spin on the flight although I wish I could. I don’t think my fellow passengers would appreciate having my extended arm in their faces.
It’s one heck of a trip…60 hours from door to door. There’s a reason why some tickets are less expensive than others! At least I arrive at my brother’s place in the evening and can go straight to bed. A million thanks to my weaving friend Emerald who will help me out with my 150lbs of luggage (this is Phase 1 of my eventual move back to Australia) while waiting in Sydney for the train up north. The hardest thing about traveling alone with so much luggage is queuing to buy food and then somehow finding a hand free to carry it away, and going to the restroom.
As for the Jaunty Bag, here’s where I left it in my last post…
The bag had been constructed and I was weaving the strap. I used the structure that I call Andean Pebble Weave in only one color rather than two for the warp-faced part of the strap. I turned Andean Pebble Weave sideways and wove it using weft for the little figured squares. I had planned to weave the strap with four selvedges but overestimated the amount of take-up. With four selvedges the strap would be too long. But I am crazy and created the four selvedges anyway because it’s good experience! As I mentioned in a previous post, I find it much easier to fill the gap between the two ends of weaving with weft-faced weaving rather than warp-faced.
I cut off the excess length of band and sewed it onto the bag. It doesn’t have its lining yet but I did buy a book on stitched shibori which is the technique I would like to use for the lining. When I looked online again for that thirty-five-dollar Stitched Shibori book, it had magically become twenty-six dollars. I’ll have plenty of flight time in which to read it. Even without its lining the Jaunty Bag will go traveling with me.
I haven’t been back to Australia in three and a half years and I haven’t been there in the summer months since 2014. I’m not teaching on this trip because I have no room for any workshop equipment but I will meet up with a weaving friend or two just to have some fun weaving together. I wonder if I’ll be able to attend the guild meeting in Sydney.
I’ll be back in March. There’ll be lots of thinking time on flights to plan my next project. I’m not going to bring back any yarn (Ha! Lets see if I stick to that plan). Working with dwindling yarn stash throughout the pandemic and these last years has been a really good experience and I’d like to keep that going. I will however, bring back some acid dyes.
I guess I’ll see you when I get back to Bolivia. I’ll be posting Aussie things that catch my eye on my personal Facebook account.
I once created what I called the “yurt-shaped” bag from woven cloth. The hand-dyed and painted reeled silk warp had been given to me by Sara whose weaving and dyeing studio is a yurt. It seemed appropriate to weave cloth from her warp and shape into a yurt!
Sara’s yurt-shaped studio in the woods.
Sara gave me the warp ready to go and I adorned it with a pattern in the structure that I call Andean Pebble Weave. I am sure that many of you will recognize Sara Lamb’s color palette.
It wasn’t a terribly long piece of fabric but it turned out to be just long enough to form the walls of a cylinder with circular base. Adding a drawstring at the top completed the yurt-ish look.
The circular base with tubular edging challenged my limited sewing skills. Cutting into the fabric was stressful!
I added tassels and a braided strap. I’ve never been happy with that strap and one of these days I’ll weave another.
The reason I am looking back at this old project is that my current project….a bag for my cotton-spinning tools was meant to be the same shape. I chose that shape because the mortar that I use to support my takli spindle is round-based and so a round-bottom bag seemed like a good idea.
However, once the fabric was off the loom with circular base sewn in place, I decided that I would lose too much height with a draw-string top. I added a band of fine cotton to the mouth of the bag. I figured I could sew a channel along its center to hold the drawstring but even so, I felt that I was sacrificing too much height. I wanted to be able to fit a good amount of cotton sliver in the bag along with my tall mortar and spindle. And so, the “odd-shaped” bag was born! I have been trying to find something to which I can liken this shape so that the bag can have a better name. I haven’t come up with anything. If you do, let me know, please. I am thinking that once it has its strap and is being carried cross-body wise, it may look less odd.
My bag for cotton spinning tools awaits its strap.
You’ll see that I went with a zipper in the end. The cotton band that I added at the top is woven from 30/2 indigo-dyed Guatemalan cotton that I got from Mayan Hands at a conference many years ago. It’s lovely stuff and I have used it in the past to weave covers for books. It was the perfect color for this project.
Weaving cloth from Guatemalan cotton to cover a small journal. My friend Claudia’s initials, CS, were placed to sit on the spineof the book.
That indigo-dyed cake of thread has sat on a shelf far away from windows for years. It’s amazing how much the color has faded. I had to pull thread from the center to find the original rich blue. However, I do love the unevenly faded stuff too and will definitely use it in a project one day.
In my last blog post, I showed you my progress with the spinning-bag cloth on the loom. Here’s a slightly different view of it resting on the floor.
This was just before I added the final band of patterning which would be made up of woven words. The darkest blue sections that you see in this piece are warp-faced….a complementary-warp structure that I call Andean Pebble Weave. The other horizontal bands in various shades of blue are weft-faced. I have basically turned the Andean Pebble Weave structure on its side and woven it as complementary-weft instead. This means that I can weave it in any color I like. I chose to use various shades of blue and teal in this piece.
The woven words that I chose to use are “Spinning Cotton” and ” Hilando Algodon”. This is the first time that I have woven letters using the structure that I call Andean Pebble Weave. I showed you many others structures that I have used for lettering in my last post and I wonder if any of you were inspired to try them. I used the letters that Alison Irwin designed and published in the latest issue of Little Looms magazine. Letters in Andean Pebble Weave are naturally quirky. The nature of the structure doesn’t allow them all to sit along the one line. That makes them seem to dance jauntily along the warp. Because I wove them as complementary-weft rather than as complementary-warp, the words I wove run width-wise across the warp rather than along the length as Alison has woven them in her article. I think they perfectly suited my jaunty little bag. Okay….I’m liking that…The item formerly known as The Odd-shaped Bag will now be called The Jaunty Bag.
I altered a couple of Alison’s letters to better suit my layout.
I always love the moment when the cloth is off the loom and I get to see the detail on the other face. In this case I don’t have to try to decide which of the two faces I prefer because of course the words are backwards on the reverse. Still it’s nice to enjoy looking at it before I sew and it gets hidden forever inside the bag.
I was able to continue weaving once the lettering was done and the bag cloth finished because I had enough warp left to enable me to weave a piece that could be cut into the circular base of the bag. I stabilized it with heavy interfacing before cutting and that gave me a nice sturdy base for the bag.
I hadn’t planned on adding a strap to the original draw-string bag idea. It was just going to be a storage bag for my spinning tools that would go into another bag when I was out and about. However, I felt that the jaunty bag was asking for a strap. No problem. I was happy to have a reason to continue practicing combining warp and weft-faced structures in the one piece.
I wound a warp for the warp-faced strap using only one color instead of the two that I would normally use for Andean Pebble Weave projects. The warp-faced sections would be one solid color and I could play with weft colors for the small weft-faced sections. That way, the strap would not be too loud next to the rather busy bag.
I’ve been conservative in my color choices in this project. Perhaps in the next I’ll weave a solid black band with a variety of lively weft colors for the weft-faced patterns.
Take a look at this colorful warp-faced hair sash below from Jacaltenango in Guatemala. The weaver has made good use of the fact that she is free to change the color of her supplementary weft at will. Complementary-weft doesn’t allow that much freedom but I could still create some quite lively spots of weft-faced color along the length of a warp-faced band in which the weft is normally completed hidden.
Speaking of hair sashes of Jacaltenango, Carol Ventura will be giving a free Zoom lecture on them on Friday the 11th. Follow this link to register.
And now the thought has crossed my mind that perhaps I can line the Jaunty Bag…but not with my handwoven cloth. I’ve been thinking that I would like to try stitched shibori. For those who don’t know what that is, it is a resist dye technique for patterning cloth in which stitches are used to pull and shape cloth before it is dyed. The stitching creates areas that resist the dye and remain the original color. I’ve never done it before but was lucky enough some years ago to be in the area when Kris Nardello (and another dear lady whose name, forgive me, I have forgotten) were giving a workshop on it at the Textile and Fiber Arts Guild of Santa Cruz in California.. I wasn’t able to attend the whole thing but did bring home the kit which was made up of three sheets of scoured cotton cloth, needles, beads, thread and other bits thinking that one day I will take it up. The day has arrived.
The only things I have found from the kit so far are the sheets of cloth. I can decorate and line my bag with them and try something new…and if I make a mess of it, well, it will be hidden inside the bag, or I can just over-dye the whole thing. By the way, Kris kindly left a very helpful comment on my blog for me when I puzzling over my cochineal dyeing experiments a while ago. She is an expert in natural dyeing techniques.
This book cover will give you an idea of what stitched shibori can look like in expert hands….don’t expect to see anything like this in my next post!
The initial knee-jerk plan of action was to go looking on Youtube for instruction. But then it occurred to me that there will be highly experienced people who have devoted time and effort to writing books on the subject and that it would be nice to support them. As I have written a number of how-to books myself I know what it’s like to be in their shoes. Trust me…no one is getting rich from writing these kinds of books. The Kindle version of the one I have looked at is $35 and so I will need to give that some thought. If you own a book on the topic and can recommend one, please let me know. I have only just started to look. It will have to be a Kindle edition, though.
I hope in my next post to show you the finished jaunty bag with its accompanying sedate strap…and maybe my beginner attempts at stitched shibori. It will be one of those “mess or success” projects and no doubt, much will have been learned.
I wanted to write a short post just to record what I have been up to in these last weeks of 2022. Here in Santa Cruz we are marking the end of the year with yet another strike tomorrow. It’s supposedly just a 24-hour one this time rather than another strike-without-end like the one we endured in October and November for 36 days. However, I was up and out early and at the supermarket today just in case it drags on.
This is a summary of what’s been going on in my fiber-y activities. I finally managed to get all the stuff I needed for my cochineal dyeing, including paper to measure pH, and produced a red in my final attempt. Then I ran out of cochineal. My usual supplier in the street market is out of it and I guess I’ll need to find another. I want to make sure that getting red wasn’t just a fluke! You can see the bright red that I got at the top and then all the other colors I got while trying, below.
I made a couple of other experiments. First, just out of curiosity, I threw some alum-mordanted wool in the pot before adding the silk in the last run. I was amazed to see it instantly turned a dark, rich red-wine red. The silk wouldn’t have anything to do with that color! The closest it would go was a dusty pink. Another thing I did was soak some of the dark purple that I had already produced, and didn’t particularly like, in pH- neutral distilled water. It turned an interesting copper color. I had too many orange samples and so I soaked one of those in the same pH-neutral distilled water and got a dull pink.
It’s nice seeing all the colors together. Now I need to come up with an idea for using them.
My original plan had been to create two tones of red to use in a silk ikat project but dyeing with cochineal on silk has been trickier than I had imagined. Wool seems to be easier.. Maybe it’s time to try ikat with wool. I feel sure that using a material like wool which has a certain amount of stretch will make that challenging. I remember my very first experiment with ikat so many years ago. In my ignorance I just dove straight in and used my handspun llama thread with bold red dye that was meant for cotton. Needless to say the result was a very disappointing Barbie-pink background with a barely discernible white pattern.
The cochineal-on-silk colors surrounded by a silk ikat scarf fabric that I wove some time ago. I used acid dyes for the ikat fabric.
And on the side, while messing around in the dye pots, I have been experimenting on my backstrap loom with something that I have been wanting to try for a long time. I wanted to try weaving complementary-warp patterns in a complementary-weft structure…I guess you could also call it “turned” complementary-warp, although “complementary-weft” does the trick for me.
I rummaged around in my stash and found some hemp thread that a weaving friend had given me years ago and used that as the base warp. I thought that the hemp would be sturdy enough to stand up to all the fiddling about that was bound to take place as I figured out the best way to execute the complementary-weft technique. The first thing to figure out was the number of warp threads that would make up each group around which the weft threads would turn. I was lucky in that my first guess turned out to be a good one.
I chose one of the fish motifs that I had charted for my Complementary-warp Pattern Book. The fish would normally be swimming length-wise down the warp. In complementary-weft it swims across the width of the warp. The second thing to figure out was how to turn the weft threads at the edges. I wasn’t sure if I would need floating selvedges but after fiddling about with different ideas, I found that they weren’t necessary. The selvedges are neat and stable. Of course, the back of the fabric shows a red fish on a blue background.
For the weft patterns I used some of the naturally dyed cotton from Mayan Hands that my weaving friend Kate had given me many years ago. It was left over from a kit she had brought back from Mayan Hands in Guatemala. The bag of beautiful thread has sat in my closet for years waiting for just the right project.
Mayan Hands naturally-dyed cotton.
The natural dye substances used are cochineal (I am so impressed that they can get such deep colors on cotton with cochineal!). There are three depths of cochineal reds. You can see light indigo and dark indigo. I would so love to have more of that dark indigo. Obviously, it was also a favorite of Kate’s! Madder produced the orange, and osage orange the tan colors. There’s quite a lot of natural that I can dye myself. This thread is heavier than the kind that I normally like to use as warp but it has turned out to be perfect as complementary weft on the hemp base warp. You can take a look here if you would like to learn more about this Mayan Hands natural dye project in Guatemala.
Next, I tried an Andean pattern from my Complementary-warp Pick-up Book and then I played around a bit to see the effect of using a much finer main weft and a much heavier complementary weft. I used Omega Sinfonia as the heavier complementary weft. I thought that having the weft section stand out in high relief against the hemp cloth might be attractive. I decided that I preferred a more even surface. However, the heavier weft did produce a motif that wasn’t quite as compressed as the others.
I was done with that experiment and decided that I now wanted to combine complementary-warp and complementary-weft in the same piece. It was one thing to use complementary weft on plain weave. Working it on a denser base of complementary-warp would be different. I am sure that I was somehow under the influence of my silk cochineal colors when I chose the colors for this next sample. I used the Mayan Hands cotton for both warp and weft.
The orange sections are complementary-warp and the red, complementary-weft. I like the fact that I could change the color of the complementary-weft threads at any time, if I wanted to. However, I decided to just stick with red for this sample.
The complementary-weft structure lends itself well to motifs with vertical lines. In complementary-warp I can have sharp, smooth horizontal lines if I wish, like the beak of my hummingbird motif at the bottom. In complementary-weft I can have sharp smooth vertical lines like the stalks of leaves and stems of flowers. Once I had figured out the ideal number of warp threads around which to turn the weft threads, the next challenge was to match the widths of the complementary-warp and complementary-weft sections. I eventually got there by the time I reached the third comp-warp section. In order to do so, I had to weave the comp-warp sections at a width that is not natural to me which meant having to regularly check that I was staying on track. The narrower hummingbird sections sits at my natural width and I could maintain that width easily without ever having to check. My attempts to match the width are more obvious in the next picture.
Working on matching the width of the complementary-warp sections to that of the complementary-weft.
So, now I want to use these combined structures on a much wider piece to make a bag for cotton-spinning tools…my takli, the mortar in which it’s supported, and my supply of cotton sliver….something that will enable me to easily store and carry it all about with me when I travel or when it’s not in use. I’ll use the Mayan Hands cotton but will dye some of the natural to get more colors. I might dye some more blues to go with the light and dark indigo thread that I already have in the kit.
A fun thing about the sample band I just wove was that I wove it with four selvedges. That’s the first time I have created a four-selvedged piece in cotton. It was relatively easy because I closed the gap with complementary-weft patterning rather than trying to close it in the warp-patterned sections. I turned the loom around and wove some comp warp at the far end of the warp and then filled in the gap between the two woven sections with comp weft. I didn’t go so far as to attempt a pattern, though! I might try that next time.
And with this project in this new-to-me combination of structures I will be starting off the new year. No doubt, there’ll be more cochineal dyeing next year and more ikat. I have no idea why I have so much black 60/2 silk but I would love to get something wide and very detailed on the loom in that black silk. The “dwindling stash” that I am always talking about is still dwindling but there always seems to be enough of the right stuff to enable me to experiment and then go on to weave useful projects.
If all goes my way, there will be a trip to Australia in 2023 to hopefully lay the ground work for my eventual move back. That will perhaps straighten out the stress-inducing mess of unanswered questions in my head and, who knows, I may return here feeling settled and confident enough to work on continuing with the book projects I have started and left long neglected.
Thanks for staying with me. I wish you all the best for happiness and peace of mind in the coming new year!
My relationship with Time seems to be changing. I know that I am not the only one who got lost during these last two strange years, overcome by the feeling that time was speeding by… weeks and months merging into a hazy uneventful blob. Even now I struggle to separate 2020 from 2021. But I just recently realized that the passage of time is slowing down for me and starting to resemble something like normal, something recognizable from the pre-pandemic days. The calendar map that I have always carried in my mind’s eye is starting to reappear.
I resist the urge to go back and try to account, in terms of productivity, for the 24 months that have passed since we first went into lock-down here in Bolivia. Today marks the anniversary of the confirmation of the first known Covid case here. That any of us achieved anything meaningful at all is cause for celebration. And now I am talking as if it is all over. Of course, I know it isn’t, but there is definitely a change in my state of mind.
Three-panel wall hanging: Textile Trails
On the theme of Time, I am reminded of a question that I am very often asked when I show my woven work….. “How long did it take to weave that?”
I am trying very hard to think back to a time before I started weaving to see if perhaps I would have asked this question myself to a craftsperson and what might have motivated me to do so. Would it be because I was thinking of trying to make the object myself and needed to see if the time involved was worth my effort? Or perhaps I would want to know if the asking price for the object reflected the amount of time that had gone into creating it.
In any case, I find it a very difficult question to answer. How long does it take?…As long as it takes! I honestly don’t keep track. I don’t sell my work and so I need not consider time in order to fairly price an item. I am not weaving to a deadline. There is usually no exhibit for which the work has to be completed…the three pieces above were an exception as I had woven them for an exhibit at the ANWG conference in 2015. I would probably have to go back to my blog posts if I wanted to give an accurate answer in terms of the number of weeks on which I worked on a project. However, I would be at a complete loss when it came to the total number of hours.
I met a craftsperson some years ago and witnessed his response to the question…
“How long did it take to make that?”
His response:
A l i f e t i m e
I can only imagine that he very rightly considers that a lifetime of his accumulated knowledge, experience, skill and inspiration went into this and every piece that he has completed. I love his response.
So, I am willing to pour as much time and effort as is required into every piece I weave. There have been a couple of times, though, when I just wanted to get the thing done! One such time was when I had volunteered to weave six lanyards for a conference. The long piece of half-inch band with its small repeated motif did not excite me at all when the time came to weave it. I installed eleven sets of string heddles to move it along. I didn’t have to do any pick-up and that rather unique experience suddenly made the project very interesting as I came up with ways to remember which heddle came next in the sequence.
What I don’t like, is making silly mistakes and wasting time. Okay, I will admit that a mistake is always a learning experience and valuable for that reason but sometimes you just turn around and do the same old thing again!
A circular warp for a cotton scarf
Like the time I was using a coil rod for the first time on a circular warp many years ago. The coil rod (sometimes called rolling stick) is the uppermost stick in this cotton circular warp and I was using it because it seemed like an important part of a circular warp set-up. At the time, I didn’t fully understand its purpose. One of my aims for using it in this project was to figure that out. While trying to move the rod as weaving progressed, I mishandled and broke the coil rod. I did it once…I learned something. I did it a second time…I cursed…but then I learned some more. The third time I broke it, it got flung to other side of the room and I continued without it. It was then that I started understanding its purpose because it was very much aware that it was a different experience weaving without it. And so I was happy to sit patiently and install it once again.
(Note that I am talking about circular warps here. I do, however, continue to use the coil rod on both circular and single-plane warps if I am doing plain weave with cotton or silk (materials that have little to no stretch). I have written a lot about this tool in blog posts over the years. If you are interested in learning more, you could start here.)
Maybe this is something that we don’t consider when we ask the craftsperson how long it took to complete the project. Do we want them to include the time used to fix “oopsies”? After all, the fixing of the oopsies adds to that lifetime of experience about which my craftsman friend was speaking.
The first six inches of this warp were woven and unwoven twice before I found just the right weight of material for the supplemental patterning weft.
While the amount of time needed to weave a piece is not important to me, I am always interested in learning about techniques that weavers have developed to help make the whole process more efficient, like the use of multiple string heddles and pattern storage sticks, for example. However, there is one thing that I have always been a bit stubborn about and that is the use of sizing.
In weaving, sizing is a substance that is used to coat warp threads that are hairy or “sticky”, or have other characteristics that make it difficult to achieve clean sheds. Basically, it smooths the threads. I resist using it purely because of the “ick” factor. That is, I hate to think of the mess of dunking my warp into a bath of starchy goo and I don’t think I would enjoy the feel of the stiffened coated threads as I weave. Keep in mind that my hands are usually in almost constant contact with the threads as I weave pick-up patterns. Of course, it all washes off in the end and you are left with the original softness of the yarn but yech, I just don’t like the sound of it. I prefer to stay away from the sizing and just adjust my loom-operating methods instead.
Adapting my methods to the materials in use: I was able to weave with Knit Picks Palette….a soft, loosely-plied wool and create a four-selvedged piece.
My approach when working with sticky materials is to adapt the way I operate the loom…take a lot of care when opening sheds by working the threads in sections, using my finger tips to help release the grip a thread may have on its neighbors. I advance the warp more often so that sticks and heddles are not sitting on and abrading any one section for too long, causing it to shed and pill. Yes, it does slow things down but, as I said, I am not in any hurry. I suspect that using a sized warp on a floor loom is a different experience in that the weaver isn’t necessarily handling the warp threads during the weaving part of the process.
Another way to avoid using sizing might be to add extra twist to commercial wool yarn to make it smoother. My weaving teachers here create relatively smooth hand-spun yarn by using a high amount of twist. They also add twist to the synthetic thread that they buy in the market. This kind of yarn creates a certain kind of cloth. The thing is that I don’t always want that kind of cloth.
Two wool lap-size blankets that I wove using Mora yarn. It’s worsted spun which helps somewhat with the stickiness issue. I didn’t add any extra twist.
My latest project has been with mill-spun wool singles….sticky stuff. I could get a tiny heddle shed which I would then proceed to open further with my fingers. I didn’t want to use sizing. I didn’t want to ply it or add extra twist. I love the way it feels. The supplementary weft is my own plied hand-spun wool.
From the 27-inch warp I got 21 1/2 inches of cloth and my string heddles came up remarkably clean.
I always love the way the back of these supplementary-weft patterned pieces look.
There was a small amount of curl in the cloth at its opposing corners. Folding it to make a pouch for my phone and edging it with a patterned tubular band took care of that.
The fresh warp in the above photo was for a small closure tab. I used my plied hand-spun for that. I used a dense structure of three-span floats (intermesh) to produce a sturdy band…hence the two sets of string heddles.
The finished pouch.
I wet-finished the small piece on the right under the sword. The warp threads shifted slightly closer together, I took measurements, but I didn’t notice any real difference in the feel of the cloth. I didn’t wet-finish the pouch piece as I was a little concerned about color run in the supplementary weft. I had bought that roving already colored. As the supplementary weft is tightly wedged between the two layers of warp in several places, I don’t think that even a color-catcher cloth would stop the color from bleeding onto the grey wool. If wet-finishing had made a significant difference to the way the cloth felt, I may have reconsidered.
I hope that I get a chance to show this, the first of many projects in the mill-spun wool singles, to the farming couple whose sheep provided the fleece. My original plan had been to use this yarn for a shoulder bag project. I would dye the yarn to match the three-color strap that I had already woven…
I used my plied hand-spun wool for this strap. I don’t feel that I was heavy-handed in the amount of twist I used. The strap lies perfectly flat and the yarn was beautiful to weave with.
However, now that I have seen the cloth that this yarn produces, I can’t bring myself to dye it. I love all the subtle color variations from this blend of natural white and black. I’ll be using it as is perhaps for a pillow cover and will add color with supplementary weft instead.
So, I will turn once again to my Mora yarn for the bag project. I over-dyed a pale green color that I didn’t particularly like to get a dark blue that is close to the strap color. It will be mostly plain blue and with a very narrow strip of three-color pattern in the center. I have used Mora for a bag project before and know that it performs well on the loom as well as with use.
Fabric for a bag with built-in pocket woven with Mora wool.
If you are curious about the Mora yarn, here it is. It’s 20/2 worsted spun and I know that both Vavstuga and Eugene Textile Center carry it in the USA.
One skein of Mora goes a long way. It gives me material to work with for dyeing with cochineal for other projects. It’s taken two years but I finally got some alum. Just before the pandemic I had been out and about looking everywhere for the “precious” stuff…precious only because I suddenly could not find it anywhere. The usual pharmaceutical supply stores weren’t carrying it any more. The little hardware stalls in the market (there are dozens of them) didn’t have it. I tried the Mennonite market because I know that they can and pickle but they told me to go to the pharmaceutical places. The little McCormick jars of alum are not available here either. I am guessing that the Mennonite folk have a massive supply of it at home and are possibly not yet aware of it no longer being available. My friend Dorinda sent me some from Cochabamba a couple of weeks ago.
I have used cochineal in the past to dye my hand spun llama yarn. With an alum mordant I get the crimson color you see in this image.
The stones you see are a mineral that goes by the Quechua name millu. Dorinda sent it along as a bonus. It is not something that is required for dyeing with cochineal but she thought that I might enjoy experimenting with it. In the co-op, they use it to darken colors. It is also sold as a home remedy and it is in those stalls that it is found in the street markets. Now that I know what it is, I will most likely be able to find some here in Santa Cruz although I suspect that the amount Dorinda sent me will go a long way. Maybe I will also dye some silk with cochineal for an ikat project.
These are all time-consuming processes. I am not concerned about the amount of time it takes. If you have ever tried ikat, you will know what I mean by time-consuming. Slow processes are just perfect for someone who is working with dwindling stash!
When I told a friend of mine about having finally got hold of some alum via Cochabamba, he took on the challenge of hunting it down in Santa Cruz and came up with this in a very upmarket store of natural vegan-friendly cosmetics. One large chunk came contained in a cloth bag inside a fancy carry bag as if it were something terribly precious…and yes, the price was precious. The accompanying card shows someone applying it to their armpits. So I guess supplies, at least here in Santa Cruz, have been entirely diverted to the cosmetics industry.
Another “slow” project is my learning to spin cotton on a takli spindle. Version One didn’t have enough twist. Version Two had…you guessed it… what I suspected was too much twist. Version Three, which is in progress, is bound to have some other problem. And on it goes. I love the little takli spindle! And Joan Ruane’s video class on it has been so good. I’ll never forget the time I was with Joan at the Mannings. I had set up a backstrap loom and she had wanted to see what that was all about. I was doing pick-up and her reaction was “Oh my god, it’s slower than tapestry!” This from a woman who spins her own cotton for weaving! She made me laugh. I guess we all have our own feelings about Time.
As for Version Two with it’s crazy amount of twist, I decided to see if it was possible to set the twist on my singles (because that’s how I want to eventually use this thread…as singles) and did some reading about that. I have Stephanie Gaustad’s book on cotton, flax and hemp and there are also online resources about simmering and immersion. The trickiest part was having to immerse the thread under tension. My solution for that is a bit wacky. It worked for these small samples.
The thread went into the pot tightly wound around these metal mesh pencil caddies. I do want to use this thread as singles so that I can once again try to weave something approximating the sheer cotton cloth that is woven in the Alta Verapaz region of Guatemala. I want the thread to be finer than the hand-spun that I used last time in this piece…
Woven with hand-spun cotton singles that I had bought in Guatemala.
And this is where that icky topic of sizing comes back into it. I will probably give in and size the thread. I wove the above piece using a bamboo reed to maintain sett. The weavers in Alta Verapaz don’t use one and I am curious to know if the stiffening of the thread from the sizing is one of the factors that enables them to maintain the sett without the aid of the reed. I stress ONE of the factors because, of course, their supremely high level of skill gathered from years and years of work is going to be the main contributing factor. In videos, I have been able to hear the sound of their picking stick on the threads. The weavers are in the habit of slowly scraping the pick along the warp threads from selvedge to selvedge right at the weaving line as if, I am guessing, to encourage the threads to remain separated and not drift into warp dominant positions. That sound is not one that I would expect to hear from naked hand-spun cotton. The sizing that is used gives the threads a coating that produces that sound. Perhaps I will need to use sound as my guide when I try this myself.
All time-consuming stuff. But I am not here to just consume time. Hopefully, I will be using it to continue learning. When I recently explained to someone my plans for my own hand-spun cotton, they asked how long it would take before I would be ready to start the weaving. I sensibly replied….years.