
Backstrap Weaving – Cotton Tales

While scrolling through my Facebook feed last week I was surprised and excited to see an ad from the Museo ArteCampo here in Santa Cruz for a workshop being given by two Guaraní ladies on spinning cotton. There are three recognized groups of Guaraní people here in Bolivia living in the lowlands between the Chaco and the Andes. Artecampo has been working with people from the Isoseño group since 1984 helping them to recover and preserve dwindling knowledge of technique and motifs while providing a market for their handwoven hammocks, bags and wall hangings.

Examples of GuaranÍ textiles at the Museo ArteCampo.

The timing of this workshop couldn’t have been more perfect considering that I have only recently started to spend a serious amount of time spinning the stash of cotton sliver that I have accumulated in my closet…all generous gifts from my weaving friends. I haven’t seen anything like this being offered in all the years I have been here and who knows? I may not have considered taking the workshop if it had come along years ago.

Learning to spin cotton in Ecuador in 2007.

Two video classes on cotton spinning by Joan Ruane and Stephanie Gaustad as well as a short in-person demo with weaving friend Elizabeth in Australia (who had gifted me a takli spindle) had helped me to get started with using a takli. I am sure that some of what I had witnessed and tried during my stay with a family of cotton spinners and weavers in coastal Ecuador way back in 2007 also helped. I had really been way more focused on the weaving during that stay. Although I was curious and interested, cotton spinning at that point hadn’t captivated me. I just couldn’t see myself having the desire to do it or having a need for hand-spun cotton thread.

This was also true when I’d had the opportunity to study with Ju Nie, a Montagnard (Vietnamese hilltribe) weaver and spinner. She showed me how she first teased the cotton with a bow and then spun it on her spinning wheel. It was fascinating but I had considered that demonstration of such beautiful traditional skills and tools as just an interesting interlude during my studies of the beautiful patterned weft-twining that she was using on the fringes of her woven pieces. You can see the frame on which we were carrying out the twining work in the background. I recently learned that dear Ju Nie passed away last October.

And so, my time had finally come during the pandemic to focus more closely on cotton spinning. And then came this workshop. A miniature Guaraní loom sat on the table at the workshop with a piece of weaving in progress but I didn’t allow myself to get distracted!

Under a tree dripping with mangoes, fourteen of us gathered to learn how to spin cotton on the typical spindle used by the Guaraní ladies.

I already own a spindle that I had bought from my Guaraní weaving teacher many years ago. She only had a little cotton on hand and had given me a very brief demonstration. That had been enough to satisfy my curiosity as, again, I was much more interested in the weaving at that time. She did tell me at that time that cotton was being grown in the community of Isoso and that the inhabitants were not willing to give the seeds away to anyone….not that I had asked for any. I have nowhere to grow it. At the workshop, however, we were free to keep the seeds that we were removing from the cotton.

Angela back in 2010 giving me a short demonstration of how she spins cotton.

The spindle I bought from Angela as well as the ones we were given to use in the workshop, had thick pieces of rubber for whorls. The rubber pieces look like they have been cut from the soles of sandals. A simple groove is sliced into the end of the shaft.

The workshop spindle.
The spindle I bought from Angela in 2010 has a beautifully shaped end rather than just the simple cut groove.

We took the seeds out of the cotton and teased it apart with our fingers into a light airy sheet. Then we copied our teachers’ movements and rapidly lifted and dropped the sheets multiple times a few inches above the table before very gently forming them into loose rolls. One problem we faced was that Sabina, the teacher at my table, was left-handed. She loaded each spindle from scratch and then handed it off to us. As soon as we right-handed folks started turning the spindles, the thread was un-spun and subsequently broke. Not a big deal. We all laughed.

Sabina gets the spinning started while we prepare the cotton.

Although, I am very much used to the watch-and-copy style of teaching used by my teachers here, I had also had the benefit of lots of spinning explanations from my video and in-person experiences as well as lots of trial-and-error practice on my own. And so, I managed to get on just fine. I could understand very well the struggles of the other participants because it wasn’t so long ago that I was experiencing the same difficulties.

Clara worked with a group of participants at another table.

I really wanted to use this workshop as an opportunity to see how the Guaraní ladies manage to spin much heavier thread than I do. They weave hammocks with their plied thread and it is thick and sturdy and so I spent the workshop time trying to focus on that. I created thread that was just a bit thicker than what I have been creating at home but it was nowhere near as thick as Sabina’s and I wasn’t able to keep it consistent. Sabina kept laughing at my fine thread but also told me, with what seemed to me to be pride, that her grandmother had been able to spin very fine thread. My other interest in the workshop was to chat with the teachers about their experiences learning to spin and weave as children. Plus, I wanted to see if I could manage to spin decent thread from cotton I had prepared myself in such a basic way rather than with the beautifully prepared sliver that I had been given.

Cards had been placed on a table so that we could see the Guaraní words used for describing what we were doing. Our attempts to correctly pronounce the phrases brought on more laughter.

GuaranÍ spinning vocabulary and Spanish translation.

As for my cotton spinning at home, I am still working my way through the color labeled Cinnamon. I boiled the color labeled Mahogany and was astonished to see how much it changed its tone. I love it. Either some of the brown comes off in the water, or this cotton was particularly dirty…the water became a mucky, murky mess!

The boiled Mahogany in the center with the original color below right. Above is the original Cinnamon color with the boiled and not-boiled greens on the left.

Now for the latest ikat project using my hand-spun cotton. I might try this particular idea again some time, but not with my hand-spun cotton. It turned into quite a business! I wanted to have a white ikat pattern on a background of various tones of blue. You might remember a project I did a couple of years ago in which I used a multi-colored warp for ikat. This was industrially-spun and naturally-dyed silk and the project was relatively simple: tie the ikat tape on the multi-colored silk…the dyeing of the warp thread had already been done by someone else…and then dye the whole thing one solid color, in this case, black. I loved the result.

I am able to get quite sharp images when using using uniformly spun thread.
The color-inspiration picture.

The current project is more or less the opposite in that I wanted the ikat to be a single solid color, in this case, white, with a multi-colored background. I wanted the change in the blue tones to be fairly subtle. And so I had to tie the pattern and then split the warp into sections and dye two sections at a time separately so that the outer sections were very dark, gradually lightening toward the center. The very center section was dyed grey (which I now regret doing…I should have just gone with light blue) as I was using a picture of my choosing for color inspiration as part of a group weave-along and grey was part of it.

What a task it became! I was using my hand-spun cotton singles. The small individual sections totally twisted up on themselves in the dye bath and so the dye was not able to fully penetrate some parts. I had to repeatedly remove the thread from the bath and try to separate the individual threads and then poke and prod and pick at them in the water. The poor things took quite a beating. And then they would dry and I would find them to be too light and the contrast between the strips of blue too great and so back into the dye bath they would go. Yes, so next time I try this particular ikat idea, it will not be carried out with hand-spun singles. There was way too much picking and pulling and wrangling of the thread going on. I just knew that I was going to have a lot of shift in the pattern as a result. So much fuss over such a small piece. I had been planning to weave it after adding natural green cotton to the sides to make a piece wide enough for a pouch but I decided not to risk my precious green on a project that seemed doomed to fail. Perhaps it could be a wrist cuff instead.

Another goal of this project was to arrange the angle of the diagonals in the pattern so that the diamond shape was more curve-like. That part seemed to have worked out quite well. As always, I really enjoyed unwrapping the plastic ties to reveal the pattern and then sitting down to finally weave it. One of the center threads broke. That’s a problem when it’s ikat unless you have another tie-dyed thread to replace it. But everything else went smoothly. There was a lot of shift in the pattern but that was expected and I was happily weaving away at this point.

After looking at the finished piece for a few days, I decided that it wasn’t so bad after all. I decided to go ahead and weave the green sides separately so that I could piece together a useful item. Yes, another pouch. After all that work, the ikat piece really deserved to be made into something. I planned the layout combining the darker boiled and not-boiled green with a little blue that I had already dyed for a previous project.
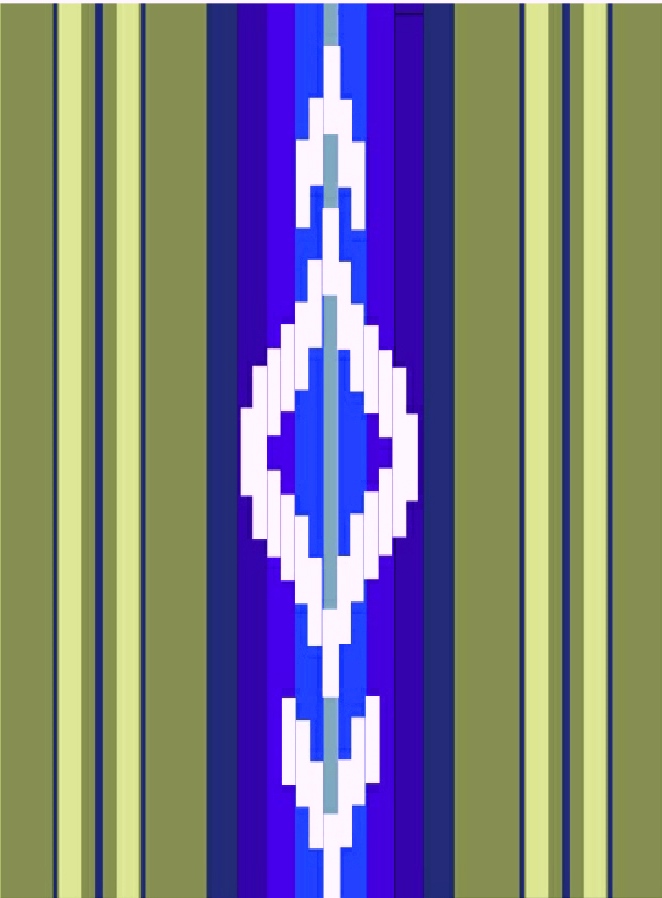
I wove the two strips separately but at the same time…if that makes sense. It fit better in my weaving space if I wove it this way rather than as one long strip cut in two. Besides, I could keep a better eye on matching width this way. Again, it was just lovely to be at the loom doing simple plain weave and enjoying the look and feel of the hand-spun cotton. Three broken threads were easily replaced…no tie-dye to worry about this time. The broken ones happened to be the not-boiled green…coincidence, or does that say something about a change that takes place during the boiling process? The threads broke when I was moving the coil rod. Note to self again…set up the coil rod right at the end of the warp and leave it there.

A first look. The sewing isn’t finished yet. I’ll just use a large snap at the mouth of the pouch. I am very happy with the curviness of the pattern.

Here’s the gang of hand-spun ikat projects all together.. The pattern of the latest one repeats on the back as I had folded the warp to halve its length and was therefore able to tie once and get two patterns.

I have another ikat idea developing using my 30/2 silk and reds…maybe cochineal? In the meantime, I will keep spinning cotton. I want to boil small amounts of the new Cinnamon color for different lengths of time to see if that produces different tones. Right now I have some 60/2 silk on the loom and am using double weave to create some jewelry pieces….experiments. I already have a nice ikat pouch in which to keep them…lol. I am thinking ahead to my eventual move back to Australia and considering the eye-wateringly high cost of living (compared with Bolivia). It will be helpful if I can perhaps sell some woven items at craft fairs.

One other thought that just popped into my head is to once again dye sections of pre-warped (but not ikat treated) hand-spun singles allowing them to twist on themselves. Perhaps the differences in dye penetration along the length and breadth will create interesting patterns. It’s hard to believe that this is me writing this….the one who likes everything to be controlled!

Until next time….

Backstrap Weaving – The Plan

Spinning cotton had certainly not been part of The Plan for how I was going to spend my time during this Bolivian summer. I spend a fair bit of time when I am away sitting in airports, or on planes, trains and buses, and that is when I like to get out my notebook and create sketches and notes on the projects I would like to attack when I get home. Cotton spinning was not one of them. However, the seed had kind of been planted, although it had not quite taken hold, when I was in Australia. Elizabeth, who came to weave with me, gave me a lovely gift of prepared cotton, a tahkli and a pretty dish in which to place the spindle tip. She had taken classes with Joan Ruane earlier that year and gave me a little demonstration one lunch break. We were so absorbed and I was so swept up in her enthusiasm that we forget to eat!

I had learned to spin cotton in 2007 in coastal Ecuador when I stayed with a family of spinners and weavers along with anthropologist Kathleen Klumpp, but had not taken it much further. I practiced a little when I got home but never spun any useful kind of amount. I certainly couldn’t imagine using the clunky kind of thread I was producing in my weaving and I didn’t have the will to practice more in order to refine and perfect the skill.

                                                                        Photo by Kathleen Klumpp.

I had brought back some of Trini’s prepared cotton and still have it sitting in the closet. Now there is a good chance that I will spin it.

This cotton had passed through the hands of the many grandchildren in the family who would sit on the floor after dinner and pluck out the seeds. Mariana, Trini and I had taken turns in pounding it. I had even made myself a miniature stand from a tree on their property on which to drape the cotton while spinning it.

I simply couldn’t see any reason to spin my own cotton. I didn’t feel that the cotton I was buying was lacking in any qualities that I needed for my weaving….until now. I want cotton singles that can come somewhere close to the fine thread that the weavers in Guatemala use for their sheer cloth. They are able to buy skeins of the commercially-spun cotton singles that they use.. Some weavers in Mexico, who also create this kind of sheer cloth, go to the trouble of splitting the ply of commercially produced cotton if they want to weave the finest pieces. Can you imagine? The seed of interest that Elizabeth had planted in me in Australia started to sprout when Deb in North Carolina showed me the amazing piece of sheer white cloth that she had bought in Guatemala. I actually own a small sample of this cloth. I have taken it out of the closet many times to admire.

There is a wonderful article by Cherri M Pancake and Suzanne Baizerman in the 1980-81 issue of the Textile Museum Journal on the production of Guatemalan gauze textiles. The article states that Handspun single-ply (Z-spun) cotton of varying fineness and degree of twist was used to produce some of the historical textiles. This is referring to textiles that were produced prior to the last decades of the nineteenth century. It seems that the weavers now only use commercially-spun thread.

Kathleen Vitale of Endangered Threads has produced a video on these sheer textiles that are being produced in both Guatemala and Mexico. If your mind boggles at the idea of splitting the ply of your already fine two-ply cotton, take a look at the technique used by the ladies in Mexico in this video!

I brought back a big ball of hand spun doubled cotton singles from Guatemala. I don’t know for what style of weaving that thread had been intended. I separated the strands and used the singles in my experiments in weaving the sheer cloth. My cloth is heavy next to the Guatemalan work! So far my own attempts at spinning cotton is producing thread that is only ever so slightly finer than the Guatemalan thread I bought but, even so, I know that I will enjoy weaving with it.

In the meantime, I decided to try weaving a small sample without a reed. I only wish I had used my own hand spun for this experiment. If I had done so, I could have killed two birds with one stone…testing the strength and suitability of my own thread as well as experiencing the difficulties of maintaining consistent sett without a reed. The sample was very small….just over four-and-a-half inches wide.

After all my talk of temples in my last blog post, I didn’t end up using one. I did find it very useful to use the comb, pictured above, to beat rather than my usual sword/beater. I used a coil rod at the start to help establish the sett. I took measurements from the scarf I had woven. If you are familiar with the ”twisty sticks” that I like to use in my backstrap loom set-up, you will understand what I mean when I tell you that I also used a coil rod in place of the far stick in the twisty stick pair. I think that was helpful. There was much time spent keeping a close eye on warp threads that might be threatening to wander out of position, probably way more time than was necessary. I was happy with the way the width remained consistent but won’t get too carried away with happiness. This was, after all, a really small sample.

And then, I wove a sample with the same number of ends using the reed. It takes time to thread the reed but then you can just relax and weave.

These experiments are preparing me for the time when I can either get hold of much finer singles, or spin my own.

Do I then abandon my 24dpi reed which won’t be fine enough, or thread multiple ends in each dent?

I have been asking some online weaving friends about the very common practice of threading reeds with multiple threads per dent to achieve a finer sett on their floor looms and have been hearing about their experiences with the ”reed marks” which can sometimes result. Apparently, they quite often disappear in the wash and one needs to sample to see if they will do so according to the material and structure that is being used. I think that reed marks would annoy the heck out of me! However, it’s good to know that these marks sometimes do remain in the cloth even after washing and that their occurrence is pretty much normal.  I need to get over that if I am to going to be able to enjoy the ease of weaving this kind of cloth in fine thread with a reed. What about you…do you have any thoughts on how having multiple threads in the reed dents will affect the kind of open cloth I am weaving?

So, I have been spinning. I have a surprising amount of prepared cotton to spin in a big box in my closet. Back in 2009 and 2010, I was swapping llama bone tools and Bolivian drop spindles by mail with folks in Australia, the USA and Europe for various bits and pieces. Quite often I was sent cotton as a swap from generous people…way, way more than I had initially bargained for! I have natural green and brown cotton ready to spin and all sorts of other natural tones as well as dyed stuff. The picture above shows just a small sampling. And then, there’s the Indian charka that my friend Lisa gave me in 2010 and all kinds of useful tips in the book that Stephanie Gaustad gave me when she came to weave with me on one of my U.S visits a couple of years ago.

I can’t spend my time only spinning. I need to be weaving too. So, I prepared a warp for anther bag with built-in pocket. Both this new bag and its pocket are bigger than the green example I recently wove and decorated.

And, this latest example is far less colorful…black and white and that’s it. I am working my way up to a shoulder bag that will will have a large built-in pocket and pick-up patterns. I am done with sampling for this larger project now. I think I have remembered and put into practice all I need to review for the creation of the pocket and am ready to move on to the real project.

Here’s the warp set up with its longer pocket section. I actually remembered to take a photo of this part of the process.

I edged the pocket with a patterned tubular band this time instead of cross-knit looping. And then, I edged the entire bag, including the mouth, with the same kind of patterned tubular band. The pocket is just the right size for my Bolivian ID card.

I added a snap to close the pouch, rather than a zipper, as well as a decorative button.

It looks a little dull in the picture above and so I stuffed the pouch and the wee pocket with bits and pieces to give it some life.

It needs a strap and I’ll most likely weave a pebble pattern into it as the bag itself is so plain. The back of it is pretty unusual. I wove the back with a window so that I could place my little sheer woven cotton sample within. I even lined that side of the bag. That’s a big deal for me with my limited sewing skills! It’s a quirky combination 🙂

Now, I would like to show you what a couple of my weaving friends have been doing with the bamboo reeds that they made with Bryan Whitehead at the ANWG conference in 2017. I will show just one project from each of Tracy and Kristin for now (so hard to choose) so as not to overload you with all that beauty! I’ll show more in future posts as the reed topic continues….

Here’s Tracy’s work using the 22dpi reed that she made herself with natural 10/2 cotton from Lunatic Fringe. It looks so awesome on the loom with that lovely roll of finished cloth on the front beams!

Here she is working on it during my visit earlier this year…

And here’s the finished cloth…so gorgeous!

You can read Tracy’s blog post about the making of her reed at the ANWG pre-conference workshop with instructor Bryan Whitehead here.

One of the reeds that Kristin made in the same workshop is 25dpi. She used it on her backstrap loom with natural and blue 16/2 hemp from Hemp Traders that she combined to weave fabric for several towels….

The finished cloth…

These ladies also do some awesome work on their backstrap looms with their hand spun yarn and reeds. I’ll be showing you more from time to time.

Here are a couple of cool warp-faced projects from online weaving friends…

This if from Penelope in the UK. She says that the hat is nalbinded in Oslo stitch using some unknown chunky grey wool…..Felted down to size. I created the chart for the pick-up pattern for her. It is based on a motif that is often seen in tablet-woven bands. Penelope says that the pattern is based on a 10thC viking find from Dublin that many call ‘Little Dragons’. 

Marie Paule in France is weaving Andean Pebble Weave patterns on her inkle loom using the two-heddle technique that I teach in my first book, Andean Pebble Weave…

The same pebbly patterns can be created without the use of the additional heddles as Marsha is doing here….

Marsha is using the technique that I teach in my third book, Complementary-warp Pick-up. If you don’t think you would like to deal with the additional heddles that Marie Paule is using, or if you don’t think that your particular loom will comfortably accommodate them, my third book teaches a method that does not use them. It is a slower method, but it suits a very wide range of looms and can be used for other complementary-warp structures besides Andean Pebble Weave..

And here’s some of Bradie’s work. I wove with her in Vermont a few months ago. She was using an inkle loom but is already wondering about going on to weave wider pieces. I feel a backstrap loom coming on! This and other Andean Pebble Weave patterns can be woven with two sets of heddles, as Marie Paule does, or without them, as Marsha does.

So, it’s back to my spinning and maybe I will get the silk on the loom this week. I have already put together my pre-warping project notes and all is set to go unless I decide to go with the wool pocket shoulder bag instead. And there’s always a chance that something else will come along to have me throwing The Plan out the window…..

Until next time………..


Backstrap Weaving – Summery Cloth

With the temperature around 91 F and a broken air conditioner, it’s just as well that I have decided to weave something light and airy as my first big project for this season. I usually find myself at this hotter time of year weaving something totally inappropriate, like a wool lap blanket. Silk thread is not pleasant stuff either in sweaty fingers. I do, in fact, have plans for both wool and silk projects for the next few months but hopefully my a/c will be up and running again by the time I get around to them.

I threaded the reed for the project for which I am using some hand spun cotton that I picked up from this lady in Guatemala in 2008.

It was a little worrying while re-tying the cotton ends to have some of them untwist  and break as I attempted to pull and tighten the knot. Breakages?! I hadn’t even started weaving yet! I did not want to have to size this warp and I am glad I didn’t panic and do so as, so far, I have only had one thread break while weaving. This same thread has broken multiple times and so I guess and hope that it was just one section of this particular strand that was more loosely twisted than the rest.

Of course, I first wove a small sample for this open and airy balanced-weave that I want to do. You can just catch of glimpse of it at bottom right in the picture above.

I am trying to replicate the structure used by weavers in the Alta Verapaz region of Guatemala…a base of open balanced weave into which they place patterns using supplementary weft. The thread they use is much much finer than the cotton singles that I have. I was told that in some communities in Chiapas, Mexico where this kind of cloth is also produced, some of the weavers divide 20/2 commercially-spun cotton into singles and use that as their warp threads. What a job! Not everyone can manage it and those who can’t will pay someone to convert a cone of thread into singles. In the Alta Verapaz region, some weavers use commercially-spun 20/1 cotton thread is used which perhaps explains why the thread in the sample piece that I bought at the International Folk Art Market in Santa Fe a few years ago is so incredibly white. This information comes from Kathleen Vitale. I also read that other weavers use a 30/2 mercerized cotton which isn’t split and which is available in local markets. The hand spun cotton that I am using is off-white (and much thicker!) as you can see below.

But, I am happy to have this piece of fabric from Guatemala and these balls of hand spun singles so that I can at least try this out and practice creating the patterns. The finer thread can come later!

Here’s a look at the little piece I bought in Santa Fe still on its loom. I would love to know how it changes after washing but I don’t want to cut it off its little loom. Or…did they somehow wash it in order to sell it?

Here’s my tiny sample on the loom, and then after washing (sitting on top of my latest knitted cowl…still very excited about picking up knitting again!)

The more open sett at the start of the sample is what I was aiming for but I unconsciously allowed the piece to narrow and deepened my beat which gave me consistent width and neater selvedges. However, in doing so, I almost lost the translucent quality that I had been wanting.

So, here is the large piece underway. I was so doubtful about the success of this project that I very uncharacteristically did not bother to plan out and chart a pattern. I just started winging it. So, I have to say that I am not entirely pleased with the layout of the figures. I am just practicing various basic lines and shapes. It’s another ”sample”, albeit a very large one!

I would call it successful because I have only broken one thread so far. That had been my biggest concern.

Un-weaving is quite the thing. The fluffy warp and weft threads meet and grab hold and do not want to let go! However, it is this ”gripping”quality that seems to allow the Guatemalan weavers to simply cut off the start and end tails of supplementary weft right at the edges of the pattern rather than leave some length and make an attempt to bury the ends within the pattern. I am guessing that washing the fabric will further reinforce this. I suppose I’ll find out! This is after all a sample, right? I haven’t cut the tails very short yet.

I was eventually able to coax out one of the ends of supplementary weft in the unwashed Guatemalan sample so I could count the number of strands the weavers were using.

It’s a very relaxing technique for me. I can sing, listen to podcasts…it doesn’t require the heavier amount of concentration that most of pick-up work involves. And, it sits light as a feather on top of my legs. It is certainly the fabric with highest amount of drape that I have created on my backstrap loom. There’s a long way to go. The warp measures something like eighty inches. which means that there is plenty of room left to play with patterns.

I am so thankful for these reeds that I managed to buy in the vendor hall at Convergence in 2010. They have just the right spacing for this open structure in the weight of cotton I am using. When the time comes to use finer thread, I will have to figure out something else. Or, not use a reed at all. The Guatemalan weavers don’t. I only want to handle one challenge at a time!

I think the only other time I used one of these reeds is when I did a four-shaft shadow-weave piece a few years ago…

My backstrap weaving friends, Christine, Kristin and Tracy made their own bamboo reeds in a workshop with Brian Whitehead at ANWG 2017. Here’s Christine with hers…I know that Kristin and Tracy have put theirs to use multiple times with both commercially and hand spun fibers and have created some truly awesome pieces of fabric. I’ll have pictures and details in future blog posts.

A much simpler project that came off my loom last week was the piece on which I had been demonstrating at recent fiber events. It is now a backstrap to add to the collection of straps that my weaving friends use when we get together. It is sitting here with a couple of my bone tools. The one on the right was given to me by a gentleman in northern Chile. He had found it in the Atacama desert. It has a beautiful shape and point.

And, here’s the latest from some of my online weaving friends and students…

It’s lovely to see patterns from my books appearing in Marsha’s beautiful band projects. She is using the Gilmore Mini and Big Wave looms as well as a Handywoman treadle tape loom with a variety of materials…cotton, silk and tencel.

Maxine combines colors so beautifully on her inkle loom. How inspiring is this? It’s nice to see these patterns from my first book being used in such an awesome way.

This is Caroline Sargisson’s first band using an inkle loom and a pattern and instructions in my Complementary-warp Pick-up book.

Julie Beers finished a really long band of the playful kitties patterns in my latest pattern book. She wove this on one of the Gilmore looms.

Tara’s making a pouch from fabric she wove using a backstrap loom. She may use some of the finishing techniques I teach to decorate it.

And Tracy has edged her bag with the ñawi awapa tubular band. She wove the bag itself using a backstrap loom and her own hand spun wool. The strap is currently underway.

Penelope made bands for her living history top hats using a Jonathan Seidel card loom with a Vav kompaniet heddle.

And, yarndragon made some keyfobs using 10/2 cotton. Because she thought 10/2 cotton too lightweight for fobs, she neatly backed them with denim.

Patrick finished the double weave band he started with me. The pattern is his own creation…

And, last of all, I will leave you to gasp at a picture of the amazing pikb’il cloth that really inspired my current project. It was one of the last things I saw on my recent trip away but became the item that jumped to the top of my to-do list on my return. I couldn’t get it out of my mind. Many thanks to Deb who showed me this scarf that she had bought on a recent trip to Guatemala. It looks like it would float away in a summer breeze………