Backstrap Weaving – Bubble, Bubble

Why “Bubble, Bubble”? Because I seem to have spent more time at the pot dyeing yarn and boiling my hand spun cotton than anything else these last days. And that’s okay. I can stand there stirring and thinking about what I am going to weave, or continue with the Bananagrams game that is always in progress nearby. I kept a careful watch over the cotton because I am notorious for letting things boil dry. I don’t know how many times I have stepped away from rice, beans or quinoa on the stove to weave “just a few rows” only to be alerted to a dry pot by the smell of something burning. The pencil cups that I showed in my last post have been working out well for holding these samples of my newbie hand-spun cotton singles under tension. I got a few suggestions from Facebook friends for alternatives when I start producing larger quantities….mostly involving pvc pipe.

I put my juggling balls into the cups to weigh them down and then set them on the window sill to dry. The wind was so strong yesterday that I had to go down the three flights of stairs twice to retrieve everything from the garden below. Versions 2 and 3 seem to to be similar enough to use in a piece of sample weaving. I am not ready to go with the sheer-cloth-and-sizing idea yet. I am thinking of using these samples in my finest reed to weave some balanced plain-weave, something along the lines of this silk sample that I wove some time ago….

I’d like to weave in some tufts of very lightly twisted colored cotton into the cloth now and then. I have a few shades of natural brown and a bit of green. I saw a lovely scarf on Instagram that had been created like that with tufts of wool.

That’s taking second place on the to-do list because I am first weaving fabric for the bag to accompany the three-color pebble strap that I recently finished. It’s funny that this whole project has sprung out of the desire to weave something in the reversible three-color pebble structure and use it in something that would allow both faces to be seen. A bag strap is what I came up with. And so, here comes the bag fabric.

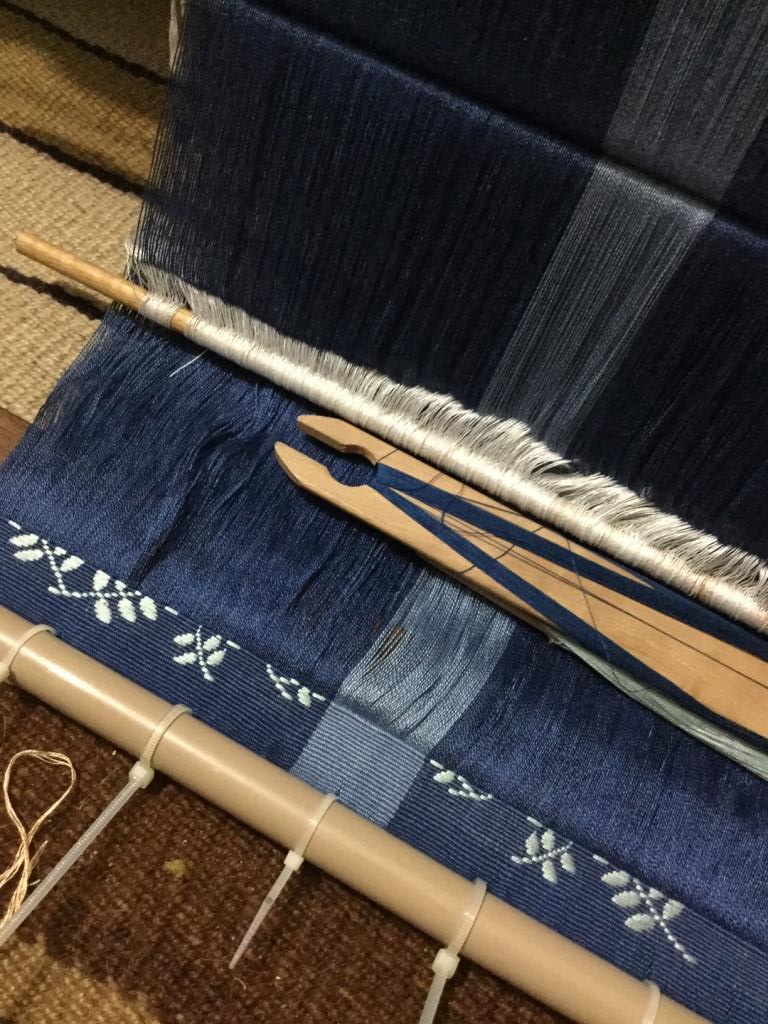
I over-dyed some pale green yarn to this dark blue, hadn’t thought through the project properly at all, and ran out while creating the warp. So then I had to over-dye some pale yellow to finish the warp and have enough for the sides and separate flap. Of course, I can’t expect for a minute to be able to create the same shade of blue when over-dyeing yellow instead of green but this is what happens when you are working with diminishing stash. You either have to plan more carefully around the quantities that you have or just go making it up as you go along! I am usually much more in tune (to the extreme!) with the former of the two strategies and it is interesting finding myself being fairly content with this more carefree approach this time.

I found out when I dyed cotton black for the scarf project above, when it was already too late, that not all blacks are alike. You can probably make out the two strips of darker black in the cloth. They could have been placed at the two selvedges if only I had noticed earlier. What chance do I have, then, of perfectly replicating blue on two different base colors? At least this time I was aware that there was going to be a difference and I placed strips of the “new” blue on the left and right edges of the warp to balance things out. I am weaving in warp-faced plain weave and will add a hummingbird and a flower motif in supplementary weft to one lower corner of the front of the bag and perhaps another pairing in the center of the back. The cloth needs to be fairly “quiet” because the strap is so lively.

I christened the Weaver’s Journal that I had covered with my woven cloth. I haven’t even tried to make my notes neat and pretty because I knew that the effort would not last long at all. Besides, I kind of like my scribblings. 🙂

I haven’t made notes in the Dyer’s Notebook yet because my latest dyeing has been of the more desperate never-to-be-repeated variety.

My Weaver’s Journal covered with cloth in 30/2 silk and patterned with supplementary weft.

This kind of stash scrounging reminds me of when I weaving Navajo-style tapestry pieces in southern Chile in the mid 1990s. I had brought back some Wilde and Woolly wool from the States and topped up my stash some months later via mail order. The rich “Ganado Red” color that I had ordered didn’t arrive. Instead, I got this kind of dusty pink. It worked out okay. I gave this piece to my brother when he visited here and he keeps it under glass on his dining table.

The way the diamond pattern was meant to be aligned.

After that, I decided that I wouldn’t order more yarn by post and that I would only buy in person. I wove several pieces and eventually the bottom of the yarn barrel was in sight with no plans to travel to the States. I had to get into “make-do” mode with whatever I could scrape together. I didn’t want to stop weaving.

Joanne Hall had written a book on tapestry weaving. I had a used copy and I loved some of the Mexican patterns that she had included. The main motif of intertwined black and white lines was meant to be woven as a diamond shape sitting within a square. The square was supposed to be positioned with horizontal top and bottom and vertical sides surrounding the diamond motif….that is, not like I had woven it on the loom.

Because I didn’t have enough of any one color to weave the whole surrounding square, I had to swivel the pattern 45 degrees. And I didn’t have enough yarn to be able to weave the two inner motifs in the same colors. It didn’t look like the picture in the book and I just wasn’t crazy about it when it was done. When I moved to Bolivia, it got left behind in Chile hanging on the wall of the little cottage in which I had lived. I wonder where it is now. Of course, I wish I had it now. What you see here are photos of the only photo I have of it.

The way I had to align it on the loom.

I remember tapping away at a calculator to plan out this piece so that the pattern would fit into the four-selvedged limits and use just the right amount of yarn. My boyfriend at the time asked me if that was how the Navajo weavers plan their pieces….with a calculator…lol. I had obviously put more thought into planning this around my available yarn quantities than my current bag project!

And then I threw almost all the left- over bits and pieces into a pot, dyed them red and wove one last piece….another odd piece with, naturally, multiple shades of red. I got to use the Navajo saddle-blanket structure at the top and bottom of this four-selvedged piece before running out of the tan color and then filled the center with plain weft-faced pattern. Sound familiar? Here I am in 2022 doing the same thing with dye to make the most of my supplies. I like the challenge. I like just making do with what I have on hand.

The twined edging tassels in the corners were sewn down to make the piece less interesting to my cat (who had chewed off the tassels on one of my other pieces as well as a chunk of corner!)
From the archives! 1996 and weaving with my backstrap warp attached to the bottom of the Navajo-style vertical frame.

Of course, it didn’t matter in the end that I had run out of tapestry wool yarn for weft because shortly after all this I went to Peru for the first time and it all became about warp-faced weaving on backstrap looms when I returned, using locally available cotton and the high-twist wool singles that I had been using for warp for my Navajo-style pieces. It all got used! My Navajo-style loom was only used as the anchor point for the end of my backstrap-loom warps after that, except for a couple of quite wide warp-faced pieces which I wasn’t yet ready to handle on a backstrap loom.

Now I am looking at a tiny amount of powder at the bottom of my pot of red-blue dye. My friend Mog had given me some of her supply the last time I was in Australia and it’s almost all gone now. That’s okay. I had a good run with it in some fun projects mixing it to get a variety of blues….

I enjoyed creating different intensities of blue on 30/2 silk for this book cover project.
More fun with dyeing blue on this 60/2 silk ikat warp.

I still have a good amount of a green-blue (again, thank you, Mog) as well as a teal, so who knows what might come of that.

I am reminded that I have credit with Southwest Airlines that expires in September and an empty Traveler’s Diary. But everything is still so unclear and confusing, isn’t it? In the meantime, I am trying to coax my book-writing mojo back into existence. I made a good start but a tripod-fail let me down. I finally got a new one…no excuses now! Please check out the eight books I have published so far at Taproot Video. They’re available as PDFs to download as well as in the form of spiral-bound books. Here are a few…

Until next time.

Backstrap Weaving – The Story So Far

More books! Well, just one more for now. I still have a book that I had originally bought for my current book-cover obsession but which I had decided wasn’t quite the right size. I might just cover that one too. I already have a name in mind for it…Daily Mischief. I would like to do this one in Andean Pebble Weave. It’s not an ideal structure for lettering but my friend Ruth in Australia came up with some quirky fun lettering in it when she wove a name tag for herself. A quirky, fun style would suit the Daily Mischief title, I think.

My latest book cover is once again in 30/2 silk and, as I only have natural white, I had to measure out my needs for this project and dye it. I combined two blues that I have with a color called Quarry and I am delighted to say that this is one of those times when I can declare that I got exactly what I had wanted. I am wondering if maybe I am getting better at this!

Although I loved the color, this scraggily heap was rather dull and uninspiring. I had to keep reminding myself that this is soft, sleek silk. When wound back into balls for warping, it started showing once again its silky loveliness. It’s funny how when it is woven on the loom it somehow takes on a very matte cotton-like quality only to recover its sheen once again after having been wet-finished.

The sheen returns.

The color palette…

All the smaller balls are the 60/2 silk which might get used as supplementary weft to create the patterns. The skein on the left is more 30/2 silk for warp that I also dyed.

The warps for the last three book covers that I have woven in 30/2 silk have all had 904 ends and the warp is just short of 13 inches wide. I use Schacht warping stakes that are five inches inches long. I take a lot of care with tension when I am winding my warps for the backstrap loom. These ends aren’t going to cut and threaded through a rigid heddle or reed and then tied and re-tensioned. This means that I need to get it right as I am winding at the stakes. I always say that a beginner can be handed a well-wound and well-tensioned warp and then proceed to weave something decent. But even a very experienced weaver will have a very difficult time dealing with a poorly prepared warp. There are ways of dealing with a certain kinds of tension issues but it doesn’t make for fun weaving.

I love seeing a new wide, evenly-tensioned warp stretched out before me.

For that reason, I don’t like piling more then two inches worth of thread on my stakes in case they lean, even ever so slightly, and will always wind my wide warps in sections. The following pictures are some that I quickly snapped as I worked. First I chose and then laid out my sticks on the floor…cloth beam, warp beam and cross sticks.

Then I decided how many ends I would have in each section. In this case I had 80 in each in the dark blue areas. I wrote that out so that I could check it off as I went. I wound the first section on my stakes, replaced the stakes with safety strings, saved the cross and transfered it all to the sticks on the floor.

I leave the safety strings in place. Later when I am weaving, I only remove the ones at the cloth beam. The ones near the warp beam will make good counting strings when I need to lay in the first row of each of the pattern sections.

Adding more and more sections. If I lose track because I neglected to check off the numbers on my paper, I can always count the safety strings.

This is a very basic figure-eight warp in a single plane. Backstrap loom weavers in some regions add the heddles and often a coil rod as they wind the warp. It’s not my habit to do so even though I was taught this way on a circular warp by my Montagnard (Vietnamese hilltribe) teacher. (You can read more about that here).

Next comes the lashing. I have my own rather unconventional way of doing this. Most backstrap loom weavers will tightly lash a header cord to the cloth and warp beams all the way across the width of the warp. I prefer using a metal rod instead of a header cord.

Using a metal rod in place of a header cord and lashing it to the beam. On this narrow warp from many years ago I only needed two lashing points at the edges of the warp. I prefer using cable ties now.

I have collected rods in a multitude of girths and lengths over the years. My lashing is done with cable ties, usually five to seven depending on the width of the piece. I count the threads so that one is placed exactly in the center and further divide the warp into other sections with two or more…again counting so that the cable ties are placed in exactly the right spots. Two more cable ties are placed at the two edges. Being precise in the placement of the cable ties really helps me when it comes to measuring and setting the width before the first shot of weft is thrown. I can calculate how wide the warp should be in each section that the cable ties divide and distribute the warp threads within those sections as evenly as possible.

Starting on the 452 string heddles.

Next, I set up a second cross so that I can use what I call the “twisty sticks”. These are two sticks that I grasp and twist to help me open the heddle shed. I explain how I set up and use these in my video class Operating a Backstrap Loom which you can stream or buy as a dvd at Taproot Video. You can also see me using them in one of the video clips in this blog post.

You can see the two rods that are bound with rubber bands on my warp in this picture. Those are my “twist sticks”. In the various regions around the world in which the backstrap loom is used, weavers use a variety of techniques to help them raise the heddled threads smoothly and create a clear shed. Using the twisty sticks just happens to be my current favorite way of doing this.

You can also see me using the twisty sticks on a silk warp in this video:

And finally, because I will be weaving this piece in warp-faced plain weave and want to avoid the corrugated look that plain-weave cloth can sometimes develop especially when the warp material is one which has little to no stretch, I insert a coil rod. The coil rod locks the two layers of warp threads together so that they can’t see-saw back and forth as I operate the loom. Many weavers achieve the same thing by weaving an inch or so first at the far end of the loom before turning the loom around and starting at the cloth beam. That also locks the two layers of threads together. In fact, that was the way I was taught to do it by my several of my indigenous teachers but I have since become a big fan of the coil rod. For me, it has other benefits in addition to the one I mention here.

Dar Ku from Myanmar allowed me to spend some time with her as she wove at her backstrap loom You can see the coil rod in her warp, the rod that is furthest to the left.

After measuring and pushing threads around and measuring and repeating, I finally feel that the sett is just right and that I can start weaving. Of course, there was time spent drawing patterns onto charting paper. That was something that I was doing while waiting for the dyed thread to dry. I had decided that this would be a Traveler’s Diary (yes, I settled on the single ‘l’ spelling) and charted out lines of verse that I thought would suit the theme as well as picked the best hummingbird figure to go with them.

The first lines of writing appear.

I really like the way the light blue supplementary weft looks on the light blue spine color and am thinking about perhaps weaving an entire piece that way in which there is only a subtle difference in color between the warp and patterning weft…even more subtle than what you see here. It will depend on how clever I can be at the dye pot. My dyeing is still all a bit “mess or success” at the moment.

The second line of verse and the hummingbird leaving us for its long journey of migration. I have been seeing articles recently on hummingbirds in some parts of the U.S that have actually started to change their habits and winter over.

Bye-bye hummingbirds. You can see the two swords I use to prop open sheds and beat. My current favorite pick-up stick from Guatemala is also there. The little tool with the handle is from Ecuador and also used to beat. I use it when I feel that I need a little extra “oomph” and use it to press the weft into place while inching my way across the warp. I use it in much the same way as highland weavers here use the llama bone tool. My llama bone tools are too harsh for this silk.

It’s still on the loom as I write. It will be cut off, washed and placed on the book cover. I will most likely need to weave narrow strips as I have with the other covers to compensate for lost width during the wet-finishing process. I don’t feel that I can precisely account for shrinkage in the number of warp-ends to ensure a perfect fit. Adding the narrow strips to the other books has actually provided quite a lovely finishing touch. You can see three that were added to the Weaver’s Journal. A fourth was also added to the edge of the back cover.

So that’s the story of the books so far…to be continued. I actually remembered to take a picture of myself at the loom as I approached the end of this one so that I can wish you all a very happy, safe and peaceful transition into the new year.

Backstrap Weaving – A Resonance of Emerald

I have a short blog post today just to show you the latest book cover that I have finished.

I had planned to have a break between book covers to experiment with cross-knit looping and the little hummingbird figures that I showed you in my last blog post. You can see my initial experiment with tail feathers in very heavy cotton here. I was able to track down Sue Prior via the backstrap weaving grapevine and she was kind enough to send me some good resource material on creating three-dimensional figures in this structure. Irina also told me about another source. In a future blog post I’ll list them but for now, if you scroll down my RESOURCES page, you’ll find a link to an article by Lila O’Neale. (I just noticed that a few of the links on that page no longer work. I must go through and tidy it up).

The break was supposed to give me time to mull over the design and colors for the next book cover but as it turned out, the idea came to me very quickly. Some time ago, I found a nice collection of hummingbird poems online and decided to go back and read through them once again. Two lines from an untitled poem by Emily Dickinson (often referred to as “The Hummingbird”) sprang out at me:

A resonance of emerald,

A rush of cochineal

Rucker’s Hermit Hummingbird by John Gould, 1861. 

Color! My new book would be A Dyer’s Notebook. I had written in my last blog post about how horrifyingly unscientific I am about dyeing. Maybe having a nice book in which I can keep notes will motivate me to be more organized.

I only had natural white in the 30/2 silk that I would use as warp and so I mixed my dyes to create purple and green. My color choices are dictated by what I have left in the 60/2 silk that I use as supplementary weft to make the patterns. I don’t have any really light colors left. Gold is the lightest in any decent quantity. I over-dyed the small amount of pale blue that I have to a light shade of green for the leaf patterns. That left me with gold for everything else. I would have preferred a pale buttery yellow but I used up all of that on these!

Another possibility would have been to dye the natural white 30/2 warp thread a pale color which would have given me lots of choices for the patterns from my range of dark colors in 60/2 silk. However, I wanted the colors for this piece to be deep and rich.

It would have been nice to have found a way to include a little cochineal and emerald in the hummingbird figure. I tried a few different things but none of them worked well enough. And so my little hummingbird figure is showing a furnace glow of gold in this moment of its flight. From a poem by Alexander Wilson:

Each rapid movement gives a different dye,

Like scales of burnish’d gold they dazzling show,

Now to sink to shade—now like a furnace glow!

The dark green stripe is placed to wrap around the spine. I knew that I was going to wet-finish the cloth and that it would shrink in width and length just like the cloth for my Weaver’s Journal did but I didn’t add extra warp ends to this piece to account for that. You may remember that I fixed that loss of width on the last cloth by adding narrow woven strips in 60/2 silk. I decided that fixing cloth that is too narrow is possible but adding more warp ends and possibly having then to deal with cloth that ends up being too wide would be a problem.

I wove narrow strips in 60/2 teal silk to account for the loss of width and added strips to other parts of the cover for balance.

For the new book, I extended the width with a narrow strip of the green spine color only on the back cover.

So, I am thinking maybe one more book…perhaps A Traveler’s Diary? That might create some magic and get me back on the road. In the meantime I’ll chew over whether to spell traveler with one or two l’s.

I’ll leave you with some Christmas decorations that I made a couple of years ago if you are looking for some ideas for uses for odds and ends of band. I don’t think these necessarily need to have Christmas-themed patterns. The metal ends are called ribbon crimps and come in various sizes. They clamp onto and protect a cut edge. I add a bit of weft twining to other end just above the fringe to stop the band from unraveling. You could use the same color as one of your warp colors or a different color all together.

All these patterns come from the two patterns books that I wrote to follow up my instructional books on Andean Pebble Weave on Inkle Looms and Complementary-warp Pick-up. Either one of those instructional books will give you the skills to weave all the patterns in the pattern books (although some of the motifs might be too wide for a standard inkle loom). The pattern books are Complementary-warp Pattern Book and More Andean Pebble Weave Patterns.

And I have a free tutorial on weft-twining here. It starts with a little cultural context and then you’ll eventually get to the tutorial part with its video clips.

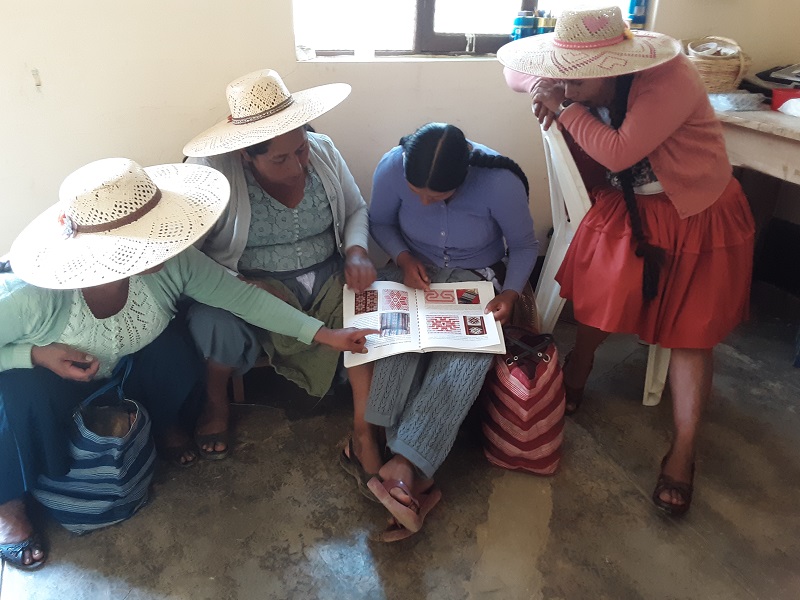
My friend Dorinda recently got back from the highlands where she had been visiting my teacher Maxima and the other ladies in the weaving co-op. The last time I was up there, the ladies were interested in the woven sample bands I had brought which had patterns that they had never seen before. They wanted to learn them and because I was only able to leave a couple of samples behind, I left behind one of my pattern books. Before I could leave, Maxima had already set up a warp and was copying one of them. On her recent trip, Dorinda took this photo of the ladies examining more patterns in the book. Just like us, they love to learn new ones.

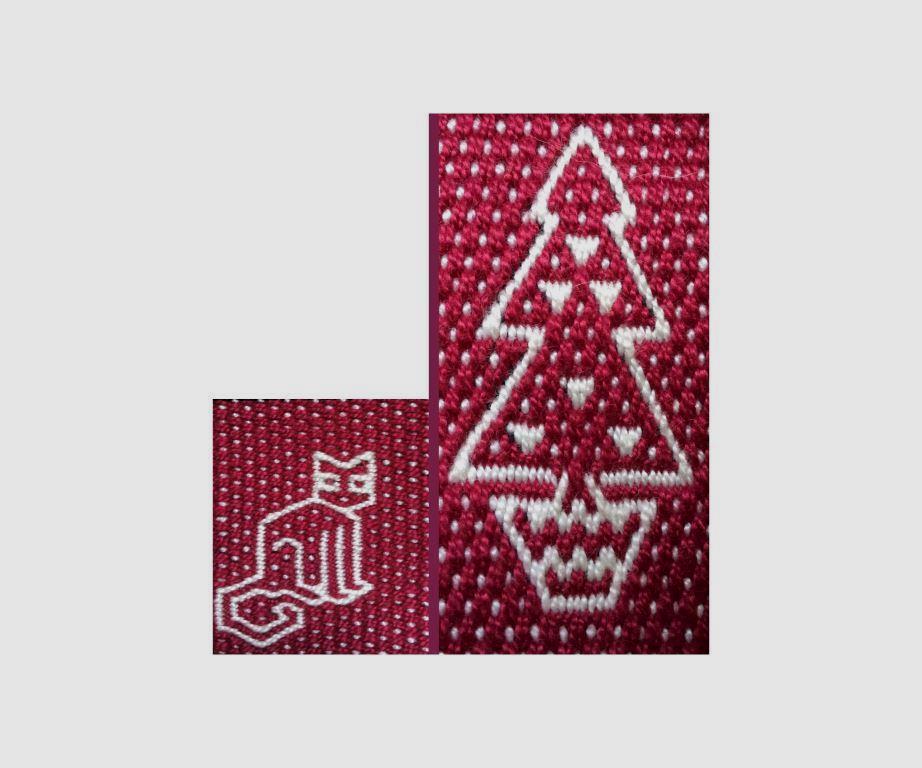
And just for fun, here’s a compilation of patterns for a Christmas card for all those experiencing the annual battle of Christmas tree and cat…(these patterns are from the Complementary-warp Pattern Book). I am going to buy myself a new tripod for Christmas so that I can start using my good camera again.

Enjoy your end-of-year celebrations, stay safe and see you next time.