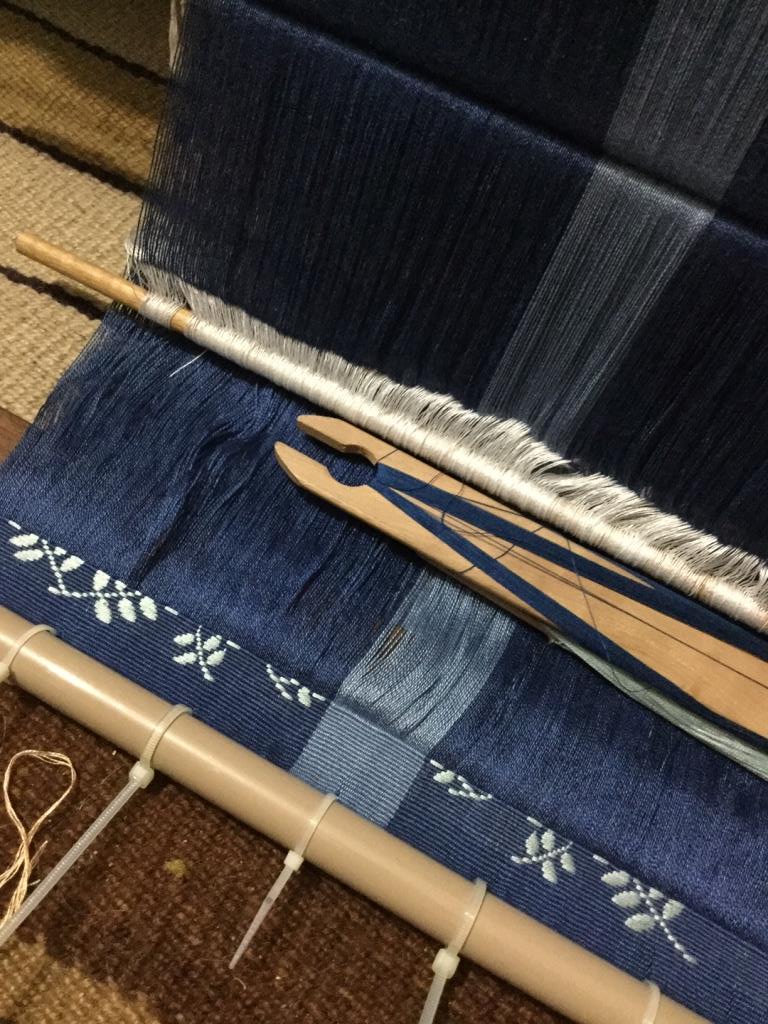
Backstrap Weaving – The Big Bag Theory

In my last post I left you with the fabric that I had woven for pockets for my new tote bag. It’s part of a stash-busting project using the small balls of Omega Sinfonia cotton that I’ve accumulated over the years.

Fabric for two pockets that I wove using the structure that I call Andean Pebble Weave. My backstrap loom enables me to create a nice neat third selvedge at the start of the fabric.

Then came the task of weaving the fabric for the body of the bag. Again, I wanted to be able to use up as much of that stash of Omega Sinfonia as possible. I knew that I could over-dye the lighter colors dark blue. But the dark colors would have to be dyed black. There weren’t enough lighter colors to allow me to create entirely blue fabric but I didn’t want the bag to be completely black either. I decided the cloth would be both blue and black. Oh my gosh, I had so many doubts about what this was going to look like!

The fact that each color that I overdyed would give me a different tone of blue and black was another thing to consider. This could be a mess. The differences in tone were not fully apparent until the warp had been wound and spread out before me. I suppose I could have taken the time to arrange the stripes in some sort of clever Fibonacci sequence of widths but once the warp was wound and on the loom beams, I wasn’t keen on fiddling around with it.

You might notice the absence of a coil rod on this warp. I’m in the habit of using one when I do warp-faced plain weave using material that has little to no stretch. Inserting one locks the two layers of threads together and stops them from see-sawing back and forth around the warp beam as I operate the loom. That see-sawing can cause the cloth to form a corrugated look. This time, I wove a inch or so at the far end of the warp to lock the two layers together instead before turning the loom around to start weaving at the knot-less “good” end.

I planned the cloth to be 19 inches wide. That’s a fair bit wider than what I usually have on my backstrap loom but certainly not as wide as the cloth I have seen on the backstrap looms of weavers in Indonesia and other parts of SE Asia. The widest cloth that I have seen on a backstrap loom in my travels in South America was 39 inches. It was light cotton cloth and the weaver had to stand to weave it.
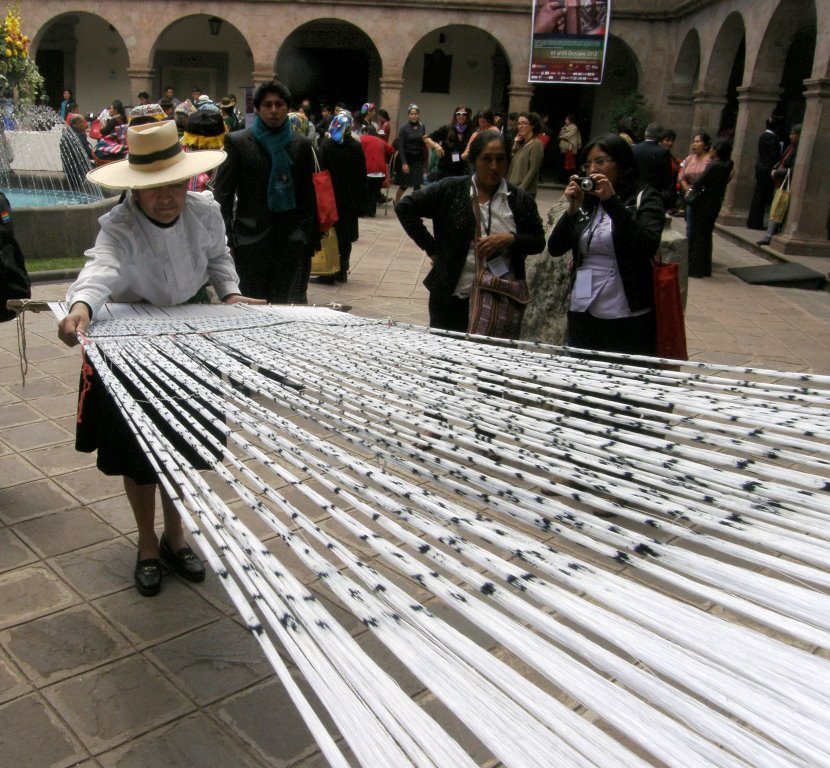
This weaver in Peru stands weaves a wide, light, cotton ikat warp.

I had to get out the long sticks and swords.

The sword on the right was just right for this project.
Laying the pocket fabric on top to see if I could imagine what the end product would look like.
Almost there.

Omega Sinfonia is quite hefty thread compared with what I have become used to using over recent years and so it was quite a work-out operating the loom and beating. My longest sword is not a particularly hefty one.

Before and after wet-finishing and pressing. The straps in the picture on the right don’t belong to this bag. I had just placed the cloth on top of another tote that I own to get an idea of strap placement.

The original idea had been to have two outer pockets, one on each side, showing the two faces of the Andean Pebble Weave pattern. In the end I went with one outside and one inside pocket instead. It was a fairly basic sewing project. I created box corners and then set about weaving the straps.

It has already been on its first grocery-shopping outing….

Its a winner. I’m really pleased with it. Well, that took care of about a third of the Omega Sinfonia scraps. What’s next? I have two kinds of reds and three kinds of browns left, none of which look good together, and a bunch of other odds and ends. I have in fact used red and brown together before but I guess that they just have to be the right kinds of red and brown in order to work…

Two wool panels that I wove and later sewed together to make a lap blanket.

People often ask me how I go about weaving wider pieces. For me, it’s all about the warping. Once a good evenly tensioned warp has been created and you are seated at the loom, there’s not a whole lot of difference in the process of dressing the warp and weaving. Additional sticks and other tools might be needed but operating the backstrap loom with a wide warp works on the same body-movement principles as with a narrow warp. It just requires more physical effort.

I have a few tips for creating and managing wider warps. I stress that this is just the way I do it. There are many different ways and of course, no one single correct way. This isn’t a step-by-step description…just some tips that I can share after perhaps having made every possible mistake over the years.

Tip 1: Make sure you have a stable warping set-up with stakes that aren’t going to shift or bend:

I always warp in sections and won’t pile up any more than two inches of threads on my warping stakes to avoid having them lean. I tie off and remove each section from the stakes and place them on beams and cross sticks that are waiting on the floor. Always use safety strings in case there’s an accident along the way!

First of several sections of a silk warp I created some time ago removed from the warping stakes and placed on beams and cross sticks on the floor.
This is the second warp that I created after returning from my first weaving lessons in Peru in 1996. I was in a big hurry to create a wide piece using both the Andean Pebble Weave and supplementary-warp structures that I had been taught but I didn’t yet have a good warping set-up. Take a look at the disaster on the warp beam!

Tip 2: Know your yarn, know your width, know your technique:

What I am saying is, don’t go wide with a yarn you have never used before. First weave a decent-sized sample.

I know that some people don’t bother with sampling but I like to know the width I am aiming for rather than just warping up and seeing what turns out. So, there is a lot of measuring and calculating that goes on based on samples that I have woven, preferably fairly recently, with the yarn I plan to use. I had a sample using the Omega Sinfonia thread for my bag project in both warp-faced plain weave and Andean Pebble Weave and used it to make my calculations. That way I knew exactly the number of ends I would need for each of the two structures to create my 9-inch-wide pocket fabric. The plain weave sections in the pocket actually came out slightly wider than expected (perhaps my sample had been too old and I have since then unconsciously changed the way I handle the weft). I was able to use that updated information to plan the warp-faced plain-weave cloth for the body of the bag.

One of my sampling warps. This one was more about sampling a motif that I was designing but it also gave me a chance to update the ends-per-inch information that I have for this 20/2 cotton warp as I plan to use this thread as part of my next project. It turned out that my epi info hasn’t changed since the last time I worked with this thread.

My brother still has the wedge-shaped wall hanging that I had gifted to my mum back in the early days. I had woven it with new-to-me yarn, so no sampling had been done, and I started off too narrow. It started to widen and didn’t stop widening all the way to the end. There’s an inch difference in width from start to finish. But because it never settled down into a consistent width, the gradual widening almost looks intentional.

Another thing worth mentioning that applies to wide warps more than narrow ones, is that I find it best to set up my loom in one place at one angle and then keep it there for the duration of the project. I had started my mum’s wall hanging in Bolivia and taken it unfinished to Australia. It got set up in a few different places at various angles while I struggled to finish it in time. I even had to work on the short warp with the warp beam awkwardly lodged behind my feet for a while (I didn’t have another rod or cord handy to extend its length). That awkwardness accounts for the fact that the cloth isn’t straight.

Many lessons were learned from this one project from back in the day.

I wouldn’t attempt a wide piece with a technique that I had just recently learned either. (Obviously I hadn’t added this to my advice list on that red warp back in 1996!)

Tip 3: Warp undisturbed and don’t disturb the warp:

Have everything you need for warping close at hand including the loom bars and cross sticks….scissors, rubber bands or tape, lashing string, string for tying off groups of warps for counting etc.

Try to warp in one uninterrupted session…turn off the kettle, put the cat out, ignore the phone, forget that cup of coffee! It’s amazing how things can change from one day to the next. I never leave a warp half-done until the next day.

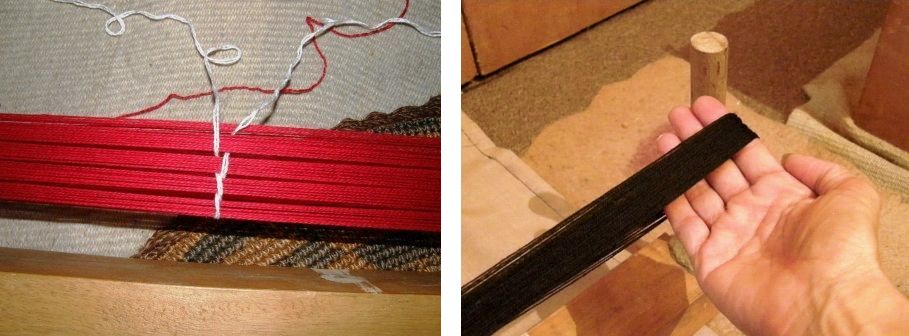
Once you have wound that beautifully-tensioned warp, do your very best not to disturb it. When I slide a section of warp off the warping board I try to keep my hand under the ends so that they are all lying flat across my fingers and not bunching up. Then I place them very carefully onto the beams. This saves a lot of tugging and rearranging later when I’m seated with the warp and tension and getting ready to weave. A lot of tugging can mess up your tension. Below right, you can see how I place my hand to lift the threads off the warping stake. Another thing you can do is chain thread around groups of threads as I’ve done on the red warp. It can help stop threads in a larger section of warp from shifting and climbing on top of each other, which all means less work and less time spent straightening things out later. One of my Guatemalan teachers did this.
Tip 4: Slow and steady…take the time to set-up and start well:

If necessary, settle the threads one by one along the cloth beam untwisting any that have overlapped. I learned to love doing this from my teacher in Guatemala. She so calmly and patiently lifted each thread on the tip of her pointed sick and placed it on the beam and I’ve learned to do the same. This is not entirely necessary if you are starting with a fringe and using waste yarn or cardboard strips as weft for your first few inches, but if you’re going for a third selvedge, this exercise will give you the neatest possible start.

Learning the patterning technique with supplementary weft with my weaving teacher in Guatemala. The cloth did not have a third selvedge. She carefully arranged the threads along her cloth beam which enabled her to press her first shots of weft hard against the beam for the least possible amount of loom waste.

Then I measure sections so that I know that my sett is consistent the whole way across the warp. There are varying degrees of “warp-facedness”. In some sections your threads might be crammed up tightly next to each other. In others they might be just a hair’s breadth apart. Mine tend to be the latter and I want that to be consistent. It’s especially hard to tell when you are working with dark colors or very fine threads. The overall width might be correct but the warp threads may still not be evenly distributed across that width.

I calculate the width that each of those sections that I removed from my warping stakes should be and make sure that the threads in each section are settled at that width. I can sometimes use up a whole morning fiddling around with this! However, with the right amount of prep, once I have thrown the first shots of weft and measured once again, I know that all will be smooth sailing from there on…just pure fun!

I’m going to finish with the The Big Bag again because after spending so much time doubting the success of this project, I now love it so much!

Backstrap Weaving – The Story So Far

More books! Well, just one more for now. I still have a book that I had originally bought for my current book-cover obsession but which I had decided wasn’t quite the right size. I might just cover that one too. I already have a name in mind for it…Daily Mischief. I would like to do this one in Andean Pebble Weave. It’s not an ideal structure for lettering but my friend Ruth in Australia came up with some quirky fun lettering in it when she wove a name tag for herself. A quirky, fun style would suit the Daily Mischief title, I think.

My latest book cover is once again in 30/2 silk and, as I only have natural white, I had to measure out my needs for this project and dye it. I combined two blues that I have with a color called Quarry and I am delighted to say that this is one of those times when I can declare that I got exactly what I had wanted. I am wondering if maybe I am getting better at this!

Although I loved the color, this scraggily heap was rather dull and uninspiring. I had to keep reminding myself that this is soft, sleek silk. When wound back into balls for warping, it started showing once again its silky loveliness. It’s funny how when it is woven on the loom it somehow takes on a very matte cotton-like quality only to recover its sheen once again after having been wet-finished.

The sheen returns.

The color palette…

All the smaller balls are the 60/2 silk which might get used as supplementary weft to create the patterns. The skein on the left is more 30/2 silk for warp that I also dyed.

The warps for the last three book covers that I have woven in 30/2 silk have all had 904 ends and the warp is just short of 13 inches wide. I use Schacht warping stakes that are five inches inches long. I take a lot of care with tension when I am winding my warps for the backstrap loom. These ends aren’t going to cut and threaded through a rigid heddle or reed and then tied and re-tensioned. This means that I need to get it right as I am winding at the stakes. I always say that a beginner can be handed a well-wound and well-tensioned warp and then proceed to weave something decent. But even a very experienced weaver will have a very difficult time dealing with a poorly prepared warp. There are ways of dealing with a certain kinds of tension issues but it doesn’t make for fun weaving.

I love seeing a new wide, evenly-tensioned warp stretched out before me.

For that reason, I don’t like piling more then two inches worth of thread on my stakes in case they lean, even ever so slightly, and will always wind my wide warps in sections. The following pictures are some that I quickly snapped as I worked. First I chose and then laid out my sticks on the floor…cloth beam, warp beam and cross sticks.

Then I decided how many ends I would have in each section. In this case I had 80 in each in the dark blue areas. I wrote that out so that I could check it off as I went. I wound the first section on my stakes, replaced the stakes with safety strings, saved the cross and transfered it all to the sticks on the floor.

I leave the safety strings in place. Later when I am weaving, I only remove the ones at the cloth beam. The ones near the warp beam will make good counting strings when I need to lay in the first row of each of the pattern sections.

Adding more and more sections. If I lose track because I neglected to check off the numbers on my paper, I can always count the safety strings.

This is a very basic figure-eight warp in a single plane. Backstrap loom weavers in some regions add the heddles and often a coil rod as they wind the warp. It’s not my habit to do so even though I was taught this way on a circular warp by my Montagnard (Vietnamese hilltribe) teacher. (You can read more about that here).

Next comes the lashing. I have my own rather unconventional way of doing this. Most backstrap loom weavers will tightly lash a header cord to the cloth and warp beams all the way across the width of the warp. I prefer using a metal rod instead of a header cord.

Using a metal rod in place of a header cord and lashing it to the beam. On this narrow warp from many years ago I only needed two lashing points at the edges of the warp. I prefer using cable ties now.

I have collected rods in a multitude of girths and lengths over the years. My lashing is done with cable ties, usually five to seven depending on the width of the piece. I count the threads so that one is placed exactly in the center and further divide the warp into other sections with two or more…again counting so that the cable ties are placed in exactly the right spots. Two more cable ties are placed at the two edges. Being precise in the placement of the cable ties really helps me when it comes to measuring and setting the width before the first shot of weft is thrown. I can calculate how wide the warp should be in each section that the cable ties divide and distribute the warp threads within those sections as evenly as possible.

Starting on the 452 string heddles.

Next, I set up a second cross so that I can use what I call the “twisty sticks”. These are two sticks that I grasp and twist to help me open the heddle shed. I explain how I set up and use these in my video class Operating a Backstrap Loom which you can stream or buy as a dvd at Taproot Video. You can also see me using them in one of the video clips in this blog post.

You can see the two rods that are bound with rubber bands on my warp in this picture. Those are my “twist sticks”. In the various regions around the world in which the backstrap loom is used, weavers use a variety of techniques to help them raise the heddled threads smoothly and create a clear shed. Using the twisty sticks just happens to be my current favorite way of doing this.

You can also see me using the twisty sticks on a silk warp in this video:

And finally, because I will be weaving this piece in warp-faced plain weave and want to avoid the corrugated look that plain-weave cloth can sometimes develop especially when the warp material is one which has little to no stretch, I insert a coil rod. The coil rod locks the two layers of warp threads together so that they can’t see-saw back and forth as I operate the loom. Many weavers achieve the same thing by weaving an inch or so first at the far end of the loom before turning the loom around and starting at the cloth beam. That also locks the two layers of threads together. In fact, that was the way I was taught to do it by my several of my indigenous teachers but I have since become a big fan of the coil rod. For me, it has other benefits in addition to the one I mention here.

Dar Ku from Myanmar allowed me to spend some time with her as she wove at her backstrap loom You can see the coil rod in her warp, the rod that is furthest to the left.

After measuring and pushing threads around and measuring and repeating, I finally feel that the sett is just right and that I can start weaving. Of course, there was time spent drawing patterns onto charting paper. That was something that I was doing while waiting for the dyed thread to dry. I had decided that this would be a Traveler’s Diary (yes, I settled on the single ‘l’ spelling) and charted out lines of verse that I thought would suit the theme as well as picked the best hummingbird figure to go with them.

The first lines of writing appear.

I really like the way the light blue supplementary weft looks on the light blue spine color and am thinking about perhaps weaving an entire piece that way in which there is only a subtle difference in color between the warp and patterning weft…even more subtle than what you see here. It will depend on how clever I can be at the dye pot. My dyeing is still all a bit “mess or success” at the moment.

The second line of verse and the hummingbird leaving us for its long journey of migration. I have been seeing articles recently on hummingbirds in some parts of the U.S that have actually started to change their habits and winter over.

Bye-bye hummingbirds. You can see the two swords I use to prop open sheds and beat. My current favorite pick-up stick from Guatemala is also there. The little tool with the handle is from Ecuador and also used to beat. I use it when I feel that I need a little extra “oomph” and use it to press the weft into place while inching my way across the warp. I use it in much the same way as highland weavers here use the llama bone tool. My llama bone tools are too harsh for this silk.

It’s still on the loom as I write. It will be cut off, washed and placed on the book cover. I will most likely need to weave narrow strips as I have with the other covers to compensate for lost width during the wet-finishing process. I don’t feel that I can precisely account for shrinkage in the number of warp-ends to ensure a perfect fit. Adding the narrow strips to the other books has actually provided quite a lovely finishing touch. You can see three that were added to the Weaver’s Journal. A fourth was also added to the edge of the back cover.

So that’s the story of the books so far…to be continued. I actually remembered to take a picture of myself at the loom as I approached the end of this one so that I can wish you all a very happy, safe and peaceful transition into the new year.

Backstrap Weaving – Woo hoo! Going Wide!

Some people have noticed the lack of recent blog posts and commented with concern. Others know to expect a period of silence once I mention that I am about to travel. Some may even be relieved to perhaps have a chance to catch up on some older posts.

I took my new weird two-tone hair look out of the hat and boldly faced the public! I’ve had some twenty-something-year-olds tell me that it is a cool look. I would actually like to keep the two-tone look. It has taken nine months to get to this point and I quite like it! I have also had some weaving friends tell me that they have decided to join me in this cold turkey trip from dyed hair to natural grey.

There’s plenty to tell but I will limit this post to sharing with you what some of my particularly hard-core backstrapper friends did when we spent a weekend together.

We decided to try going wide together.

Everyone wove samples in preparation. Realistic expectations also needed to be set. This weekend was not going to be about weaving the super-wide project of our dreams. It would be about  warping, setting up and beginning a project that was significantly wider than the bands that we had previously been weaving together, yet not so wide as to take all weekend just to set up! The new skills could later be transferred to even wider pieces.

Some of the samples that were created before the gathering.

The samples were essential. From those we would take measurements and make calculations for the ”real” project. We had samples in the pick-up structure that we wanted to weave. All except Tracy went with complementary-warp pick-up. Tracy chose a structure that creates warp floats on only one face of the band so that she could replicate some beautiful patterns that are woven into yurt bands in Central Asia. Aunt Lydia’s size 10 and size 3 crochet cotton were the yarns of choice with a beautiful range of colors (there are a lot more colors in size 10 than in the thicker size 3). Tracy again was the exception in that she chose to weave with her hand spun wool. The other required sample was a piece in plain weave.

Tracy’s hand spun wool alongside one of Allen Berry’s gorgeous swords.

Nancy’s ”samples” were awesome in their own right! and enabled us to calculate the number of ends she would need for her project and plan layout.

Nancy was planning a woven cover for her daughter’s journal and it needed to be a precise width. We took measurements from her pebble weave and plain weave samples to calculate the number of ends she needed as well as the layout of the pick-up patterns and areas of plain weave.

Number-crunching with Tara for her wide project calculating warp requirements based on her samples. She planned a length of patterned fabric that could be folded into a box shape.

The wide warps were wound in sections as they were too wide for our warping stakes. I often choose to wind in sections as I don’t like having my warps climb too far up my warping stakes. I have found that even the sturdiest of stakes can lean when they are holding many bouts of yarn. Good, even tension on the warping stakes is critical. These warps will not be cut and threaded through heddles and then re-tensioned as they would be for floor and other kinds of looms. We are basically dressing the loom as we warp and the tension we create while doing so is what we must live with for the life of the project.

Ann removes one of sections from the stakes . She placed each section on loom beams and cross sticks that waited on the floor in another room…out of the way of feet and curious kitties!

Off comes one of Tracy’s sections. Each person decided how large they would make their sections depending on how far they trusted the sturdiness of the warping pegs under their particular warp tension. Some people wind tight warps, others not so much.

Nancy stops to check her count. Her notebook lies nearby with warping plan. There was much chatter and laughter which made me nervous. No one can come anywhere near me when I am warping and I need silence!

I stopped now and then to amuse myself with the cats and take pictures of the projects that the ladies had brought to share.

Above you can see the spindle bag that Tracy made using some of the beautiful pieces of fabric from the Bolivian co-op that we all support. Tracy covered the seams with cross-knit looping stitches and added a round base. On the table you can see a collection of spindles also made by the talented wood-working friend Allen Berry.

This is the band that Ann had been weaving the last time I saw her. She used my favorite leaf motif in spring-to-fall colors.

And here are some lanyards for name tags woven by Tara and Nancy. They combined patterns that had been woven into Bolivian bands that they own.

Lanyards in cotton and tencel made by Nancy and Tara.

Here are more amazing swords by Allen Berry. The ladies knew that they would need longer swords for their wide projects and Allen Berry created these. Each has its own unique pattern.  You can  view his products via his allenrberry Instagram account and make direct contact with him there.

Tracy was using this shoulder bag. I had last seen this as fabric on the loom made from Tracy’s own handspun wool a year ago. It was great to see the finished product with its eye-pattern tubular edging and strap. It feels gorgeous!

And, as I photographed all these beautiful projects and played with the cats, completed warps started appearing!

Phew! The warps are on the looms and they look great! Now to make heddles.

Tracy’s hand spun wool is even more stunning all stretched out like this!

Aunt Lydia’s size 10 crochet cotton has some bold and beautiful colors and Ann has combined them so nicely.

Stacy starts her heddles on a beautiful red, black and white piece for which she planned a knot-work pattern in pebble weave….

Some moments of hush while heddles are made. It’s funny because that is the part of the process when I can actually talk to people. These ladies, on the other hand, got very quiet during this part.

Tara’s warp with heddles in place. She included some sparkles in the warp which unfortunately don’t show up in the picture. This piece will be for her daughter. It is beautifully tensioned…so exciting to see a fresh warp on the loom!

Are we done yet? Getting there slowly with the heddles!

Woo hoo…time to start weaving!

Stuff happens when big projects like these are warped and set up. I won’t say that every warp came off the stakes ready to roll. Some threads had to be removed when the count was wrong. Some threads needed a little adjustment for uneven tension. That’s all to be expected. I remember sitting with my teacher in Ecuador and learning how to wind a dove-tailed warp for a hammock while her family watched. She made three errors in the warping and how she laughed and laughed when she discovered them. Everyone joined in! Maybe it’s not so funny when you are on your own but we were all there to help each other. With my Bolivian teacher we chatted as we rolled the balls of yarn back and forth to each other as we warped. Only when we finished we discovered that the stripes we had warped were totally asymmetric. Hilda laughed it off but I was determined to fix it!

Consulting with Nancy above as she throws her first passes of weft.

Tracy is counting out her first row of pick-up. The first row is critical as all other rows will be picked relative to that foundation. It’s always a relief to get that first row and in and confirm with subsequent rows that all is well.

Getting each and every warp end settled in its place at the very base of the warp is something I like to do.  Tara shares my feelings about this and is using a pointed stick to separate the ends and create as neat a start as possible. In some projects this selvedge will end up hidden in a seam and this much attention to neatness may not be necessary.

Tracy’s yurt band pattern takes shape.

Classic Andean hooks start to appear in Ann’s turquoise beauty … with another Allen Berry sword.

Nancy’s journal cover will include bee and hive motifs among others. She wove in her daughter’s initials in supplementary weft using lettering of her own design while I was there. You can just make out part of the lettering in progress below her right hand.

Margarite was not part of this group of friends but she did show me this weaving when I visited with her. She had started it back in the 1970’s when she was learning Guatemalan-style patterning. It had the two patterning sticks in place that I know well and we were able to set it up to finish off the motif she had started working on all those years ago. I was able to show her how to continue and put the pattern sticks to good use for creating other motifs. This is one of my favorite things to do…reviving a long forgotten warp that has been languishing in some dark corner unfinished. This one is between forty and fifty years old!

Let me leave you with an important announcement about Patternfish, home of my e-books….

IMPORTANT ANNOUNCEMENT: Some of you may have heard about the fact that Patternfish.com that hosts my ebooks is planning on closing at the end of May. Patterns, e-books etc that you have bought along with any accompanying videos will be available for downloading and saving until the END OF JUNE and I urge you to do so. I will be making a separate blog post about this in the near future once I have investigated my options. In the meantime, if you have concerns about your ability to save your purchases, please contact me via a comment on this blog post or via private message on Facebook or Ravelry. I have an awesome team of customers who have been willing to provide technical help to those who may be having trouble downloading or finding places to store their purchases. Let’s work through this together. We have two months to get your purchases safely tucked away. It’s sad news. Patternfish has been a wonderful home for my ebooks but it’s time to move on and new things are coming!


Backstrap Weaving – Bands to Bracelets

My contribution to the Cuff and Bracelet WAL.

February is here and we are still weaving along in the Cuff and Bracelet Weave-along on Ravelry. I had initially proposed closing it at the end of January but I think that folks are just getting warmed up! I have to hang my head in guilt as, since finishing the first cuff, I have allowed myself to be completely captivated by my paisley project.

Yes, I am still sampling paisley shapes! I took my own advice from my tutorial on Designing for Double Weave in which I say that once you have traced your pattern onto the charting paper, you should put the original drawing away because you will never be able to exactly replicate it and you will, therefore, always be comparing and feeling that the shape you have charted is not good enough. The problem is that I changed my traced shape and re-drew and reshaped and changed it again and again to the point where I had completely altered it. It no longer looked like the classic paisley shape and looked like more like a large comma….a large circle with a tail. I had to get the original drawing out to remind myself of the original idea and start all over.

Now I am working on all the little spots and dots that fill in the spaces within and around the paisley shapes and am finding that there is a very fine line between a well-balanced layout and total chaos! I learned the value of a good pencil and eraser….love my palomino Blackwing 602…thanks, Lori for putting me onto those.

Here’s the latest sample warp. I seem to be in a blue phase…such a nice cooling color in this summer heat. The heddles are made with tatting thread which is a similar girth to the 60/2 silk. They work pretty well together. I am using four heddles simply because my warp thread is so fine and because there are so many ends…360 in the pattern area. Normally when I do double weave, I keep it simple and reduce the clutter by just operating with two sheds. On narrow bands I work much faster that way with just two basic sheds.

Participants in the Ravelry Weave-along have been producing some gorgeous things.

KEOG’S bracelet is so elegant with its magnet closure. She said that she was not sure about how well the magnet would hold and I agree that the bracelet could well snag on something which might pull the two magnets apart. I think that she could add a fine safety chain to the loops on the ribbon clamps so that the bracelet could be opened wide enough to slip over her hand. Then she could close it with the magnet. I imagine that the dangling safety chain would look elegant too.

Here is Katherine’s first weave-along band cut into two for two potential bracelets. They came out a little too wide for her hardware and so we will see if she comes up with another idea for transforming these bands into bracelets. She used the Andean Pebble Weave structure to create her patterns.

I love the way Jan posed her cuff for this picture. She wove a pattern in a supplementary-warp structure. She used a technique for the closure which is used by the Mayoruna people of Peru as described in this issue of The Weaver’s Journal.

Aphelocairos is weaving the above piece on her inkle loom using a pattern and instructions from my Complementary-warp Pick-up book and has joined the weave-along so that she can make a bracelets with her bands. Any loom that allows you to create warp-faced fabric can be used for this pick-up technique which requires just two basic sheds.

I might use this now as an excuse in this New Year to remind you of my latest e-book which is available from Patternfish.com….A an edition in German is under construction.

It is aimed at ”experienced” band weavers by which I mean that you need to know how to warp and set up your loom of choice and weave warp-faced plain-weave bands. It’s as simple as that!

Below, you can see Rosemary’s band. She is working from my book too and is using a combination of linen and cotton.

She’s working on a backstrap loom, has wound a long warp, and hopes to get several bracelets from it.

While Katy-cat awaits the arrival of her jewelry findings and ribbon clamps, she wove a pretty plain-weave band and made her first bracelet. She is not crazy about the lobster-claw clasp. Admittedly, it takes some practice connecting bracelets with those kinds of clasps with just one hand. I have it down now. 🙂

Here’s Kathrine’s next warp…so soft and pretty…

Ooh and I just spotted some progress on this warp…this is Knit Picks Curio cotton, by the way…

Wendy’s variegated yarn warp in jewel colors came out beautifully with its Andean Pebble Weave pattern…

Janet has been learning complementary-warp pick-up from my book. She is not actually participating in the weave-along but perhaps she will decide to make this band into a bracelet or two when she is done. I love this pattern which is included in the book. My weaving teachers here in Bolivia always weave it in black and white, as have I. It is great to see it in other colors.

Janet is using a Gilmore Wave loom and her second band, using another pattern from my book, is even more striking than the first….

My inbox brought me some lovely work by Janneke with star patterns from my second book…

My inbox also brought news from Dorinda. She lives up in the highlands of Cochabamba and works with Maxima and the other weavers in the co-operative that she helped establish. Firstly, she told me that she had mailed my latest order of long bands that the ladies make with their handspun naturally dyed wool. I always order a mix of bands…half with cochineal red and half without….

Then she showed me a picture of what Maxima has been weaving using my second book. I left a copy of the book with the ladies when I visited last year. Maxima can weave the patterns by simply looking at the photos of my samples. Other ladies in the co-op say that they read the charts. Each person has their own way of seeing things. The problem for Maxima is that not every single pattern has a pictured woven sample. Here is a band which Max wove working from the pictures in my book. This puts a big smile on my face!

Dionicia, who is the oldest member of the co-op at 86 years of age, looked at one of Max’s other sample bands when she was in town. It was another band that Max had woven using patterns from my book. Dionicia then went back to her community and wove the pattern from memory. An NGO in town has given synthetic yarn to the ladies and encouraged them to weave tapa bancas (bench seat covers) to be sold at the local market. Dionicia has made her first one and included the pattern she had glimpsed on Max’s band. Yes, each person has their own way of learning new patterns!

Here is Dionicia studying and attempting to replicate the fish pattern on a band, which you can see on her lap, that I had taken to show on my visit last year…

She was more than willing to help younger ladies to get on their way when we all got together to weave last year and she was the one who generously lent her hat for me to wear in the sun…

Julia Tate in the Ravelry group has been working a large projects. First, she recently finished this stunning piece patterned with supplementary weft which she plans to make into a pillow cover…

And now she is using a rigid heddle with her backstrap loom to create this…

Carlos wove this elegant cotton piece. It is such a gorgeous combination of subtle color and pattern…

And here is one of his latest projects. I love seeing other people’s set-ups. I see a nice coil rod in place there.

Winding wide warps with perfectly even tension is always a challenge. I have my way which involves warping in sections. I don’t allow the threads to climb up too high on the warping stakes so that I don’t risk having the stakes lean in. Carlos is experimenting with different ways and is interested in a set-up that he has seen in videos on warping in Mexico, a system which is also used in some communities in Guatemala. My teachers in Guatemala used a system of spaced vertical stakes. He showed a screen shot of the warping board and is interested in building one of his own….

And here I will leave you to make some more progress on my spots and dots and swirling paisleys….hoping not to fall over the edge into chaos!


Backstrap Weaving – Highland Fling Part 2

Here’s Part 2 of my post about my recent trip to the Bolivian highlands. Read Part 1 here.

Huancarani! Whenever I have written about Huancarani on this blog and about Dorinda, her PAZA organization and the weavers in central Bolivia I have always had to go to Dorinda’s web page and check how to spell, and therefore pronounce, the name of this tiny highland settlement. It just wouldn’t stick. Quite often I would leave out the first letter ”n”. Now I have actually been there and spent an entire day weaving with all the ladies whose names had become so familiar to me. When I order woven bands from the group, the orders arrive with each piece labeled naming its weaver and Dorinda would send me a document with little stories about each one of them. I have often shared those stories on this blog. It was delightful to be able to meet the weavers and shake their hands at last. I know I will never forget how to spell Huancarani ever again. The community and the day I spent there have now become a very special part of my weaving experience.
group-photo-huancaraniHere’s a mini group photo taken at the end of the day taken in the same beautiful spot that Dorinda has shown on her website and which I had so often admired…so green and with those lovely hills in the background.

Unfortunately, a few of the weavers had gone home at this stage. Narciza, in the center with the blue skirt and spindle,OLYMPUS DIGITAL CAMERA had grabbed my attention right at the end of the day to have me help her weave a new pattern. Everyone was waiting to get together for the group photo but Narciza kept pleading ”unita mas!” (one more!)…that is, one more row of pattern, as she was so determined to weave a full repeat so that she could carry on and copy it on her own later. I totally get that kind of focus and obsession and was happy to oblige. Her joy at learning the new pattern was infectious. However, many of the weavers simply had to head home. There were animals to round up and herd, families to attend to and meals to be prepared. Special arrangements had been made by many to have a day off from chores to spend a whole day out on the ”green” outside the church to spin, weave, chat and have lunch together.

After the group photo, we separated and Dorinda, Maxima and I headed back to town an hour away. My hand was firmly shaken, I was given gifts of food and I was even hugged by some of the ladies. Maxima expressed surprise at that as it is not generally their custom to hug. I take orders from my backstrap weaving students for the bands that these ladies weave and they were expressing their appreciation for this much needed source of income. May I pass on their gratitude to all my students who have placed orders. Thank you!

examining a woven sample to copyAfter lunch, Narciza and Felicidad had wound a warp of 56 ends (that’s a whole lot of ends to be holding on just fingers!) determined to copy a pattern on one of the bands that I had brought to show. It just happened to be the pattern I was weaving on the backstrap loom that I had brought to demonstrate to the ladies. Narciza spotted the motif first thing in the morning, asked me for the thread count and set to work after lunch. In the morning she had learned a simpler pattern with me.

narciza and felicidadYou might be able to make out my sample band sitting on the Felicidad’s skirt. Narciza and Felicidad were puzzling it out together with the suggestions of others peering over their shoulders from time to time. However, time was running out and so I was called over to help before I could take back my sample and leave. I talked her through one repeat but I ended up leaving the sample with her in any case after having had my arm very tightly twisted!

charts-and-samples

narcizas new patternThere’s the pattern taking shape. Some of you might recognize it from my second book. Narciza has enough information now to be able to continue weaving this motif.

It was an action-packed day with lots and lots of weaving going on. There hadn’t been any kind of plan for the visit, as far I had known. I was simply being taken to Huancarani so the weavers could meet me and Dorinda thought that they might like to see my backstrap loom and some of my weaving. The ladies had offered to provide lunch. Apparently I was known as ”La Laverna”…the lady who gave them orders for weavings from time to time.  Maxima had wisely thrown all the cones of cotton that Dorinda had back at the house into her bag and brought them along. She must have known that everyone would want to weave and would most likely not have thought to bring any of their hand spun yarn. They had, of course, all brought their spindles!

They enjoyed looking at my samples.  Maxima, who is currently working on a wide piece on her leaning vertical loom with strips of double weave patterning, enjoyed looking at my double weave sample and picked out bird motifs that she would like to copy.

the small group first thing in the morningThe ladies arrived in a slow trickle, one by one. I set up my backstrap loom while Maxima took out the cotton and started winding a warp. I had taught Maxima one new pattern the day before and Adviana another. Maxima wanted me to teach her the pattern I had taught to Adviana and I was happy to do so. However, once the brightly colored cotton was out, everyone wanted to try some and there was a frenzy of activity as warps were prepared on fingers and toes everywhere I looked!

casimira warpingWho needs warping stakes when an index finer and big toe do nicely?

teaching momentI love this wonderful teaching moment as one of the elders starts a warp for one of the younger ladies. Dorinda told me that she had never seen this young lady before and that she was not part of the weaving co-op. She has high hopes that she may now join. I sat with her and got her started on a pattern and got the impression that she was not an experienced weaver. She was having a difficult time working the sheds and asked for my help. Who knows…this may have been her first time actually weaving although she would have been exposed to it all her life..

weaving generationsI love seeing the various generations represented in this picture. The older lady isn’t wearing a hat as she had insisted on my wearing it. I was out in the sun with the first group of ladies to arrive while she very wisely sat in the shade.

I took my very first selfie so I could see how I looked in that hat. I like it!

selfie with hatEveryone wound a warp with the same number of ends as Maxima had and they all wanted to learn the same pattern! How was I to manage that? There was only one tiny sample in fine 20/2 wool to pass around and one pattern repeat was 25 picks! There wasn’t enough time for me to weave samples right there and then so that small groups could each have one to examine.

eulalia figuring out the patternI asked Dorinda to copy the pattern chart I had made for Maxima. After working with one of the younger ladies, I could see that the youngsters quickly understood the chart and were able to weave on their own after I demonstrated just 4 or 5 rows. They still pleaded with me for ”unita mas!” but I left them to weave on with the chart and they got on just fine. Of course, the more experienced weavers would be able to sit, figure out and copy a woven sample with few, if any, problems but we only had one such sample to pass around. Above, you can see Eulalia. This lady blew my mind. I don’t know how many times she caught a glimpse of the tiny sample as it was being passed around but she sat and started weaving an almost perfect copy of it.

She soon gathered a fan club and I was the biggest admirer of all!

copying the patternYou can see Maxima in the center starting a warp for the lady seated next to her with pattern chart in hand. Narciza in the foreground has her own chart and is on her way. Narciza is a real ”go-getter”. I enjoyed meeting her a lot. And, that’s Eulalia in the background with her fan club. People learn in so many different ways. Of course, pattern charts are completely unknown and foreign to these weavers and it was interesting to see how eagerly the younger women took to them. If I had known that the ladies were going to be so keen and determined to use our time together to learn new motifs, I would have brought a dozen samples in heavy yarn for them to copy. I really hadn’t had any idea of what to expect.

copying the fish motifMy hat companion took my band of fish motifs and set about copying one of them on a band that she had brought with her. My fish are woven in heavy cotton and she could easily see the pattern to copy.

colorful woven bandsSome of the weavers had brought bands on which to work and the widest band had just enough ends to accommodate the fish motif.

maribel and daniel with dorindaIt’s not fair to have favorites but I had mine. ..19-year old Maribel and her toddler, Daniel. Maribel was the first one to arrive and should have had top priority to learn the new pattern. However, she sat by patiently while some of the older ladies got started and then sweetly asked me to teach her. She then took herself off to a quiet spot away from everyone else so she could concentrate and happily wove her band. Dorinda is seated next to her making more pattern charts.

maribels patternAfter lunch, she was happy to sit near one of the older ladies and talk her through the pattern in Quechua. She had me won over!

And, she was excited to be able to copy some of the patterns in my book that require the same number of ends. I think she went home one very happy weaver.

maribel-collecting-patternsMaxima and I were kept really busy helping everyone who wanted to learn. If only we could have taught everyone but there simply wasn’t time. I’ll be better prepared next time. I can’t wait for next time!

max-starting-another-weaver-offMaxima is starting the weaving for one of the ladies while she looks at the chart.

max-helping-another-weaverAnd then the student took over and you can see her pattern emerging. Once she has a full repeat woven, I know that she will be able to continue on her own simply copying what she has already woven.

Lunch was a”pot luck” of rice with chili sauce, potatoes, corn and sheep and goat cheese. Some ladies just kept weaving as everyone wanted their chance to learn.

pot luck highland lunch

lunch breakAfter lunch it was even more fun as it started raining and we had to cram onto the church porch.

church huancarani

weaving on the porch after lunchThere’s Maribel weaving with Daniel between her legs. Dorinda is making yet more charts. Maribel is calling out the pick-up to the lady seated on the other side of Dorinda. There was lots of talk and laughter in Quechua. I loved listening to Maribel call out the moves in Quechua to other weavers. Every now and then I would hear a word in Spanish. As I had suspected, there is no word in Quechua for ”blue”. They use the Spanish ”azul” or ”celeste” for light blue.

weaving-on-the-porchI learned that if you leave the circle someone will quickly wriggle in to take your place!

There were many ladies who simply didn’t manage to spend enough time examining the sample or get one-on-one instruction. They sat and wove anyway, chatted and laughed with their friends. Dorinda said that these ladies never have time to do this kind of thing. Maxima says that in their youth they would go out herding their animals and look for their little friends and neighbors so that they could sit and weave together.

I had to stop every now and then and look around and take it all in. I couldn’t believe how lucky I was be able to spend this day with the weavers doing what we all love. Even just looking at all the different hats in this one tiny settlement was interesting. The one with the woven hatband is especially cool…

cool-hat

admiring-patternsOne lady wove a pretty hook pattern and was happy to show it off to me.

comparing-patternsHer neighbor also admired it and I wonder if it was a new pattern for her. Perhaps she then tried to copy it.

ccopying a neighbors patternThis lady liked the pattern her neighbor said she had just invented and now she is setting out to copy it.

In the late afternoon weavings got put away and spindles came out as everyone prepared to stroll across the ”green” to the fabulous photo spot for the group photo.  Narciza, reluctant to stop weaving, looked at me and said ”unita mas?!” How could I resist?

I told you in my last post that Narciza hitchhiked into town two days later on market day hoping I was still around so that she could learn more. She and her sister Maxima wove together at Dorinda’s place. I had left two woven sample bands with Maxima plus my book and I think they had fun with that. Maxima is showing off her new patterns in this photo that Dorinda sent me but I can’t quite make them out.

narciza-and-max-learning-new-figuresWhen I got back to Santa Cruz, I wrote emails to some my backstrap weaving friends and was able to deliver a new order of bands to Dorinda for the ladies.

bands paza

Here they are warping for the very first one.The weavers from Huancarani come into town on Sundays to bring their produce to market. They often go to Dorinda’s place for tea and cake (Dorinda loves to bake!) before returning to Huancarani. They ask if there are any orders. She had good news for them last Sunday.

warping-for-the-orders

The area is so green and pretty now that the rains have come. Every night during my stay there was a downpour at around 4am. We would wake up to clean sparkling freshness and the delicious aromas of Dorinda’s lovely garden.

dorinda

And, finally, a picture of dear Dorinda walking me to the bus stop on the day I left. I did try to take a selfie of the two of us in Huancarani but I apparently need more practice with selfies. Dorinda has worked so hard with the weavers over the years and has lots of stories to tell of the ups and downs during the establishment and development of the weaving co-op, the handcraft club, the girls club and her relationship with the weavers. There is plenty to read on her PAZA Bolivia website and an opportunity to donate if you would like to help.