
In my last post I left you with the fabric that I had woven for pockets for my new tote bag. It’s part of a stash-busting project using the small balls of Omega Sinfonia cotton that I’ve accumulated over the years.

Then came the task of weaving the fabric for the body of the bag. Again, I wanted to be able to use up as much of that stash of Omega Sinfonia as possible. I knew that I could over-dye the lighter colors dark blue. But the dark colors would have to be dyed black. There weren’t enough lighter colors to allow me to create entirely blue fabric but I didn’t want the bag to be completely black either. I decided the cloth would be both blue and black. Oh my gosh, I had so many doubts about what this was going to look like!
The fact that each color that I overdyed would give me a different tone of blue and black was another thing to consider. This could be a mess. The differences in tone were not fully apparent until the warp had been wound and spread out before me. I suppose I could have taken the time to arrange the stripes in some sort of clever Fibonacci sequence of widths but once the warp was wound and on the loom beams, I wasn’t keen on fiddling around with it.

I planned the cloth to be 19 inches wide. That’s a fair bit wider than what I usually have on my backstrap loom but certainly not as wide as the cloth I have seen on the backstrap looms of weavers in Indonesia and other parts of SE Asia. The widest cloth that I have seen on a backstrap loom in my travels in South America was 39 inches. It was light cotton cloth and the weaver had to stand to weave it.
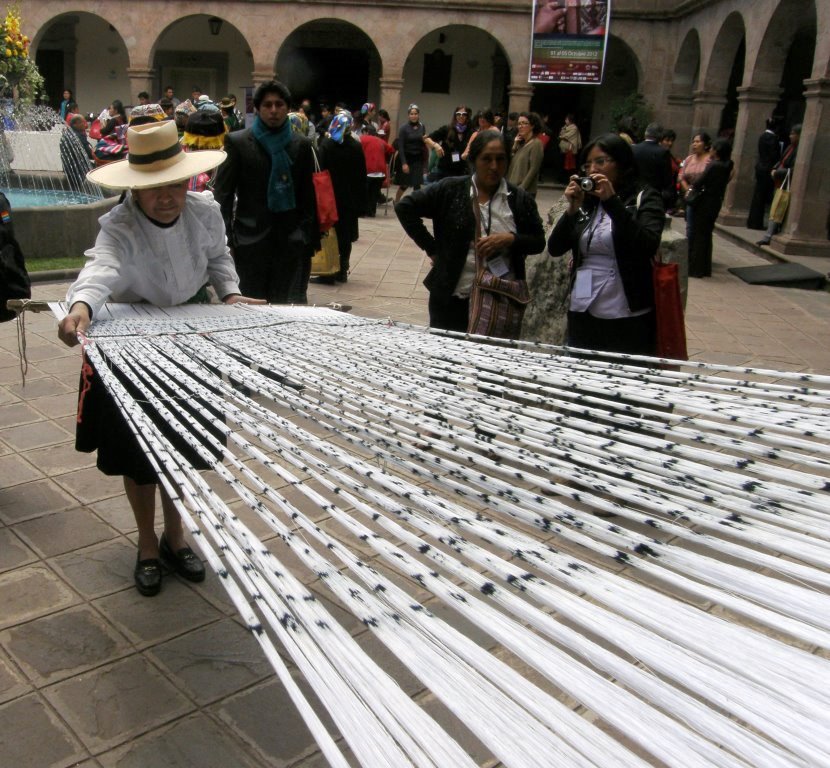
I had to get out the long sticks and swords.


Omega Sinfonia is quite hefty thread compared with what I have become used to using over recent years and so it was quite a work-out operating the loom and beating. My longest sword is not a particularly hefty one.

The original idea had been to have two outer pockets, one on each side, showing the two faces of the Andean Pebble Weave pattern. In the end I went with one outside and one inside pocket instead. It was a fairly basic sewing project. I created box corners and then set about weaving the straps.
It has already been on its first grocery-shopping outing….

Its a winner. I’m really pleased with it. Well, that took care of about a third of the Omega Sinfonia scraps. What’s next? I have two kinds of reds and three kinds of browns left, none of which look good together, and a bunch of other odds and ends. I have in fact used red and brown together before but I guess that they just have to be the right kinds of red and brown in order to work…

People often ask me how I go about weaving wider pieces. For me, it’s all about the warping. Once a good evenly tensioned warp has been created and you are seated at the loom, there’s not a whole lot of difference in the process of dressing the warp and weaving. Additional sticks and other tools might be needed but operating the backstrap loom with a wide warp works on the same body-movement principles as with a narrow warp. It just requires more physical effort.
I have a few tips for creating and managing wider warps. I stress that this is just the way I do it. There are many different ways and of course, no one single correct way. This isn’t a step-by-step description…just some tips that I can share after perhaps having made every possible mistake over the years.
Tip 1: Make sure you have a stable warping set-up with stakes that aren’t going to shift or bend:
I always warp in sections and won’t pile up any more than two inches of threads on my warping stakes to avoid having them lean. I tie off and remove each section from the stakes and place them on beams and cross sticks that are waiting on the floor. Always use safety strings in case there’s an accident along the way!


Tip 2: Know your yarn, know your width, know your technique:
What I am saying is, don’t go wide with a yarn you have never used before. First weave a decent-sized sample.
I know that some people don’t bother with sampling but I like to know the width I am aiming for rather than just warping up and seeing what turns out. So, there is a lot of measuring and calculating that goes on based on samples that I have woven, preferably fairly recently, with the yarn I plan to use. I had a sample using the Omega Sinfonia thread for my bag project in both warp-faced plain weave and Andean Pebble Weave and used it to make my calculations. That way I knew exactly the number of ends I would need for each of the two structures to create my 9-inch-wide pocket fabric. The plain weave sections in the pocket actually came out slightly wider than expected (perhaps my sample had been too old and I have since then unconsciously changed the way I handle the weft). I was able to use that updated information to plan the warp-faced plain-weave cloth for the body of the bag.

My brother still has the wedge-shaped wall hanging that I had gifted to my mum back in the early days. I had woven it with new-to-me yarn, so no sampling had been done, and I started off too narrow. It started to widen and didn’t stop widening all the way to the end. There’s an inch difference in width from start to finish. But because it never settled down into a consistent width, the gradual widening almost looks intentional.
Another thing worth mentioning that applies to wide warps more than narrow ones, is that I find it best to set up my loom in one place at one angle and then keep it there for the duration of the project. I had started my mum’s wall hanging in Bolivia and taken it unfinished to Australia. It got set up in a few different places at various angles while I struggled to finish it in time. I even had to work on the short warp with the warp beam awkwardly lodged behind my feet for a while (I didn’t have another rod or cord handy to extend its length). That awkwardness accounts for the fact that the cloth isn’t straight.

I wouldn’t attempt a wide piece with a technique that I had just recently learned either. (Obviously I hadn’t added this to my advice list on that red warp back in 1996!)
Tip 3: Warp undisturbed and don’t disturb the warp:
Have everything you need for warping close at hand including the loom bars and cross sticks….scissors, rubber bands or tape, lashing string, string for tying off groups of warps for counting etc.
Try to warp in one uninterrupted session…turn off the kettle, put the cat out, ignore the phone, forget that cup of coffee! It’s amazing how things can change from one day to the next. I never leave a warp half-done until the next day.
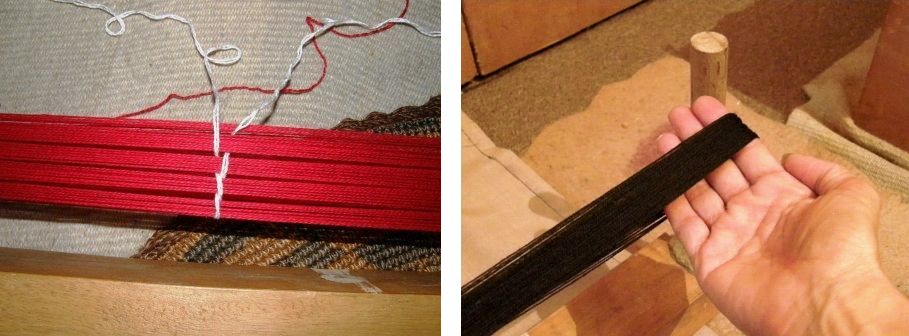
Once you have wound that beautifully-tensioned warp, do your very best not to disturb it. When I slide a section of warp off the warping board I try to keep my hand under the ends so that they are all lying flat across my fingers and not bunching up. Then I place them very carefully onto the beams. This saves a lot of tugging and rearranging later when I’m seated with the warp and tension and getting ready to weave. A lot of tugging can mess up your tension. Below right, you can see how I place my hand to lift the threads off the warping stake. Another thing you can do is chain thread around groups of threads as I’ve done on the red warp. It can help stop threads in a larger section of warp from shifting and climbing on top of each other, which all means less work and less time spent straightening things out later. One of my Guatemalan teachers did this.
Tip 4: Slow and steady…take the time to set-up and start well:
If necessary, settle the threads one by one along the cloth beam untwisting any that have overlapped. I learned to love doing this from my teacher in Guatemala. She so calmly and patiently lifted each thread on the tip of her pointed sick and placed it on the beam and I’ve learned to do the same. This is not entirely necessary if you are starting with a fringe and using waste yarn or cardboard strips as weft for your first few inches, but if you’re going for a third selvedge, this exercise will give you the neatest possible start.

Then I measure sections so that I know that my sett is consistent the whole way across the warp. There are varying degrees of “warp-facedness”. In some sections your threads might be crammed up tightly next to each other. In others they might be just a hair’s breadth apart. Mine tend to be the latter and I want that to be consistent. It’s especially hard to tell when you are working with dark colors or very fine threads. The overall width might be correct but the warp threads may still not be evenly distributed across that width.
I calculate the width that each of those sections that I removed from my warping stakes should be and make sure that the threads in each section are settled at that width. I can sometimes use up a whole morning fiddling around with this! However, with the right amount of prep, once I have thrown the first shots of weft and measured once again, I know that all will be smooth sailing from there on…just pure fun!
I’m going to finish with the The Big Bag again because after spending so much time doubting the success of this project, I now love it so much!

The final bag looks amazing, and seeing the process is fascinating!
Also, I’m so happy to have your new book on designing supplemental warp patterns! I am experimenting with the new dotted charts, but I don’t quite have the hang of it. And trying out intermesh will be a whole new adventure!
Wow! Thanks for sharing. I am always inspired by your work.
Wonderful article! I’m researching before starting my first weave, and you answered a few questions before I asked them, and many more I should have thought of to ask. I will definitely be digging in deep for more knowledge and ideas, and have subscribed to the blog. Thank you so much for sharing your knowledge and time.