Backstrap Weaving- The Walls

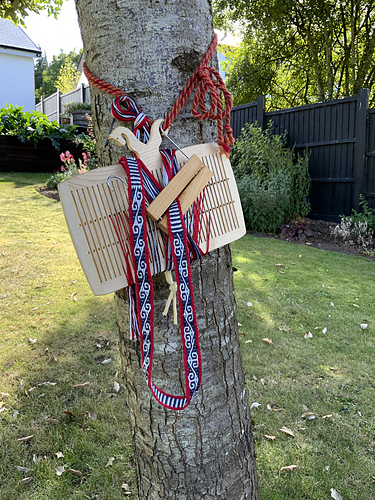
The only time these got hung was at the ANWG conference back in 2015, I think. Terry (RIP), whom many of you may know as the owner of Magical Moons Etsy shop, made me some beautiful wooden hangers for them. I own and cherish several of her lovely swords.
Warp-faced double weave in the center flanked by a single-faced pattern of three-span floats.
For the panels on the left and right I used the ikat technique to create the bird shapes. The advantage of that over the center panel is that the background of the ikat panels can be a strong solid color rather than a pebbly one.
In these I also first used ikat to create the shapes which allowed the black areas to be solid.

Creating the shapes in ikat might seem like an excessive amount of trouble to go to just to get the solid rather than pebbly background but my long-term plan for this method is to create curved shapes that I otherwise wouldn’t be able to using the structure that I call Andean Pebble Weave. The block-shapes that I’ve created so far are just the warm-up!

60/2 silk in warp-faced double weave.
Ikat on 60/2 silk with a little supplementary-weft patterning in the center.
Figures that I learned in Guatemala with my teacher, Carmen.
With one of my teachers, Lidia, back in 2008.
These are the colors that I used when learning the techniques with my teacher.
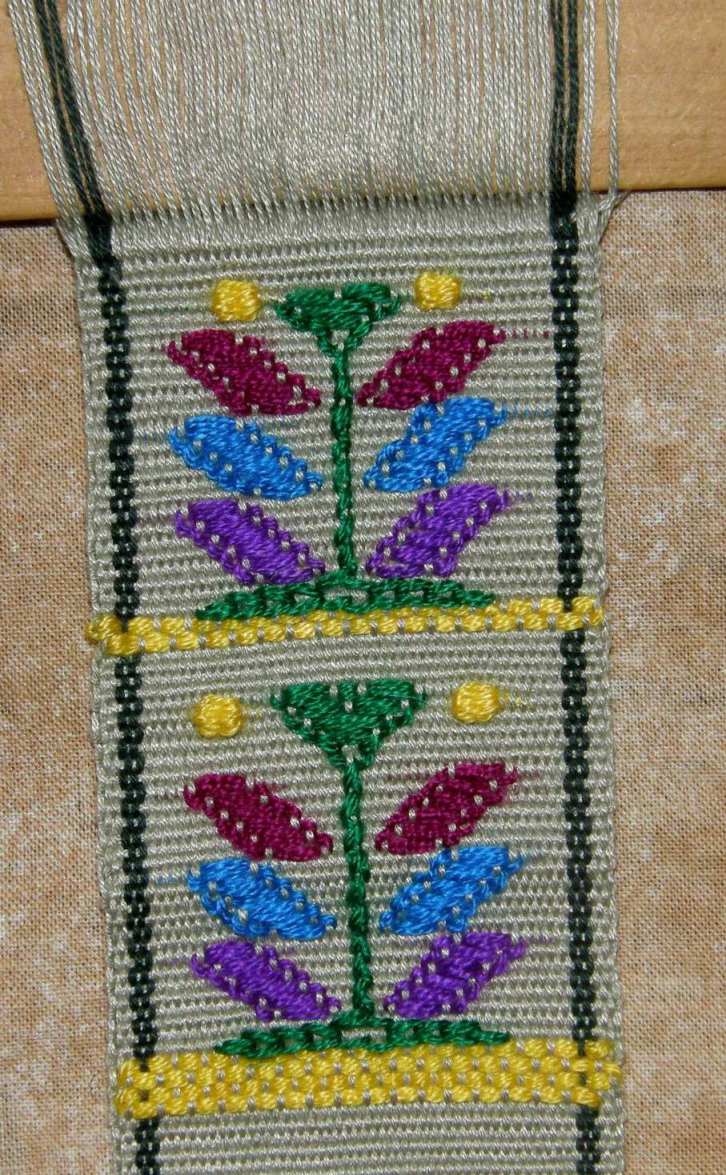
Guatemalan tree designs woven with acrylic supplementary wefts on a fine cotton ground weave.

GUATEMALAN SUPPLEMENTARY WEFT PATTERNING TUTORIAL.

I suggest you follow the beginner tutorial on supplementary-weft patterning here before attempting this second more advanced one. 

This tutorial was first presented over two weeks within blog posts so there are two parts. I have extracted the information from the two blog posts for this tutorial page. It shows the kind of supplementary-weft patterning that I learned in one particular town in Guatemala.

I wove a tree design at left using the various warp wrapping and inlay techniques that my Guatemalan teacher employs and this was fun as I hadn’t done any of this since 2008 immmediately after my return from my first visit there.

I learned these techniques with my teacher Martine and her daughter Carmen in Santa Catarina Palopo on the shores of Lake Atitlan. I met Martine in Panajachel where she sells textiles in the street market. She took me to her home and spent one morning setting up the loom and then her daughter took over weaving and teaching me for the next week or so. She was a good teacher. Each motif was repeated six or seven times across the cloth. Carmen would show me five times what to do and then would let me weave the last one or two motifs to practice what she had shown.

The weavers set up their looms with great care. Martine was obviously more skilled at doing this and Carmen only took over when everything was set to go. The warp is wound with two crosses. The second cross helps hold the shed rod in place.

In the first part of this tutorial you will see a series of step-by-step pictures showing how the warp is prepared for this kind of supplementary-weft patterning. A plain-weave ground cloth is woven onto which the supplementary-weft motifs are woven. Certain warp threads are raised in each shed under which the supplementary weft threads are passed.

As the same warp threads for the supplementary weft patterning  are raised every time, they can easily be picked and stored on pattern sticks so that the weaver does not have to continually pick them up by hand for every weft pass. There are two sets of these warp threads. One set is made up of certain threads from the shed-rod shed and the other of certain threads from the heddle shed.
In the above picture you can see four passes of yellow supplementary weft under the warp threads which form the two pattern sheds.. All the motifs that my teachers showed me were created by passing supplementary weft thread under the warps in these pattern sheds.

Two pattern sticks are used. One stick is inserted under the selected pattern warps in the shed-rod shed and another holds the selected pattern warps in the heddle shed.

I show the process of picking and inserting the pattern sticks first in step-by-step pictures and then in a video.
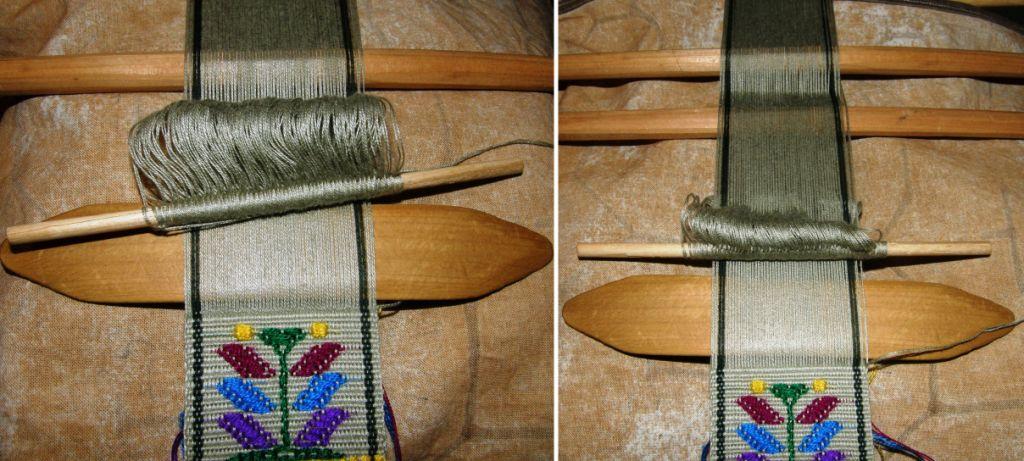
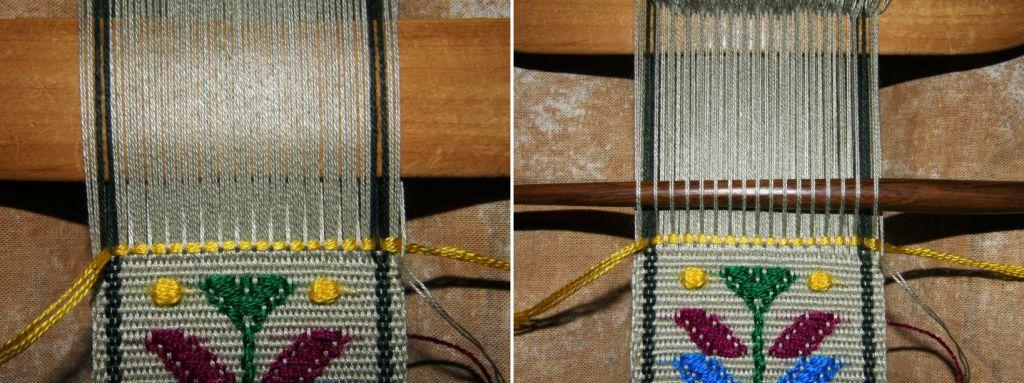
LEFT: This is the basic loom set-up with shed rod and string hedddles in place. RIGHT: An extra stick is placed in the second cross to hold the shed rod in position.

In order to create the patterns, two extra patterning sticks need to be inserted. These are stored up beyond the shed rod. One is stored on top of the warp and the other underneath.
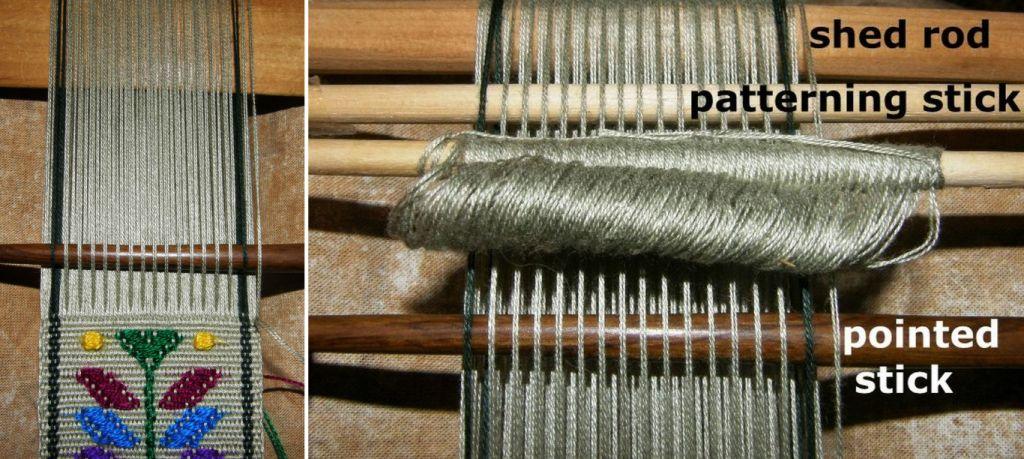
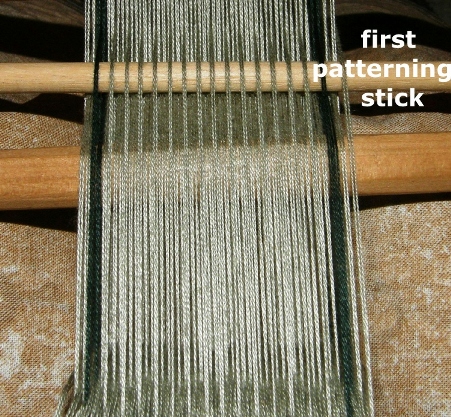
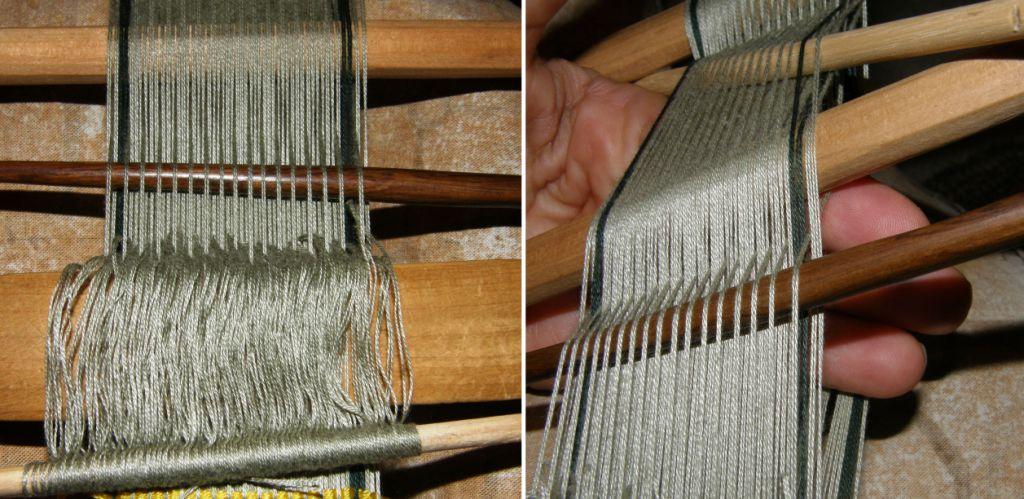
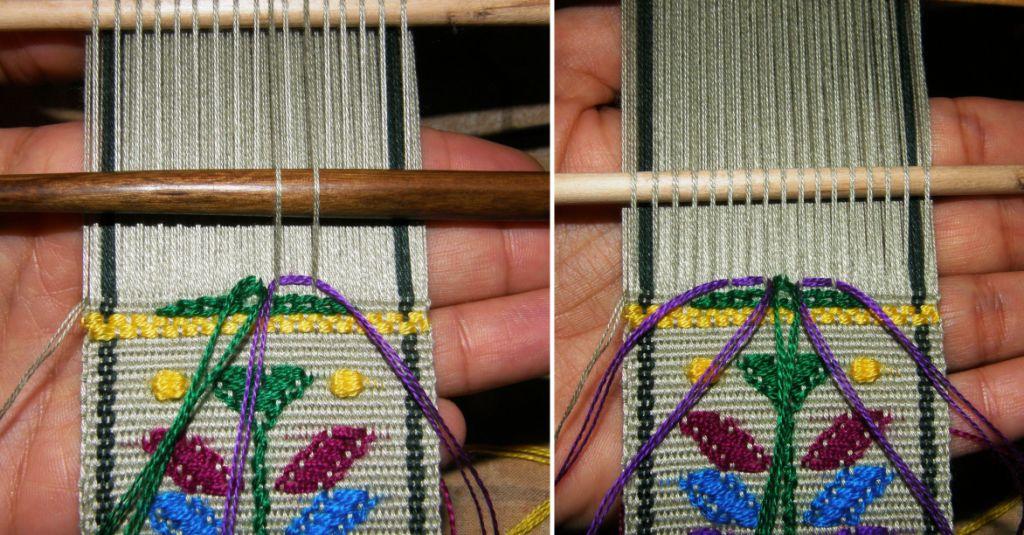
LEFT: To set up the patterning sticks, the shed rod shed is opened and the first set of patterning warps are picked up. Pick one, drop two, pick one, drop two across the width of the warp.. NOTE: I am using doubled threads so what looks like two threads in the photos actually counts as one thread. The weavers use a pointed stick to do this. RIGHT: The pointed stick is inserted under all the picked warp threads and then pushed up toward the heddles. This will raise the picked up threads on the other side of the heddles. Another stick is then placed under these threads on the other side of the heddles. This is the first patterning stick.
The first patterning stick sits up beyond the shed rod until called into use.
LEFT: A colored piece of weft is placed under the warps in the first patterning shed. This serves as a reference to make picking up the warps for the second patterning shed easier. RIGHT: The heddle shed is opened and the warp threads in the second patterning shed are picked up. Between each warp in the first patterning shed, there are three warp threads in the heddle shed. You need to pick up the middle one of these three warps. You will pick one, drop two, pick one, drop two all the way across the warp. The pointed stick is inserted under all the picked up warps. The pattern stick for these warps will be stored UNDER the warp and a special maneuver is required in order to do this…see the next set of pictures. (This is also all shown in the video clip a little further on).
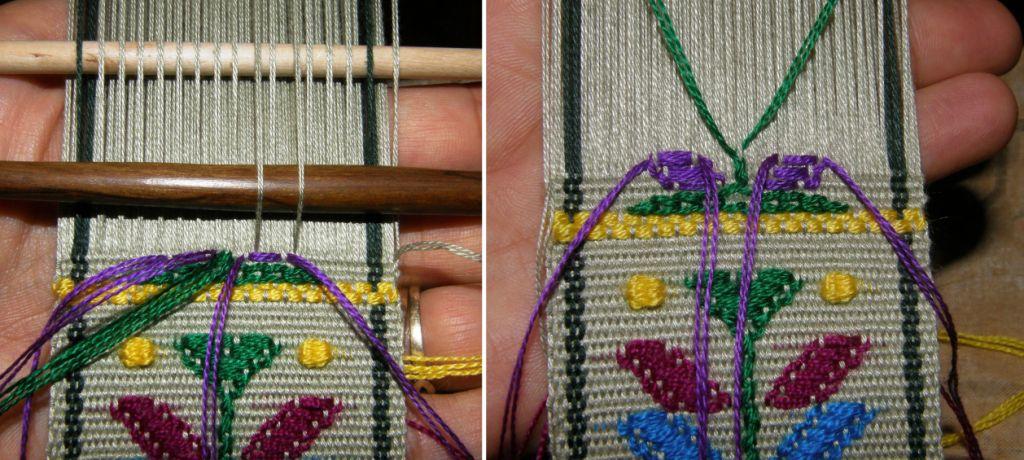
LEFT: The pointed stick is moved up toward the heddles which will raise the picked up warp threads on the other side of the heddles. RIGHT: A stick is placed under the raised threads on the other side of the heddles. Then both the stick and the shed rod are raised in order to create a new shed underneath the two. In the picture I have my hand within this shed and will replace it with the second patterning stick.
Here you can see the two patterning sticks in place up beyond the shed rod…one on top of the warp and another underneath.

Now the warp has been prepared with its two patterning sticks ready to create patterns with supplementary wefts.

Watch the process again in the following video. I am using very thick yarn and only a few warps in the video just to demonstrate the basic process. The video is in two parts.

The second part of the video shows how to use the pattern sticks to raise the warps and lay in weft for some basic patterning. This is also explained in the photos below. I am using thick warp and weft in the video just so everything is easy to see.

Two wefts are used to weave the above typical patterns of Santa Catarina Palopo: a red weft is passed through the two main sheds (shed rod shed and heddle shed) to weave the red warp-faced ground weave and the brightly colored supplementary weft thread are passed under or wrapped around the patterning warps to form the motifs.
Below are samples that I’ve woven since my return from Guatemala.
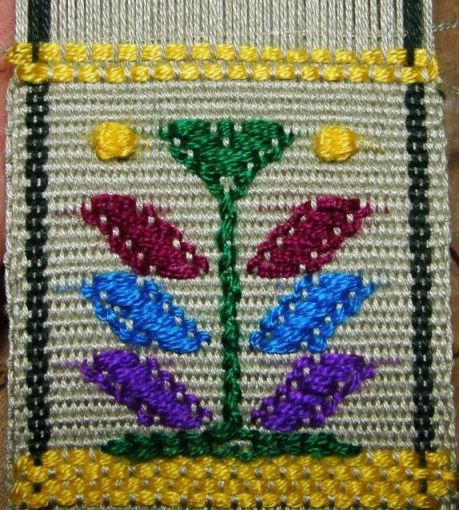
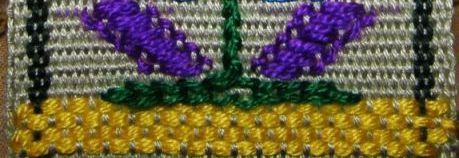
Motifs are usually started and ended with four rows of supplementary weft in the patterning sheds forming the yellow brick-like design shown above. The colored pattern weft (in this case yellow) is passed through the pattern shed and then the main weft (in this case light green) is passed through the main shed.
The two pattern sheds.
In this picture I have laid in the first pass of yellow supplementary weft and am in the process of passing the main weft. Four rows of yellow weft are usually woven before starting a new motif.

Here concludes Part One of this tutorial on Guatemalan single face supplementary-weft patterning. So far we have looked at how to pick the two patterning sheds and store them on sticks up beyond the shed rod, how to open the patterning sheds and how to weave the basic brick design which separates the motifs on a piece.

In Part Two,  I will show you how to create the outlines of shapes by wrapping the supplementary weft around warp threads and fill them in by laying in supplementary weft. The Guatemalan weavers create all kinds of bird, plant and human figures in this way.

END OF PART ONE

#####################################################

PART TWO:

In this part of the tutorial I show you how to create the motifs using the supplementary wefts. I am using a tree motif as the example. You will see how to create:

  • a horizontal line for the base of a tree,
  • a vertical line to form a stem,
  • filled-in shapes for leaves,
  • diagonal lines to outline the tree top, and
  • spots for buds.

This is a fun technique with little or no counting involved which allows you to play freely with shapes and colors.

The resulting weaving looks like a piece of embroidered cloth except that the “stitches” only appear on one side of the fabric.
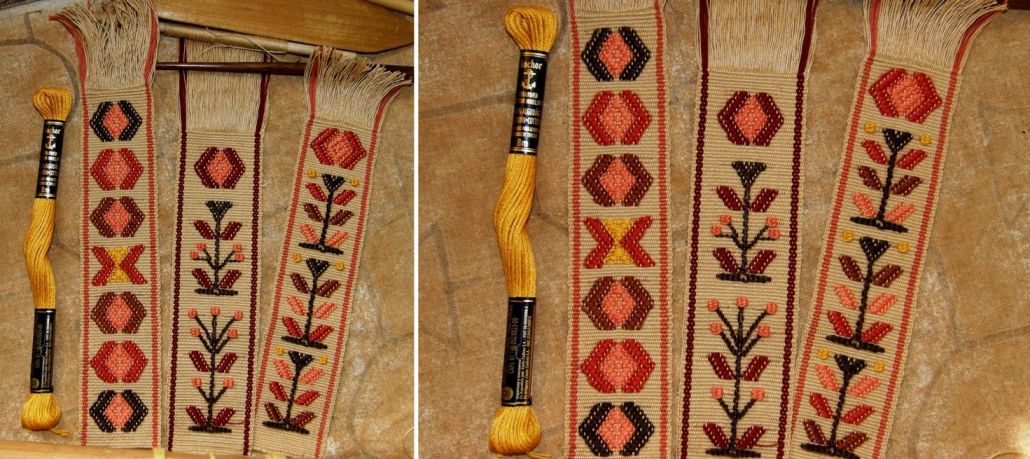
Bookmarks made with Guatemalan tree and sun motifs

Last week when I started the tutorial on this technique, I was using acrylic threads that I had brought back from Guatemala to create bright mutlicolored trees on a green background, pictured at left.

I decided to buy some embroidery floss to work with and it took some time to get just the right thickness to go with my chosen ground weave warp. The ground weave is a 50 wpi cotton and I used 4 strands of embroidery floss to do the patterning. (one piece of embroidery floss has 6 strands so you need to remove 2).

The 50 wpi warp produces a wonderfully thin cloth just right for bookmarks although the pattern wefts do add some bulk. Remember to always use a good firm beat.

So, let’s continue with the tutorial.

All the colored wefts that form the patterns pass under or wrap around the warps in the two patterning sheds. This green piece has 86 ends between the dark green border stripes. We will start with the horizontal line that forms the base of the tree motif.

FORMING A HORIZONTAL LINE

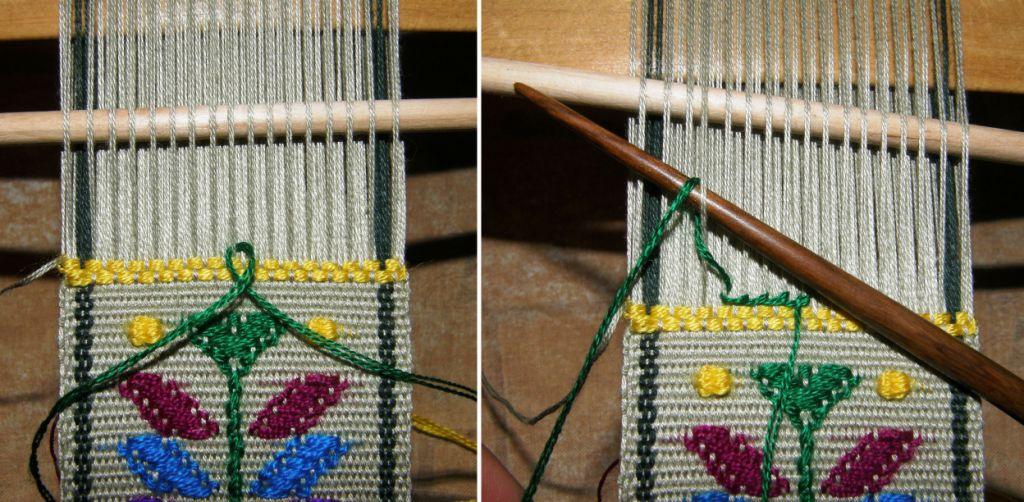
The base of the little Guatemalan tree is a double horizontal line. STEP ONE: To form this horizontal line, place a strand of around 40cm/16″ of supplementary weft under the central patterning warp. The two ends on either side should be of equal length. The central warp in my set- up just happens to be in patterning shed 2 so I have started in the heddle shed.
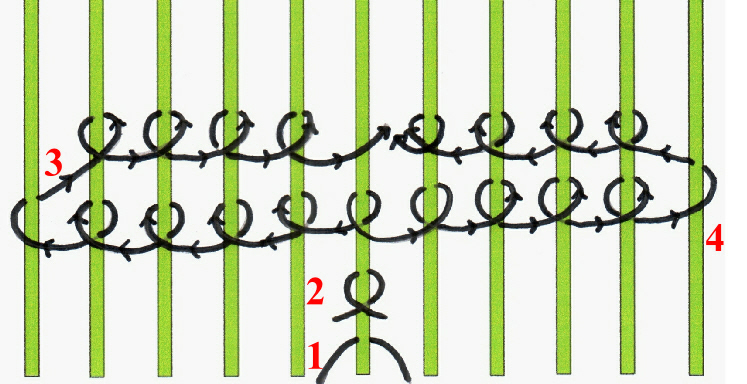
STEP TWO: Cross the ends of the supplementary weft as shown. STEP THREE: Start wrapping the left hand end around the 5 warps to the left of the central warp and return wrapping around 4 warps. The diagram below shows how this is done.
The steps for horizontal wrapping are shown here. The left end of the weft wraps to the left and returns and then in STEP 4, the right end wraps to the right and returns. These four steps all take place in the same pattern shed. The wefts wrap around four warps on their return journey to the center. STEP 5: Pass the main weft through the complete shed.

This completes the base of the tree. Now I am ready to start creating the stem….a vertical line.

FORMING A VERTICAL LINE

Open the next shed, which is, in my case, the shed rod shed and pass the main weft.
Open the heddle shed and raise the patterning warps in patterning shed 2.

Patterning shed 2 contains my central warp.

Every time I raise the warps in patterning shed 2, I will wrap my green tree base weft around the central warp to form a stem. The drawing at left shows the very simple vertical wrapping method.

The stem, therefore, is woven only in every second shed.

In this shed I will also lay in the wefts to form the first pair of leaves.

FORMING A SOLID SHAPE – A LEAF

Cut two lengths of weft around 24cm/9 1/2” long for the two leaves.
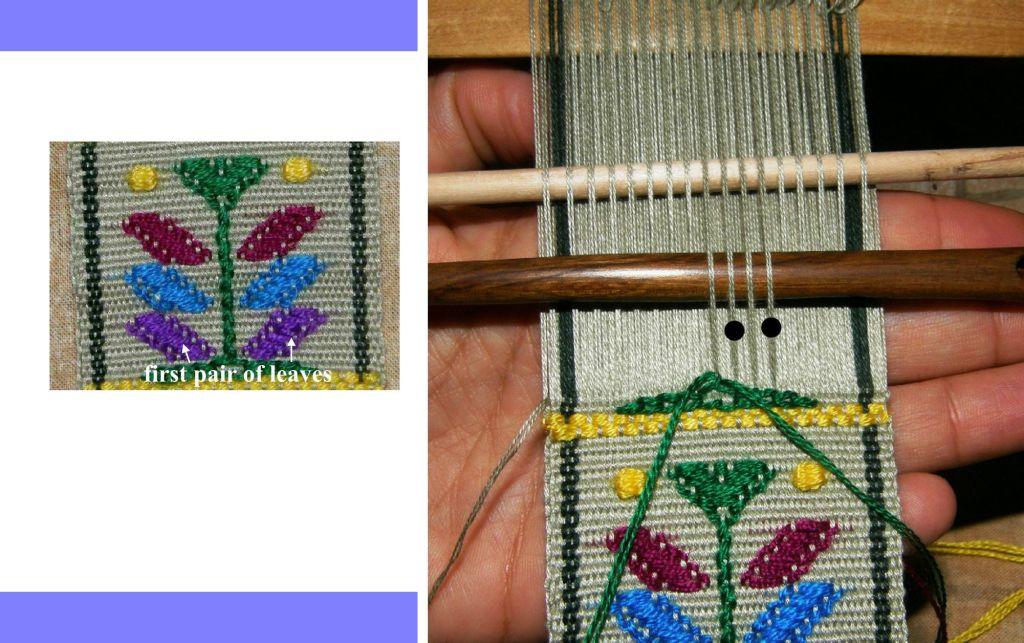
I choose the position of the base of the leaf shape from the available pattern warp threads. I decide on two threads (marked above with two black dots). Note that the two marked threads aren’t adjacent. I’ll use these to create one leaf on the right hand side of the stem and also select two threads on the left hand side.
I lay the purple weft thread behind the two selected warp threads adjusting it so that its two tails are of equal length. Then I do the same on the left hand side. Now I can pass the main weft in the heddle shed, change sheds and beat.
ABOVE LEFT: I’m now in the shed-rod shed. For the second row of leaf pattern I select two warp threads from the set of pattern threads on Pattern stick 1. For the right-hand leaf I select the two pattern warp threads that lie immediately to the right of those from the previous row. I pass the right tail of weft under these two warp threads from right to left and then the left tail passes from left to right. From now on, the supplementary weft is handled in this same way. The two tails are passed behind the selected warp threads in opposite directions. Use the tip of a pointed stick to gently push them down into position. they are relaxed as they turn around the warps. Make sure they don’t pull the warps out of position as they turn around them. On the left-hand side, I select the two threads that lie immediately to the left of those from the previous row and pass the supplementary weft tails in this same way. Then pass the main weft through the shed-rod shed. Change sheds and beat.

ABOVE RIGHT: I’m now working in the heddle shed and with the pattern warp threads held on the lower pattern stick. In this row I’ll turn the green weft around the center warp to continue forming the stem. I’ll also select pattern threads that sit immediately to the right of those used in the previous row for the right-hand leaf and immediately to the left for the left hand leaf.
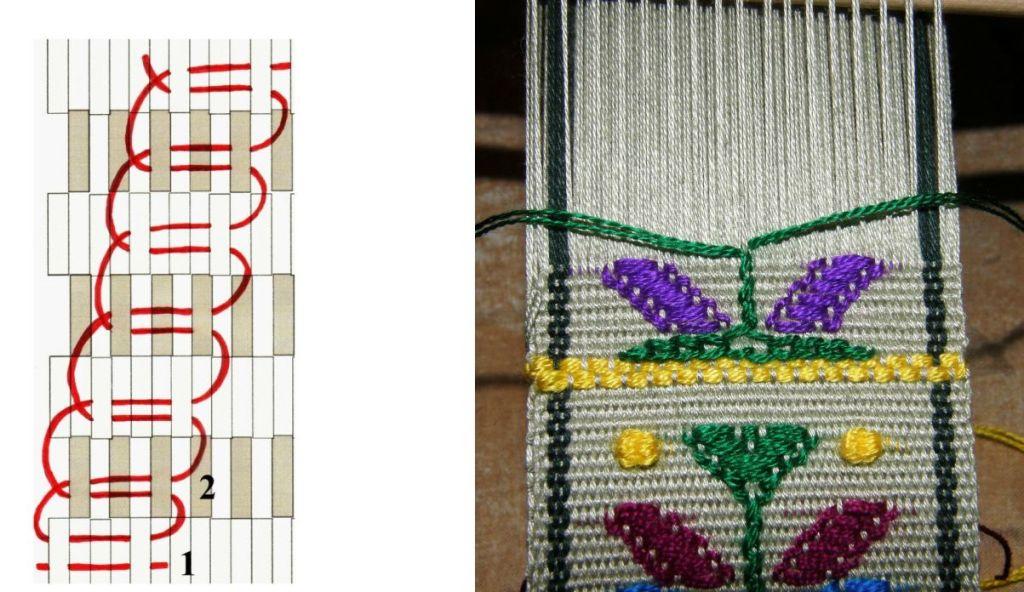
The drawing shows the paths of the two tails of supplementary weft from row to row. In every row the leaves advance and in every other row, the stem advances. Make the leaves as many rows as you like.
In what you’ve decided is your final row of leaf pattern, pass the right hand tail of the supplementary weft under the pattern warps as usual and then pass it for a short distance to the left within the shed before pulling it out to hang from the back of the cloth where it can be cut later. The left tail does the same…passing under the two pattern warps and then continuing to the right within the shed. In the photo above right, you can just make out the slight bulge of the supplementary weft traveling within the shed to the right of the right-hand leaf.
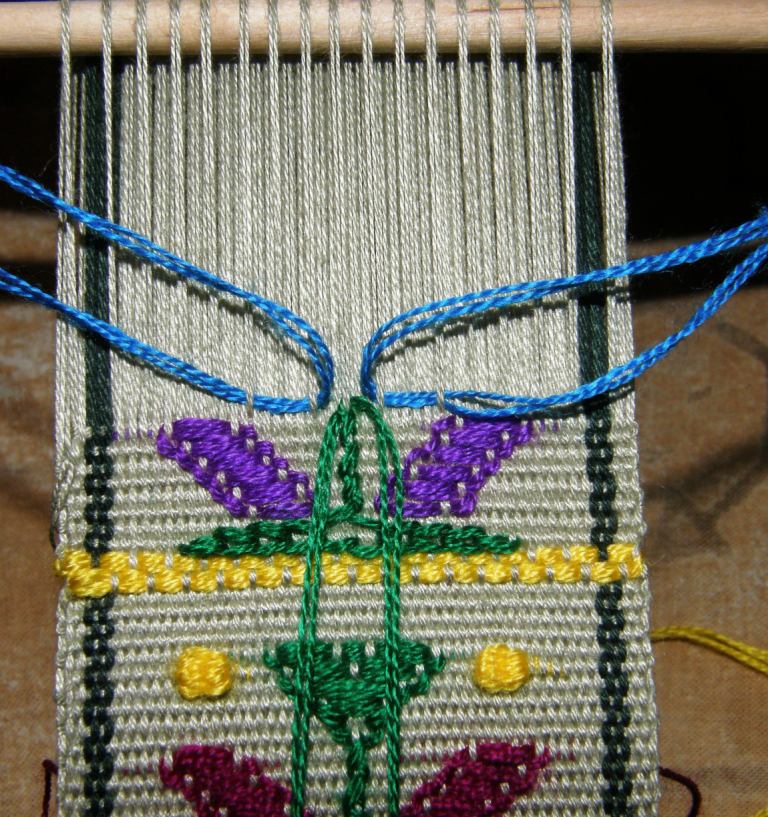
Starting the second leaf.

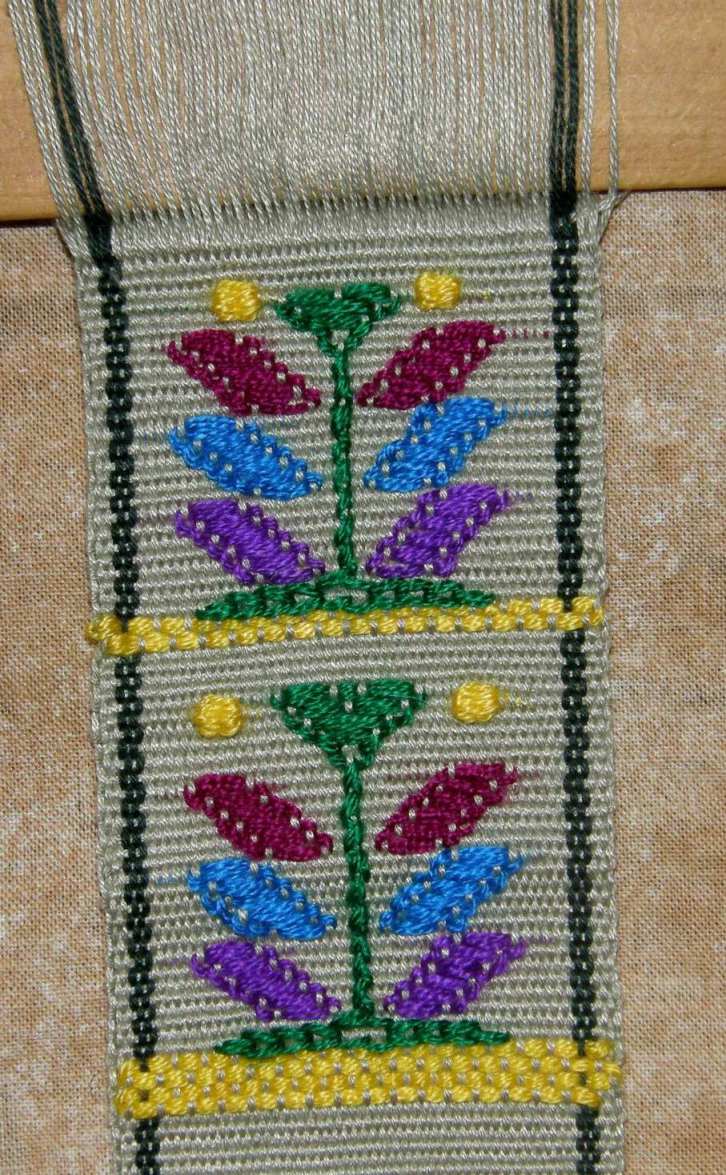
The little Guatemalan tree has three pairs of leaves and the stem continues growing until it eventually widens out into the tree top. You can see the green V-shaped top of the first tree in the photo.

Once you have woven your six leaves, I am sure that it will be very easy for you to see how the tree top is formed.

You’ve been weaving your stem with two strands of weft – to form the top, one strand will start traveling diagonally to the right and one to the left forming a solid V shape. The V shape gets filled in the same way that you “filled” the leaves.

Sometimes you might wish to just weave a little branch rather than a leaf. In that case you would just wrap the weft thread around single pattern warp threads moving out diagonally as you progress from row to row as in the drawing below right.

Finally, there are the little spots that the Guatemalan weavers like to use to fill in blank spaces between motifs. I used them in my bookmarks as flower buds. You can see two yellow spots in the photos above and below.

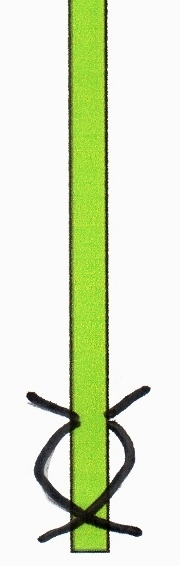
To make a spot, you use two adjacent patterning warps as shown in the drawing above left. Use a strand of weft half the thickness that you were using for the tree. Around  12cm/5″ length should be plenty. First place the weft behind the right-hand warp in the pair that you’ve selected making sure that the two tails are of equal length. Then join the two ends together and go wrapping them back and forth in in a figure-eight in the same shed about six times as shown in the drawing. When you’re done, pass the ends a short distance through the main shed and out the back of the weaving.

It is very easy to improvise with this technique. Have fun with it!

Backstrap Weaving – An Unexpected Match

Finished with the second figure and glad that I hadn’t cluttered the center space.
This photo gives a better view of the white-on-white pattern which is sometimes very hard to capture well. Note how the variegated thread mysteriously changes tone right at the middle of the warp.
When laid out flat like this, it’s a bit disappointing how “flat” it looks considering that it is, after all, made from silk.
Here’s another look at the white-on-white patterning on the sides that I love so much.
Here it is with one of the two flower/foliage bands placed alongside.
The two flower/foliage bands together. I was particularly pleased with these two bands as they had been a study in how to switch background colors smoothly back and forth along the length of a band without using a harsh and sudden horizontal transition.

I’ll leave you with images of two little slices of culture here in Santa Cruz…

Backstrap Weaving – Expanding Skills

One panel of three that I wove for this project using wool singles in a three-color version of the structure I call Andean Pebble Weave..
This stitch can be found in some embroidery books as Van Dyke Stitch.
I used cotton lining fabric…you may recognize this fabric from some of my other recent projects. I don’t have a fabric stash and it was just pure luck that this print with its little red and green flowers and leaves suited this project so nicely.
A button and braided loop have completed the project.
The leaves on this piece varied according to how closely the warp threads were spaced in different areas. It’s just one of the challenges of doing warp-faced weaving on a backstrap loom.
Outside of my sampling notes, the way the threads lie along the cross sticks is the best indication of how wide this warp wants to be. But even so, the figures in my notebook will more often than not tell me that I need to spread the threads even more before I can start weaving. I have to trust those figures even though my eyes are telling me otherwise.
Maintaining width from start to finish.

Backstrap Weaving – Breathing in, Breathing out.

Some place last week, I have completely forgotten where, I heard (or read) someone say that reading is like breathing in and writing is breathing out. That really appealed to me.

Because I have been house-sitting for the last couple of weeks and don’t have all my stuff around me, on top of the fact that the whole city was on strike for 36 days (the strike ended last Saturday), I had been feeling a little as if I were standing still and unable to be as productive as I would normally like to be. However, since hearing that thought on breathing, I’ve been thinking of these weeks as a period of breathing in…time to sit back in my enforced stillness and cruise the internet, soak up inspiration, make sketches and notes in my weaving book while figuring out if the projects I have in mind are actually technically doable, and deciding if my stash will stretch far enough to make them possible…. readying myself to eventually breathe out and create.

Just a handful of the sample bands in the bucket.

But of course I haven’t been completely idle. One thing I did during the strike was go back to my home on one of the permitted shopping mornings and bring back the bucket-load of woven samples that I have accumulated over the years. Most of the pieces are bands of motifs that I wove to photograph for my pattern books and double weave book. Some were width samples as I tested a new-to me yarn for a larger project while others were just fun experiments…those funny little “what-if” things that I get a sudden urge to explore now and then. Some have stories attached to them. I have felt an urgent need to downsize lately and I’ve been procrastinating about attacking the pile of woven samples. Taking those pieces out of my home to this unfamiliar place has somehow made the task of sorting and tossing things away easier.

I managed to whittle the bucket-load down to a more acceptable amount of bands. This is one of the samples that I decided to keep. Maybe it’s the horrendously hot and dry weather we have been having lately that has made me feel a particular attachment to this watery scene with its cooling blues.

Rivers and Ocean-themed band woven for my Complementary-warp Pattern Book.

I expect that I will make something out of this band one of these days. It might end up being the strap for a bag. It wouldn’t be the first time that a strap has inspired a bag project.

The bag project that grew from a simple strap. Every part is handwoven…even the lining.

During the strike I hadn’t been able to get the distilled water that I need to continue with my cochineal dyeing experiments on silk. I finish house-sitting on Thursday and I will get that organized on my return home. In the meantime, someone on Facebook suggested using bottled water…not as a substitute for distilled, but just to see if it made any difference. I thought, why not?

Cochineal dye experiments on scoured 30/2 silk using hard tap water for some and bottled water for others.

The dusty pink upper right is the result of alum mordant on silk in bottled water with added cream of tartar. I really like it!

This is what the tap water and cream of tartar dye bath had looked like….so promising, right? However, a tap-water rinse sent it right back to purple again. Oh well. It was worth a try.

While on the topic of dye experiments, I can tell you that I just happened to come across the Long Thread Media podcasts again a couple of days ago. I have listened to these chats with fiber artists in the past but because I haven’t subscribed, I keep having to remind myself to go and check out the new episodes. I listened to the fairly recent one with natural dye expert Catherine Ellis the other day and was so happy to hear her speak about the time she had been teaching someplace in the north east and was unable to coax any red out of cochineal bugs. This was due to the hard water that they were using. She also mentioned that using distilled water had provided the solution to this problem. Hooray. It’s so nice to have this confirmed by such an authority. It squashes the thoughts I have every now and then that I am simply doing something very wrong and that it isn’t the fault of the water that I can’t produce red. And so, while I don’t have any nice dyed red silk to show you this time, hopefully in my next post there’ll be some lovely red tones to add to my collection of samples.

The other thing that I have been working on here is the case for my friend’s quena (flute). I showed you in my last post how I was weaving two bands at once in the structure that I call Andean Pebble Weave on my backstrap loom so that I could have two pieces each with a third selvedge.

The idea was to use the third selvedges at the mouth of the case and at the edge of the closure flap as you can see below….

That gave me two raw edges to take care of at the other end of the case. I joined the fringed endings of the two bands together with weft twining which sealed the raw edges. You can see that in the photo below. I’ll leave it up to my friend to decide how short he would like to cut the fringe. He does tend to like things on the wild and woolly side. All that’s left to do is add a large snap closure or a magnet closure, or even velcro tabs if that’s what he prefers. I have a tutorial on this kind of handy weft twining here on my blog.

I am so happy with the way the pattern on the flap lines up with that on the body of the case. The pattern is a modified version of one that I include in my More Andean Pebble Weave Patterns book.

I then got the idea of replacing the decorative bands on the flute itself with woven ones. The bands that are currently in place are made from colored nylon fishing line. There were three bands and I have managed to remove one of them so far. I think that woven bands in red and black would look much nicer.

So, if it’s fun to weave two bands at once on my backstrap loom….how much more fun would it be to weave three? That way I get three pieces each with its third selvedge to place around the flute. The selvedge will slightly overlap and cover the raw edge at the other end of each band. I am weaving these in much finer cotton than the thread I used for the case. This is the good ol’ Clea thread that I used to use for almost everything long before I started traveling a lot to the States to make my yarn purchases. It’s made in Brazil and I have a bin of its odds and ends from all those years ago. It’s a 2-ply crochet cotton which isn’t as highly mercerized as the crochet cottons I have come across in the States. When I eventually move back to Australia, I am sure that I will long for it. I prefer the flatness of 2-ply thread over the round-ness of 3-ply and the less polished feel of the Clea thread.

Three bands to encircle and decorate the quena in the structure that I call Andean Pebble Weave. This is just one of the hundred patterns in my Complementary-warp Pattern Book.

And when the evening comes and its time for cat-sitting cuddle duty, I brush this little old lady and spin her fur for fun.

I have two takli spindles here with me. One is occupied with the natural brown cotton labeled as “cinnamon”. By the way, I did some boil tests with the cinnamon thread to see if the darkening of the brown color intensified the longer it was boiled. I started with the two extremes, boiling one lot for 40 minutes and the other lot for only 5. The difference is disappointingly barely noticeable and so that’s the end of that experiment! It was actually the label on the brown color called “coyote” that stated that a range of tones could be obtained by boiling the thread for different lengths of time. I haven’t started spinning the coyote yet and so I will perhaps try this experiment again when I have spun a decent amount of thread.

I’ll be back home by the time I write my next post. I’ll be breathing out some kind of mixture of everything I have been breathing in these last couple of weeks. See you then.

Backstrap Weaving – Ikat in my In box

Surprising and amazing things come to me via Messenger or email and I so appreciate people’s willingness to share their stories with me.

Recently when I was posting some of my ikat work on Facebook, Christina Palafox contacted me to share photos of her experience learning about the ikat work of Camelia Ramos Zamora and José Mancio Gutiérrez in their studio, Taller Xoxopastli in Malinalco, Mexico. After meeting José and Camelia at an event in Texas, Christina went to Mexico in 2019 to study with these Masters in the art of creating fringed cotton shawls, or rebozos, on both floor and backstrap looms. The shawls that they weave are patterned in the ikat, or jaspe, technique in which parts of the unwoven warp threads are bound before the warp is dyed. The bound areas resist the dye and form a pattern on the unwoven warp which can then be placed on the loom and woven into cloth.

José is seated at the loom at a fair in Texas while Camelia explains the process to visitors to their booth. The unwoven warp ends at the start of the warp will be later tied into intricate knotted patterns by specialists in the technique.

I learned a little about the ikat technique on my first visit to Ecuador in 2005, a tiny bit more on a visit to Guatemala in 2008, and have been playing with it with varying degrees of success ever since. I have added to my knowledge base through trial and error but also via the internet and am grateful to those who take the time and make the effort to so beautifully document and share techniques.

Now I have yet more to add to my knowledge base and even more reason to admire the artists that create these magnificently detailed pieces.

Christina was taken through the steps for creating a jaspe warp for a single rebozo on the backstrap loom while at the same time being able to witness the process for setting up the ninety-meter japse warps that are woven by the workshop artisans on floor looms. Commercially available synthetic dyes are used on those long production pieces. The backstrap loom pieces are dyed with natural substances.

José explaining the use of indigo and cochineal to dye the backstrap-loom-woven rebozos.

Here’s a description in Christina’s own words of the start of her adventure in Malinalco…

My course began on the day after my arrival. After great local coffee and pan dulce (Mexican pastries) we entered their sanctuary of fiber and tools. I was thrilled to hear the clacking sounds of the standing pedal looms (4) the sound was like a symphony to me. The weavers were in ages 18 to 80 and most were kin or friends to José and Camelia.  Jesus was the youngest, Guillermo, Oscar, and Antonio were fast at work creating textiles. The rhythm was delicious. I felt like I was in heaven surrounded by textiles, threads of various colors, old looms, handmade warping mills and hand-cranked bicycle wheels that served as bobbin winders and other miscellaneous weaver’s tools. The ambience was enhanced by four great and well-behaved street dogs that had unique and pleasant personalities and who provided a nice diversion from my zealous attempt to learn the multiple processes I had never attempted. An added visual delight was that the studio was beautiful and set in the foothills of Malinalco. Wrought-iron glass doors and windows swung open to the beautiful mountains and yard of his house. There were hummingbirds (colibri) darting around the bougainvillea. Before work and after coffee, the weavers ceremoniously but quietly light a candle to the Virgen de Guadalupe, patron saint of Mexico, ensuring the day’s work goes well and thanking her for watching over their work.

Because I have had a little experience of my own creating ikat pieces on a backstrap loom, what initially stood out for me when Christina first started telling me about her experience in Mexico, were the differences in the methods and tools that were being used. I have been using a Japanese plastic tape to wrap the threads after a few false starts in which I tried to use agave fiber and then cassette tape. It was interesting to see the use of cotton string as the resist material in José and Camelia’s work. The other interesting thing was their use of liquid corn starch sizing before they tied the patterns. The starch helps to keep the fine threads stiff in their bundles and, therefore, easier to wrap. The warp is stretched out to dry and I love the idea of placing bottle caps between the bundles to stop them from sticking together as the starch dries.

The 90-meter warp, enough for 30 rebozos, is stretched outdoors.

Here are a couple of screen shots from a video that Christina sent me which shows José wrapping bundles with the cotton thread. He uses a blade that is strapped to his hand and with a flick of the wrist is able to cut the string when he finishes with each bundle. It’s ingenious but I know I would create havoc if I were to try using something like that!

Wrapping the warp with cotton string.
The blade strapped to José’s right hand.

I use charcoal pencil to mark the pattern on my warp after having read about the use of charcoal by ikat weavers in Uzbekistan. I once used a black marker pen but the yellow component of the black ink bled into my pattern. Jose and Camelia mark with ink which doesn’t bleed and which gets covered by the dark dye colors. Some patterns are marked free-hand while for others, wooden blocks are used….very handy for the tiny repeated patterns. The measuring and marking is quite a job and the blocks must make the process so much easier. I have seen other ways of marking patterns in India in which an entire grid of perfectly spaced lines is drawn onto the warp so that the “wrapper” does not need to stop and do any measuring of wrap length or spacing along the way.

Wooden pattern blocks used to mark the warp before wrapping.

The long floor-loom warps weigh around 20kg when wet. It’s quite a job wringing them out when they emerge from the large galvanized buckets of dye.

Christina’s backstrap-loom warp took three days to dye in blue and green. Plain green warp threads would be placed alongside strips of blue jaspe thread.

Christina undoing the string wrappings. It’s a tedious job but so exciting to see the pattern emerging. José calls this “work for crazy folk”.
It’s so gorgeous seeing the threads together like this. The threads will be combined as the warp is placed on the beams of the backstrap loom.
The combined warp.

Of course, string heddles need to be made before weaving can commence. But there is also another task. Any remaining corn starch is removed from the threads with the aid of the brushes (the best ones are made from agave fiber) that you can see here in this display of tools.

Heddled and ready to go….so beautiful!

Christina tells me that although there are 90-meter synthetically-dyed warps on the floor looms, José and Camelia spend time every day weaving single one-of-a-kind naturally-dyed pieces on backstrap looms. These are their finest pieces which are often entered in shows and awarded as well as worn on catwalks at shows that honor Mexican craftsmanship.

I have a backstrap weaving friend in Mexico who has just finished his first japse patterned rebozo on a floor loom. In his Facebook post he states that a rebozo without a knotted fringe is simply not a rebozo. And so, it would be remiss of me not to mention the beautiful knotwork, rapacejos, that goes into the fringe once the cloth is off the loom. Two sisters in their seventies who live in a remote village and who have been knotting fringes since childhood, do this finishing work for José and Camelia.

In Christina’s words….

Camelia and family with their textile business support 70 indigenous families in the communities around her, others who like these sisters do the finish work on the rebozos. Camelia knows how to do the knotwork as well, but since she is so busy being the jefa (chief) negotiator, designer, shopkeeper, she prefers to farm out the finishing to the nearby villages. Camelia’s work ensures sustainability for these little communities.

Here is an example of knotwork on a shawl that Christina commissioned to honor her grandmother…

You can see more of Camelia’s work on her website, on Instagram and on Facebook . José and Camelia are happy to welcome students to their home. Maybe one day I will be able to travel there and meet them. You can contact them via these links to ask about that. Many thanks to Christina for sharing all this with us.

I will leave you with my little ikat efforts for the first time on my own hand-spun cotton. I am not willing to attempt anything grander for the time being until I have woven this and seen how my hand-spun cotton behaves. If it works out reasonably well, I’ll sew the cloth into a zippered coin and card purse something like these that I made many years ago.

I have folded my warp of hand-spun cotton so that it is half its width so that I can tie the pattern onto two layers of warp at once. When I later unfold the warp, I will have the mirror image of what you see here on the other half. I am going to use the same blues that I used for my recent cross-body bag. Again, I am not willing to try anything new until I know that my hand-spun cotton is up to this. I had been thinking about using cochineal but decided not to risk it.

The completed pattern. The warp gets soaked and then goes into the pot for the first dye of light blue.
After the light blue dye bath, I wrapped all the areas that are to remain light blue before dyeing the warp dark blue. The ball of white is there to remind me that I also need to dye some thread for weft….how many times have I forgotten to do that! The cotton dye that I buy here leaves a slightly greasy residue in the pot. It will get a good scrubbing before its next use.
After the second darker blue dye bath. I might need to go darker.

One thing about dyeing at night….it’s hard to tell what color you are getting under artificial light. This isn’t as dark and inky as I would have liked it to be. I will unwrap one of the light blue sections and see if I like the way the two blues look together. If not, this will go back in the dye bath with a bit more black added to the blue…and I will dye in daylight! I just don’t have the instruments to accurately weigh and measure these very small quantities and so it is hard to follow the notes I have made for other larger dye projects.

Because I am using cotton singles, I expect the woven cloth to curl. You can already see the curl in the threads in the above photo. I hope to use a tubular edging on the little purse which will flatten the cloth. Andean weavers often add tubular edgings to their pieces. Perhaps the primary purpose is to strengthen and protect the edges of the cloth but the tubular bands also have the effect of calming the curl in the cloth that has been woven with their high-twist plied wool yarn.

This is the discontinuous-warp piece that I wove in high-energy hand-spun alpaca yarn from Pitumarca, Peru. Once off the loom the piece would not lie flat…..

Two corners curled over and the other two curled under.

Here is the same piece after I applied the tubular band. The tubular band has its own curling energy which possibly works against the curl of the cloth. The piece then lay nicely flat.

To finish, I am would like to show you some bands that have been woven by friends on Ravelry. Brettchenweberin contributes to the Backstrap Weaving Group while the other ladies have been contributing to a band weaving WAL that has been running these last few months in one of the other weaving groups. The band-weaving WAL brings us all kinds of band-weavers who use string heddles, rigid heddles or tablets to create their pieces using backstrap, inkle or shaft looms. I have been thrilled to see people using and enjoying both my instructional and pattern books and will use this opportunity, if I may, to also remind my readers of my publications. Things have been a little slow lately business-wise and I am guessing it’s because this is the first summer in the north since the start of the pandemic that people feel comfortable enough to get out and about. I have vague plans to travel next February and hope that things only further improve for all of us between now and then.

Brettchenweberin has used figures from my two pattern books – Complementary-warp Pattern Book and More Andean Pebble Weave Patterns. If you have used either my Complementary-warp Pick-up book or any of my books on Andean Pebble Weave to learn the technique, you will be able to weave all the patterns in the pattern books. I love the color combination and think that there might be plans to sew these strips together to make a wider piece.

This one from Beverly has one of my favorite patterns because of the memory it brings me of a cool sunny winter’s afternoon sitting on the grass in the Bolivian highlands with my teacher Maxima. She had taught me the technique so that I could continue on my own without her supervision. That allowed her to continue with her own weaving and sewing projects and we sat side by side concentrating on our work and enjoying the peaceful afternoon together. This pattern is charted in my Andean Pebble Weave on Inkle Looms book as well as in my Complementary-warp Pick-up book.

I love everything about this picture from Dunja Roberts. Can you imagine sitting on the grass in the shade of that tree weaving this? I love living in the tropics but I am afraid that this kind of activity is not so pleasant here. It is either too hot and humid or there are too many bugs! This pattern is charted in the Complementary-warp Pick-up book.

Rebekkah has been weaving lots of motifs from my pattern books. The knotwork pattern on the left is one of several in the More Andean Pebble Weave Patterns book. She added a wavy border to it which looks great. Then she took the little viscacha figure from my Complementary-warp Pattern Book and created her own layout for the little guys.

This is adorable! Nancy has been weaving patterns from my books for some time now and has just sent me her latest original creation…her own Andean Pebble Weave pattern of a cardinal. I love it when people feel inspired to start creating their own patterns.

And here’s some more “adorableness”. This comes from Brettchenweberin. She used my tutorial on the Bedouin al’ouerjan pattern (free for all to use right here on this blog) to weave a band and use it so beautifully on a bag that she sewed.

And with that, I shall leave you all until next time. I am hoping that I like the way the two blues look on my ikat project because I would really like to get back at my loom and put the dye pot away!