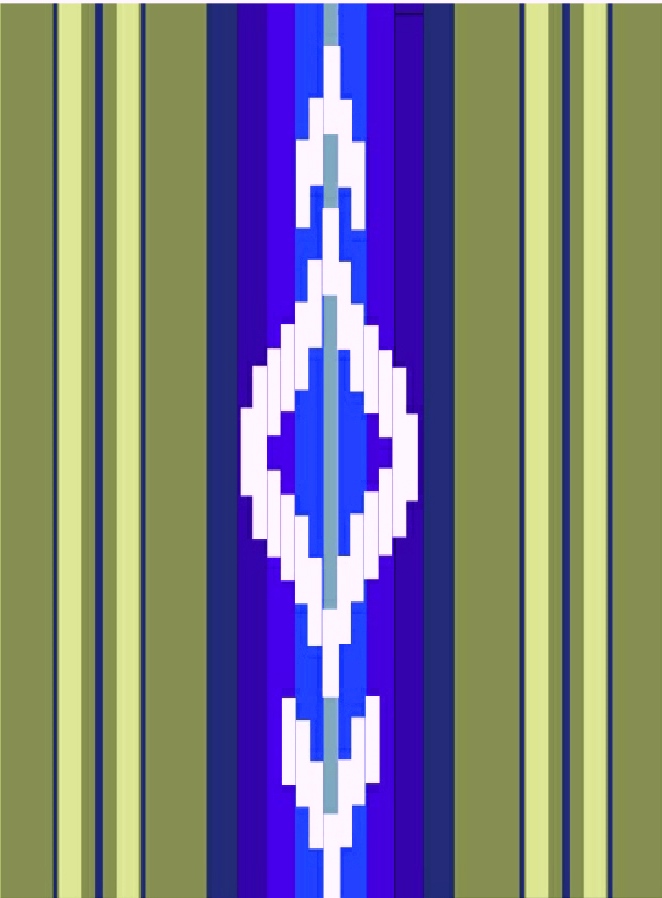
Ikat and the eternal question….Will the result be a mess or a success? At most stages throughout the long process, I have absolutely no idea. Spoiler Alert….It all worked out in the end.
Things didn’t go exactly to plan with my latest project but with my usual “make it work” persistence, I ended up with something with which I am pretty pleased.
You may remember from my last post that I had discovered a blip in my ikat warp where I had neglected to wrap one of the sections with tape to preserve the first red dye color.
You might be able to spot the rogue section of black in the uppermostlarge diamond.
I took that as an opportunity to do a bit of spot-dyeing (but only because I knew that my piece of fabric would most likely never be washed. I have yet to learn how some ikat artisans make their spot-dyeing water resistant.)
You can see the sections of diamond that I spot-dyed black in the uppermost diamond and some spot-dyeing in progress at the very top of the image.I’ve put a sheet of plastic beneath that section to protect the rest of the warp.
That seemed to go pretty well. All that was left to do now was to remove the rest of the tape. I made a little video of my doing so for those who might be curious. Note that many ikat artists don’t tie knots in their tape. I do. It takes a while but it’s always exciting seeing the pattern slowly emerging.
And here’s the warp with all its tape removed. This is one of my favorite parts…
We’re still only seeing half the width of the warp at this point. I finished this part late at night and waited until the next day to unfold the warp to its full width.
Unfolding the warp is also one of my favorite parts but it does have me holding my breath just in case I had messed up and mismatched the bundles from the two halves when I first folded it. I hadn’t. Phew!
This might be my favorite part of all…the impression of order before I have to start handling the threads that are now loose and running free outside of their nice controlled wrapped bundles.
Next in the process is recovering the cross….carefully. Please don’t let the threads that I used to save the cross break!
Once recovered, I can use the cross to guide me to making my heddles on one of the two layers of warp.
Heddled and ready to go.
If you think you’ve seen me weave this pattern before, you’re not wrong.
Here’s a comparison photo with the blue purse ikat warp I created some time ago. Both are in my handspun cotton singles thread. The main difference is that I used more threads in each wrapped bundle in my latest so that the piece would be wide enough for my wallet project. The half diamonds on the edges are also colored differently.
This is the stage, before I throw the first shot of weft, at which I most ponder the “mess or success?” question that always comes to mind when I do ikat. The question looms even larger in my mind when I am using my own handspun cotton. The uniform nature of industrially-spun thread makes the result a little less uncertain. But, to be honest, in my limited experience, I just never can really tell what’s going to happen when I work with ikat.
Were the threads going to shift out of alignment more than I like them to? Spoiler Alert…..they were.
And I can’t account for that at all! I did every step in exactly the same way as I had for the blue project (except for the spot dyeing). Because there was what I consider quite a lot of shift going on I stopped weaving once I had the length of fabric that I needed for the wallet. It was getting to the point where the amount of shift just wasn’t attractive to my eye anymore. I cut the piece off the loom which means that I won’t have any any fun left-over bits to play with in a sewing project six months down the track.
My stitched shibori cloth is ready for the dye pot.
I wanted to make the inside pockets of the wallet from stitched shibori cloth and so I stitched some diamond shapes on some scoured cotton cloth and pulled up the threads so that the folds in the puckered cloth would resist the dye. I needed to first dye the cloth red and then overdye with black in order to hopefully produce the same brownish-black of the ikat cloth. I also dyed some plain cotton to line the ikat piece and make the bill pocket.
It has never occurred to me to do a multi-color stitched shibori but once I’d dyed the cloth red, I realized that there were some small open spaces that I could stitch to reserve the red color.
I didn’t put much thought into the design of the red figures. Someone said they look like puckered lips and now I can’t unsee that! Would I be able to match the brownish-black of the ikat warp? Spoiler Alert…I wouldn’t. Well, not on the first attempt anyway.
I don’t have the equipment to weigh and measure such small quantities of cloth and dye stuff. It’s all guess-work which makes it very hard to reproduce a color. However, after giving the cloth a second round of black dye, it came out just right.
The outside of the wallet with its tubular edging in place. The little tab of fabric on the left edge covers the cut end of the tubular band.
You may remember that I placed a coin purse on the outside of the other wallets that I recently made. I wasn’t keen on doing that this time because it would cover the ikat work. So, I sewed a small expandable coin pocket to the inside instead.
All that remains is to decide if I want to use a slim tab to hold the wallet closed. One might be necessary if the coin pocket gets very full.
That probably marks the end of the wallet phase! It’s time to fish around in my stash and see what’s next.
What did I learn from this project? It gave me some more experience with some spot-dyeing and it made me realize that I can layer colors in stitched shibori just as I do for ikat. And, as always, It added to my admiration and appreciation of the fabulous and meticulous ikat work done by the Masters in Indonesia, particularly those who use their own handspun cotton.
I’ll leave you with some news about Sue Richardson’s new blog. You might remember that I mentioned her work as writer for the Oxford Asian Textile Group (OATG) blog in my last post. I’ve also mentioned at various times her work with husband David documenting the techniques, history and cultural significance of textiles that they have encountered and researched in the field in Indonesia and other regions throughout Asia in their travels. The exciting news is that they have just started a new blog of their own….Asian Textiles Studies Blog. You might like to take a look and perhaps subscribe.
There’s no chance of my giving away any spoilers about my next project because I haven’t yet been swept away by a new idea. I’ll have to peer into my stash drawer and see what leaps out me.
I was actually originally going to simply call this blog post “Oops!” and leave it at that. I made a mistake in my latest ikat. Oops! Of course to me, the maker, it’s a glaring one. However, I’ve since come up with an idea which just might turn the blip into “beauty”…if not beauty, at least something acceptable. The lesson learned is to be extra careful when my first dye color very closely resembles the color of the ikat tape.
Anyway, more about that a little later.
Since I last wrote I have had and recovered from Covid…almost exactly two years since the last time I had it. For me it’s not a question of whether I have a just a regular flu or Covid….the symptoms are different enough for me to be quite sure it’s Covid. Nevertheless, I did get tested just in case it turned out be something else altogether that needed antibiotics.. We still have to do PCR tests here as the home RAT test kits are not available. I have no idea from whom I might have picked it up and I’m pretty sure that I gave it to a friend before my symptoms showed the day after our lunch together and I think that two days earlier my dentist might have been exposed to it from me as well. This is just awful and unavoidable unless we all go back to routinely wearing masks again.
I really felt the need to sleep a lot and rest this time. The problem is that I really don’t do well with not being productive. Fortunately, I had a little unfinished object which allowed me to sit and do some quiet work.
You may remember that I had gathered all these left-over scraps from old projects in order to test my idea for my wallet project. This was meant to be the prototype but I abandoned it because I had become convinced that my plan would workand that a sample wasn’t necessary.
At the point of abandonment I had sewn my stitched shibori cloth as lining for some left-over pebble weave fabric which formed the main body of the wallet and created the storage pocket for bills. I’d also just started to construct card slots with the shibori fabric. There’s some left-over blue ikat fabric woven with my own handspun cotton singles as well as plain black cloth that was at the end of another ikat warp, again in my handspun cotton. It’s hard to throw handspun scraps away!
So, I picked it all up again to finish. The part I enjoy the most is adding the tubular edging. This enables me to cut the closure flap of the wallet into a curved shape knowing that the tubular band will enclose and protect it.
I used multiple tones of blue for the tubular edging band rather than making it just one solid color. I love the way it came out.
The tubular band gave me the chance to use even more leftovers. I had dyed cotton thread various tones of blue to use in a complementary-weft project and there were just odd short lengths left over. They were perfect for this project.
The project that had combined both complementary-warp and weft structures had required only small quantities of each dyed weftcolor.
If you think that two wallets is one too many…..well, how about three? Yep, my latest ikat cloth is also destined to be a wallet.
The ”scraps” wallet also as a coin purse with expandable sides on the back. I used the black handspun cotton cloth for the sides. I took a deep breath and threw all remaining scraps away but only when I was completely convinced that they weren’t going to be useful in any way for any thing.
I was really delighted recently to see this picture of scissor bags made by Shahsavan nomads of northern Iran (courtesy of one of Sue Richardson’s wonderful posts on textile events on the Oxford Asian Textile Group blog).
The image is from a recently published book, Scissor Bags and Sheep Scissors in the Nomadic Tradition, by Peter Umney-Gray.
I have to wonder if the fabric for these bags was specifically woven for this purpose or if the nomads are using off-cuts or leftovers from larger projects in much the same way I have. I love that so much care has been taken to house these important implements in such a beautiful way.
I’m currently working on a three-color ikat piece (two dye colors plus original warp color) with my handspun cotton singles for wallet number three. The design is one that I have used before. I just added more threads to each ikat bundle this time in order to make it a bit wider.
The warp is double the width you see here. It’s been folded in half so that I can tie the repeating pattern on both halves at the same time.
While looking around online, I’ve seen various ways that ikat artists measure out and mark the pattern on the warp which is then tied with tape. Here’s a photo that my friend Pam shared with me of a gentleman in Uzbekistan just eyeballing it while marking the pattern lines with a charcoal stick.
I’ve seen weavers in the islands of Indonesia mark out an entire grid of lines on the warp which helps the artist tie sections of equal length and consistent spacing. And I’ve seen an artist working with the warp suspended over a grid of lines as a guide rather than having the grid marked on the warp itself. I haven’t come up with a good way yet. I just measure and mark with charcoal pencil as I go. If I get out of alignment by a millimeter or so here and there, it all adds up and then things end up noticeably misaligned. I tend to find it much easier in my larger pieces, like this one…..
Larger patterns with wider ikat bundles seem to be easier for me to measure and mark. This one is 60/2 silk.
Or with smaller scattered patterns….
Using 20/2 cotton with a scattering of small individual motifs.
Here’s the warp after the first dye color….so far so good.
The pink tape is reserving all the parts of the warp that I want to have remain the original white. Before I dye the second color, I need to add more tape to reserve the areas that I want to remain red. The final dye color, black, will cover all the remaining unprotected red areas.
And there’s the blip…can you see it? At this point the warp is stretched out on my backstrap loom and I’ve removed the second application of tape which reveals all the red areas. However, one bit that was supposed remain red is now black. I’d neglected to wrap it….after having checked three times!
I could just leave it as a reminder to be careful in future or I could find a way to “make it work”. Hopefully my plan will work. I decided to do what is called “spot dyeing”. Black dye is added (outside the dye pot) to other red areas in order to balance the mistake and add symmetry…..in other words, make it look like it was meant to be!
I’ve seen videos online of ikat artists in India routinely dong this spot dyeing, not to mask a mistake as I am doing but rather to add additional colors to their ikat warp. They carefully dip a small section of warp that is flanked by resist ties into a dish of dye and vigorously work the dye into the fibers with their fingers. I don’t know how wash resistant this kind of spot dyeing can be but it seems to be a normal part of the process for adding small sections of fourth and perhaps fifth colors to an ikat piece in certain parts of India.
I’ve also seen additional colors being painted onto ikat warps in some parts of Indonesia. My wallet won’t be getting washed at any stage and so I think that my spot dyeing will be safe. I am however very curious about the dye solution that is used by the artists in India and Indonesia for this kind of spot work because I’m quite sure that the fabric they are creating will be laundered many times. If I were making an item to be worn and washed, I’d just throw the warp back into a black dye bath and overdye all the red areas black. That would cover the mistake and give me a simple black-and-white pattern that I know would be safe to wash.
I had some experience with spot dyeing many years ago when I created this ikat fabric for a book cover. It’s a piece that has never been laundered.
I was using Dylon cold water dyes for cotton for the book cover project. Terracotta was the first color which was then overdyed with blue to give the darker chocolate-like color. These were three separate warps which I later combined on the loom. The easiest way for me to overdye the terracotta cross in the center block with blue was to spot dye. However, this was back in the days when I was using cassette tape as my resist material. For some reason, I made up a dye solution for the spot dyeing with very hot water. The cassette tape didn’t like that water temperature at all and the blue color seeped under the tape into the white. So then I had to rescue it by also spot dyeing a section of white with the blue to even out the bleeding. It added something totally unexpected to the project.
You’ll find out in my next post if my not-all-that-cunning spot dyeing plan worked. I’m still at it. If I remember, I’ll also wrap and spot dye a small sample so that I can see how it goes in the wash.
I’m going to leave you with something that I think is really spectacular. As some of you know, every now and then I do some reversible three-color Andean Pebble Weave and I get a lot of requests for instructions. I will be publishing on it but I can’t say exactly when. Life is a little topsy-turvy at the moment. The instructions that I have published on Andean Pebble Weave so far have been on the much more common two-color version which in itself is an awesome technique. For those who are hankering after the additional color and complexity of the three-color technique, I hope you find it interesting and inspiring to see what can be done with the basic two-color structure and a little imagination….
Julie Beers sent me this photo of her work with one of the double dragon patterns that I have published.
The richly-colored Lunatic Fringe cotton that she’s using really makes this piece glow and I also think that it makes it look deceivingly complex. It’s still just the two-color structure that we all know and love. Thank you, Julie, for allowing me to share this here. It’s so inspiring.
I gathered together a handful of these historic double dragon patterns that I’d seen on tablet-woven bands and transposed them into the Andean Pebble Weave structure. They’re published in my More Andean Pebble Weave Patterns book. I’d originally been asked to transpose one of the dragon patterns by a weaving acquaintance on Ravelry so that it could be woven with string heddles rather than with tablets. I shared the chart and this is what Penelope Hemingway did with it, adding it to a hat that she’d made with nalbinding.
I don’t have the stash to be able to get into the kind of colorful work that Julie is doing right now. Or do I? I just remembered this…..
My 30/2 silk cochineal stash. I’ve yet to come up with a project for it.
This might be next on the drawing board. I have more white 30/2 silk left as well as a new supply of cochineal. Maybe I’ll be able to add some more colors to this collection.
The slooooow move back to Australia is presenting some problems. One of them could have been easily solved by simply making a list of things that I have taken over there so far. That would save me from having the annoying ”Where is it?” question occupying so much of my time.
For example, I can’t find the silk that I dyed with cochineal last year. I have a certain photography spot beneath the bedroom window and I remember removing from it the little zippered bag that holds all those silk cochineal-dyed balls of thread so that I could place an item to be photographed. Now where the heck did I put that zippered bag? If I can’t find it here, surely that means that I must have taken it to Australia. But that doesn’t make sense. I wanted all of my yarn stash to be here so that I have things to work on between trips to Australia.
Anyway, something good comes from combing through plastic bags and cupboards….you find other stuff. You get to say….”Ooooh, I’d forgotten all about you” and feel all warm and fuzzy with the memories that the unexpected item triggers.
The first example of this was the band woven from my own handspun llama fiber that I uncovered in the closet. That brought back memories of a trip to Bolivia’s amazing Uyuni salt lake way back in 2002. It was on that trip that I met a farmer who sold me bags of llama fiber. I was grateful to be able to take the fiber back with me to spin in the fiber-less tropical lowlands in which I live.
I wove a long band from the mill-spun wool singles yarn that you see in the photo, cut it in two and used it to flank the llama band. I joined the three pieces with the tiniest of seams and it has become the slip case for my pin loom. What can I say?…. I love to weave and anything that is not nailed down around here will eventually get its own woven pouch.
Here’s a look at just some of the black-and-white bags, pouches and slip cases that house all manner of things around my home. They showcase a variety of techniques. Top left is a two-color ikat with a little supplementary weft patterning at the bottom. Top right is a shoulder bag patterned in the intermesh structure with a little weft substitution at the bottom. Bottom left is a three-color ikat using my own handspun cotton. Bottom right is a laptop slip case patterned in a single-faced two-color warp-float structure.
I like that I can keep learning and practicing stitched shibori techniques and use the learning pieces to line my latest creations.
I never seem to decide on the lining until I have finished sewing the bag which means that I get a lot of practice installing drop-in linings. This third stitched shibori project taught me about the effect of different spacing in the stitches and now lines the llama-band bag.
Find Number Two: This was some cotton fabric that I had picked up from a give-away box at a guild meeting I had attended years ago. I had no plans to sew it into anything. I took it because I like to use fabric as backdrops for some of my photos and no one else seemed to to want it. This find gave me the idea of trying the stitched resist technique on print fabric rather than plain white. I gave the fabric a quick wash in hot water which was obviously not enough to truly scour it and make it ready-to-dye. This was just a sample and I wasn’t willing to go to too much trouble. It was okay for a quick experiment and I think this idea is worth pursuing. Ideally, I would have the surrounding print almost totally covered by the dark dye. I don’t know if that’s even possible but I will do some research and put more effort into the scouring next time.
Flower pattern idea for stitched shibori from the website of Townhill Studio where you’ll find lots of tips and tutorials.
Find Number Three: This was a ball of indigo-dyed reeled silk that a former English teaching colleague had brought back for me from Japan. Dear Sayuri (r.i.p) had totally surprised me with this thoughtful gift. She was about the only one among my many teaching colleagues here who showed any interest in what I do but even so, I had never expected her to bring back such a treasure for me. I remember that I had been initially disappointed because my fingers had been stained blue as I was winding the thread off the skein into a ball. I wasn’t sure how that would affect my weaving with it and that might be why I set it aside all those years ago.
I decided that it was time I did something with this gift. I wound some off into skeins and washed them over and over until all the blue had been released. The difference in color as it appears in the photo is subtle but is actually quite significant. I prefer the post-wash color. This silk and some pictures that I had seen of indigo-dyed clothing worn by Chinese minority groups gave me the idea to weave something using a motif that had a kind of eastern flavor. I set about designing one to be woven with supplementary weft.
I used several strands of two colors of silk on a base of 20/2 cotton for my sampling. I love how a backstrap loom allows me to whip up these small samples without wasting too much thread. It took a couple of attempts to get something I liked. That first one was wrong! I was happy with this and was just getting down to the number-crunching part of the preparation process (I like this part because I get to write in my weaving journal with its handwoven cover) when I got distracted by Find Number Four.
Many years ago, I had bought these two ply-split straps. They were made in Colombia by Wayuu artisans who generally use them as straps for their crocheted mochila bags. In this case, they were being sold online as guitar straps but did not come with any hardware. I had become fascinated with the mochila bags and the band weaving of the Wayuu people after buying Dutch weaver Mirja Wark’s book on the subjects back in 2011. My Dutch friend, Anna, (if you are long-time follower of my blog, you might remember “bicycle Anna”) had arranged to get this book from the Netherlands to me here in Bolivia. The following year, 2012, I actually had the opportunity to travel to the Netherlands and spend a day with Mirja Wark. You can see that my recent unearthing of these these two straps has also unearthed a whole string of lovely memories.
My friend Dorothy owns this Wayuu mochila bag with its ply-split strap.
I am usually pretty good at focusing on one weaving project at a time. I may take time out to spin some cotton, weave a pin-loom square or stitch some shibori cloth but once I have chosen a weaving project, I usually stick with it from start to finish. Not so this time. The “eastern” project has been set aside so that I can plan a bag around the darker of the two ply-split straps. I had the idea of using the strap as the sides and base of a plain black bag and weaving an ikat patterned outer pocket to complement the strap pattern.
Wrapping warp threads with tape to resist the first of the three dye colors.
And away we go. I planned a very simple ikat pattern to mimic the “M” shapes in the ply-split strap. I used 20/2 cotton. I have woven two ikat projects with this weight of cotton in the past. The first was the two-color drawstring bag that appeared in the photo near the start of this post. The second was this one in three colors….
These were the pieces that would help me make my calculations. In my latest project I would use four colors. I wrapped bundles of thread that were twice the size of those that I had used in the first two projects. That fact, together with the small spacing between the wrappings, meant that the dense bundles of threads emerging from the wrappings did not have much room in which to spread and evenly take up the dye all the way up to the very edges of the wraps. I spotted the problem after the first dye bath using the tan color but it was too late to fix. I didn’t want to throw it into a second tan bath because I figured it would darken the color too much. In the subsequent brown and black dye baths I worked on moving the threads (as much as I could with rubber-gloved fingers) so that the dye would penetrate all the way to the edge of the wrappings. Every project carries a lesson. I just have to make sure that I add that to my notes….don’t make the bundles too thick if the wrappings are going to be placed close together.
The completed pocket fabric. The tan areas have little fringes of white due to the problem mentioned above.
Sides and base of bag….done. Outer pocket…mostly done. I am deciding on whether it needs a zip. I am going to scrape together thread to dye black for the body of the bag (remember that I’m trying to work solely from stash and so that will mean over-dyeing some colors black). I know from past experience that I’ll most likely end up with various intensities of black color as a result but that could be interesting. As for the shape of the bag…that’s yet to be decided. I wonder if I can actually figure out the lining this time before I sew the bag.
I still haven’t found the cochineal-dyed silk. But I am sufficiently distracted now. It will no doubt turn up when and where I least expect it to. Looking for it has resulted in some beautiful memory trips, though!
I have mentioned before that I am trying to limit all my projects to using yarn that I already have in my stash. I had no choice but to do so during the pandemic and found that it was an interesting challenge that often took me to unexpected places. It had me spinning all the wool that had been stashed away in my closet as well as learning to spin cotton. It’s been quite easy so far and I am trying to continue in this way. My projects are slow ones which means that my yarn goes a long way in terms of time. I made sure not to bring back any yarn on my last two visits to Australia but I did bring back some dyes and a pin loom.
The pin loom has kept me happily busy using up odds and ends of wool yarn that I have accumulated from the finishing techniques workshops that I sometimes teach. I guess I’ll sew these squares together to make a lap blanket for my eventual return to Australia and my new cold-ish home in the Blue Mountains. But what has made the pin-loom weaving all the more interesting is the chance it has given me to experiment with a little warp-and-weft ikat. That’s been fun.
So far, my ikat projects have all been about warp ikat. The fabrics have been warp faced with the weft threads completely hidden. I wrapped resist material only around the warp threads.
One of my warp ikat projects.
Warp-and-weft ikat, on the other hand, requires a balanced fabric in which both warp and weft threads are exposed. The pin loom gives me that. I was able to apply wrappings to some of the threads that run warp-wise as well as weft-wise. Where they intersect, you get an area of solid color from which extend finger-like sections of just weft ikat and just warp ikat. I’m doing this just for fun…just for something different, as well as for a chance to try out some of the new dye colors I had brought back with me from Australia.
It’s been a fast and low-risk way to play with warp-and-weft ikat. Not much yarn will be wasted if it all goes wrong. My favorite of the three ikat squares above is the one in the middle. The “fingers” that extend from the solid light square are just that little bit more out of alignment and I like the way that looks.
While I sit and weave these little squares, I ponder what my next backstrap loom project will be. When I took out the bag of grey mill-spun wool singles that I had bought from the farmer in California, within I re-discovered the piece that you see below that I had woven way back in something like 2004. It’s woven from my own handspun llama yarn and used to be part of a shoulder bag. The cotton base for the shoulder bag onto which I had sewn this llama-yarn band eventually got worn and shabby. I cut off the llama band and threw away the cotton cloth thinking that I could easily re-use the band. It still looks as good as new! And, besides, it’s handspun and some of the first I had ever done…I couldn’t discard it.
And so I am thinking that my pin loom might be getting its own handwoven pouch. I’ll flank the llama band with the singles wool in plain weave and use some sewn finishing techniques to decorate it. I’ll need to line it so that the loom’s pins don’t get caught in the weave.
Which brings me to talk about lining. I finally got around to making a couple of stitched shibori experiments. Being an absolute beginner at this, I wasn’t expecting much from these initial efforts. For that reason, I thought that the finished cloth would make good lining fabric. It would give me some practice in basic techniques as well as something useful which will be largely hidden away if it turns out to be hideous. It’s been a lot of fun. I really enjoy the part where I can sit quietly and stitch.
Stitching the second attempt.I am just stitching on a single layer for now and haven’t yet started to explore folds. Once the simple running stitches are in place, the threads are pulled tightly so that the fabric puckers. This creates areas of resist when the cloth is dyed.
That’s the first experiment and one of my ikat pouches. These little purses and pouches are the kinds of thing that I would like to line with this cloth. Of course, my technique needs a lot of work but even so, after having completed this first piece, I don’t think that it’s possible to create anything truly hideous even with clumsy beginner attempts. It all looks pretty nice to me.
This is what it looks like when the threads are pulled and the cloth is ready to go into the dye bath.
Of course, traditional shibori artisans use indigo dye and there’s a beautiful video that I shared on my personal Facebook account of a Chinese gentleman taking all the steps to harvest the indigo leaves and prepare the dye bath before stitching and immersing the cloth. Unfortunately, I can’t seem to find it on Youtube to share here. I am just using cotton dye made in Brazil that I buy from my LYS. It gives a very pretty blue.
This is the second attempt which is a sampler of different shapes. It will be ironed eventually but I quite like the crinkly look the cloth has when the stitching is first removed.
I might use this piece to line this tool bag that I made about twelve years ago. It has traveled all over the place with me and is nowhere near as bright and clean now as it is in this picture!
I cut a long strip of cloth that I had woven into two pieces and joined them to make this zippered tool bag
You can see the Van Dyke stitch that I used to cover the join. My Vietnamese backstrap loom teachers used this same stitch to cover theirs. Below, you can see how it looks after twelve years of laundering and heavy use! The blue Anne yarn bled and toned the whole thing down and the green has faded a lot. I quite like this more subdued and weathered look….like a favorite pair of faded denim jeans. Now it will get a pretty lining. It will make me happy every time I look inside and see the shibori cloth. This bag is constantly by my side as I sit at my backstrap loom. It holds swords, pick-up sticks, scissors, small shuttles, measuring tape, elastic bands, sewing needles, seam ripper, sticky tape etc etc
As for upcoming projects on my backstrap loom…while looking around online, I have found inspiration in the form of certain color combinations that I just can’t seem to get out of my mind. The problem is that I don’t have the colors in the right weights of yarn to carry out any kind of plan. So, some of my time is being spent at the dye pot trying to get something that will match my expectations. I’ll be pleased when I have finally settled on a project and am back seated at my backstrap loom. In the meantime, there are pin loom squares, a woven pin loom case (woven on my backstrap loom), stitching and dyeing to keep me creatively occupied.
While scrolling through my Facebook feed last week I was surprised and excited to see an ad from the Museo ArteCampo here in Santa Cruz for a workshop being given by two Guaraní ladies on spinning cotton. There are three recognized groups of Guaraní people here in Bolivia living in the lowlands between the Chaco and the Andes. Artecampo has been working with people from the Isoseño group since 1984 helping them to recover and preserve dwindling knowledge of technique and motifs while providing a market for their handwoven hammocks, bags and wall hangings.
Examples of GuaranÍ textiles at the Museo ArteCampo.
The timing of this workshop couldn’t have been more perfect considering that I have only recently started to spend a serious amount of time spinning the stash of cotton sliver that I have accumulated in my closet…all generous gifts from my weaving friends. I haven’t seen anything like this being offered in all the years I have been here and who knows? I may not have considered taking the workshop if it had come along years ago.
Learning to spin cotton in Ecuador in 2007.
Two video classes on cotton spinning by Joan Ruane and Stephanie Gaustad as well as a short in-person demo with weaving friend Elizabeth in Australia (who had gifted me a takli spindle) had helped me to get started with using a takli. I am sure that some of what I had witnessed and tried during my stay with a family of cotton spinners and weavers in coastal Ecuador way back in 2007 also helped. I had really been way more focused on the weaving during that stay. Although I was curious and interested, cotton spinning at that point hadn’t captivated me. I just couldn’t see myself having the desire to do it or having a need for hand-spun cotton thread.
This was also true when I’d had the opportunity to study with Ju Nie, a Montagnard (Vietnamese hilltribe) weaver and spinner. She showed me how she first teased the cotton with a bow and then spun it on her spinning wheel. It was fascinating but I had considered that demonstration of such beautiful traditional skills and tools as just an interesting interlude during my studies of the beautiful patterned weft-twining that she was using on the fringes of her woven pieces. You can see the frame on which we were carrying out the twining work in the background. I recently learned that dear Ju Nie passed away last October.
And so, my time had finally come during the pandemic to focus more closely on cotton spinning. And then came this workshop. A miniature Guaraní loom sat on the table at the workshop with a piece of weaving in progress but I didn’t allow myself to get distracted!
Under a tree dripping with mangoes, fourteen of us gathered to learn how to spin cotton on the typical spindle used by the Guaraní ladies.
I already own a spindle that I had bought from my Guaraní weaving teacher many years ago. She only had a little cotton on hand and had given me a very brief demonstration. That had been enough to satisfy my curiosity as, again, I was much more interested in the weaving at that time. She did tell me at that time that cotton was being grown in the community of Isoso and that the inhabitants were not willing to give the seeds away to anyone….not that I had asked for any. I have nowhere to grow it. At the workshop, however, we were free to keep the seeds that we were removing from the cotton.
Angela back in 2010 giving me a short demonstration of how she spins cotton.
The spindle I bought from Angela as well as the ones we were given to use in the workshop, had thick pieces of rubber for whorls. The rubber pieces look like they have been cut from the soles of sandals. A simple groove is sliced into the end of the shaft.
The workshop spindle.
The spindle I bought from Angela in 2010has a beautifully shaped end rather than just the simple cut groove.
We took the seeds out of the cotton and teased it apart with our fingers into a light airy sheet. Then we copied our teachers’ movements and rapidly lifted and dropped the sheets multiple times a few inches above the table before very gently forming them into loose rolls. One problem we faced was that Sabina, the teacher at my table, was left-handed. She loaded each spindle from scratch and then handed it off to us. As soon as we right-handed folks started turning the spindles, the thread was un-spun and subsequently broke. Not a big deal. We all laughed.
Sabina gets the spinning started while we prepare the cotton.
Although, I am very much used to the watch-and-copy style of teaching used by my teachers here, I had also had the benefit of lots of spinning explanations from my video and in-person experiences as well as lots of trial-and-error practice on my own. And so, I managed to get on just fine. I could understand very well the struggles of the other participants because it wasn’t so long ago that I was experiencing the same difficulties.
Clara worked with a group of participants at another table.
I really wanted to use this workshop as an opportunity to see how the Guaraní ladies manage to spin much heavier thread than I do. They weave hammocks with their plied thread and it is thick and sturdy and so I spent the workshop time trying to focus on that. I created thread that was just a bit thicker than what I have been creating at home but it was nowhere near as thick as Sabina’s and I wasn’t able to keep it consistent. Sabina kept laughing at my fine thread but also told me, with what seemed to me to be pride, that her grandmother had been able to spin very fine thread. My other interest in the workshop was to chat with the teachers about their experiences learning to spin and weave as children. Plus, I wanted to see if I could manage to spin decent thread from cotton I had prepared myself in such a basic way rather than with the beautifully prepared sliver that I had been given.
Cards had been placed on a table so that we could see the Guaraní words used for describing what we were doing. Our attempts to correctly pronounce the phrases brought on more laughter.
GuaranÍ spinning vocabulary and Spanish translation.
As for my cotton spinning at home, I am still working my way through the color labeled Cinnamon. I boiled the color labeled Mahogany and was astonished to see how much it changed its tone. I love it. Either some of the brown comes off in the water, or this cotton was particularly dirty…the water became a mucky, murky mess!
The boiled Mahogany in the center with the original color below right. Above is the original Cinnamon color with the boiled and not-boiled greens on the left.
Now for the latest ikat project using my hand-spun cotton. I might try this particular idea again some time, but not with my hand-spun cotton. It turned into quite a business! I wanted to have a white ikat pattern on a background of various tones of blue. You might remember a project I did a couple of years ago in which I used a multi-colored warp for ikat. This was industrially-spun and naturally-dyed silk and the project was relatively simple: tie the ikat tape on the multi-colored silk…the dyeing of the warp thread had already been done by someone else…and then dye the whole thing one solid color, in this case, black. I loved the result.
I am able to get quite sharp images when using using uniformly spun thread.
The color-inspiration picture.
The current project is more or less the opposite in that I wanted the ikat to be a single solid color, in this case, white, with a multi-colored background. I wanted the change in the blue tones to be fairly subtle. And so I had to tie the pattern and then split the warp into sections and dye two sections at a time separately so that the outer sections were very dark, gradually lightening toward the center. The very center section was dyed grey (which I now regret doing…I should have just gone with light blue) as I was using a picture of my choosing for color inspiration as part of a group weave-along and grey was part of it.
What a task it became! I was using my hand-spun cotton singles. The small individual sections totally twisted up on themselves in the dye bath and so the dye was not able to fully penetrate some parts. I had to repeatedly remove the thread from the bath and try to separate the individual threads and then poke and prod and pick at them in the water. The poor things took quite a beating. And then they would dry and I would find them to be too light and the contrast between the strips of blue too great and so back into the dye bath they would go. Yes, so next time I try this particular ikat idea, it will not be carried out with hand-spun singles. There was way too much picking and pulling and wrangling of the thread going on. I just knew that I was going to have a lot of shift in the pattern as a result. So much fuss over such a small piece. I had been planning to weave it after adding natural green cotton to the sides to make a piece wide enough for a pouch but I decided not to risk my precious green on a project that seemed doomed to fail. Perhaps it could be a wrist cuff instead.
Another goal of this project was to arrange the angle of the diagonals in the pattern so that the diamond shape was more curve-like. That part seemed to have worked out quite well. As always, I really enjoyed unwrapping the plastic ties to reveal the pattern and then sitting down to finally weave it. One of the center threads broke. That’s a problem when it’s ikat unless you have another tie-dyed thread to replace it. But everything else went smoothly. There was a lot of shift in the pattern but that was expected and I was happily weaving away at this point.
After looking at the finished piece for a few days, I decided that it wasn’t so bad after all. I decided to go ahead and weave the green sides separately so that I could piece together a useful item. Yes, another pouch. After all that work, the ikat piece really deserved to be made into something. I planned the layout combining the darker boiled and not-boiled green with a little blue that I had already dyed for a previous project.
I wove the two strips separately but at the same time…if that makes sense. It fit better in my weaving space if I wove it this way rather than as one long strip cut in two. Besides, I could keep a better eye on matching width this way. Again, it was just lovely to be at the loom doing simple plain weave and enjoying the look and feel of the hand-spun cotton. Three broken threads were easily replaced…no tie-dye to worry about this time. The broken ones happened to be the not-boiled green…coincidence, or does that say something about a change that takes place during the boiling process? The threads broke when I was moving the coil rod. Note to self again…set up the coil rod right at the end of the warp and leave it there.
A first look. The sewing isn’t finished yet. I’ll just use a large snap at the mouth of the pouch. I am very happy with the curviness of the pattern.
Here’s the gang of hand-spun ikat projects all together.. The pattern of the latest one repeats on the back as I had folded the warp to halve its length and was therefore able to tie once and get two patterns.
I have another ikat idea developing using my 30/2 silk and reds…maybe cochineal? In the meantime, I will keep spinning cotton. I want to boil small amounts of the new Cinnamon color for different lengths of time to see if that produces different tones. Right now I have some 60/2 silk on the loom and am using double weave to create some jewelry pieces….experiments. I already have a nice ikat pouch in which to keep them…lol. I am thinking ahead to my eventual move back to Australia and considering the eye-wateringly high cost of living (compared with Bolivia). It will be helpful if I can perhaps sell some woven items at craft fairs.
One other thought that just popped into my head is to once again dye sections of pre-warped (but not ikat treated) hand-spun singles allowing them to twist on themselves. Perhaps the differences in dye penetration along the length and breadth will create interesting patterns. It’s hard to believe that this is me writing this….the one who likes everything to be controlled!