Backstrap Weaving – Winter Colors

I wonder what colors spring to mind when you think of winter…blues, greys, winter white? As I sit here in shorts and a tank top, I have to remind myself that it’s actually winter here in the tropical lowland part of Bolivia in which I live. It’s the same in the fall when flowers are still blooming and the city is alive with the bright colors and fragrances that are usually associated with spring. It’s easy to forget that the leaves in the fall season in other places are turning all sorts of stunning colors.

I was lucky to have been visiting my friend Lausanne in Vermont one year around the Columbus Day weekend.
One sign for me that the seasons have changed is when the rays from the low winter sun find their way through my bedroom window to fall softly across my work at my backstrap loom. At other times of year, my windows ae blacked out to keep out the heat.

I guess all this has been on my mind lately because I am in the midst of a long move back to Australia to a place that has four very distinct seasons. It will be a little too cold in winter for my liking but hey, I lived at the southern-most tip of the South American mainland for five years and spent eleven seasons living in ski resorts. I’m no stranger to cold…just getting fussy in my old age! I do look forward to the more classic fall colors but I’ve heard that the winters can be grey and foggy. The locals like to call that mountain mist “the champagne air”.

So, what are winter colors here in Santa Cruz?…all the bright colors of tropical fruits and flowers.

I love going out for a late afternoon stroll and coming home with these little tastes of sunshine. Pineapple and papaya vendors selling slices are scattered about the street markets ready to skin, de-seed and chop just the right amount for you.

And in keeping with that, I’ve had some quite bright colors on my loom lately. As you know, I am only working with yarn that I have stashed away here…no new purchases. I decided to pull out the tub of Omega Sinfonia cotton thread that I often use to prepare workshop samples. It’s a riot of tiny balls left over from years of workshop prep. I almost took one look at the mess and turned around to put it straight back into the closet. The worst part was that what looked like the bigger balls of thread were actually made up of dozens of tiny quantities all rolled into one ball.

From the days when my living room would look like a yarn jungle with piles and piles of Omega Sinfonia workshop warps.

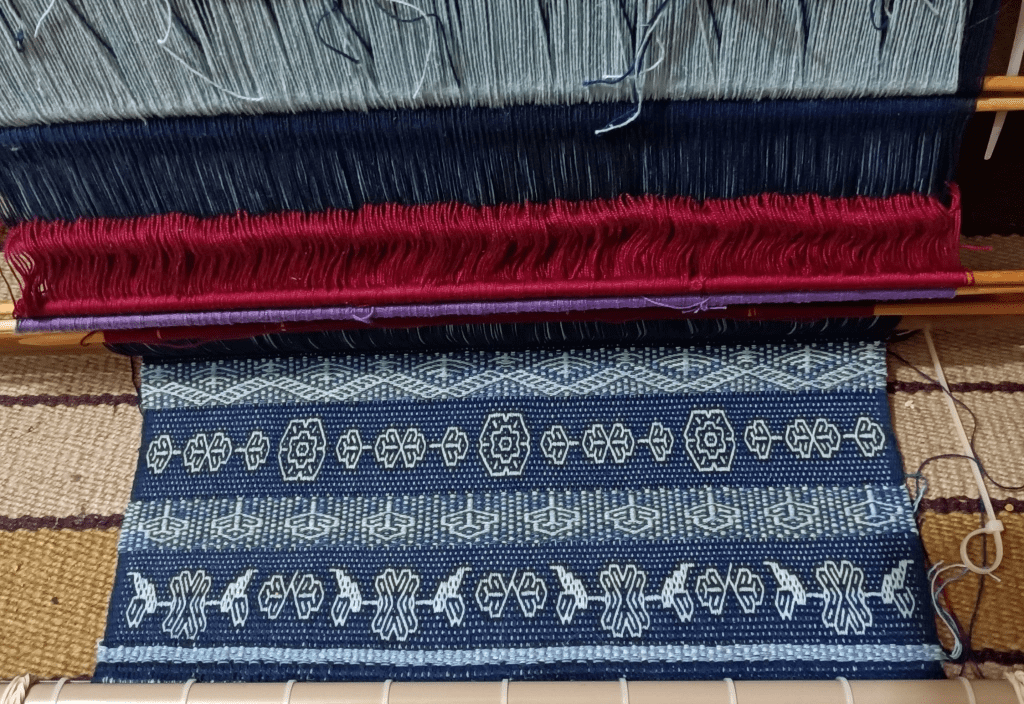
In my last post, I talked about weaving a grocery tote using the Mayan Hands naturally-dyed cotton but I just couldn’t get inspired. I turned to the Omega Sinfonia instead and decided for a start to scrape together enough to dye navy blue for outer pockets for the tote bag. If I wove the pockets in the structure that I call Andean Pebble Weave, I could show both faces of the cloth…one pocket on each side of the bag displaying each of the two faces.

As for the rest of the bag, well you know my style….I’ll figure that out later. I grabbed some other colors from the tub and set out to plan a pattern…something very colorful and jolly. I was going to say spring-like but it would actually be all-year-round-like here where I live. It would certainly be something lively to brighten the days of “champagne air” when I end up living in Katoomba.

Then it occurred to me that I had never actually woven anything substantial with this thread and that I would have to, therefore, sample….eye roll…..I wasn’t in the mood for sampling! But no, fortunately, I remembered that I had put together a warp for the cover of my video class, Operating a Backstrap Loom, in good ol’ Omega Sinfonia.

My video class that is available to stream on Taproot Video. There might even be some copies of the DVD left.

Having done its job as the DVD cover, the warp had sat unloved in a drawer for quite some time until I had the idea to unweave that small woven section and turn it into a backstrap with a bit of pick-up patterning. I took it traveling.

Weaving outdoors in beautiful Maine.
The finished backstrap which happens to be the one that I am currently using (almost all the others are now living in Australia)

Speaking of weaving one’s own backstrap, let me show the one that Natalie wove using the instructions in my free tutorial here on my blog that includes video clips. I love how the yarn she used has created its own pattern.

Backstrap woven on a backstrap loom by Natalie Marie Robinson.

So, I had all I needed to be able to make my width calculations, I dyed the scraps navy blue and drew up an idea.

Not my usual color palette and way out of my safe color comfort zone, to be honest, but it looked okay on paper, so why not?
Off paper and onto yarn, the warp kind of freaked me out…argh, I didn’t know if I could live with those colors.

I remembered a colorful warp that I had taken traveling with me years ago…hastily put together the night before I had left. I had hated it so much that it never left my bag. But I did eventually weave it when I got home and made it into a sewing kit pouch. It had grown on me, and I still like it.

Fortunately this latest warp also grew on me. I think the pockets will look very jolly against a dark solid-color bag.
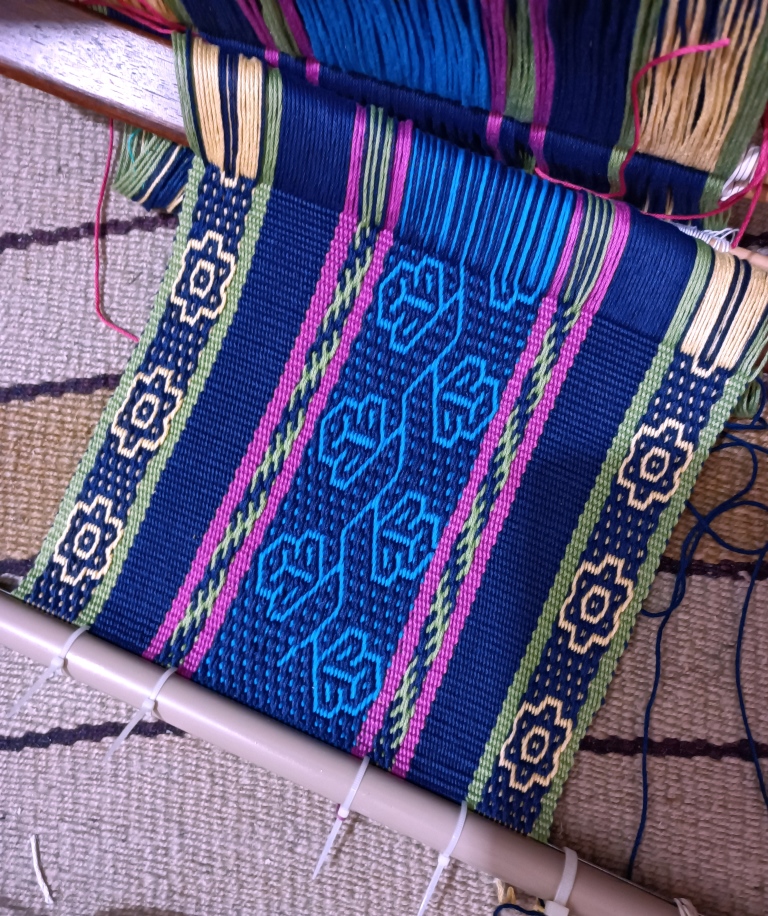
I haven’t woven using thread this size in ages. It wove up so quickly!

All these patterns are in my Complementary-warp Pattern Book. If you have followed my instructions for either complementary-warp pick-up or Andean Pebble Weave, you’ll be able to weave these.

I wove 20″ on this 26″-warp, enough for the two pockets and some extra just in case. You’ll need to put on your sunglasses to look at the other face!

I love the fact that my backstrap loom allows me to create lovely neat third selvedges…

A third selvedge means one fewer hem to sew and saves a little warp waste at the start.

I have what you might call an unconventional way of setting up to create my third selvedge in that I don’t do it the way my teachers here in South America showed me. But then who is to say what is “conventional” when it comes to this kind of thing? You can see the way my indigenous teachers do it here. I talk about how I do it here. That link takes you one of my FAQ pages….a resource that is often overlooked by my readers or perhaps forgotten. In my latest project I used an umbrella rib as the header to create my third selvedge.

To create the neatest third selvedge, you do need to dedicate some time to making sure the warp threads are all well settled in their correct positions before you start weaving. Then you open a shed and beat really well against the beam. When doing the four-stake warping that I show in Method 2 in my free warping video, paying attention to how the doubled threads pass around the two end stakes will make all the difference to the amount of time you need to spend tidying up before you start weaving. Try to have them pass consistently with one of the two colors always sitting above the other on the stakes. Of course, if you plan to start with a fringe, none of this matters.

In the meantime, another pouch got lined with a stitched shibori learning piece. This time there was an attempt to create a bird. I will do better next time. You probably know where this is heading and perhaps hummingbirds will make their appearance soon.

You could turn the bird figure upside down and call it a stem and flower.

I scoured the fabric on which the shibori pieces sits in the hope that I can do some stitched resist on it. I am intrigued by the idea of using the technique on printed fabric. I know that I’ll have to place the figures carefully or the original dark blues of the cloth and the dark dye color will just merge. If that happens, the figures won’t have clearly defined outlines.

I threw a strip of this scoured fabric into the dye pot when I was dyeing the Sinfonia thread blue. The scouring did the trick and the fabric took up the dye nicely. You can only faintly make out the pattern and I think this will be a nice effect.

A much better dye result than my experiment with the fabric that had simply been washed with regular laundry detergent.

I’ll finish with a quick reminder of the pages on this blog that list and provide links to my free tutorials and video clips. These may not be immediately obvious to those viewing the blog on certain devices. Check them out 🙂 See you next time.

Backstrap Weaving – Building the Bag

The good news is that I FOUND IT! If you read my last blog post, you’ll know what I’m talking about….the lost balls and skeins of silk that I had dyed with cochineal bugs. It had been a quite a task dyeing that silk as I slowly learned by trial-and-error about just some of the mysteries of dyeing with cochineal. It had got me through the tedium of being stuck indoors during the 36-day general strike that we had here last November. I had tucked all the thread away in a small zippered pouch and then misplaced it. The thing is that my apartment is tiny and its pretty hard to lose anything here. That made it all the more frustrating.

As expected, it turned up in a very unexpected place at a time when I wasn’t even looking for it. It was in a different zippered bag on a shelf in the bathroom of all places. It was safely tucked away in a very sweet zippered bag that I had got for a mere $3 at a used clothing store while visiting Washington State in the US. I had been thrilled with this find. It’s made of backstrap-loom-woven cotton cloth that was woven by the Women’s Skills Development Project in Pokhara, Nepal. I often use it as my toiletries bag when I travel. I can’t think of anything more perfect for me with its little label displaying a weaver at her backstrap loom. It’s beautifully put together and was in brand new condition when I bought it.

In this picture it sits on another piece of backstrap-loom-woven fabric that my aunt brought back from a trip to India. It’s an interesting combination of warp-float patterning, supplementary weft and weft twining. I’ve been twice to Nepal but never as a weaver. I would love to return and trek with a spindle and loom and see how I can connect with women along the way.

I look at my little bag from Nepal and wonder how long it took the weavers to construct it. I know, I know….I’m not a fan of the “how long did it take?” question but I can’t help wanting to compare their construction process to mine. The black bands around the mouth and base finish it so beautifully. You can barely make out the seam where they start and finish. Only the base is lined and covers the seam where the base meets the sides. I watch Handymum’s videos on Facebook and marvel at how she cuts and prepares all the parts for her bag projects. She then methodically sews everything in place and just leaves a small opening through which she eventually pushes all the fabric to reveal the finished bag right side out with everything in place ready to go. It’s like magic to me!

I tend to just make things up as I go and admit that I really don’t have much idea about what I am doing as I hand-stitch my bag projects. I look at pictures that I see online and take it from there. I am not looking for speed. I love sitting and slowly hand-stitching but I can never truly be sure about the success of a project at any point in the process. There’s almost as much time spent de-constructing as constructing and this project was no exception. But when its finally done, it’s very satisfying!

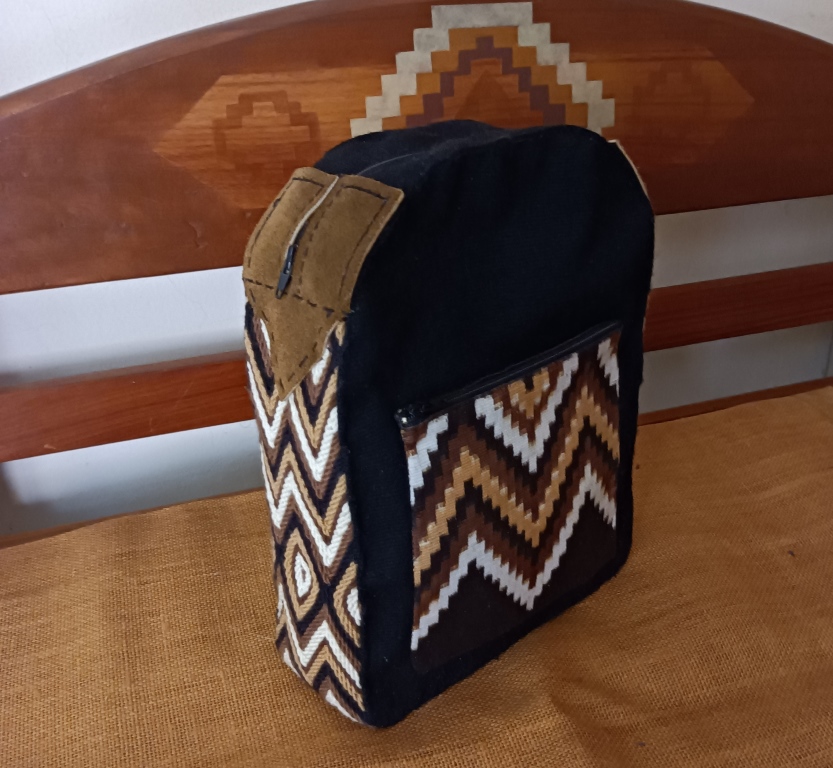
As you know, it started with uncovering the ply-split strap in my closet and deciding that it would look nice as the sides and base of a bag. How I was going to sew this rather thick and stiff strap to my backstrap-loom-woven fabric, I had no idea. That’s all part of my make-it-up-as-I-go style. I’ll just figure that out later. In the meantime, I’d go to all the trouble of weaving an ikat patterned piece to use as the outer pocket. There was wrapping and unwrapping of ikat tape and three dye baths. And then onward to the bag itself. After all that effort I’d just have to make it work.

Two hundred and sixty-eight heddles later came the black fabric for the body of the bag. I scraped together several colors of yarn and dyed them all black. Surprisingly they all came out with the same intensity of black color.

Construction underway….or should I say, construction, de-construction, re-construction. Still unsure at this point if I was going to be completely wasting my time.

Let me tell you that when you cut a ply-split band, it goes completely bonkers. I sewed back and forth across the band to secure it before cutting. All the twisted cords immediately unraveled and splayed out wildly in all directions. Help! I remembered that I had a leather backstrap that had been given to me by a guild. It had been part of one their deceased member’s estates. It was in just the right shade of brown. It would often be the first backstrap that I would put my hand on when I leaned over from my seat on the floor to open the bottom drawer and it got quite a lot of use. I hope that its former owner wouldn’t have minded my cutting it up in order to rescue this project by covering and protecting the end of the cut ply-split band.

With the leather in place and the bands for the zippered top woven and sewn into place, I was starting to think that maybe this project was going to be a success after all. I only then prepared the lining. It had to be lined. The wild ends of the ply-split band on the inside needed to be hidden! Where would the straps go? No idea at this point. I was still just making it up as I went.

This is basically a mini backpack that is designed to be slung over one shoulder. I haven’t yet been able to find a one-inch length-adjustment buckle and so I had to improvise. The strap can be attached on the left or right depending on the shoulder I want to use. The leather backstrap yet again came to the rescue.

Done! It’s ready to use now but I’ll keep looking for that length-adjustment buckle so that I can change from double d-rings to a hook. I just had to get this finished because I know that if I left it until I found the buckle, it would never get done. If I were to do it over, I’d have the zipper go down another couple of inches. Making it up as you go is kind of fun but sometimes leads to poor decisions.

Another thing that I have been doing on the side is preparing some print fabric for another stitched shibori project. I brought back some soda ash with me from my last trip to Australia (I hadn’t been able to find a way here to buy it that didn’t involve industry-sized quantities). I dismantled a Vera Bradley toiletries bag that I no longer use…it’s too big! (this might give you a clue as to what led me to the bathroom shelf to eventually find those balls of cochineal silk) because the fabric is so pretty and I’ve been busy washing and scouring it. I’m only guessing that it’s 100% cotton as there isn’t a sewn-in label. A burn test seemed to indicate that it most likely is. I wonder how well I can expect dye to cover the print.

What’s next on the loom? Well, as you know, I am weaving only from stash and I still have a fair bit of this Mayan Hands cotton that my friend Kate gave me several years ago. This is the cotton that I used to weave the fabric for my cotton spinning bag that you see below. I also used it to weave the straps for the bag in this post. I wove them in the structure that I call Andean Pebble Weave in just one solid color and they are good and sturdy.

If I have enough yarn, I’d like to weave a very brightly colored tote bag for grocery shopping, mostly in plain weave and with a little bit of pick-up patterning. I take four cloth bags with me to the store, two slung over each shoulder and walk the seven blocks there and seven back. The bags and the straps in particular need to be good and strong and comfortable in order to support the weight of the groceries over that distance. The bags are not just riding from store to vehicle in a shopping cart. Some of my bags are weaving conference tote bags that are looking a bit shabby now. I still use the one from CNCH 2010! It has been the best of all the conference totes I have.

I’ll finish by telling you about the latest issue of Tiny Studio Creative Life magazine in which I have an article. The theme of the latest issue is Magic and I really enjoyed writing about the science of the craft and the magic of the art of creating cloth on a backstrap loom.

Editor Suzy Brown describes the magazine as being for spinners and yarn crafters and she does a beautiful job putting each issue together. Once again I have to thank her for laying out my article so nicely. The magazine is available in both digital and print formats and you can buy single issues or subscribe to receive them quarterly. It’s been wonderful watching Suzy build this business and create an international community of fans from her home in New Zealand.