With the new year comes a new (woven) wallet. I’m still very much a cash person which probably comes from the fact that I’m still living here in Bolivia. I had the experience of almost going hungry while spending an eight-hour layover in Atlanta airport recently. I couldn’t find a place that took cash but in the end was able to buy a yoghurt from a juice bar. It wasn’t quite the full American breakfast I had been promising myself after the long overnight flight. For a variety of reasons I didn’t have usable cards on me. Even the vending machines only accepted cards!
Mind you, Bolivia is moving along rapidly. It’s not unusual to see vendors in the street market displaying signs with their QR code on their humble stands. I find it’s way too easy to spend when using a card or electronic device. I prefer to go to the market with X amount of Bolivianos in cash and thus oblige myself to stay within budget.
If I were superstitious, I might think that I’m jinxing myself by starting the new year with an empty wallet! On top of that, I didn’t wear yellow underwear on New Year’s Eve which is the local superstition for attracting money. Red underwear attracts love.
If you read my last post, you’ll know that I wove a sample using my handspun cotton singles thread in preparation for this wallet project to see how it would stand up to being used for pick-up patterning. It involves a lot more handling than simple plain weave.
The finished sample showing its two faces. I used the structure that I call Andean Pebble Weave.
The sample gave me the information that I needed for calculating the number of ends that would give me the right width for the wallet. I dyed some of my handspun cotton dark blue and black.
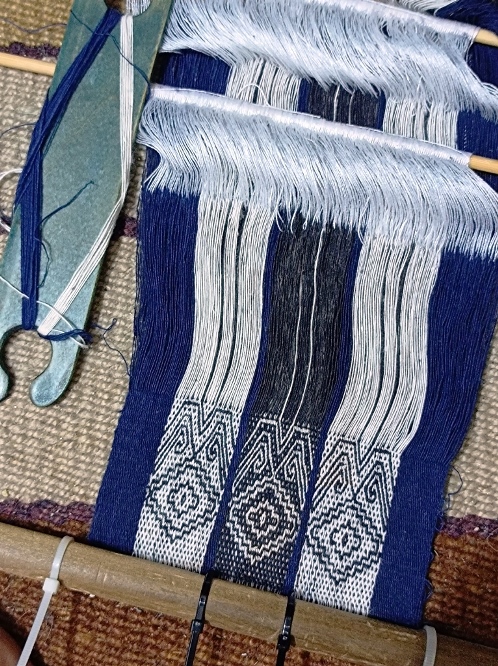
Here are my 632 ends set up with the two sets of heddles that give me my “pebble sheds”. It’s so satisfying sitting there and finally making the very last heddle and knowing that I’m all set to go.
However, in this case, I was not. I had neglected to dye some of the thread for weft. I could have got away with using white weft because I was after all planning to edge the piece with a tubular band which would cover the selvedges, but there’s always a chance that I’ll change my mind and go in another direction, in which case I wouldn’t want to see the dots of white weft at the edges. So, it was back to the dyepot. Luckily it’s summer here and things dry really quickly.
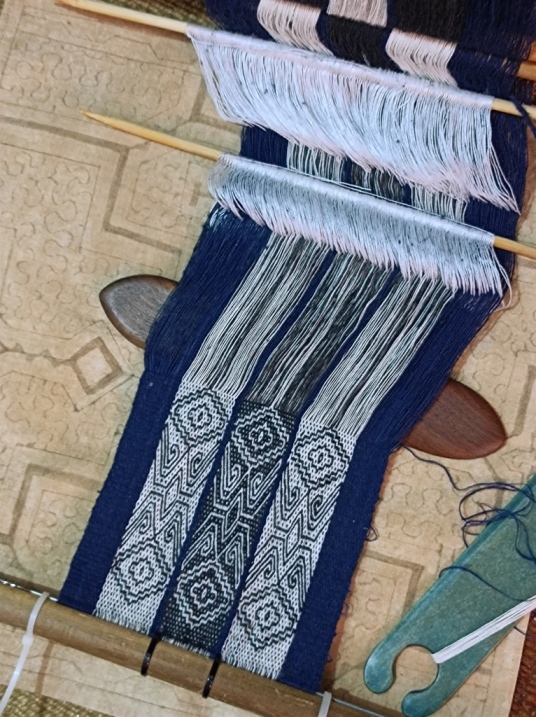
I decided to use part of the sample pattern that I had designed. And because I loved both faces of my sample band, I decided to plan this so that both possible faces could be seen at the same time.
A little progress and all going well. No broken threads yet. In the end, only one broke.
At this point, I was ready to put a bit more thought into exactly how I was going to construct the wallet and therefore, the layout of the pattern.
I got the idea of using the sample warp as a coin purse on the back of the wallet. I am always dismayed by the amount of coins I seem to accumulate when I am traveling. Australia has dollar and two-dollar coins (no one and two-cents) and the fifty-cent piece is huge. It’s not unusual for me to be carrying up to twenty dollars in coin! And in the US I’m forever handing over notes to pay for things because I never know how much something will cost until the tax is added at the register. With a line of people behind me, I don’t want to be scratching around in a tiny coin compartment for the right change. Urgh….all those pennies!
So, I wanted a large coin compartment from which I could quickly and easily fish out what I needed as well as comfortably carry all those bulky Australian coins.
This meant that it would be a waste weaving pattern for the back of the wallet only to have it covered by the coin purse. I got to do some plain Andean Pebble Weave instead which certainly accelerated the pace of this project. I returned to the pattern just to weave the final section for the closure flap.
Here are the completed pieces. From left to right, the front, plain back and closure flap. Construction can begin.
As usual, fusible interfacing was my friend when It came to cutting the cloth. I had a selvedge at one end but I cut a curve at the other for the closure flap. I used some black fabric that my friend Claudia had given me for the lining and to create the pocket for bills. All these pieces got held nicely in place by the tubular edging. The woven tubular edging that I use is woven and sewn at the same time around the edge. The sewing thread doubles as the weft. It fully encloses the edge rather than just perches along it. It’s a wonderful way to stabilize and protect cut fabric.
It can be plain (which is how I wove it for the wallet and the bag flap above) or patterned as you see below in the edging I used for a wrist cuff.
You need to get creative with how to hide the cut unwoven warp ends when you have stitched around and returned to the beginning. On the wrist cuff, I wrapped and sewed the cut end to the cloth. It wasn’t pretty but it was secure. I then covered it with a button which was part of the button-and-loop closure that I often use for my wrist cuffs.
For my wallet, I simply sewed a small tab of black fabric to cover the join.
Then came the task of figuring out card slots, zippered sections etc. on the inside. I created some black stitched shibori fabric for this. I included an unusual tiny pocket that I have always wanted to have in a wallet….a pocket that can only hold my door key. Nothing else fits! I get fed up with searching for my key in pockets amongst all the other paraphernalia that accumulates there.
The tiny key pocket is just to the right of the card slots.There’s a zippered pocket on the right for other odds and ends.
I remember being so pleased when I discovered that my key fit perfectly in the tiny pocket in this pouch that I wove. This pocket is part of the original warp and was not added later. Creating that special kind of warp that includes a pocket is a technique that I learned with one of my teachers here in Bolivia.
Here’s the coin purse on the back of the wallet…..
It was nice being able to use the sample for something.
And because I am skilled in creating expandable sides after my two recent folder projects, I added expandable sides to this purse. It’s very easy to get my hands inside, quickly find the right coins and avoid receiving yet more unwanted change.
So, wallet number one is complete. As I mentioned in my last post, I think I’ll make another using an ikat pattern this time. I’ve crunched the numbers and can start warping.
Here’s a reminder that I wrote a tutorial some time ago showing how I cut and prepare my woven fabric to take the woven tubular edging. At the end of the tutorial there’s a link to the tutorial that shows how I weave the actual tube.
I’d also like to give a big thank-you to those who responded when I plugged a couple of my books in my last post. Thank you for your support!
I hope you’ve had a wonderful start to the new year. Take care and see you next time.
This post is about the second expandable folder that I’ve been working on….the weaving, the stitching, the ironing and the gluing. I’m posting all this as much for my own future reference as for the folks who have asked me for an explanation. I have written my notes in my weaving book but there aren’t accompanying photos as there are here. If the process doesn’t interest you, I hope that you will at least enjoy scrolling through and seeing the photos in this post.
The folder is only 99% finished because my box of random buttons that I’ve picked up here and there over the years is now living in Australia. Silly me hadn’t thought far enough ahead to select one or two to bring back to Bolivia with me for this project. I’ve never actually been button hunting here in Santa Cruz. Who knows what I might discover.
The button-and-loop closure that I used for the first folder. I’d like to use two such closures on the new folder, one on each of the plain weave side panels, as this second folder is going to be quite stuffed full of charts.
What did I learn from this project?…..that the cotton fabric I bought for the stitched shibori project that I planned to combine with my woven cloth shrinks a heck of a lot in the hot dye bath. I had to adjust my overall folder design to accommodate that. I’ll keep that in mind for future projects.
In my last post I showed you how different the two faces of this cloth turned out…both attractive in their own way. I eventually decided on using this bolder face for the folder project.
First things first…finish the main pattern fabric. At this point I was celebrating passing halfway.
Next came the weaving of the plain-weave side panels. I chose to weave these separately as the wool singles are particularly grabby in plain weave and I need to operate the loom in a certain way to minimize the amount of abrasion. The sheds are much easier to open when I work with warp floats in the pattern area and so I find that it’s an overall smoother and more efficient operation to just weave the plain and patterned areas separately.
I prefer to weave the two strips separately rather than as one long band which I then cut in two. That saves me having to set up to accommodate the longer warp in my limited weaving space. It does result in a bit more waste, though.
The woven pieces were then ready to assemble into one wide piece for the folder.
Just as I had done for the first folder, I joined the three panels using the cross-knit-loop stitch that my Vietnamese backstrap loom teachers use to join panels for skirts and blankets.
I hemmed the completed piece and lined it with my stitched shibori fabric. I also inserted two pieces of stiff card between the woven fabric and the lining….one for each half…..and added a line of sewing across the center of the piece as well, thus keeping the two cardboard pieces separate. I stitch by hand and I love doing this kind of straightforward stitching. At this point I discovered that the amount of stitched shibori fabric that remained was not going to be enough for my original construction plan. Well, we just have to adjust and make it work, don’t we?
These will be the fan-folded pieces that make the expandable sides of the folder. I use two for each side…one for each half… and join the two halves together as the very last step of the process.
The sides of my first folder extend all the way from bottom to top…
You can see the line in the middle of the fan-folds where the two halves are eventually glued together.
In order to fit the full height of the folder I needed 11″ of length for each piece of shibori fabric. I only had enough fabric for 9 1/2″. It’s more than enough to contain the sheets of charting paper that will be housed within the folder so it’s not a big deal…still, I think the side panels look much nicer if they can extend all the way to the top of the folder. It’s hard to believe that the cotton cloth shrank so much in the dye bath. I’m wondering if I perhaps failed to take into account seam allowance when I originally measured out the cloth. I didn’t take notes!
I ironed fusible interfacing onto the reverse of the four stitched shibori pieces and then created the fan folds. This cotton cloth is quite a bit heavier than the fabric that I used on the first folder and I had to coax it into holding nice crisp folds. It really didn’t want to.
And now, this is where it all starts to get a bit fiddly and I’m afraid that my photos aren’t great. I hope that my descriptions don’t sound as clumsy to you as they do to me!
The four fan-folded pieces are then sewn to the inside of the folder. The first folded section in each is sewn down flat along the the edges of the folder. That piece of cardboard is only there for the photo to help distinguish the folded pieces from the background lining cloth.
And now, out comes the iron and things get even fiddlier! I have a burn on the inside of my wrist to prove it. The next step is about inserting the cardboard dividers. Here’s a photo of the sides and dividers in position in the finished folder….
Think of the side pieces as being folded into a series of valleys and mountains. The dividers extend across the folder from mountain peak to mountain peak. There are two mountain peaks on each half of each side.
I wouldn’t be at all surprised if you come up with a much better way to do this which will have me slapping my forehead, but this worked well for my first folder and I haven’t since been able to come up with another option.
I cut five pieces of stiff card (8″ tall) and twenty 8 x 1 1/2″ strips of heavy fusible interfacing. I ironed about two thirds of the width of each interfacing strip to the two edges of each card, one to the upper face and one to the lower.
I hope this photo gives you the idea. This isn’t the tricky part, by the way!
My cardboard divider pieces now look like they are edged with an “open jaw” of interfacing ready to clamp down on and enclose something. They need to be ironed onto the fan folds so that they grip the mountain peaks. Yep, that’s the fiddly bit. For the most part it works really well, especially if you manage to keep your body parts out of the way of the iron. I used Wellbond glue for any parts that weren’t quite within reach of the iron. It’s good stuff and works really well. However, I prefer risking the iron to the mess of the glue. Plus the glue requires a much longer “cure” time than the ironed interfacing.
This process will utilize four of the five pieces of card. The fifth gets inserted at the end when you join the two halves of the side panels together. I used the Wellbond glue for this and could then sit back and give it the required amount of time to cure before placing my pile of pattern charts into their new home.
You can see the center join which forms another mountain. The interfacing tabs on the last cardboard divider are glued in and sandwiched between the two sections.
All I need to do now is braid some loops and find two nice silver buttons.
That just about finished off my supply of Petaluma wool. I have some left to use in my next venture into dyeing with cochineal which could well be my next project. I’ll be able to weave a (very) little something with it. If not that, I’ll weave cotton ikat cloth, using my handspun, and make another stitched shibori project for a wallet.
And here’s a reminder that Dorinda is in the States and will be able to mail orders of beautiful cloth and products created by my weaving teacher, Maxima, and the other ladies in the co-op they operate in the central Bolivian highlands. She can do this until December 6. The pieces ae made from the weavers’ own hand-spun and naturally-dyed wool. Take a look at the gorgeous range of colors they are able to create from local dye plants and cochineal. Finished products are available as well as just the cloth on its own for you to use in your own sewing projects. These are snippets of pieces that I have bought over the years.
You can contact Dorinda directly at dkdutcher@hotmail.com or via the PAZA Bolivia blog. I hope you’ll consider making a purchase for yourself or friends for this holiday season. And many thanks to those who have already done so. Dorinda keeps me updated!
Here’s some news for those of you who have bought either of my books on the eye-pattern tubular band or for those who might be considering buying it. What do we know so far? There are two versions of this book, a short version which is about weaving the eye-pattern tubular band as an independent band and the full version which also teaches how to weave the tube as a decorative edging. It’s a clever technique which allows you to weave and attach the band to the edge of cloth at the same time by using the weft as the sewing thread. The extended version also includes instructions for other decorative sewn finishes and is called The Eye-pattern Tubular Band and Other Decorative Finishing Techniques.
But you already know all that.
That isn’t the news.
Here’s the news…..While preparing material for a Zoom class on this topic, I decided to make a couple of additional video clips to enhance my Zoom teaching. I have now added them as Bonus Videos to the collection of clips that already accompany the books. You will be able to access these clips in the same way that you access the current collection. Instructions for doing so are in the books themselves in a section on Videos near the beginning. As you know, the video clips are accessible to those who have bought the PDF version as well as to those who bought the spiral-bound printed version. The original collection of videos were designed to supplement the dozens of step-by step photos and detailed explanations that are in the books. These two new videos will give you more supplemental material in that they give you a chance to see in action the steps that are laid out in the book, in step-by-step photos, for Sheds R1 and R2 .
I know that different people have different learning styles and I hope that I am able to cater to several of them in these books by providing step-by-step photos, detailed explanations, as well as video clips.. Some people like to see a process frozen into bite-sized steps in step-by-step photos. Others like to read detailed explanations and form visuals of their own. Many people like to have both kinds of instruction side-by side. And then there are others who like to hear the steps being described while watching them on video. Some people have told me that they hear my voice in their heads as they weave. Hopefully that’s a good thing! So, there are now two new opportunities to do just that.
Accessing the two bonus videos will be straightforward if you bought the books at Taproot Video. If you bought them some years ago from Patternfish which no longer exists, you will need to contact me via a comment on this blog post. I will see your comment behind the scenes and it won’t get published. EDITED TO ADD: The offer to share the videos for those who purchased from Patternfish ends on November 5, 2021.
I remember when I first learned to weave tubular bands as edgings….I wanted to edge everything I could get my hands on! I thought that the novelty might eventually wear off but it never has. It’s such a pretty finish to a project as well as being very practical. I doubt that my iPod pouch with the amount of use it gets would still be in such good shape if not for its protective edging. The tube actually encloses the edge of the fabric giving it strength and full protection. It could also be used to hide some questionable selvedges! I have edged bags and pouches in my woven cotton, silk and wool fabric. Here are just a few examples….
And, I was really happy to discover that some cotton fabric that I had bought, perhaps to one day use as lining, stood up really well to the tubular band. Until then, I had always thought that light commercial fabric, as opposed to the heavier warp-faced fabric that I am used to weaving, would not be able to support the spiraling energy of the tubular band. But I was wrong. By the time I had turned in the edges of the cloth to make a pouch, I was sewing onto four layers and they were more than able to support the pretty tubular edging. I love this little pouch with its cotton edging! The mouth of the pouch is decorated with the cross-knit looping stitch which I also teach in my book.
The eye-pattern tubular band was used to dress up a simple pouch made with commercial cotton fabric.
And, of course, there are a multitude of things to do with the tubes when woven as independent bands….cords to hold pendants, eye glasses and ID cards, fobs for keys, scissors and other tools, shoe laces, bracelets, draw strings…. They can be woven using a string in the warp ends which gets tied to your waste as my friend Marilyn is doing here. The other end of her warp is attached to a C clamp on a table.
Or the warp can be placed on a loom such as an inkle loom. Full instructions are given in the books to show how to set up and weave these on inkle looms. One of the many cool things about it is the fact that the warp does not require heddles. Once the warp threads are set-up and the cross is saved on two sticks, as you can see above and below, you are ready to weave. The book explains it all.
Weaving an eye-pattern tubular band on an inkle loom.
Independent tubular bands made into fobs.
I had a bit of fun recently using my own hand spun wool for the first time to create one of these lovely eye-pattern tubular bands. Many years ago, I wove some as edgings in my own hand spun llama and alpaca fiber but this is the first time that I have done so in wool.
A cuff I wove using my handspun llama fiber. It is edged with an eye-pattern tubular band in the same yarn.
I have set myself the task of fishing out every bit of random fleece from my closet and spinning it. It has been slow going as I only do it while I am on Zoom calls. At other times, I would really rather be weaving. But apart from this small indulgence, I have not allowed myself to use the spun and plied yarn. I want to first spin everything, decide which colors I will over-dye and only then plan a project. I did weave some of it right at the start of this project just to make sure that it was suitable for the kind of warp-faced fabric that I weave on my backstrap loom. A couple of wrist cuff projects told me that all was well except that I really wanted to go a bit finer. So that’s what I am doing now.
Of course, the cuff got an eye-pattern tubular edging.
Weaving and sewing a eye-pattern tubular band to a second cuff in my hand spun wool.
So, here is my eye-pattern tubular band in the finer hand spun wool that I have been recently preparing. I wanted to see how well these three colors played together….
I’ll finish this band and continue spinning while planning how I will use these and other colors in what will hopefully be a large-ish project on my backstrap loom. Then it will be time to get back into cotton spinning and another clean-out of the closet. I am still very much in the infancy stage of my cotton spinning.
Here’s an old photo that I recently unearthed from back in 2007 which was taken after I had returned from my second trip to Ecuador. I had had the opportunity to learn about the preparation and spinning of cotton for weaving from a family of weavers and spinners in coastal Ecuador. Here I am practicing the skills that they taught me. The distaff is a miniature version of the kind that they use. I built it while I was there with their help as the full-sized version would have been too difficult to bring back to Bolivia. Yes I know that you are probably distracted by my cat. It’s those eyes…she can burn holes in things with those eyes. She is now a grand old lady of 18 years of age. If I had only continued to practice, I would probably be a pretty decent cotton-spinner by now.
But I have wandered off topic now. This was really just meant to be a quick message about the two new BONUS videos. I hope those who own my books enjoy them and I hope that this post might encourage others to learn how to weave these patterned tubular bands.
Thank you so much for your support and see you next time (with more hummingbirds 🙂 )
A cotton pebble weave cuff with its tubular edging.
Lots of people ask me about how the pandemic is affecting me here in Bolivia and there is plenty to say about all the negative ways in which lives have been changed. But, there’s also a flip side…at least there is in my case…and there are some positive things going on as well as a direct result of not being able to travel and being obliged to stay in one place. I was thinking about it and this is the longest period of time I have stayed here in Bolivia since 2005! There was a period prior to that during which I hadn’t left South America for nine years but, after 2005, I seemed to be regularly picking up and flying away.
This long period at home has my Ideas Notebook crammed with planned projects and leaves me with plenty of time to play with those things that do require more sampling, planning, charting and trial-and-error which, for me, is best done over one long uninterrupted period of time. I have lots of uninterrupted time.
I showed my finished Finnweave sampler in my last post and am pleased to tell you that I found a use for it beyond just being a sample to which I can refer for future projects. It makes a wonderful cowl. Having worn my hair long for most of my adult life, I am very much aware of my bare neck and how cold it can get now that I have cut my hair short. I was very conscious of that on my winter visits to Australia and New Zealand last year.
Yes, I had a moment of frustration the other day and took it out on my hair in the form of yet another DIY haircut. At 10:30 pm with toothbrush in mouth this suddenly seemed like a good idea. While we are certainly not in cowl-wearing weather here south of the equator, the time will come when I can be back visiting the USA in the spring and fall, and hopefully Australia in the winter months, when the air can get a little nippy.
Quite a few people have been curious about the Finnweave I have been doing. I explain that I chose this structure simply because the pre-columbian textile fragments that I have were woven this way. There are of course other kinds of double weave pick-up structures that can be used to weave figures and the figures will have a certain appearance on the front and back of the cloth. Weavers can choose the look that they prefer. As always, I refer to the Doramay Keasbey article in Handwoven Jan/Feb 2011 in which she compares the front and back of bookmarks that she wove using five different doubleweave pick-up structures.
So, what about the flip side of my Finnweave? The Keasbey article includes Finnweave and I can show you the two sides of a motif on a piece that I wove some years ago using 8/2 cotton which I think is much clearer than trying to show you the example in the finer 20/2 cotton that I just wove.
You can see that smooth horizontal lines on one face look like toothy lines on the other . This particular motif does not have any fine vertical lines but a fine vertical line on the “good’ face looks like a column of small disconnected horizontal dashes on the back. Occasionally, I prefer the way a particular motif looks on the back in that from a distance it resembles blurry ikat with those toothy edges. It’s a softer look. The upper face has a much smoother and sharper appearance.
So, I will keep my Finnweave cowl on hand as I think about my next project using this structure. There’s not much chance of it being used as a cowl any time soon as we have temperatures in the high 90s with one day at 100 degrees forecast for the next eight days. The tropical “winter” is over!
What has been keeping me busy lately is refreshing my memory on three-color reversible pebble weave. It’s another one of those things that grabs my attention every few years. I showed you in my last post the sample I wove in tencel using this technique some years ago in which I used yellow and white on a blueberry background.
I can’t find that sample anywhere now but, thank goodness, I am better at keeping tabs on my notes. However, my notes could have been better and it was frustration with trying to interpret them that led to the late night hair-cutting incident! After a good night’s sleep, I got the notes all sorted and I chose primary colors in 8/2 tencel once again to test whether I had indeed understood the steps.
Examples from Peru shared with me by Mary Spanos with the red, green and yellow sections of three-color pebble..
I am using my backstrap loom with string heddles as you know. If you are a tablet-weaver, three-color double-faced pebble weave is apparently quite straightforward. I have read about people doing it by using triangular tablets but also square tablets that have holes in the sides. So, if you are in a great hurry to learn this, you might want to go with tablets. I’ll leave you to investigate that further.
I will be writing a tutorial on this eventually for those who use string heddles. “Why don’t you just use tablets?” you might ask… I am more interested in the string heddle process as that is the way the technique is woven here inSouth America.
I have examples of three-color pebble weave in pieces I bought in Peru on my very first visit in 1996. These particular pieces were relatively expensive and I had to think long and hard about investing in them back in my do-it-on-a-shoestring backpacking days. They blew my budget for the following ten days. I am so glad I bought them, though. My weaving friend Mary also sent me pictures of some similar pieces that she owns.
The three-color pebble weave figures in these particular pieces are not identical in appearance on the back of the cloth.
Here you can see the back of one that I wove myself many years ago in a non-reversible technique….
I haven’t yet had the chance to sit with a weaver who knows how to do the double-faced version and so my efforts have been guided by the writings of Adele Cahlander and Marjorie Cason in The Art of Bolivian Highland Weaving and a lot of trial-and-error of my own. Just by chance I was able to pick up a small piece of cloth that was woven using the double-faced three-color version. It was being used as the cover of a small photo album that I found in a souvenir store right here in Santa Cruz. I grabbed it! Thankfully, it had only been glued to the photo album along its edges and I could easily remove the cloth.
Bolivian cloth with pattern in double-faced three-color pebble.
The cloth is so very tightly woven as is the way here in Bolivia, that it is impossible to separate the warp threads to perhaps get some clues about how it was woven. In any case, I am using a series of steps for my own experiments and am getting the results I want. I feel that I could replicate the pattern on this cloth if I wanted to.
I would, however, love to be able to spend time with the Bolivian weaver of this piece of cloth and see if she has some other less laborious and more efficient way of achieving this which will no doubt have me slapping my forehead and exclaiming “Of course!” On the other hand, perhaps I am doing it just the way she does….I would love to know! Bolivian weavers think nothing of what may appear to us as extremely laborious weaving tasks….think of what they go through every time they finish a piece of warp-faced cloth with four selvedges, or the thread-by-thread pick-up that goes into weaving pieces like the red and black one you see here….
A weaving of the Jalq’a people of Potolo, Bolivia.
So, here is the piece in tencel that I wove to practice creating patterns using all three colors as outlines, background and fillers. My sample motifs got smaller and smaller as I gradually centered my focus on just some very specific aspects. These patterns are charted in my Complementary-warp Pattern Book.
The idea was to refresh my memory about this technique and, as it turned out, improve my notes for next time. But it was also about wanting to weave something using the wool I had started spinning during the Tour de Fleece. My spinning output is quite sad. I simply can’t manage to motivate make myself to devote that much time to it. I am more interested in charting and weaving. In any case, I have some yarn to use and after sampling in tencel, I was ready. I had originally planned to sample in some industrially spun wool but everything I found in the closet was either too heavy or too stretchy. I do have some Knit Picks Palette but I didn’t want to push my luck with that. The method I use has a lot of heddle action and I wasn’t sure how well the Palette would stand up to it.
A couple of wrist cuff projects seemed like a good way to start….
I used a little leaf motif that I had created for my Complementary-warp Pattern Book (slightly modified here) as well as part of a larger flower motif that I had created for the same book in the Garden-themed section.
One of the challenges for me when using this three-color technique is finding three colors that will work well together on bothfaces. I have a light color -white, a very dark color – black and a medium color- let’s call it tan. These three work well together. Other combinations may not. If, for example, I use two medium colors like purple and green, I can have them sit on either side of the lightest color on one face, but they will have to sit right next to each other on the other face. In that case there may not be enough contrast between the two for the pattern to be easily distinguishable.
You can see that tan and black sit right next to each other in the leaf motifs on the upper face and are separated by white on the lower face. I played with the outline color in the flower motif using both white and black as shape outlines and tan and white as the fillers.
My hand spun yarn stood up well. Admittedly, this is only a very short and narrow piece but I can tell thatf it will do well even in something much larger.
I added an eye-patterned tubular band in the same colors and then played around with different buttons for the button-and-loop closure. I love this cuff!
Next on the loom, was another cuff project using the green and purple that I mentioned above. I didn’t do any outline color-flipping in this one. Here it is getting its tubular edging. I love weaving and sewing that edging! (Check out my book if you would like to learn how to weave this patterned tubular band to use independently as jewelry, for example, as well as weave and sew it as an edging).
These are the buttons that I eventually chose…a flower one for the garden-theme and an interlocking shape to match the interlocked motifs which are charted in my pattern books.
The last thing is to braid and sew on the loops that go around the buttons to close the cuffs.
So, what’s next? While I am in wrist-cuff mode, I might make one in Finnweave. I do like to have examples of the various structures that I use in my wrist-cuff collection. I also feel motivated to spin some of the colors that I am least likely to use and then dye them so I that I can continue to play with three-color pebble. If you have suggestions for three colors that would work well together no matter how they sit in relation to each other, please let me know. I wove this wool three-color pebble some years ago in which the orange and green played well together when placed right next to each other….….and look just as good on the other face where they are separated by white.
Finally, I would like to promote my publications…in this case, the one I produced on the eye-pattern tubular band which you have seen along the edge of the cuffs I made. My ability to earn has been greatly reduced with my inability to travel to teach and book sales help to keep me afloat. Perhaps youwould like to try weaving an eye-pattern tubular band. I have two versions of the book. One, which is only available as a pdf, teaches how to weave the band as an independent tube which can be used in jewelry and other accessories. Ideas are given in the book.
In addition to this, the other extended version shows you how to weave and sew the band to the edge of cloth as I have done. It also goes on to teach two other decorative finishing techniques that are used by some of my Bolivian weaving teachers. This extended version is available as a pdf and as a spiral-bound book.
Both the short and extended versions, in either pdf or book form, give access to supplementary instructional video clips and are available atTaproot Video.
I’ll be donning my masks and venturing out a bit more in the next week or so as I need to re-stock the pantry before our national elections this month. I plan on staying in and well out of the way during and after that event.
Some very kind people took some time and put some extra effort into helping me bring my new book to you in just a matter of days after I sent off the files. The place that prints my spiral-bound books worked extraordinarily quickly but I don’t think that was a personal favor! I just hope that doesn’t mean that they are experiencing a serious slump in business. It was the folks at Taproot Video who were kind enough to re-arrange priorities for me so that my finished work could be brought to you as quickly as possible. Thank you Marilyn and Rainer at Taproot Video!
So, here it is...Warp-faced Double Weave on Inkle Looms…an advanced-level technique that is aimed at band-weavers who love to do pick-up. Yes, you do have to love it! because it is one of the slower techniques that I have encountered here in the highlands and lowlands of South America. The book is aimed at those who use the standard inkle loom. By that, I mean the kind of inkle loom that uses individual string heddles and where the weaver raises and lowers one layer of threads in order to create the two basic sheds. I used my Ashford Inklette for the tutorials in the book and I just use the loom’s two basic sheds.
Okay, it might be a slow technique that requires some extra work to set up and some extra care and attention while weaving (hence the advanced-level rating), but it is by far the easiest technique for designing. Some of the 45 patterns in the book were contributed by my students and weaving friends and many of them were created right there in the workshop as they were learning the technique. You could take a blank chart from the book and fill in cells in a completely random fashion, doodle away filling cells with your mind on something else, and still be able to weave the “pattern” you have created. It will be structurally sound!
This double-weave technique does not use warp-floats. The surface of the band is not pebbled or spotted or speckled in appearance or texture. It is perfectly smooth in texture. Both faces carry the same motif with colors reversed. Bolivian weavers often flip the colors so that both possible faces can be seen at once.
A Bolivian belt in warp-faced double weave.
One of my students went home after Day One of a workshop and showed her beginner band to her 13-year old daughter. Thirteen-year old Emma then sat down with the charting paper and created a rabbit pattern and it was shared with all of us the next day. She has kindly contributed it to the book. I showed you Marilyn’s little llama in my last post which is made up of very few warp threads and weft picks. She used to keep llamas. Often the figures my students create have a personal meaning to them. Jen keeps rabbits and created one of her own. Ruth drew the perfect figure for our narrow 12-thread learning band… an elegant long-legged, long-necked flamingo. But it’s not all about animals. All kinds of curved, angular, solid and delicately outlined figures can be created. Karen conjured up a grinning pumpkin during one gathering we had close to Halloween.
Some patterns were inspired by traditional patterns that I have seen in Mapuche and Bedouin textiles. While researching, I enjoyed learning more about the double-weave animal pack-bands that are woven by Qashqai nomads. Pictures of their bands are included as well as information on informative and inspiring magazine articles and websites.
And then there’s flora….my leaf pattern and Gerbelien’s Flower Love pattern, for example…
Forty-five pattern charts will keep you busy while your mind turns over ideas for designing one of your own. A section in the book is devoted to designing. Another shows you how easy it is to chart a figure from an image of a woven textile. There are charting challenges with an Answer Key in the Appendix.
One of the hardest things when I was putting this book together was how to come up with a limited set of patterns. I tried to provide examples of angular shapes, curve-like shapes, lines branching off at varying angles, thin lines, heavy lines, vertical and horizontal bars, curls and swirls so that you would have examples of the various elements that could be used to create your own patterns. The charts are there for you to enjoy straight from the book to your bands but also there to inspire you to create your own patterns.
The step-by-step pictures and detailed instructions and descriptions are supplemented by video clips. Both the PDF and printed formats allow you access to the clips.
As you can see in this picture, the tools you need to use are simple. I use two “tongue-depressor” craft sticks which do just fine as you learn. If you plan on doing a lot of double weave, you might think about investing in some heavier smoother swords which are more comfortable in the hands.
There is a series of instructional clips that supplement various sections in the book as you set up the loom , start weaving, learn about color changes and how to pick up threads to form patterns.
Two additional clips were filmed in silence so that you can watch the process in an uninterrupted flow.
One of my favorite sections is the one on how to finish a band. I was pleased about being able to teach one of my favorite braids as well as weft twining which you will find useful and decorative not only for double weave, but for all your bands. There is also instruction on a special way to finish double-weave bands which makes them easier to attach to buckles and clips for creating straps.
I hope that you enjoy my latest addition to my collection of technique and pattern books. Maybe I will follow it up with a pattern book but, in a way, I would be happy if that proves to be unnecessary because you are all busy creating your own beautiful patterns! That would mark the achievement of one of my goals in writing this book.
As always, thank you for your support and thanks to everyone who has bought the book since I posted about it on Facebook. (and also to those who discovered the book on Taproot Video before I could even announce it!)