Backstrap Weaving – The Music of Weaving

tools01A weaver posted something on Weavolution recently that stuck with me. An Australian gentleman, Hakim, is learning to make cut pile knotted rugs with an Iranian teacher in Australia. He said that when he is at home working on his practice piece, he can tell that the tension of the warps is correct if they make the same sound  when he handles them as they do when he is working on his learning piece with his teacher in class.

Priceless knowledge!

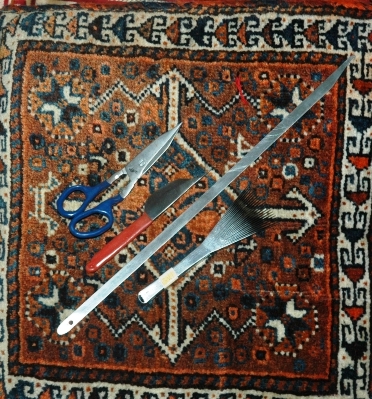
(At left you can see an example of a set of tools that I hope that Hakim can get for me for the day when I try this technique! It’s on that long, long to-do list).

Hakim’s comment made me think about the different sounds that are connected with weaving on simple looms and how much I enjoy them.

I am not one for placing things in my ears and listening to music while busy with something else. I can’t stand that. I like to be in touch with the sounds around me. They form a very important part of my memories of places and experiences.

In my skiing days, I would wonder at people who skied with headphones on. I would never give up the pleasure of hearing the wind and the swish of the skis on the snow, or the sudden change of sound as snow turned to ice giving me time to react and adjust position.

I learned to fly a glider when I was 19. There is nothing like the sound of an engine-less craft rushing through the air. There was so much with which to be occupied while learning (especially for someone like me who was so utterly un-coordinated at the time!) but I could always simply rely on my ears for certain information. For example, if the sound of the rushing air suddenly disappeared it was a sure sign that I had the nose up too high and that told me that I had better do something quickly before the glider stalled!

As for sounds while weaving, I love using multiple big swords. I so enjoy the musical tok tok sound they make as they knock together in the sheds. And I love the chuckling chatter of all the sticks on the loose as they fall together when I release tension and roll up the warp at the end of the day. You can see below the sticks used in the last wall hanging piece….many different kinds of wood making interesting sounds. It can become quite a collection!

O

Then there’s the plink plink sound as the tip of a delicate Guatemalan pick-up stick slides from one taut warp to the next as the weaver counts out threads for supplementary-weft inlay.
weaving-tijera

The dancing dangling bobbins used in weft twining go clackity clack as they twist and jiggle.
final-twining-sessionI love the opportunity to drag the llama bone tool across strong highly-twisted wool threads…scritch, scritch, as I strum to help separate the warps.

OListen to my teacher doing it…

If you stroll around a  village of weavers in the central highlands of Bolivia, you will know in which houses a weaver is at work by the LOUD THWACK!! THWACK!! of the llama bone hitting the sword as the wefts are slammed into place. That sound is one that  is not really pleasant, at least to my ear, when I am seated right next to my teacher. Here is one of my teachers in Candelaria at work at her loom:

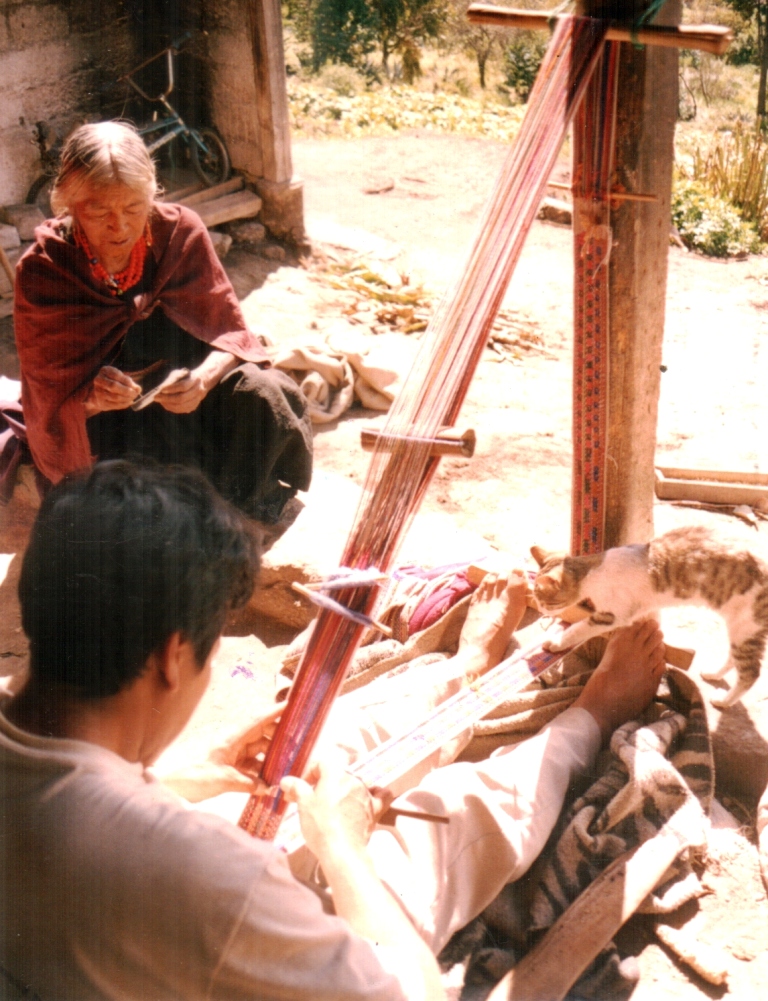
When I stayed in the stilt-house home of my weaving teacher in Ecuador, I was often awoken by the muffled thump, thump and accompanying vibrations as Trini drew down her heavy beater while working at her vertical loom. This was combined with various house shaking and creaking sounds as the loom was connected to floor and ceiling beams…a part of the house itself. You can see that big sword/beater lying across Trini’s leg below and get an idea of the muscle that goes into operating this particular set-up!

trini-opening-shed1

The sound of threads in a warp-faced weaving rubbing past each other as a shed is opened can range from a soothing smooth swish to a painful tearing protest depending on the yarn being used and how it has been prepared.

when weaving with new backstrap weavers, we even learn to be amused by the constant clatter of swords jumping out of their sheds and hitting the floor. Each sword has its own musical tone…nowhere near as much fun on a rug! A cement floor greatly enhances the melody!

Joan following a pattern chart at the Mannings.

By the way, I am in charge of picking up the fallen swords….gives me something to do. It is funny that as time goes by we have people weaving in silence. What happened to our musical accompaniment? Well, new weavers, without even realizing it, get a feel for the right amount of tension and the sweet spot in the warp where the sword will sit happily upright and not leap to the floor. Or…they just get rather good at catching the sword on its way down!

Maybe one of the nicest sounds for me is the fwip fwip fwip fwip in rapid succession as I pull my heddle string quickly but carefully (or else it will tangle miserably!) off its heddle stick. This means that the piece is finished!

Speaking of finishing…the wall hanging is off the loom and away in the closet until another time when I can face braiding all the warp ends. I will show it to you when that is done.

In the meantime I am circular-warped and coil-rodded in my purple scarf project! Thank you teachers Felipe and Ju Nie.


purple sacrf project backstrap loom

facebook postCheck out that coil rod! If you are wondering what all that fuss is about, read last week’s post. I am using my studies with Guatemalan teachers to weave the supplementary weft patterns.

The pattern you see above will appear at both ends. I am resisting the temptation to fill the middle with designs and hope to weave one long continuous pattern in the narrow area bordered by gold along both outside edges. I may place very widely-spaced small individual motifs in the center panel as I go.

I am inspired by the colors in the  above picture that appeared on my Facebook news feed. I do hope to be able to give you its source later. I can’t find it for the time being.

I like the circular warp. It took a while to clamp it well enough so that it wouldn’t just slip around the loom bars with every movement. I am not yet sure what role the coil rod is playing but it isn’t getting in the way of anything so there it shall stay.
dovetail warp Salasaca EcuadorI can see the merit of the triangular set-up that my belt weaving teacher in Ecuador uses with his circular warp.

That set-up opens out the circular warp (into a triangular shape) separating the lower layer from the upper. I am not using the triangular set-up and I find it a little off-putting seeing the lower layer immediately below where I am weaving. The unwoven threads fan out a bit wider than the woven fabric and makes it a bit harder for me to clearly see and control what is happening at the edges of the upper layer. It is also more difficult to get to the back of the weaving, which is necessary when dealing with the tails of the supplementary wefts. I have to work my hand between the two layers to do so.

But, I have just started and will, no doubt, get used to this just as I am now used to the fineness of the thread with which I am working.

As I get used to this I am hoping to find out more about the coil rod and what it is doing. Until next week….


Backstrap Weaving – Hands Full of Threads

The black neck wrap is done and I am already thinking about the next one.

I thoroughly enjoyed working with this fine Guatemalan cotton thread (you see how I have forgotten about all the woes in the beginning!). It was fun picking up threads with the delicate Guatemalan pick-up sticks and feeling the silk supplementary wefts slide through my fingers.

This will be the color scheme for the next one…

colors for next backstrap woven scarf

Maybe I will use some Guatemalan-inspired designs this time or perhaps I will invent some of my own.

cotton-spinnersI got the black piece off the loom and then I was faced with fringe twisting. Would you believe I have never done this before? I have left fringes on placemats and braided the ends of other pieces. I had read the grumblings about fringe twisting from those who regularly weave scarves in the weaving forums and seen pictures of the gadgets and gizmos that have been designed to make this task less tedious.

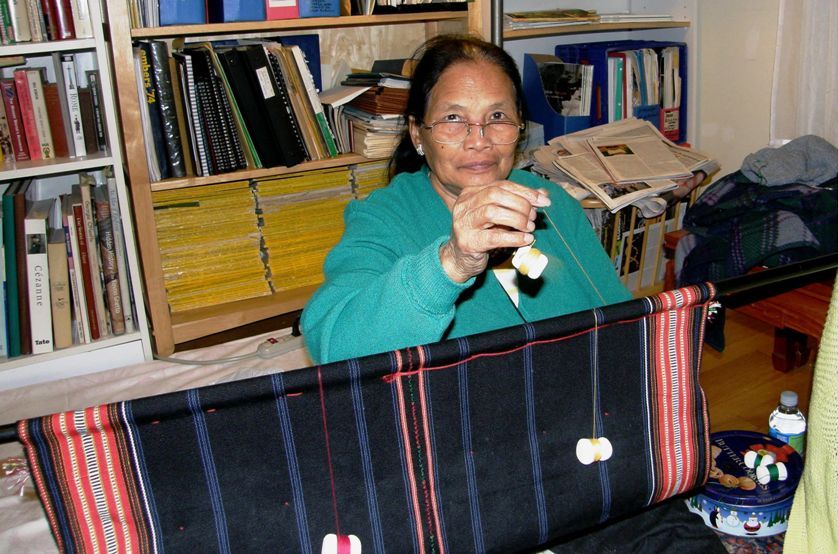
I even watched a video I had taken of my Montagnard weaving and twining teacher, Ju Nie (seen at left spinning cotton), twisting the ends of a piece she had recently taken off her backstrap loom. Ju had come to visit at friend Betsy’s house and, rather than sit idle while chatting in the living room, she pulled out a wad of stuff wrapped in paper and a woven piece of cloth and started working. The “stuff” turned out to be mushy, sticky over-cooked rice through which she drew the warp ends before rolling them on her leg and setting them in the twist.

Here is the video. Ju explains that doing it on her pants is “no good” and that it works much better on her bare leg. I am guessing that her bare shin makes the best rolling surface.


So, I twisted my fringe and it wasn’t as slow as I had thought…much faster than braiding, I can tell you! I added weft twining to the ends of the fabric before taking it off the loom. I think that made a nice finish.  See the countered weft twining tutorial here.

And then I found that scarves are kind of hard to photograph…way too long and flat and lifeless to try and stretch out in one shot so I gathered it up and threw it down many times, fiddled about and I felt that this was the best “pose” in the end.

bhutan scarf with border

And another shot that shows my favorite central motif…

finished bhutan scarf backstrap loom

Although I was mad keen to get into the Guatemalan purple thread and warp up another scarf, (especially since I think that I  already experienced, hopefully, all possible mishaps when weaving the black one), I decided that there was another project sitting in the closet that needed my attention…(plus I really need to ponder and plan the patterns I want to use on the purple scarf before rushing in and weaving it)…

wayuu_motif_with_twining

Remember this guy? I had just started the large main motif when I decided that I would not touch this until I was sure I would have enough time to stick with it and finish it. When doing pick-up, I think it is best to do a pattern all in one go rather than leave it sitting while I travel. If I leave a piece for a long period of time,  I can almost see the place where I left off and picked up again. Perhaps I sit a little differently, apply a little bit more or less tension, beat differently…I don’t know…something changes. So, now is the time to get down and finish this piece.

Usig a forked stick in the warpI welcome the opportunity to have my hands in there and full of threads again. I am not a pick-up stick kind of gal,  unless a particular technique or yarn really demands it. I like to hold and pick and drop threads with my hands. Perhaps it’s because that is the way my first Peruvian teachers showed me. I have been shown and I have willingly tried other ways but I always come back to just using my hands.

Here is a weaver creating a belt patterned with supplementary warps. It is a narrow piece and so it is easy for her to simply insert her hand between the warp layers to do the pick-up.

I was finally successful in uploading the video of this weaver at work. You can see how she does her pick-up as well as see the two-stick method she uses for opening the heddle shed. She has a forked stick in the warp….one prong is her shed rod and the other prong holds a second cross. Grasping and twisting the fork, while leaning forward to relax tension, helps her to smoothly open the heddle shed. 

These are the kinds of textiles she produces…

O

I watched a gentleman from Chahuaytire also weaving supplementary-warp patterns into a much wider piece of cloth. He uses a pick-up stick to hold all the threads in both the pattern and plain-weave sections as he works his way across the cloth…


This is his weaving…

chahuaytire backstrap weaving

Both weavers work equally fast, don’t you think?

So, on I go with hands full of threads. This is the third piece in my red-white-and-black wall hanging series. This one has patterns which have been inspired by the si’ira belts woven by the Wayuu people of Colombia and Venezuela. Since starting this project, I got to go to Holland and meet Mirja Wark who spent years studying, collecting and cataloging these belts as well as writing a book describing the weaving, braiding and twining techniques used.

si'ira belts wayuu mirja wark

wayuu project in progressThese are belts that Mirja herself wove while studying. You can see the “cow’s nose” pattern at the bottom of the blue, pink and green belt that I used in my wall hanging. The large motif that I will use in the center has been very much adapted to fit my piece and uses just certain elements of the Wayuu patterns as inspiration. There are a lot of threads to pick and, until I things get rolling, I am very much clinging to my pattern chart. Thank you, Terri, for introducing me to removable highlighter tape which works like a dream!

So I will be parked in front of that piece for some time while taking breaks to re-spin the Malabrigo yarn, plan supplementary-weft patterns for the discontinuous-warp piece for which the Malabrigo is destined, ball up that large skein of Guatemalan purple cotton, sketch some patterns for the purple scarf project, plan piece number four in the wall hanging series…maybe ikat??…do I dare?

And I am folding this sampler piece this way and that to see if something useful can be made of it. It’s still on the loom and there is room for more pattern experiments.

O

Let me show you some things that Ravelry members and students and friends have made. It is a strange coincidence that three people decided to edge pieces of clothing with woven bands. Janet decorated a pair of felted slippers that she made, Laura edged gloves (and also made a camera strap and headbands) and Julia edged a couple of tiny shadow-weave kimonos with a pebble weave band. Three gorgeous projects! (I am in love with that shadow-weave cloth, by the way…it takes four shafts…I would like to try it).

christmas_projects__2012_006_medium

laura xmas projects

kimono_baby_black___white2_mediumI will leave you with the happy twin recipients of the wee kimonos…Julia’s grand nieces!

ZellaHattieinKimono_medium2

######################################

Right before I was about to publish this post,  a question was posted in the Ravelry group by a weaver who is trying supplementary-weft patterning for the first time and not getting the rich satin-like finish  that she would like in her patterns. Instead, there are spaces and gaps between the rows of her design. I posted a reply in the group but am copying it here as I think that it may be useful for others who feel like trying this lovely technique…

There is no formula that will suit all weavers…that is, “x” number of strands of such-and-such a supp weft material will give sufficient coverage with such-and-such warp thread. All weavers are different in the way they handle their warps.

For example, some weavers put a lot more tension on their warp than others. This means that they have fewer picks per inch than others because the warps are pulled so tight that they can’t bend over and under the wefts as easily as they do for weavers who use less tension. This means that a certain amount of supplementary weft material won’t give the same amount of coverage for those weavers as it does for others who use less tension.

Another case…some people simply don’t beat hard enough when using supplementary wefts. I beat hard and really mash the weft into place…not “wham wham” beating…more like placing the beater right at the weaving line and pushing against the weft hard with a rocking motion.

Other people pull too tightly on the supplementary weft. It has to be fairly relaxed in the shed to allow it to spread and cover the surface. As an experiment, pull your supplementary weft tight once you have changed sheds and see what happens. It will flatten and narrow and not give good coverage. You have to find the balance between thread that is relaxed enough in the shed and bumps at the sides, where the weft turns, that are not too big and loose.

These are all things that come with trial and error and experience. It might be that you need to use more supp weft material or it could be one of the other factors I have mentioned here.

I often use thread that is similar to #3 and #10 crochet cotton. It is Brazilian cotton that I get here in Bolivia. I have used two strands of embroidery floss with the “#3” and one and a half with the “#10”. This gives people an idea of where to start and what to try but, as I said, every weaver is different.

Hope this helps.

ETA My first Guatemalan teacher combed the strands of her supp wefts with the point of her pick-up stick so that they lay next to rather than on top of each other. They didn’t move with handling…the floats are not long enough to cause that to happen. I did the same with the six strands of 60/2 silk on my current project.

Backstrap Weaving – The Weft-Patterned “Neck Wrap”

I suppose that it is normal to want to look back a bit as the end of the year approaches. This time I decided to jump back to the end of my blog years in 2011, 2010 and 2009 and take a look at what was going on. It is interesting to see that supplementary-weft patterning was a part in some way of all those December posts.

This time last year I was in a downsizing phase and rummaging through my closet to see what could be tossed. That was when I came across this wildly colorful supplementary-weft sampler that I made after having studied some of the patterning techniques in a few different communities in Guatemala. I included it in my blog post…(no, I didn’t toss it!)

supplementary-weft-pattern-detailYou can see that all the patterning elements that I am using in my current supplementary-weft project are present in this piece and this is barely the tip of the iceberg when it comes to all the different ways to create patterns with supplementary wefts that are used by Guatemalan weavers.

In December 2010, I was posting about the practice piece I made after studying with the Montagnard (Vietnamese hilltribe) weavers in North Carolina.  While the piece is mostly about the warp float patterning technique that they use, it also includes twined ends and a couple of their traditional motifs woven with supplementary wefts.

O

And finally, back in December 2009, when I had been blogging only a few weeks, I wrote a post on weaving wider projects which included this…

OLYMPUS DIGITAL CAMERAI included a tiny bit of supplementary-weft patterning  in the center of this placemat and mug rug set. I gave the pattern a thin striped look instead of a richer satin-like finish so that it would mimic the stripes in the two outer bands. The simplicity of the outer bands were inspired by a Guaraní textile.

So, this wonderfully fun patterning technique, which allows quite a lot of spontaneity, (the patterns on both the Montagnard and placemat projects were not planned and could have been just as easily cut out and removed if I had decided that I didn’t like them) has been in my weaving skills kit for quite some time.

hatbands of PotoloI remember the first time I saw a Bolivian highland weaver sitting in the street of Santa Cruz making a hatband only days after I had arrived here in 1998. The base weave was off-white sewing thread-weight cotton and she was creating patterns with bright acrylic threads. I crouched and chatted with her, watched what she was doing, and noted the name of the street so that I could return the next day and watch some more. I never found her again nor have I ever seen another weaver making a hatband since! I have seen plenty of beautiful hatbands but never one being woven again.

The hatbands above adorn the hat of a weaver from Potolo in the Bolivian highlands….bright colors on a black ground, much the same as the color scheme I have chosen for my scarf project. I have decided to call it a “neck wrap” as it is not going to be all drapey and flowing as one would normally expect a scarf to be. As long as I don’t have to actually bend and fold it around my neck, I will be happy!

start of Bhutan design scarf

Here it is, a little bit further along from the little I showed you last week, after all the messing around and lesson-learning. I am trying to think if I learned any more lessons from this wicked warp this week….I think I probably just convinced myself even more that I love putting in a second cross stick behind the shed rod and using those two sticks to help open the heddle shed. (Of course, this is just one of many ways that backtrap weavers operate their looms).

Second cross stick backstrap loom

Above you can see the second cross stick and shed rod in place. The third shorter stick sitting between them is the pattern stick.

If you watched the video of the Tacabamaba weaver in last week’s post, you will have seen how she places her sword on top of the warp and rolls that together with her shed rod to help open the heddle shed. Below, you can see Montagnard backstrap weaver, Ju Nie, doing the same using a bamboo slat instead of her sword.

montagnard weaver opening heddle shedI have a video on my page about sticky sheds showing this system in action.

I prefer to have the second stick permanently in the warp. One of the weavers that I met at the recent conference in Cusco used this system, with the second stick permanently in the warp, to open her heddle shed.

Her set-up is so cool. I wish I had a forked stick like that…must go out and look for one. The prong of the fork nearer the weaver holds the stick shed open while the other prong sits within a second cross.

Usig a forked stick in the warpShe would simply grip the place on the fork where both prongs join and twist the fork away from her while relaxing tension and pulling up on the heddles.

In the picture above, she is about to slide her sword under the warps raised by the shed rod. She will then turn the sword and clear those threads through the heddles and down to the weaving line. I have wonderful video of this weaver operating her loom and doing very fast supplementary-warp pick-up and I had every intention of showing it to you. Too bad my internet would not behave and allow me to upload it.

So, my warp has been behaving like a dream…sticky threads have been defeated and no more have broken. The odd loose ones here and there have been dealt with smoothly and calmly.

The center of Bhutan scarf project bacckstrap loomI decided to make the long motif the center of the scarf and work from there on repeating the designs from the first half of the project. However, I am not repeating the  motifs in the side bands as there are still plenty of those that I want to try!  I have no discipline sometimes!…I should just keep it simple and symmetrical…

starting the other half of the Bhutan scarf projectHere starts the other half….

I managed to almost squeeze in one more green motif before it was time to stop and write this blog post. It’s addictive and I don’t want to stop! The motifs are new and I am anxious to see how they turn out. Plus, I can’t weave it at night so, I really try to make the most of daylight hours. All that black thread is just too much at night and I am on an economy drive so, no super high powered lamps allowed!

one more green motif bhutan scarf

In the evenings, I have been spinning away tightening up the twist on the Malabrigo wool singles I bought while in the US. I am hoping to then ply them and weave a discontinuous-warp piece. As I am not confident about trying any warp float patterns on one of those yet, I will decorate the panels with some wool supplementary-weft designs.

respinning wool for discontinuous warp projectWhat has been happening in the Ravelry group?  ”It’s dead in here!” exclaimed Bobbie recently but she livened things up a little by posting her recently finished guitar strap made for her granddaughter…

bobbie guitar strap intermesh

This was made using the instructions for the two-heddle intermesh technique from my second book. Bobbie used Annie’s guitar strap kit to convert her beautifully woven band to a guitar strap.

Rob has been using my first book to weave some lovely bands with Andean patterns but we may have lost him to a four-shaft loom which recently appeared in his life. Now he is also turning out beautiful towels on that. Here are some of his latest backstrap, inkle and four-shaft loom projects….

rob's weaving projects

There have also been some mutterings in the group about using the 24 sets of string heddles to weave one of the fabulous fajas saras after I showed a picture of some of the belts of San Ignacio de Loyola Peru…

fajas saras san ignacio de loyola peruThat could be a fun weave-along but I don’t think I will join them on that one. While I do love making string heddles, I enjoy doing pick-up even more!

ikat textiles of the AndesOn another topic, a couple of interesting ikat resources came my way recently in my internet ramblings…

Quite by chance I discovered an e-book byMarguerite Gritli Pfyffer entilted “Ikat Textiles of the Andes”.

The book is the result of the author’s two years spent traveling in the Andes researching ikat patterned textiles. There is one section devoted to the pañones of Tacabamba that we saw last week.

From the other side of the world in China, Chris Buckley sent me the link to his recently finished paper entitled Investigating Cultural Evolution Using Phylogenetic Analysis: The Origins and Descent of the Southeast Asian Tradition of Warp Ikat Weaving.

The paper can be viewed online here.

Chris has always been very generous with his resources and, on several occasions, has allowed me to use images of textiles in his collections in these blog posts and for my charting.

Christmas will be done by the time I come to write my next blog post. I don’t do Christmas but I wish all of you the very best for whatever you get up to in the coming week. Now, back to that “neck wrap” thingy….

Backstrap Weaving – One Warp, Many Lessons

Guatemalan pick up sticksI have been playing with my black scarf warp for a week now and feel that, at last, I am slowly getting to know the “beast”. There have been some adventures along the way.

I am not so nervous now about the fineness of the threads. While broken warp threads are a major nuisance, they really aren’t that hard to fix once you have a system. Having said that, I haven’t broken many. As it turns out this Guatemalan cotton is surprisingly resilient. I like it.

I have learned to slowly and softly strum the warps with the blunt end of my pretty Guatemalan pick-up sticks (pictured at left) as I open the sheds. I insert the sword and shuttle carefully. Hitting a thread  along the way will either loosen or break it. I think that loose threads are possibly even more annoying and more difficult to remedy than broken ones.

In the meantime I enjoy sitting back now and then to look at the smooth silky curtain of unwoven thread in front of me. It is impossible to see each individual thread. They all merge into a black glossy sheet of loveliness which I have tried without success to capture in a photograph. Is this warp a black beast or a black beauty?

sample for Guatemalan cottonYou may be surprised to find that I have not really advanced at all since I showed you the piece last week. While I haven’t advanced in terms of inches happily woven, I have advanced in lessons learned. There were, in fact, many inches woven….and then sadly un-woven, woven and un-woven yet again….before I could feel happy with what I was producing. And that showed me more than anything how much abuse this cotton thread could stand.

Firstly I had to give in to the fact that it was useless trying to weave a 7-inch piece of fabric on a warp that clearly wanted to be wider.

Lesson 1: Sometimes a “wee” sample just isn’t going to do the trick! The teeny tiny band that I hastily wove to test this new-to-me yarn simply did not have enough ends to give me a true reading of the width I could expect. So, after un-weaving and starting to weave the black beast once again, I let it settle into the width it was yearning to be.

Lesson 2: Don’t get so caught up in happily playing with the supplementary-weft patterns, that you neglect to keep a close eye on what is happening to the ground weave. Yes, I was having a lovely time playing with the soumak technique and didn’t notice how much the ground weave, or the “canvas” on which I was placing the patterns, was becoming distorted. This was a sign that I was stuffing too much supplementary-weft into the sheds. The material that I was using for the supplementary weft, 8/2 tencel, was not appropriate.

Lesson 3: Several strands of fine yarn work better as a supplementary weft than just two strands of a thicker yarn. I already knew this!! but, I was in really new territory with this fine yarn and again, my sample had “lied” to me!  So, it was out with the 8/2 tencel and, yippee, I got to use my new 60/2 silk.

60/2 silk

So, instead of two 8/2 tencel sausage-like strands, I used six to eight strands of the 60/2 silk which emerged from the ground weave to lie side by side like a glossy satin sheet on the surface of the fabric.

Lesson 4: Not everything that is labeled as 60/2 silk in the bargain basket at the yarn store is, in fact, 60/2. Imagine the frustration…. I kept doing my sampling with six strands the off-white silk pictured above as I have more of that than the colors. Then I would weave the “real thing” with the colors. But things just weren’t working out. Why? The off-white 60/2 is at least twice as thick as the colored 60/2’s!…go figure.

Lesson 5: Slow down! A little extra planning goes a long way. It was beautiful to see a video of  Bhutanese weaver Leki Wangmo at work on an incredibly richly patterned piece of fabric. It was as if she had cast her arm across the warp and scattered seeds.  Then we got to watch as the the seeds sprouted and flourished into patterns. It all seemed so random but, without a doubt, it was all carefully thought through and planned from the moment the first warp thread wound its way about the warping stakes. The strategic placement of the stripes and the placement of the particular patterns within them was all part of the overall plan.

backstrap loom Bhutan

It was hard for me, having so many photos and books with images of designs to use on my scarf, to carefully select and plan the layout of my piece. I wanted to weave and try everything at once! Result…mess! Un-weave and start again!

Scarf project with supplementary weft patterns backstrap loom

So, here it is. It may look much the same to you as what I showed you last week but it is, in fact, a little wider, the colors are slightly different and I am using silk weft instead of tencel. Funny how some of the small skeins of white thread dyed in the one black dye bath came out more intensely black than others…another “go figure”. I need to even up the length of the exit points of the supplementary wefts so they look neater and more consistent.

Now I am taking it all more slowly…enjoying rather than fearing the fineness of the cotton warp threads, appreciating the smoothness of the silk weft. I no longer think “Aargh!…sticky warp”. I gently strum and the sheds open cleanly. Now to sit down and map out a design.

While I sit and feel pleased with my seven-and-a-bit-inch piece of cloth as it takes shape on the loom, I remember the backstrap weavers from Tacabamba, Peru that I met in Cusco with their equally fine cotton ikat-patterned shawls measuring up to a meter in width  Humbling!! Oh so very humbling!!

The simple backstrap loom of Tacabamba, Peru on which the indigo ikat-patterned "panones" are woven. They are up to one-meter wide, covered with tiny motifs and have patterns knotted into their fringes.
The simple backstrap loom of Tacabamba, Peru on which the indigo ikat-patterned “panones” are woven. They are up to one-meter wide, covered with tiny motifs and have patterns knotted into their fringes.
Of course, the warp lying idle on the ground attracted many admirers all anxious to see it spring to life.
Of course, the warp lying idle on the ground attracted many admirers, all anxious to see it spring to life.
Nila sits while she prepares the loom for weaving. Weaving is done standing up.
Nila sits while she prepares the loom for weaving. The weaving itself is done standing up.
A few final adjustments are made before weaving can begin. Then Nila asked the crowd to give her more room and we all understood why when she raised the very long sword and shuttle to be placed within the sheds.
A few final adjustments were made before weaving could begin. Then Nila asked the crowd to stand back and give her more room and we all understood why when she raised the very long sword and shuttle to be placed within the sheds.

Now you can watch Nila at work!…The video starts with laughter as Nila nearly clobbers an onlooker, who got too close, with her sword! I love the way she gently pats the warp to separate the threads. That is her way of dealing with any stickiness. I love her balance…one arm outstretched to help her stay centered while the other reaches to pass the shuttle. It’s like a dance.

wearing the Tacabamba shawl

Here’s Tacabamba weaver Laura wearing one of the shawls…something to aspire to??? So, I head back to my wee 7-inch piece hoping that I will end up with something that has at least some of the lovely drape that those warp-faced shawls have!

Backstrap Weaving – Supplementary-Weft Patterning from Two Continents

I have had so much fun playing with supplementary wefts this week on my white warp!

This is the start of my blank canvas…an off-white plain warp-faced piece of fabric into which I can weave patterns with tencel supplementary weft. My inspiration came from several textiles from Bhutan that I saw during my recent trip to the US and I was able to use patterning skills that I learned in Guatemala to set up the warp and lay in the wefts. It has been fun to be able to apply the skills learned on one continent to weave designs from another.

First came the insertion of the two patterning sticks. From what I have seen on Bhutanese backstrap looms that I have examined and from videos, the warps under which the supplementary wefts will be passed are selected from those in the stick shed and then from the heddle shed and stored on two patterning sticks.

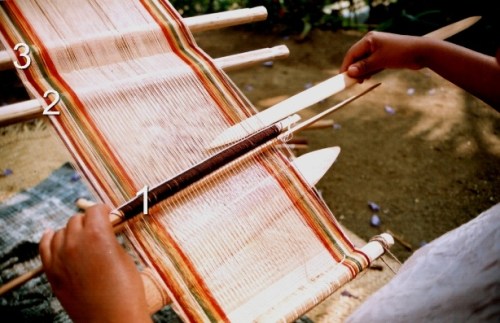
This is the warp that I used for the Bhutanese designs. The two sticks bound together with rubber bands are the stick shed stick and the stick which holds a second cross. The darker of the two sticks in front of those holds the patterning warps from the stick shed and the other holds the patterning warps from the heddle shed. You can see my video tutorial of how these sticks are placed in a warp destined for Guatemalan patterns here.

The spacing of the warp threads that are selected and stored depends on the kind of pattern being woven and, to a certain extent, the kind of yarn.  Within Guatemala, this can vary a lot from region to region. The warp pictured above from San Antonio Aguas Calientes in Guatemala shows the two patterning sticks in place (the two thinnest sticks). These will be used to raise the warps under which the supplementary wefts are passed saving the weaver the work of having to pick them up from every shed.

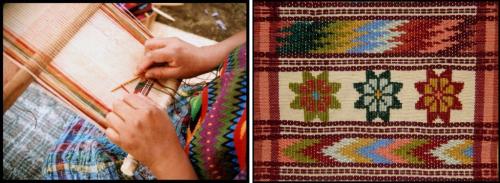
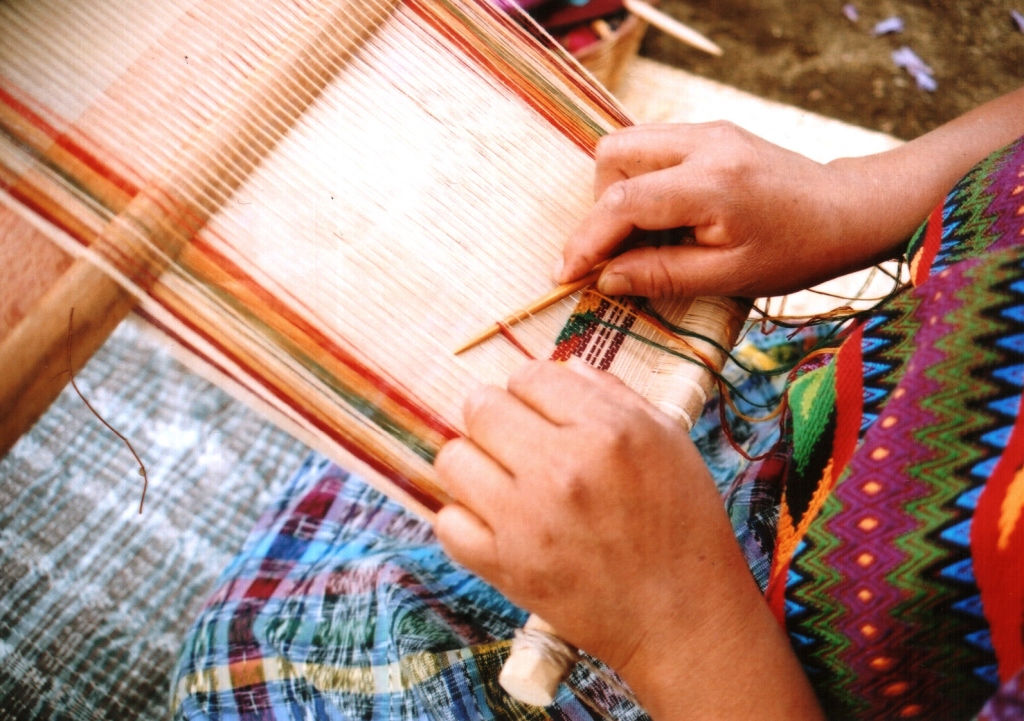
My weaving teacher in San Antonio Aguas Calientes has just selected the warps from the stick shed for her first patterning stick and is about the store them on a stick which will sit between sticks 2 and 3.

Lydia will draw the patterning sticks toward her to raise the selected warps to weave patterns like the ones she taught me to weave above right. The patterns in the upper and lower bands were woven using the warps stored on the two patterning sticks. The flower patterns in the center band, however, require the weaver to select different warps for every pick and so, patterning sticks cannot be used in this case. Naturally, weaving those flower patterns was a much slower process.

Here are some bookmarks that I wove using Guatemalan patterns. Most of these designs are based on those that I was taught in Santa Catarina Polopo. My teacher in that part of Guatemala also uses the two patterning sticks but the warps that are selected are spaced differently to those in San Antonio Aguas Calientes and you can immediately see how different the patterns are from these two weaving communities.

Above, you can see how the warps are spaced in one of the pattern sheds. I have just placed the supplementary weft which will allow me to weave the stem and base of the plant.

Here are some more patterns that I wove with my teacher in Santa Catarina Polopo. All the patterns except for the ‘X” design which separates some of the motifs were woven using the same two patterning sheds.

On the above piece which I wove in Guatemala alongside my teacher, you can see all the patterning techniques that I used in my latest Bhutan-influenced sampler…the horizontal and diagonal “chain stitch” lines  and the solid “stitches” that serve to fill in the outlined shapes.

The question was, how do the Bhutanese weavers space the warps that they select for their patterning sheds?

Frustrating!! I had a Bhutanese loom in my hands when I was in the US with unfinished weaving and sticks in place. I took lots of photos of it but did I think to look for that crucial piece of information? No!!

Thankfully, Wendy Garrity’s wonderful website came to the rescue.

Pictures and sketches that she has there gave me the answer. As I said, it is quite likely that the spacing varies from region to region within Bhutan as it does in Guatemala but, I used the spacing that I saw in the pictures, and it seems to have worked.

Here is the piece growing on the loom. I didn’t use the patterning sticks with their pre-selected warps for the designs in the foreground. The sheds for those patterns had to be created manually for every pick.

Things to work on…making the supplementary-weft turn “bumps” neater and of a more consistent size, making a smoother transition from horizontal to diagonal line…I messed that up…, calculating better the amount of weft needed for a particular design…I wasted too much yarn!

I think of how accurate the Guatemalan weavers are. They know exactly how much weft they need for each of their patterns and waste nothing!

Some of it has been trial and error…finding a neat way to start the chain stitch took quite a few attempts. My Guatemalan teachers work that stitch one thread at a time whereas the Bhutanese weavers have a very cool way of working it using both threads at once. The end result is the same but it is these little differences that are so fascinating.

I look at Leki Wangmo’s magnificent work (above) and sigh!

Here are more gorgeous Bhutanese textiles that Ute left for me to examine while I was in Massachusetts…bands of supplementary-weft patterns on a ground of extremely fine tablet-woven cloth. I was told that the tablets used to weave the ground fabric had to be cut from X-Ray film to achieve such fineness!

He he :-)…one more shot of the whole lot so far. Can you tell I have been having fun with this?

Now on to much finer yarn. I have some cotton that my friend Betty got in Guatemala about 30 years ago…much finer stuff and I am thinking about making a very light-weight scarf with it with supplementary-weft patterns using the techniques I have been practicing on the sampler this week. The motifs will be smaller using this finer thread and the whole thing will hopefully look a lot more delicate than the sampler with its large kind of clumsy motifs. I can use it on my spring and fall trips  in the US. I am thinking black with lots of small colorful motifs.

Another thing with which I have just begun to play this week…

This is my first sample using the 60/2 silk that I got at Handweavers Studio in London (it was a splurge and one of my souvenirs of the UK trip!). I saw this pebble weave design on a textile in a book and  found it quite unusual. The picture’s caption states that it was most likely woven during the colonial period. The silk weaves up beautifully and yes, it is hard to see! All the little nicks and chips in my finger nails become immediately apparent as the fine silk catches on them. Now I just have to wait for THE project for this silk to come to mind.

In the meantime I am getting the third post on the Encuentro de Tejedores de las Americas ready…yes, I know I keep promising it.! I look at those pictures now and can hardly believe I was there among all that magic!

In the meantime, I will leave you with some Cusco magic fit for the coming season from the CTTC (Centro de Textiles Tradicionales de Cusco)…

Look at these gorgeous ornaments made from narrow woven bands! If you “Like” the CTTC on Facebook you can see many more beautiful images and news updates that don’t appear on their website.

Off to dye that cotton and start planning my scarf!