Backstrap Weaving – One Step at a Time

Stage One of the eventual move back to Australia is complete. I got back last week and have been struggling with the usual jet lag ever since. There are so many time zones to cross between Australia and Bolivia. Going forward in time on the way over there is really not that bad. It’s the return journey when you gain back the time you lost that really knocks me about.

I took a whole bunch of my weaving books over to Australia as this first part of my move. I can’t sell them here and don’t know anyone who would be interested in them. I know that once I am resettled in Australia I will be so grateful for the effort I made to carry them all that way. I also did some business and laid the ground work for the eventual move but I still don’t see it happening until well into 2024.

I spent most of the time with my brother and sister-in-law on the mid north coast of NSW. It was novel being there in the summer, something that I hadn’t done since 2014. There was a lot of pool and beach time, barbecues and picnics. I brought back a tan and a stronger Australian accent according to an English-speaking friend of mine here.

While breakfasting by the pool, I did a repair job on this bag that I wove for my sister-in-law back in 2006. It’s been around the world with her and is still in pretty good shape.

While I was over there, the latest issue of Tiny Studio Creative Life digital magazine was published with my article on ikat. The theme of the issue is Timey Wimey (it sounded odd to me at first but then I discovered that this is a quote from Doctor Who). The invitation was to consider topics on how tools and techniques have evolved over time, or perhaps something about putting a new spin on ancient practices. I described my various experiments with the ancient technique of ikat on my backstrap loom and the way I have given it my own unique twist in some of my more recent projects. Suzy always does such a nice job of laying out the text and images. I give her a lot of images to work with which I am sure makes it very challenging.

I took my new cotton spinning tool bag and enjoyed a lot of laid back family time spinning my stash of upland cotton and catching up.We hadn’t seen each other since September 2019.

Spinning kept me sane while on the road…I had a 22-hour layover in Los Angeles on the way home and was grateful for something to do while sitting in the airport. The ball of thread grew and grew!

My brother’s cars were in the workshop and so we had outings on the motorcycle and sidecar. That’s a unique way to see the countryside…watch out for crossing koalas.

I got to see at last some things that I’d had sent to my brother’s place in Australia for safe-keeping until I could come and claim them.

A book sent to me by Yingyu Hung in Taiwan on the style of backstrap loom used by one of the ethnic groups in her country. On the left is material used by some groups in Indonesia to wrap their ikat warps. I was curious about it and Sue Richardson kindly organized to have that sent to me so that I could try it.

My spinning tool bag doubled as a handbag when I was out and about. It went exploring with me when I was with my weaving friend Emerald in Sydney at the tail end of the visit.

Weaving with Emerald in Sydney many years ago. We met via his blog and have woven together on almost every one of my visits to Australia since then.

She lives just a stone’s throw away from the harbor and we walked our legs off one day touring the harbor and surrounds. It’s weird feeling like a tourist in the city in which you grew up. So much has changed!

Some things never change, though….the Sydney Opera House and the majestic Moreton Bay Figs atop Observatory Hill.

Airport-sitting time also leads to lots of screen scrolling. I watched a video of weavers from the Apurimac region of Peru and was astonished to see sash weavers using reeds on backstrap looms. I have never seen reeds in use like this here before and I hope that I can track down more information about that…..why have they chosen to use them, who makes them and what are they made from? Does their use pre-date the Conquest? Here is a screen shot that I took from the video which was posted to the Cconchaccota Progreso Grau Apurimac Facebook page.

I spent a week doing goodness-knows-what when I returned between bouts of nodding off due to the jet lag. Finally I was able to get my head together and plan a new project for Stage Two of the repatriation which is happening, believe it or not, next Monday. Aargh, I think I may be getting too old for this kind of thing. I’ll be back on flights to Sydney…on standby this time…trying to squeeze in just one more trip before high season prices kick in.

I decided to make a case for my passport…actually passports, in plural, because my residency sticker is in an old one and has to be carried on every trip…alongside vaccine and yellow fever certificates and ESTA document. I wanted a decent pouch to put all those bits and pieces in and hey, I am always happy for an excuse to weave.

I decided to use the mill-spun wool singles that I had bought a few years ago on a farm in California. The farmer had allowed my weaving friends and me to gather in his barn for a weekend of backstrap weaving and I was grateful.

Fond memories of gathering with my Petaluma friends in the farm co-op barn.

I really had no idea of what I would do with wool singles but it was nice to know that the wool had come from this farmer’s very own sheep. It’s a pretty blend of black and white.

I had taken the plunge and woven with it as singles some time ago when I created a slip case for my phone and was surprised at how well it performed in warp-faced weaving which can be quite hard on yarn.

I had used my handspun plied wool as the supplementary weft to create the pattern.

I was able to take the measurements from this project and use them to plan and create a wider and shorter piece of fabric for my passport pouch.

The warp for the passport pouch ready to receive its heddles. I fell asleep several times while making the heddles…jet lag is terrible! On the left is the felt airline freebie that I had been using which really isn’t big enough to hold everything I need any more.

I liked the pattern on the phone case so much that I re-designed it sideways to span the width of the warp. I again used my own handspun plied wool as the supplementary weft. So, that part of the Stage Two journey is done. Now I need to decide which treasured possessions will get taken over this time, the ones that I can live without here for the next year or so. There are actually still a lot more books but I just don’t feel like dealing with those right now.

While out and about wearing jeans in Australia, I suddenly became aware of just how worn and tired-looking my handwoven belt had become. I have been using this one belt exclusively since I wove it back in 2010. I wove a bunch of other belts at that time but this particular black-and-white became a favorite. I am actually pretty amazed at how well the rather soft cotton from which it is made has stood up all these years.

Belts that I wove years ago. The upper rolled up one became the favorite. The double weave one in the center will now take its place.

It has only taken me twelve years or so, but I finally walked the three blocks down to the sewing and fabric section of the market and got the holes punched in the double weave belt that I had woven but never completed all those years ago. The fact that I can walk a handful of blocks in either direction and find pretty much everything I need is something that I will certainly miss when I move back to Australia.

There you can see the double weave belt with its freshly punched holes, ready to use. The motifs were taken from Bedouin textiles that I had come across in my studies. I would check my understanding of the structures by weaving replicas of the motifs.. Even though the belt is in sturdy double weave, I still prefer to mount it on webbing for extra strength. I used a finer and “harder” thread for this belt than the thread I used for the old worn out one. I guess it will be with me for at least the next ten years or so. Somehow, I can’t see myself still wearing jeans ten years down the track, though!

The collection of metal “corners” in the photo are used I guess to protect the bottoms of handbags or perhaps the corners of leather wallets? I had seen them being used by a weaver who had covered books with hand woven cloth. The corners on the books that I’ve covered with cloth don’t need that kind of protection but I think that these metal corners nevertheless make a really interesting decorative finish on certain kinds of book covers. I spotted them in the stall while I was having the holes punched in the belt. Now that I have them, I have the urge to make more book covers. As if I need more books to lug to the other side of the world! Maybe that will be my first project when I get settled over there in Australia.

Oh my gosh, my head spins with all that needs doing before I can declare myself truly re-settled! High anxiety. One step at a time….

Backstrap Weaving – Time and Time Again

Panel 1: Within These Walls, a pandemic project.

My relationship with Time seems to be changing. I know that I am not the only one who got lost during these last two strange years, overcome by the feeling that time was speeding by… weeks and months merging into a hazy uneventful blob. Even now I struggle to separate 2020 from 2021. But I just recently realized that the passage of time is slowing down for me and starting to resemble something like normal, something recognizable from the pre-pandemic days. The calendar map that I have always carried in my mind’s eye is starting to reappear.

I resist the urge to go back and try to account, in terms of productivity, for the 24 months that have passed since we first went into lock-down here in Bolivia. Today marks the anniversary of the confirmation of the first known Covid case here. That any of us achieved anything meaningful at all is cause for celebration. And now I am talking as if it is all over. Of course, I know it isn’t, but there is definitely a change in my state of mind.

Three-panel wall hanging: Textile Trails

On the theme of Time, I am reminded of a question that I am very often asked when I show my woven work….. “How long did it take to weave that?”

I am trying very hard to think back to a time before I started weaving to see if perhaps I would have asked this question myself to a craftsperson and what might have motivated me to do so. Would it be because I was thinking of trying to make the object myself and needed to see if the time involved was worth my effort? Or perhaps I would want to know if the asking price for the object reflected the amount of time that had gone into creating it.

In any case, I find it a very difficult question to answer. How long does it take?…As long as it takes! I honestly don’t keep track. I don’t sell my work and so I need not consider time in order to fairly price an item. I am not weaving to a deadline. There is usually no exhibit for which the work has to be completed…the three pieces above were an exception as I had woven them for an exhibit at the ANWG conference in 2015. I would probably have to go back to my blog posts if I wanted to give an accurate answer in terms of the number of weeks on which I worked on a project. However, I would be at a complete loss when it came to the total number of hours.

I met a craftsperson some years ago and witnessed his response to the question…

“How long did it take to make that?”

His response:

A    l  i  f  e  t  i  m  e

I can only imagine that he very rightly considers that a lifetime of his accumulated knowledge, experience, skill and inspiration went into this and every piece that he has completed. I love his response.

So, I am willing to pour as much time and effort as is required into every piece I weave. There have been a couple of times, though, when I just wanted to get the thing done! One such time was when I had volunteered to weave six lanyards for a conference. The long piece of half-inch band with its small repeated motif did not excite me at all when the time came to weave it. I installed eleven sets of string heddles to move it along. I didn’t have to do any pick-up and that rather unique experience suddenly made the project very interesting as I came up with ways to remember which heddle came next in the sequence.

What I don’t like, is making silly mistakes and wasting time. Okay, I will admit that a mistake is always a learning experience and valuable for that reason but sometimes you just turn around and do the same old thing again!

A circular warp for a cotton scarf

Like the time I was using a coil rod for the first time on a circular warp many years ago. The coil rod (sometimes called rolling stick) is the uppermost stick in this cotton circular warp and I was using it because it seemed like an important part of a circular warp set-up. At the time, I didn’t fully understand its purpose. One of my aims for using it in this project was to figure that out.  While trying to move the rod as weaving progressed, I mishandled and broke the coil rod. I did it once…I learned something. I did it a second time…I cursed…but then I learned some more. The third time I broke it, it got flung to other side of the room and I continued without it. It was then that I started understanding its purpose because it was very much aware that it was a different experience weaving without it. And so I was happy to sit patiently and install it once again. 

(Note that I am talking about circular warps here. I do, however, continue to use the coil rod on both circular and single-plane warps if I am doing plain weave with cotton or silk (materials that have little to no stretch). I have written a lot about this tool in blog posts over the years. If you are interested in learning more, you could start here.) 

Maybe this is something that we don’t consider when we ask the craftsperson how long it took to complete the project. Do we want them to include the time used to fix “oopsies”? After all, the fixing of the oopsies adds to that lifetime of experience about which my craftsman friend was speaking.

The first six inches of this warp were woven and unwoven twice before I found just the right weight of material for the supplemental patterning weft.

While the amount of time needed to weave a piece is not important to me, I am always interested in learning about techniques that weavers have developed to help make the whole process more efficient, like the use of multiple string heddles and pattern storage sticks, for example. However, there is one thing that I have always been a bit stubborn about and that is the use of sizing.

In weaving, sizing is a substance that is used to coat warp threads that are hairy or “sticky”, or have other characteristics that make it difficult to achieve clean sheds. Basically, it smooths the threads. I resist using it purely because of the “ick” factor. That is, I hate to think of the mess of dunking my warp into a bath of starchy goo and I don’t think I would enjoy the feel of the stiffened coated threads as I weave. Keep in mind that my hands are usually in almost constant contact with the threads as I weave pick-up patterns. Of course, it all washes off in the end and you are left with the original softness of the yarn but yech, I just don’t like the sound of it. I prefer to stay away from the sizing and just adjust my loom-operating methods instead.

Adapting my methods to the materials in use: I was able to weave with Knit Picks Palette….a soft, loosely-plied wool and create a four-selvedged piece.

My approach when working with sticky materials is to adapt the way I operate the loom…take a lot of care when opening sheds by working the threads in sections, using my finger tips to help release the grip a thread may have on its neighbors. I advance the warp more often so that sticks and heddles are not sitting on and abrading any one section for too long, causing it to shed and pill. Yes, it does slow things down but, as I said, I am not in any hurry. I suspect that using a sized warp on a floor loom is a different experience in that the weaver isn’t necessarily handling the warp threads during the weaving part of the process.

Another way to avoid using sizing might be to add extra twist to commercial wool yarn to make it smoother. My weaving teachers here create relatively smooth hand-spun yarn by using a high amount of twist. They also add twist to the synthetic thread that they buy in the market. This kind of yarn creates a certain kind of cloth. The thing is that I don’t always want that kind of cloth.

Two wool lap-size blankets that I wove using Mora yarn. It’s worsted spun which helps somewhat with the stickiness issue. I didn’t add any extra twist.

My latest project has been with mill-spun wool singles….sticky stuff. I could get a tiny heddle shed which I would then proceed to open further with my fingers. I didn’t want to use sizing. I didn’t want to ply it or add extra twist. I love the way it feels. The supplementary weft is my own plied hand-spun wool.

From the 27-inch warp I got 21 1/2 inches of cloth and my string heddles came up remarkably clean.
I always love the way the back of these supplementary-weft patterned pieces look.
There was a small amount of curl in the cloth at its opposing corners. Folding it to make a pouch for my phone and edging it with a patterned tubular band took care of that.

The fresh warp in the above photo was for a small closure tab. I used my plied hand-spun for that. I used a dense structure of three-span floats (intermesh) to produce a sturdy band…hence the two sets of string heddles.

The finished pouch.

I wet-finished the small piece on the right under the sword. The warp threads shifted slightly closer together, I took measurements, but I didn’t notice any real difference in the feel of the cloth. I didn’t wet-finish the pouch piece as I was a little concerned about color run in the supplementary weft. I had bought that roving already colored. As the supplementary weft is tightly wedged between the two layers of warp in several places, I don’t think that even a color-catcher cloth would stop the color from bleeding onto the grey wool. If wet-finishing had made a significant difference to the way the cloth felt, I may have reconsidered.

I hope that I get a chance to show this, the first of many projects in the mill-spun wool singles, to the farming couple whose sheep provided the fleece. My original plan had been to use this yarn for a shoulder bag project. I would dye the yarn to match the three-color strap that I had already woven…

I used my plied hand-spun wool for this strap. I don’t feel that I was heavy-handed in the amount of twist I used. The strap lies perfectly flat and the yarn was beautiful to weave with.

However, now that I have seen the cloth that this yarn produces, I can’t bring myself to dye it. I love all the subtle color variations from this blend of natural white and black. I’ll be using it as is perhaps for a pillow cover and will add color with supplementary weft instead.

So, I will turn once again to my Mora yarn for the bag project. I over-dyed a pale green color that I didn’t particularly like to get a dark blue that is close to the strap color. It will be mostly plain blue and with a very narrow strip of three-color pattern in the center. I have used Mora for a bag project before and know that it performs well on the loom as well as with use.

Fabric for a bag with built-in pocket woven with Mora wool.
If you are curious about the Mora yarn, here it is. It’s 20/2 worsted spun and I know that both Vavstuga and Eugene Textile Center carry it in the USA.

One skein of Mora goes a long way. It gives me material to work with for dyeing with cochineal for other projects. It’s taken two years but I finally got some alum. Just before the pandemic I had been out and about looking everywhere for the “precious” stuff…precious only because I suddenly could not find it anywhere. The usual pharmaceutical supply stores weren’t carrying it any more. The little hardware stalls in the market (there are dozens of them) didn’t have it. I tried the Mennonite market because I know that they can and pickle but they told me to go to the pharmaceutical places. The little McCormick jars of alum are not available here either. I am guessing that the Mennonite folk have a massive supply of it at home and are possibly not yet aware of it no longer being available. My friend Dorinda sent me some from Cochabamba a couple of weeks ago.

I have used cochineal in the past to dye my hand spun llama yarn. With an alum mordant I get the crimson color you see in this image.

The stones you see are a mineral that goes by the Quechua name millu. Dorinda sent it along as a bonus. It is not something that is required for dyeing with cochineal but she thought that I might enjoy experimenting with it. In the co-op, they use it to darken colors. It is also sold as a home remedy and it is in those stalls that it is found in the street markets. Now that I know what it is, I will most likely be able to find some here in Santa Cruz although I suspect that the amount Dorinda sent me will go a long way. Maybe I will also dye some silk with cochineal for an ikat project.

These are all time-consuming processes. I am not concerned about the amount of time it takes. If you have ever tried ikat, you will know what I mean by time-consuming. Slow processes are just perfect for someone who is working with dwindling stash!

When I told a friend of mine about having finally got hold of some alum via Cochabamba, he took on the challenge of hunting it down in Santa Cruz and came up with this in a very upmarket store of natural vegan-friendly cosmetics. One large chunk came contained in a cloth bag inside a fancy carry bag as if it were something terribly precious…and yes, the price was precious. The accompanying card shows someone applying it to their armpits. So I guess supplies, at least here in Santa Cruz, have been entirely diverted to the cosmetics industry.

Another “slow” project is my learning to spin cotton on a takli spindle. Version One didn’t have enough twist. Version Two had…you guessed it… what I suspected was too much twist. Version Three, which is in progress, is bound to have some other problem. And on it goes. I love the little takli spindle! And Joan Ruane’s video class on it has been so good. I’ll never forget the time I was with Joan at the Mannings. I had set up a backstrap loom and she had wanted to see what that was all about. I was doing pick-up and her reaction was “Oh my god, it’s slower than tapestry!” This from a woman who spins her own cotton for weaving! She made me laugh. I guess we all have our own feelings about Time.

As for Version Two with it’s crazy amount of twist, I decided to see if it was possible to set the twist on my singles (because that’s how I want to eventually use this thread…as singles) and did some reading about that. I have Stephanie Gaustad’s book on cotton, flax and hemp and there are also online resources about simmering and immersion. The trickiest part was having to immerse the thread under tension. My solution for that is a bit wacky. It worked for these small samples.

The thread went into the pot tightly wound around these metal mesh pencil caddies. I do want to use this thread as singles so that I can once again try to weave something approximating the sheer cotton cloth that is woven in the Alta Verapaz region of Guatemala. I want the thread to be finer than the hand-spun that I used last time in this piece…

Woven with hand-spun cotton singles that I had bought in Guatemala.

And this is where that icky topic of sizing comes back into it. I will probably give in and size the thread. I wove the above piece using a bamboo reed to maintain sett. The weavers in Alta Verapaz don’t use one and I am curious to know if the stiffening of the thread from the sizing is one of the factors that enables them to maintain the sett without the aid of the reed. I stress ONE of the factors because, of course, their supremely high level of skill gathered from years and years of work is going to be the main contributing factor. In videos, I have been able to hear the sound of their picking stick on the threads. The weavers are in the habit of slowly scraping the pick along the warp threads from selvedge to selvedge right at the weaving line as if, I am guessing, to encourage the threads to remain separated and not drift into warp dominant positions. That sound is not one that I would expect to hear from naked hand-spun cotton. The sizing that is used gives the threads a coating that produces that sound. Perhaps I will need to use sound as my guide when I try this myself.

All time-consuming stuff. But I am not here to just consume time. Hopefully, I will be using it to continue learning. When I recently explained to someone my plans for my own hand-spun cotton, they asked how long it would take before I would be ready to start the weaving. I sensibly replied….years.

Until next time…..

Backstrap Weaving – The Sounds of our Craft

It’s been a while since I last heard the scritchy sound of hairy warp threads releasing their grip on each other as I open sheds on my backstrap loom. I am hearing it now because I have taken on the challenge of weaving with mill-spun wool singles that I bought from a farm while traveling in California. I don’t really know what I had in mind when I bought that yarn. I had just wanted to buy something as a souvenir of that part of my travels from the lovely people who had allowed my friends to gather and weave in their barn.

Because traveling to far off places to buy yarn like this is off the table at the moment, this is another case of my exploring my dwindling stash and enjoying the new challenges that this presents. My idea is to use this yarn to weave the body of a bag that will go with the strap I just finished. I used a three-color reversible Andean Pebble Weave structure for this strap and the wool yarn that I had been spinning and plying on a drop spindle during pandemic Zoom gatherings.

Despite the dark colors, I think it’s a happy garden scene of flowers and hummingbirds.

I did start off with the idea of creating an orderly, cohesive pattern layout but the temptation to play with the three colors and pop those hummingbirds wherever I wanted took over and I had a lot of fun doing just that.

One thing that I had wanted to do was use one color for the pebble spot that represents the hummingbird’s eye and another color for all the other pebble spots that sit within the figure’s body…but you know, I forgot to do that every single time! Well, almost every single time. I was determined to remember to do two things before I eventually finished the band…take a picture of myself at the loom working on it and get those colored eye spots in!

I once met a bird photographer that told me that it is really important to capture the little spot of white light in a bird’s eye in order not to have it appear lifeless. I have looked for it in every bird photo I have seen since. In the same way, I think the different colored eye spot on these last two hummers makes an enormous difference.

I didn’t hear any woolly scritchy sounds while working with this hand spun of mine. I had been concerned about how well it would stand up to this rather dense structure but realized after a while that I had completely forgotten all my concerns and was able to enjoy how friendly it was and how lovely it felt.

I remember the first time I wove with my hand spun. It was with some rather nasty dry and dusty llama fiber that I had bought from the animals’ owner up in the highlands. At the time, the scritchy tearing sounds were freaking me out and the yarn I had spun was anything but soft and lovely to handle. I had put a tremendous amount of twist into it so that it would stand up to warp-faced weaving. I don’t do that any more.

And now, there is a new experience…weaving with these mill-spun singles. This is a first for me. Yes, there’s some “scritchiness” but I am actually finding it pleasant…almost like the warp is whispering to me. That llama fiber had seemed to be screaming at me in that first-ever experience. I made adjustments to the way I was spinning it, it became friendlier, and I was able to enjoy weaving with it more. 🙂

This is my sample for the bag fabric that will follow. I wound a warp of 27″ length and 160 ends. The idea was to weave and allow it to settle into a consistent width so that I could then make calculations for the bag fabric. I most typically start off too narrow with new-to-me yarn and have to let the piece gradually widen and settle. Once I am happy with that, I put it aside and work on the real project. This time, however, I was enjoying working with this wool so much, I decided that this piece really needed to be something and I figured that my cell phone, which currently sits in a case, could do with a pouch. So, I unwove a good 3″ of fabric so that I could start over at the correct width. The fact that I was able to unweave the warp-faced cloth woven with wool singles yarn without losing my mind, tells me that this yarn and I are going to have a happy weaving relationship.

And I decided to use some of my plied hand spun as supplementary weft to weave in a pattern. This is some of the thicker “Zoom” hand spun that I first created and used to weave a wrist cuff before deciding to try and go finer. It is making a very nice supplementary weft. I am using the outlining technique of supplementary-weft patterning in which the weft does not travel from selvedge to selvedge. I can make my hand spun yarn go further that way. It is precious to me and I don’t want it to be just hidden away between the layers of warp as it travels to the selvedge. I can’t tell you how much fun I am having with this!

Wrist cuff with the initial run of hand spun.

A couple of observations: There had been a tendency for me to think that the action of the heddles against the wool would be the cause of most of the abrasion and subsequent pilling or shredding. Lately I have found that with good loom-operation technique, this isn’t so. There is actually a point of layer exchange that sits between the heddle and the shed rod where most of the abrasion is occurring for me. This exchange happens when the threads that lie on top of the shed rod are lifted and brought down through the heddles to the weaving line. (I keep my shed rod stationary and don’t slide it forward to the heddles as some backstrap weavers do which explains why the point of layer exchange on my particular warp is in that position.) That abrasion point is the one I need to watch and I notice that a little bit of fluff accumulates there. I am particularly gentle there and tend to spread the threads with my hands and lift them through that point in sections. It is also important to advance the warp as often as possible so that the abrasion point is constantly changing position.

I love the multiple tones in the warp and its rustic look. I had considered a hummingbird pattern but decided that this one better suits these natural earthy colors.

But despite all that gentle handling, the warp does continue to whisper to me in its scritchy voice, possibly just as a reminder not to get cocky and careless when I open the sheds. This talk of sound playing a part in our weaving, reminded me of some thoughts I had posted way back in 2013 that I thought I would revisit and share with you.

tools01

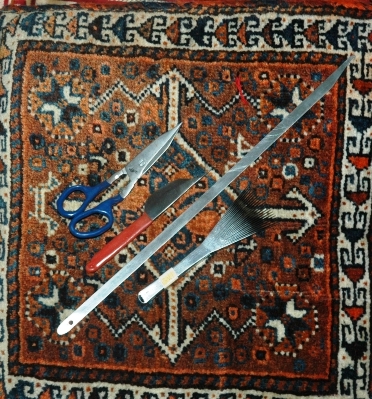
Back then, something a weaver had posted on the Weavolution website had resonated with me. An Australian gentleman, Hakim, was learning to make cut pile knotted rugs with an Iranian teacher in Australia. He said that when he is at home working on his practice piece, he can tell that the tension of the warp threads is correct if they make the same sound  when he handles them as they do when he is working on his learning piece with his teacher in class.

What a piece of priceless knowledge!

(At left you can see an example of a set of tools that Hakim was able to get for me from his teacher for the day when I try this technique. It’s on that long, long to-do list).

Hakim’s comment made me think about the different sounds that are connected with weaving on simple looms and how much I enjoy them.

I am not one for placing things in my ears and listening to music while busy with something else. I can’t stand that. I like to be in touch with the sounds around me. They form a very important part of my memories of places and experiences.

In my skiing days, I would wonder at people who skied with headphones on. I would never give up the pleasure of hearing the wind and the swish of the skis on the snow, or the sudden change of sound as snow turned to ice giving me time to react and adjust position. Back then, no one wore helmets. I am told that the helmets being worn now don’t affect the skiers ability to enjoy those sounds.

I learned to fly a glider when I was 19. There is nothing like the sound of an engine-less craft rushing through the air. There was so much with which to be occupied while learning (especially for someone like me who was so utterly un-coordinated at the time!) but I could always simply rely on my ears for certain information. For example, if the sound of the rushing air suddenly disappeared it was a sure sign that I had the nose up too high and that told me that I had better do something quickly before the glider stalled!

When we first went into pandemic lockdown here in Bolivia, I remember finding the sudden absence of sound really disturbing and almost frightening. Then I realized that what was missing were familiar sounds of human activity and that they had been replaced by much more pleasant ones…bird song and the sound of leaves being blown across the cobbles…sounds that normally were drowned out by the hum of city living.

As for sounds while weaving, I love using multiple big swords. I so enjoy the musical tok tok sound they make as they knock together in the sheds. And I love the chuckling chatter of all the sticks on the loose as they fall together when I release tension and roll up the warp at the end of the day. Below, you can see the sticks I used in a wall-hanging piece….many different kinds of wood making interesting sounds. It can become quite a collection.

O

Then there’s the plink plink sound as the tip of a delicate Guatemalan pick-up stick slides from one taut warp to the next as the weaver counts out threads for supplementary-weft inlay.

weaving-tijera

The dancing dangling bobbins used in weft twining go clackity clack as they twist and jiggle.

final-twining-session

And they enable my teacher to create such beautiful work as this:

Examples of kteh work by my Montagnard weaving teachers.

I loved the opportunity to drag the llama bone tool across the strong highly-twisted wool threads that my teachers in Peru had prepared below…scritch, scritch, as I strummed to help separate the warps. Only warp threads with certain characteristics will tolerate this.

O

Listen to my teacher doing it…

If you stroll around a  village of weavers in a certain part of the central highlands of Bolivia, you will know in which houses a weaver is at work by the LOUD THWACK!! THWACK!! of the llama bone hitting the sword as the wefts are slammed into place. That sound is one that is not really pleasant, at least not to my ears, when I am seated right next to my teacher. Here is one of my teachers in Candelaria at work at her loom:

When I stayed in the stilt-house home of my weaving teacher in Ecuador, I was often awoken at dawn by the muffled thump, thump and accompanying vibrations as Trini drew down her heavy beater while working at her vertical loom. This was combined with various house shaking and creaking sounds as the loom was connected to floor and ceiling beams…a part of the house itself. You can see that big sword/beater lying across Trini’s leg below and get an idea of the muscle that goes into operating this particular set-up.

trini-opening-shed1

The sound of threads in a warp-faced weaving rubbing past each other as a shed is opened can range from a soothing smooth swish to a seemingly painful tearing protest depending on the yarn being used and how it has been prepared.

When weaving with new backstrap weavers, we even learn to be amused by the constant clatter of swords jumping out of their sheds and hitting the floor. Each sword has its own musical tone…nowhere near as much fun on a rug! A cement floor like the one in this picture greatly enhances the melody.

Joan following a pattern chart at the Mannings.

By the way, I am in charge of picking up the fallen swords….gives me something to do. It is funny that as time goes by we have people weaving in silence. What happened to our musical accompaniment? Well, new weavers, without even realizing it, get a feel for the right amount of tension and the sweet spot in the warp where the sword will sit happily upright and not leap to the floor. Or…they just get rather good at catching the sword on its way down!

Maybe one of the nicest sounds for me is the fwip fwip fwip fwip in rapid succession as I pull my heddle string quickly but carefully (or else it will tangle miserably!) off its heddle stick. This means that the piece is finished.

And with that soft, happy sound in your head, I will leave you.

Until next time.

Backstrap Weaving – The Story So Far

More books! Well, just one more for now. I still have a book that I had originally bought for my current book-cover obsession but which I had decided wasn’t quite the right size. I might just cover that one too. I already have a name in mind for it…Daily Mischief. I would like to do this one in Andean Pebble Weave. It’s not an ideal structure for lettering but my friend Ruth in Australia came up with some quirky fun lettering in it when she wove a name tag for herself. A quirky, fun style would suit the Daily Mischief title, I think.

My latest book cover is once again in 30/2 silk and, as I only have natural white, I had to measure out my needs for this project and dye it. I combined two blues that I have with a color called Quarry and I am delighted to say that this is one of those times when I can declare that I got exactly what I had wanted. I am wondering if maybe I am getting better at this!

Although I loved the color, this scraggily heap was rather dull and uninspiring. I had to keep reminding myself that this is soft, sleek silk. When wound back into balls for warping, it started showing once again its silky loveliness. It’s funny how when it is woven on the loom it somehow takes on a very matte cotton-like quality only to recover its sheen once again after having been wet-finished.

The sheen returns.

The color palette…

All the smaller balls are the 60/2 silk which might get used as supplementary weft to create the patterns. The skein on the left is more 30/2 silk for warp that I also dyed.

The warps for the last three book covers that I have woven in 30/2 silk have all had 904 ends and the warp is just short of 13 inches wide. I use Schacht warping stakes that are five inches inches long. I take a lot of care with tension when I am winding my warps for the backstrap loom. These ends aren’t going to cut and threaded through a rigid heddle or reed and then tied and re-tensioned. This means that I need to get it right as I am winding at the stakes. I always say that a beginner can be handed a well-wound and well-tensioned warp and then proceed to weave something decent. But even a very experienced weaver will have a very difficult time dealing with a poorly prepared warp. There are ways of dealing with a certain kinds of tension issues but it doesn’t make for fun weaving.

I love seeing a new wide, evenly-tensioned warp stretched out before me.

For that reason, I don’t like piling more then two inches worth of thread on my stakes in case they lean, even ever so slightly, and will always wind my wide warps in sections. The following pictures are some that I quickly snapped as I worked. First I chose and then laid out my sticks on the floor…cloth beam, warp beam and cross sticks.

Then I decided how many ends I would have in each section. In this case I had 80 in each in the dark blue areas. I wrote that out so that I could check it off as I went. I wound the first section on my stakes, replaced the stakes with safety strings, saved the cross and transfered it all to the sticks on the floor.

I leave the safety strings in place. Later when I am weaving, I only remove the ones at the cloth beam. The ones near the warp beam will make good counting strings when I need to lay in the first row of each of the pattern sections.

Adding more and more sections. If I lose track because I neglected to check off the numbers on my paper, I can always count the safety strings.

This is a very basic figure-eight warp in a single plane. Backstrap loom weavers in some regions add the heddles and often a coil rod as they wind the warp. It’s not my habit to do so even though I was taught this way on a circular warp by my Montagnard (Vietnamese hilltribe) teacher. (You can read more about that here).

Next comes the lashing. I have my own rather unconventional way of doing this. Most backstrap loom weavers will tightly lash a header cord to the cloth and warp beams all the way across the width of the warp. I prefer using a metal rod instead of a header cord.

Using a metal rod in place of a header cord and lashing it to the beam. On this narrow warp from many years ago I only needed two lashing points at the edges of the warp. I prefer using cable ties now.

I have collected rods in a multitude of girths and lengths over the years. My lashing is done with cable ties, usually five to seven depending on the width of the piece. I count the threads so that one is placed exactly in the center and further divide the warp into other sections with two or more…again counting so that the cable ties are placed in exactly the right spots. Two more cable ties are placed at the two edges. Being precise in the placement of the cable ties really helps me when it comes to measuring and setting the width before the first shot of weft is thrown. I can calculate how wide the warp should be in each section that the cable ties divide and distribute the warp threads within those sections as evenly as possible.

Starting on the 452 string heddles.

Next, I set up a second cross so that I can use what I call the “twisty sticks”. These are two sticks that I grasp and twist to help me open the heddle shed. I explain how I set up and use these in my video class Operating a Backstrap Loom which you can stream or buy as a dvd at Taproot Video. You can also see me using them in one of the video clips in this blog post.

You can see the two rods that are bound with rubber bands on my warp in this picture. Those are my “twist sticks”. In the various regions around the world in which the backstrap loom is used, weavers use a variety of techniques to help them raise the heddled threads smoothly and create a clear shed. Using the twisty sticks just happens to be my current favorite way of doing this.

You can also see me using the twisty sticks on a silk warp in this video:

And finally, because I will be weaving this piece in warp-faced plain weave and want to avoid the corrugated look that plain-weave cloth can sometimes develop especially when the warp material is one which has little to no stretch, I insert a coil rod. The coil rod locks the two layers of warp threads together so that they can’t see-saw back and forth as I operate the loom. Many weavers achieve the same thing by weaving an inch or so first at the far end of the loom before turning the loom around and starting at the cloth beam. That also locks the two layers of threads together. In fact, that was the way I was taught to do it by my several of my indigenous teachers but I have since become a big fan of the coil rod. For me, it has other benefits in addition to the one I mention here.

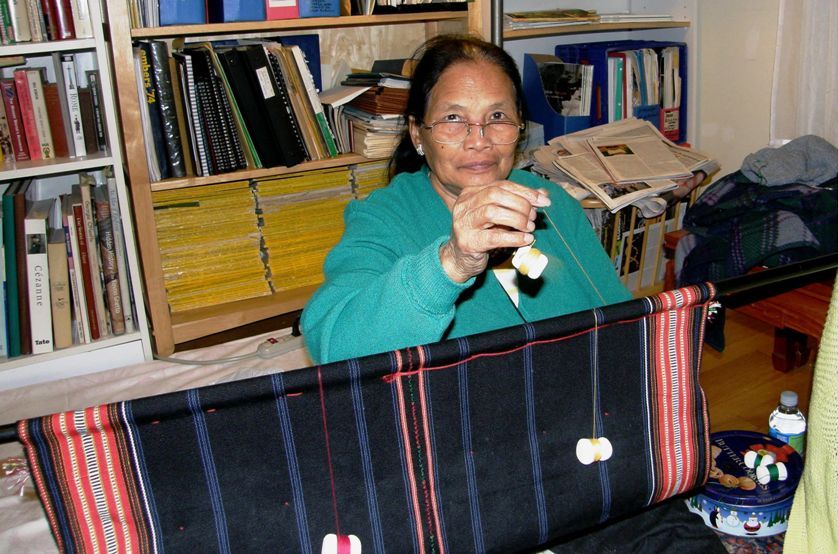
Dar Ku from Myanmar allowed me to spend some time with her as she wove at her backstrap loom You can see the coil rod in her warp, the rod that is furthest to the left.

After measuring and pushing threads around and measuring and repeating, I finally feel that the sett is just right and that I can start weaving. Of course, there was time spent drawing patterns onto charting paper. That was something that I was doing while waiting for the dyed thread to dry. I had decided that this would be a Traveler’s Diary (yes, I settled on the single ‘l’ spelling) and charted out lines of verse that I thought would suit the theme as well as picked the best hummingbird figure to go with them.

The first lines of writing appear.

I really like the way the light blue supplementary weft looks on the light blue spine color and am thinking about perhaps weaving an entire piece that way in which there is only a subtle difference in color between the warp and patterning weft…even more subtle than what you see here. It will depend on how clever I can be at the dye pot. My dyeing is still all a bit “mess or success” at the moment.

The second line of verse and the hummingbird leaving us for its long journey of migration. I have been seeing articles recently on hummingbirds in some parts of the U.S that have actually started to change their habits and winter over.

Bye-bye hummingbirds. You can see the two swords I use to prop open sheds and beat. My current favorite pick-up stick from Guatemala is also there. The little tool with the handle is from Ecuador and also used to beat. I use it when I feel that I need a little extra “oomph” and use it to press the weft into place while inching my way across the warp. I use it in much the same way as highland weavers here use the llama bone tool. My llama bone tools are too harsh for this silk.

It’s still on the loom as I write. It will be cut off, washed and placed on the book cover. I will most likely need to weave narrow strips as I have with the other covers to compensate for lost width during the wet-finishing process. I don’t feel that I can precisely account for shrinkage in the number of warp-ends to ensure a perfect fit. Adding the narrow strips to the other books has actually provided quite a lovely finishing touch. You can see three that were added to the Weaver’s Journal. A fourth was also added to the edge of the back cover.

So that’s the story of the books so far…to be continued. I actually remembered to take a picture of myself at the loom as I approached the end of this one so that I can wish you all a very happy, safe and peaceful transition into the new year.

Backstrap Weaving – A Resonance of Emerald

I have a short blog post today just to show you the latest book cover that I have finished.

I had planned to have a break between book covers to experiment with cross-knit looping and the little hummingbird figures that I showed you in my last blog post. You can see my initial experiment with tail feathers in very heavy cotton here. I was able to track down Sue Prior via the backstrap weaving grapevine and she was kind enough to send me some good resource material on creating three-dimensional figures in this structure. Irina also told me about another source. In a future blog post I’ll list them but for now, if you scroll down my RESOURCES page, you’ll find a link to an article by Lila O’Neale. (I just noticed that a few of the links on that page no longer work. I must go through and tidy it up).

The break was supposed to give me time to mull over the design and colors for the next book cover but as it turned out, the idea came to me very quickly. Some time ago, I found a nice collection of hummingbird poems online and decided to go back and read through them once again. Two lines from an untitled poem by Emily Dickinson (often referred to as “The Hummingbird”) sprang out at me:

A resonance of emerald,

A rush of cochineal

Rucker’s Hermit Hummingbird by John Gould, 1861. 

Color! My new book would be A Dyer’s Notebook. I had written in my last blog post about how horrifyingly unscientific I am about dyeing. Maybe having a nice book in which I can keep notes will motivate me to be more organized.

I only had natural white in the 30/2 silk that I would use as warp and so I mixed my dyes to create purple and green. My color choices are dictated by what I have left in the 60/2 silk that I use as supplementary weft to make the patterns. I don’t have any really light colors left. Gold is the lightest in any decent quantity. I over-dyed the small amount of pale blue that I have to a light shade of green for the leaf patterns. That left me with gold for everything else. I would have preferred a pale buttery yellow but I used up all of that on these!

Another possibility would have been to dye the natural white 30/2 warp thread a pale color which would have given me lots of choices for the patterns from my range of dark colors in 60/2 silk. However, I wanted the colors for this piece to be deep and rich.

It would have been nice to have found a way to include a little cochineal and emerald in the hummingbird figure. I tried a few different things but none of them worked well enough. And so my little hummingbird figure is showing a furnace glow of gold in this moment of its flight. From a poem by Alexander Wilson:

Each rapid movement gives a different dye,

Like scales of burnish’d gold they dazzling show,

Now to sink to shade—now like a furnace glow!

The dark green stripe is placed to wrap around the spine. I knew that I was going to wet-finish the cloth and that it would shrink in width and length just like the cloth for my Weaver’s Journal did but I didn’t add extra warp ends to this piece to account for that. You may remember that I fixed that loss of width on the last cloth by adding narrow woven strips in 60/2 silk. I decided that fixing cloth that is too narrow is possible but adding more warp ends and possibly having then to deal with cloth that ends up being too wide would be a problem.

I wove narrow strips in 60/2 teal silk to account for the loss of width and added strips to other parts of the cover for balance.

For the new book, I extended the width with a narrow strip of the green spine color only on the back cover.

So, I am thinking maybe one more book…perhaps A Traveler’s Diary? That might create some magic and get me back on the road. In the meantime I’ll chew over whether to spell traveler with one or two l’s.

I’ll leave you with some Christmas decorations that I made a couple of years ago if you are looking for some ideas for uses for odds and ends of band. I don’t think these necessarily need to have Christmas-themed patterns. The metal ends are called ribbon crimps and come in various sizes. They clamp onto and protect a cut edge. I add a bit of weft twining to other end just above the fringe to stop the band from unraveling. You could use the same color as one of your warp colors or a different color all together.

All these patterns come from the two patterns books that I wrote to follow up my instructional books on Andean Pebble Weave on Inkle Looms and Complementary-warp Pick-up. Either one of those instructional books will give you the skills to weave all the patterns in the pattern books (although some of the motifs might be too wide for a standard inkle loom). The pattern books are Complementary-warp Pattern Book and More Andean Pebble Weave Patterns.

And I have a free tutorial on weft-twining here. It starts with a little cultural context and then you’ll eventually get to the tutorial part with its video clips.

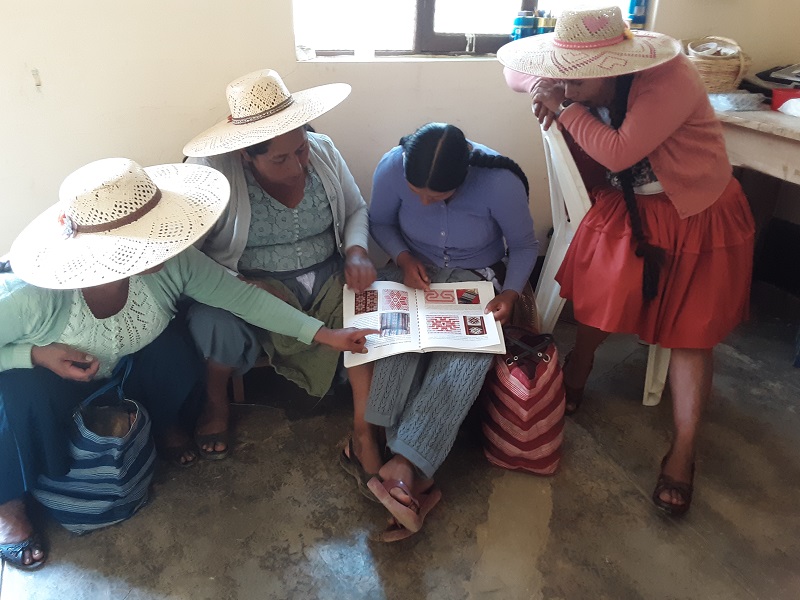
My friend Dorinda recently got back from the highlands where she had been visiting my teacher Maxima and the other ladies in the weaving co-op. The last time I was up there, the ladies were interested in the woven sample bands I had brought which had patterns that they had never seen before. They wanted to learn them and because I was only able to leave a couple of samples behind, I left behind one of my pattern books. Before I could leave, Maxima had already set up a warp and was copying one of them. On her recent trip, Dorinda took this photo of the ladies examining more patterns in the book. Just like us, they love to learn new ones.

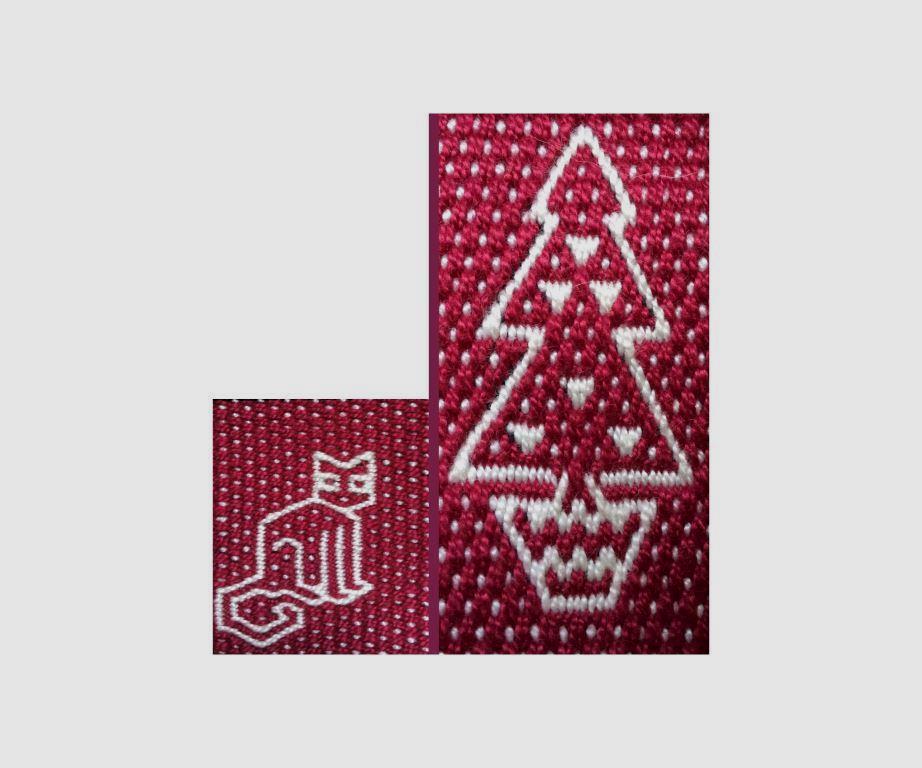
And just for fun, here’s a compilation of patterns for a Christmas card for all those experiencing the annual battle of Christmas tree and cat…(these patterns are from the Complementary-warp Pattern Book). I am going to buy myself a new tripod for Christmas so that I can start using my good camera again.

Enjoy your end-of-year celebrations, stay safe and see you next time.