Backstrap Weaving- Easter colors in Guatemala and a new tutorial

Easter is upon us. Here in Santa Cruz, the stores stock aisles of chocolate Easter eggs but people have not really warmed to this tradition so we usually see these same Easter eggs sitting forlornly at the check out well into October when they are replaced with Halloween goodies. Now Halloween is something  that has really taken off here.

The night of Holy Thursday here has its own special tradition. All the streets of the downtown area get closed off to traffic and become a gigantic pedestrian walkway full of strolling families and teenagers out and about socializing, eating – there are food stands set up every few yards – and stopping in at the various churches. The idea is to visit nine churches. My mother tells me that this was the tradition amongst Catholics in India too when she lived there.

In Guatemala it is a very different story. So let’s see what activities and traditions surround Easter there. Of course as soon as Guatemala is mentioned, you know what to expect…

################# LOTS OF GLORIOUS COLOR #############

A sawdust "alfombra" laid out in wait for the Good Friday procession in Huehuetenango

Easter weekend was my final one on my trip to Guatemala in 2008. I don’t usually move around all that much when I travel. I like to find two or three nice places and a few weaving teachers and stay put but, as all my weaving classes were over, I was taking the opportunity to visit as many spots as possible before heading back to Guatemala city for my flight on the Monday after Easter. This meant that I got to take in the Easter celebrations in three different places.
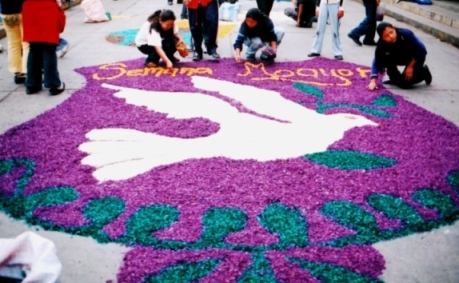
I arrived in the city of Huehuetenango the Wednesday before Easter hoping to travel further into the highlands the following day. Little did I know that the whole of Huehuetenango would be shut down on Holy Thursday as an unofficial "hang over" day after Huehuetenango Day celebrations on the Wednesday night - food and music including a "battle of the marimbas" in the main plaza until the wee hours. So there was no transport to be had and Thursday was a very dull day indeed. BUT, I woke up to the preparation of these fabulous sawdust "alfombras" on Good Friday morning.

Now, Antigua is THE place to be in Guatemala  if you want to see the most spectacular sawdust alfombras. People come from all over, the city is packed to the gills and prices rise so I was determined to avoid Antigua for those very reasons. I had no idea the alfombra tradition was carried out in almost every city, town and village in Guatemala and so I got to enjoy a smaller but no less colorful version of it in Huehuetenango. 

Alfombra means carpet in English and the tradition is to create these fantastic carpets from colored sawdust on top of which the Easter processions will pass. Other carpets are made from pine needles , flowers, stones and even vegetables. Large metal and wooden stencils are used to form the shapes and designs and the entire carpet is intermittently sprinkled with water to weigh down the dust and hold it in place. The themes are most often religious and once the procession passes they are completely destroyed.

What amazed me most was how quickly and efficiently the designs were measured out and put into place. Everyone worked quietly on what is, after all, a somber day but it was very hard to feel somber with all those gorgeous colors about. Watching the whole process was irresistible and I had to drag myself away to take my bus into the highlands. I was actually glad that I wasn't around to see all that hard work destroyed.

Read an excellent article here which gives a lot of information about the origin, history and significance of the alfombra-making tradition. To quote just a little…

“HISTORY

The custom of making carpets was brought from Spain and the Canary Islands. However, it is believed that in pre-Hispanic times the Maya made carpets for various ceremonial reasons. Possibly the carpets were used in altars to induce positive energies and absorb negative ones. Thus the constant destruction of the carpet is necessary to remove bad energies and bring new positive ones with the construction of a new carpet or offering.”
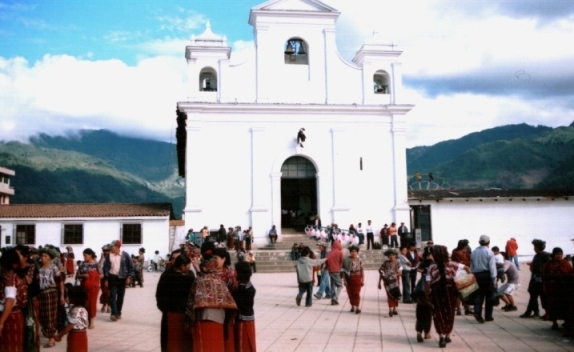
The church in the main square of Nebaj with an effigy of Judas hanging on a noose above the main door. In the afternoon young men came to shoot at it.

Next stop was Nebaj, a small town of adobe dwellings tucked away in a highland area known as the Ixil triangle. There I was also treated to splashes of color but in this place the color came in the form of the women’s traditional huipiles (blouses) and cortes (skirts).

People from the neighboring villages of Chajul and San Juan Cotzal had come into town for Easter to see and be seen in their very best hand woven huipiles decorated with animal and geometric figures in supplementary wefts and warp wrapping.
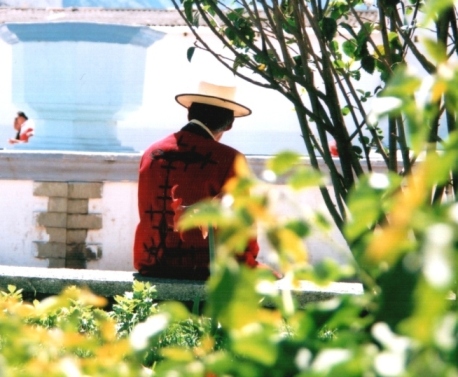
The typical scarlet jacket decorated with black embroidery worn by the men of Nebaj for festivals. Apparently the jacket is modeled on that of Spanish officers from colonial times.

Good Friday was no somber occasion here. The atmosphere was festive with even a ferris wheel set up near the market and cotton candy, icecream and balloon vendors strolled amongst the crowd. The older men too, were wearing their festival gear – scarlet jackets embroidered in black. In this way I got to see the traditional clothes of all three areas in one place. All I had to do was sit in the plaza and watch it all go by while trying to discreetly snap a photo or two.

The icecream vendor is wearing one of the typical backstrap woven hair sashes of the area complete with enormous tassels-quite a weight to be carrying around. So much decoration and color on every huipil!

Finally on Saturday when things had settled back to normal I visited the artisans market and met two of the coolest weavers and vendors there. Such a shame that I was at the end of my trip and couldn't spend more time with them. We swapped heddle making tips and weavings.
This is a lively Nebaj textile that I received as a friendly swap for one of my own weavings. I would have loved to have stayed longer in Nebaj but it was time to move on to Chichicastenango.

Colorful in its own way, the market town of Chichicastenango is more a tapestry of sights, sounds and smells. It was even more chaotic than usual on Easter Sunday. It was my second visit there and I could really tell the difference as this time the locals who had come into town for the Easter Mass far outnumbered the tourists. The Easter celebration was a strange and interesting mixture of  Catholic and indigenous rituals.

One of the clogged market alley ways on the left - spot the tourist! Fortunately there are some places where one can escape the madness. The Hotel San Tomas allows you stroll around its beautiful colonial-style courtyards and enjoy the marimba music.
Of course I had to revisit my favorite stall - guess which one!
LEFT: Thread which the vendors were calling "seda" (silk) - only available in green and pink. Why only these colors? I was told quite simply that these are the colors of Chichicastenango. RIGHT: The steps of the church gave a nice high vantage point from which to survey all the activity until I nearly got run down by the emerging Easter procession.

After all this frantic travel and activity I went to Guatemala City and onto Miami where I spent three nights stuck in the airport waiting for a flight back to Bolivia – the hazards of stand-by travel!

##################################################

FROM A FRENZY OF COLOR TO BASIC BLACK AND WHITE…

The double "S" band on the loom

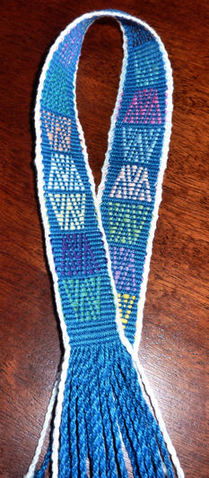
As promised, I have  made a tutorial on weaving another of the yurt band border designs using simple warp floats. I used this design on the cell phone pouch that appeared in this previous post. I warped up this week to weave the design with the tutorial in mind. However, there were obviously other things on my mind as well as, instead of warping up the required fourteen warps, or seven pairs, I warped fourteen pairs and so ended up with a warp twice as wide as necessary. So I wove the “S” border design in two columns as mirrored images and found that it was the perfect width for a belt.

THE TUTORIAL…

You will find the tutorial here.

Continuing with the black and white theme, you may remember the Abba Yohanni piece that I showed you in this previous post.
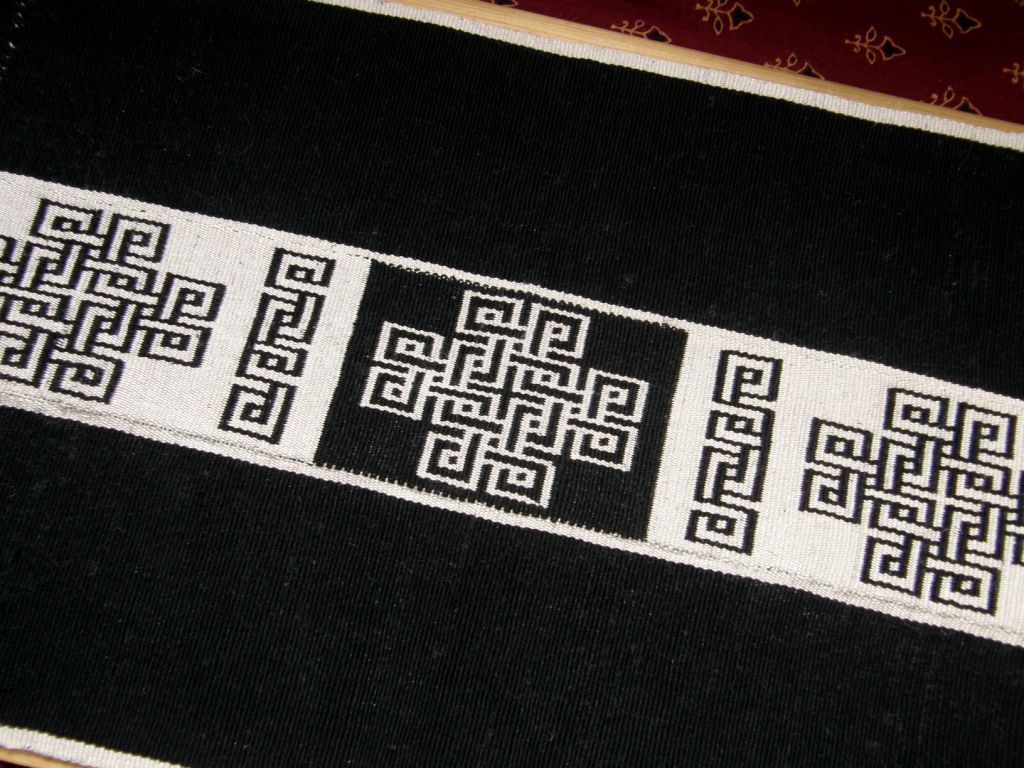
The cross motif taken from a curtain in an Abba Yohanni cave church in Ethiopia

Here I can show you the table runner finished (which I think I am going to turn into a wall hanging) but I mostly wanted to revisit this topic as Alexis Tancibok in London, whom I met on Weavolution, recently emailed me with some interesting background information on these motifs and the curtains on which they were woven. (which I quote below). I am very grateful for this as I had not been able to turn up much on the net about it and was mistakenly under the impression that these curtains dated only as far back as the 17th Century…

“Curtains like this were a common feature of churches in N. Africa & the
Middle east from at least the fourth century. They were often devotional
items commissioned or donated by individuals making a vow, fulfilling a vow,
or as an act of piety.
Similarly fabric woven with religious motifs – such as Abba Yohanni’s cross,
and stylised scenes from the Gospels, and Apocryphal texts were designed and
worn by people at all levels of society as talismans – the V&A has a rather
decent collection, so too does the Louvre. The best extant versions are
Coptic (Egyptian) which is relevant to the Abba Yohanni piece because the Coptic church and the Ethiopian church have strong historic links…

Early christian art motifs are still extant in the Eastern tradition and in many cases almost unchanged from when they first emerged. The shape of the cross for example is commonly made in twisted leather both in Ethiopian and Coptic pendants.

Devotional curtains/veils/textiles serving different functions in Eastern Christian settings are still used today – especially in Ethiopian churches and shrines.”

################################################

I couldn’t keep away from the colors for too long….
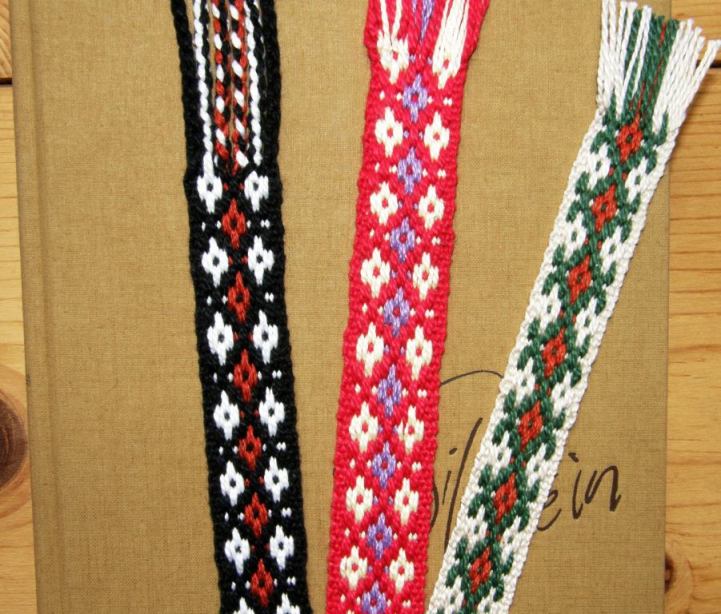
I have another wonderful thing to share courtesy of a new online acquaintance. Chris Buckley in Beijing has generously allowed me to use images of his yurt band pieces. Those of you who saw the X and O yurt band border design in the tutorial on simple warp floats last week will recognise it here on this piece worked in two colors…


I am excited to have yet another yurt band design to chart and attempt to weave. Chris tells me that these Kyrgyz yurt bands were cut and sewn together to make mats and that he acquired them on a trip to far Northwestern China. I have only just started exploring his fascinating blog.

And here is another gem from Chris…

Here is a slight variation of the 'S' design featured in this week's tutorial! Ah...the colors!! If only I could get red and blue to work together so well for me!

######################################

And to finish, a contribution from a blog reader. Sharon finished her first mug rug in one-weft double weave with her own butterfly motif…

I have seen the rest of her butterfly charts and they are so pretty. Hopefully we will get to see the whole set of mug rugs as they come off the loom.

Oh… and I spied Grace Hatton on her blog working on the yurt band border from last week’s tutorial. She has a fun post entitled “Loom Porn – Size Doesn’t Matter” where you can see a photo of her band and other small looms.

Enjoy the new tutorial and keep the projects coming…remember, I love to hear from you all! 🙂


Backstrap Weaving- Warp floats galore! – a tutorial

I am seeing squares! I feel like I have spent the whole week charting. The yurt band design that I charted and wove into a cell phone pouch last week was pretty easy to pick out from a photograph. So I launched myself into a bigger yurt band design this week. A lot of the elements are similar so I figured it would be a piece of cake but, as it turns out – not so much.

Getting the main motif down was easy but filling in all the background floats was the hard part. Where exactly to place the five-span floats around the curves in the motif was the dilemma and the photo I was working with was no help at all. I really wish I could put the photo here but it is not mine to show. The original band has the main motif in orange on a slatey blue – it is gorgeous – but I have stuck with some old faithful colors for this first attempt.

The first few rows woven of a new yurt band design

The outer bands have a brown motif on beige and the main section beige on red. Anyway, I think I have finally got it down. I do have a drawing program for this kind of thing but I prefer the old fashioned way –  sprawled on the floor with marker pens, corrector, pencil, eraser and scotch tape.

I have been trying to come up with a good name for this technique as a title for this post but all I have so far is warp floats galore – that doesn’t even come close to covering it – but try getting your mouth around this “offiicial” classification:

“simple alternating float weave with two color patterning with all the warp-floats on one face, colors exchanging function to create pattern” (Warp Patterned Weaves of the Andes – Rowe)

Thank goodness someone came up with the simple name “pebble” to describe my favorite pick-up weave as the description for that is even longer. I have been trying to find the origin of the name “pebble” but haven’t had luck with that. It is a name that seems to be applied quite loosely to a variety of weaves and I am wondering who first coined it and to which structure in particular they were referring. Imagine my surprise when a young weaver in the main plaza in Cusco used the term “pebble weave” to describe the band she was trying to sell.

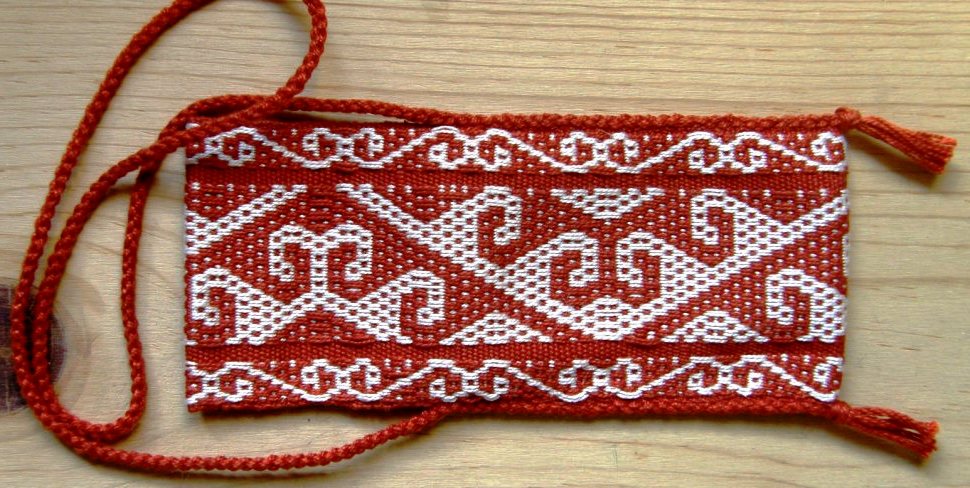
The border design from Lisa's yurt band that I charted

But, back to my “warp floats galore”. I also charted the border design of Lisa’s yurt band so that I could do a tutorial based on that here this week and, fortunately, I can show you a photo of that, thanks to Lisa.

I wove it in a variety of yarns and color combinations to see which I liked best. The example on the yurt band uses three colors one of which is also used as a border.

So this is what I came up with…

Four versions of the yurt band border design. The one on the right is the most authentic as I used the same color to weave the O's and the borders.

So I decided to go with the one on the right as it most closely resembles the original and looks nicer in the finer yarn

Fabric for the cell phone pouch

and made another cell phone pouch. I have to tell you that I don’t even own a cell phone but I think these make great gifts. I usually take woven coin purses along on my travels as gifts for my indigenous weaving teachers. On a trip to Ecuador I was looking for a typical spindle whorl and asked a group of ladies who were embroidering skirts in the marketplace . No one showed much interest or enthusiasm for my request. I then offered one of my little coin purses to anyone who could get me a whorl. In the blink of an eye out came all the cell phones from deep inside the folds of their blouses! So I think that these little pouches may be appreciated and may make better gifts than the coin purses from now on.

The cell phone pouch edged with a four-strand braid
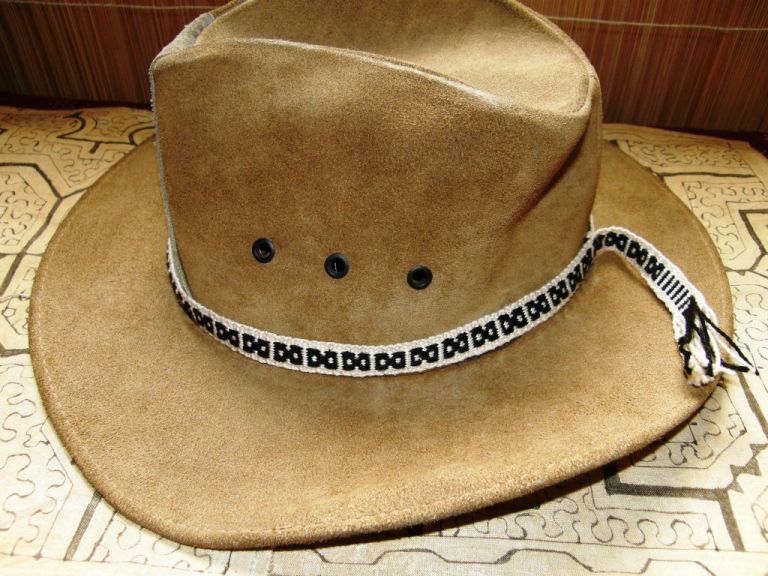
Simple X design warp floats on a hat band

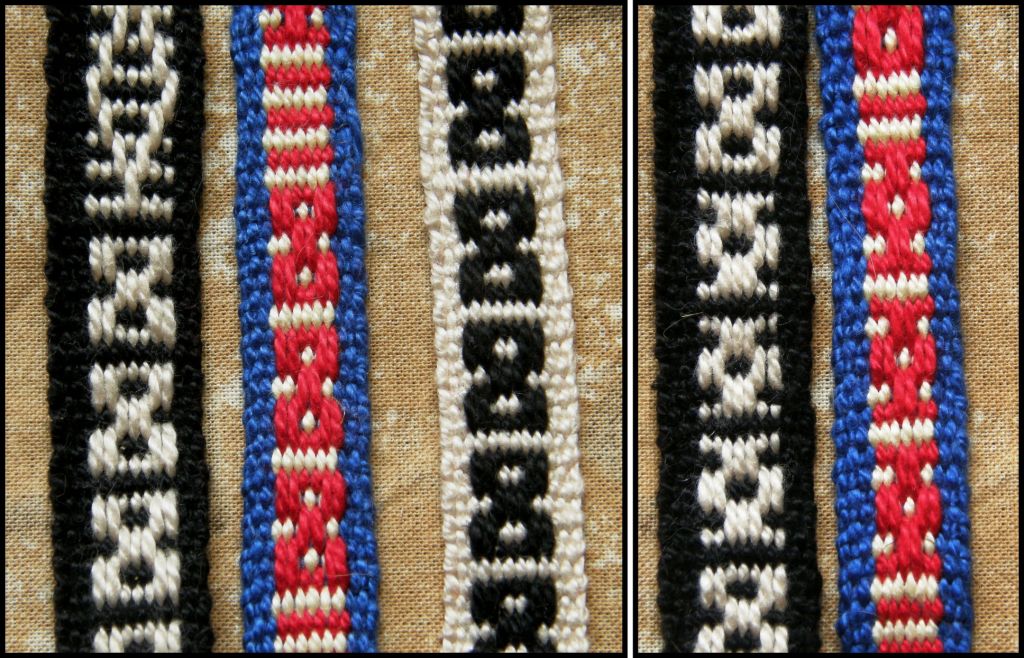
The border design from the yurt band comprises a series of what I call X’s and O’s. These are about the most basic designs you can weave in this simple float technique.

I used a series of X’s separated by a single stripe to make the hat band at left.

Starting off with black and white horizontal stripes, the black warps float over the surface to form the X motifs.

LEFT: X motifs... RIGHT: O motifs
X's and O's woven in succession

In the above examples, the X’s and O’s are separated by a single stripe. If you put the X’s and O’s together on the one band and weave them in succession so that they overlap, they will look like what you see at left.

The example on the left has red X’s and yellow O’s. This is reversed in the example on the right.

Now it is just a matter of putting three columns of X’s and O’s together and, voila! you have the yurt band border.

Here are the pattern charts for the X’s and O’s…

LEFT: X and O motifs; CENTER: X and O motifs overlapped in succesion; RIGHT: Three columns of X's and O's - the yurt band border.

I am going to give a step-by-step tutorial here now for the yurt band border.

For those of you who have never woven this simple warp float technique, there are step-by-step instructions here. The tutorial there guides you through warping, arranging the cross and weaving some simple patterns.

Once you have the hang of weaving this border design, especially the parts where the two motifs overlap, you will have the skills necessary to weave the yurt band design that I wove on the cell phone pouch last week – at left.  But, I recommend starting small! Practice the small design in this tutorial and make something useful. Next week I will give the chart and instructions for weaving the  border of the red cell pouch, pictured below.

##################################################################

WARP FLOATS GALORE-THE TUTORIAL

This is a warp-faced weave.

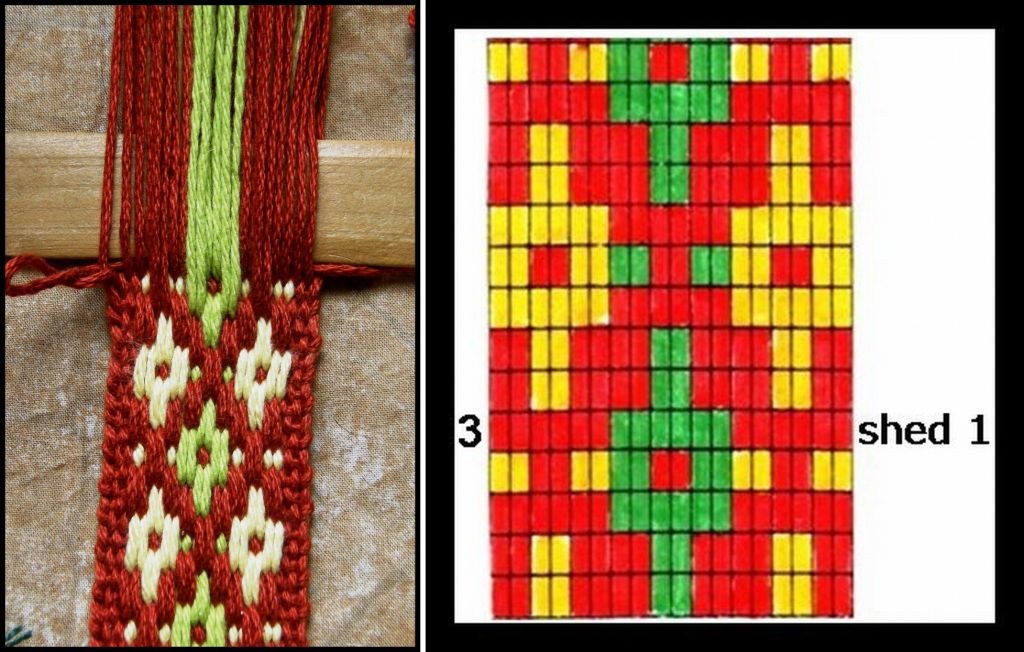
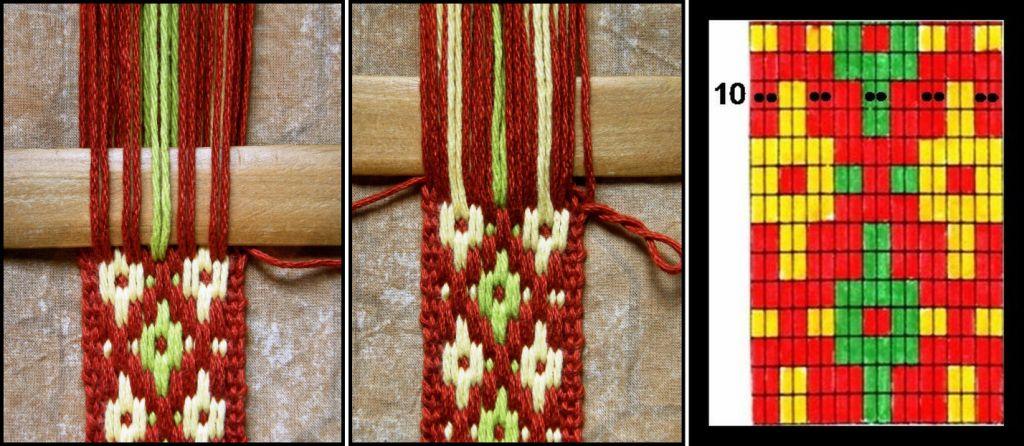
You need to wind a warp and rearrange the cross so that it looks like the picture at left. The warps in shed 1 will go in heddles and shed 2 will be controlled by a shed stick. I have 4 ends in each of my borders. I am working with 18 warps, or 9 pairs of warps in each shed. This tutorial gives instructions for weaving the first 10 weft passes. Start by simply passing the weft through sheds 1 and 2 and weaving a few rows of horizontal stripes. I recommend passing your weft from left to right in shed 1 to be in sync with these insructions.
FIRST WEFT PASS: Start the design by passing your weft through shed 1. My weft is passing here from left to right through shed 1.
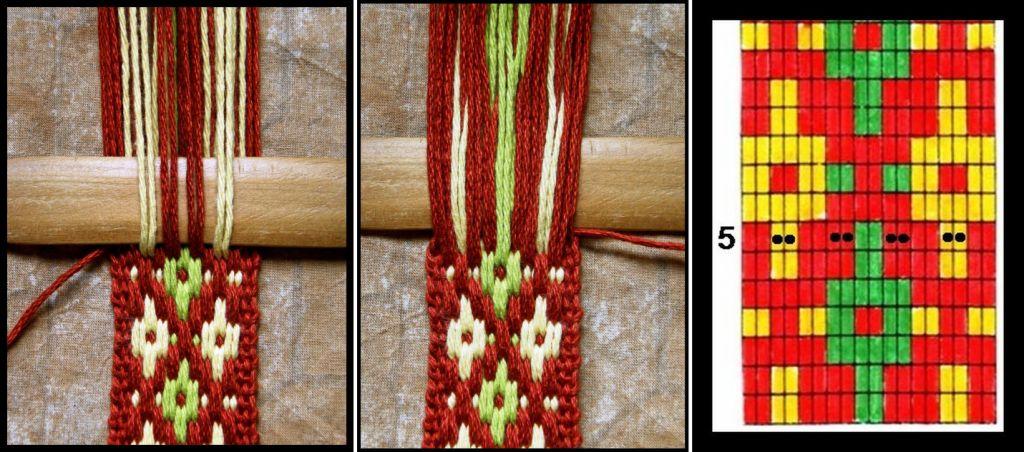
SECOND WEFT PASS: Select the warps from shed 1 that will float. These are indicated on the chart as pairs numbered 2, 4, 6 and 8. Add these to all the warps in shed 2. Pass the weft from right to left.
THIRD WEFT PASS: Pass the weft from left to right through shed 1.
FOURTH WEFT PASS: Select the warps from shed 1 that will float and add them to all the warps in shed 2. Pass the weft through this shed from right to left.
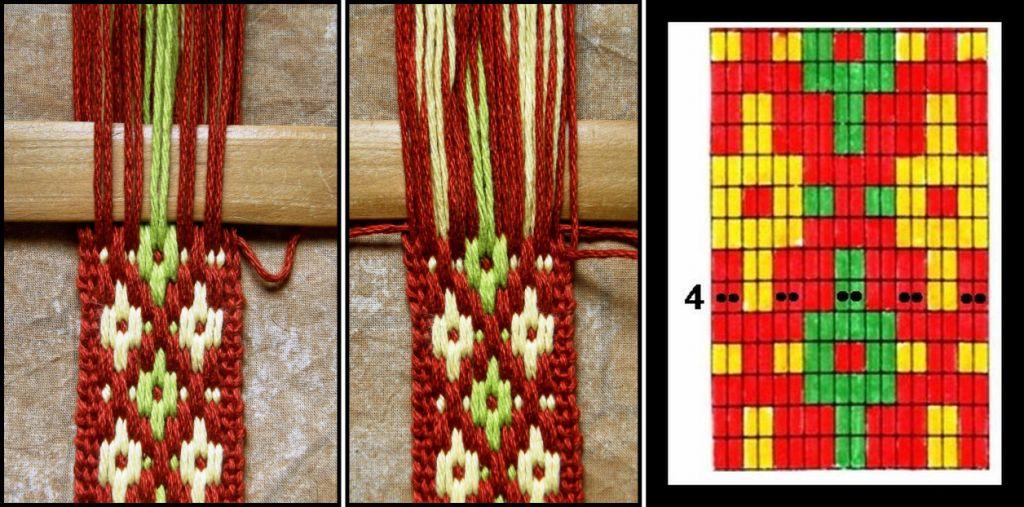
This is where the designs overlap so we need to float warps again for this weft pass and will be selecting them this time from shed 2. FIFTH WEFT PASS: Select the warps from SHED 2 that will float and add them to all the warps in shed 1. Pass the weft from left to right.
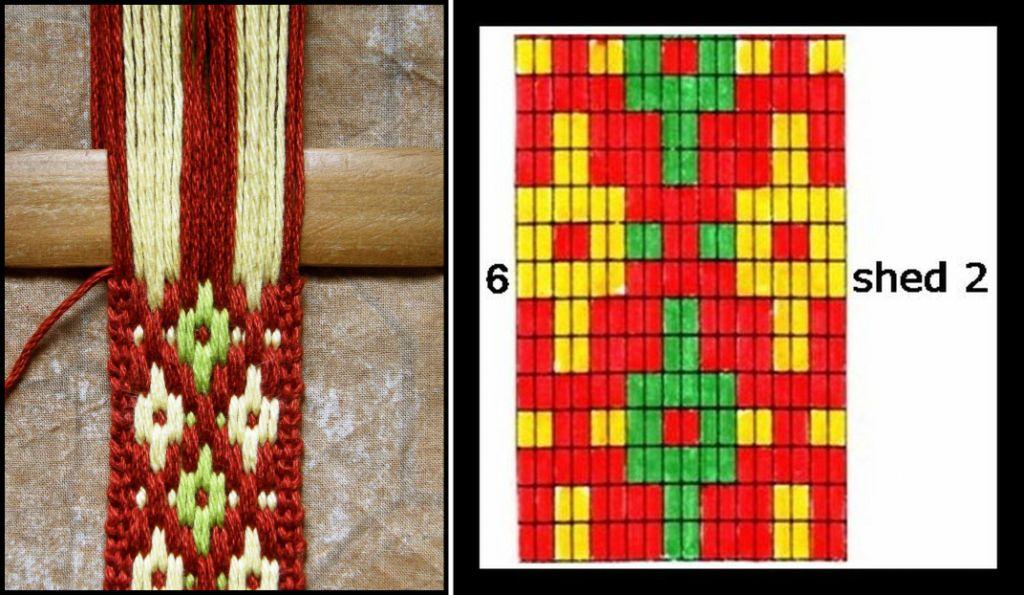
SIXTH WEFT PASS: Pass the weft from right to left through shed 2.
SEVENTH WEFT PASS: Select the warps from shed 2 that will float and add them all to the warps in shed 1. Pass the weft through this shed from left to right.
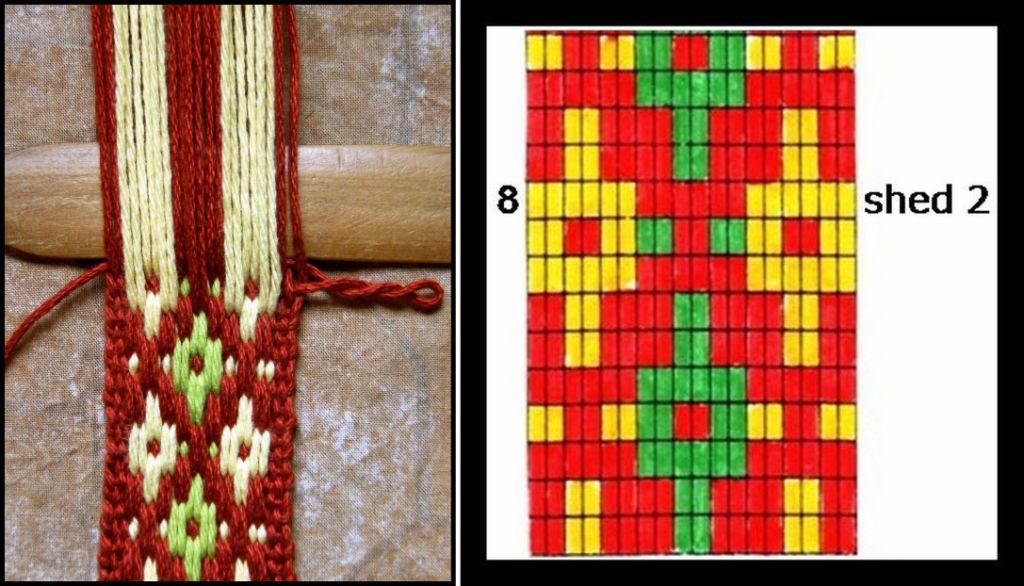
EIGHTH WEFT PASS: Pass the weft from right to left through shed 2.
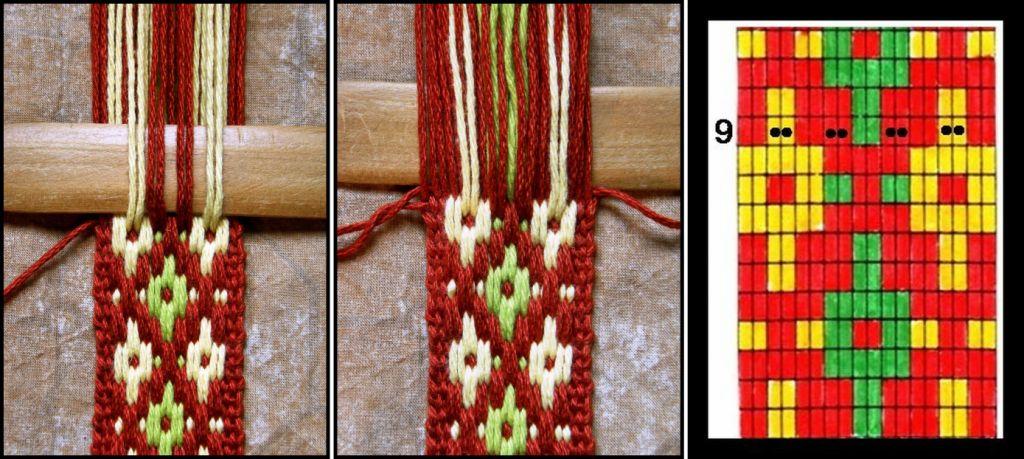
NINTH WEFT PASS: Select the warps from shed 2 that will float and add them to all the warps in shed 1. Pass the weft through this shed from left to right.
This is where, once again, the motifs overlap so we need to select warps to float again but this time from shed 1. TENTH WEFT PASS: Select the warps that will float from shed 1 and add them to all the warps in shed 2. Pass the weft from right to left through this shed.

And there it finishes. We are back to step 1 – the first weft pass.

The yurt band designs on my red cell phone pouch reqiure that you select warps to float for every single weft pass.

Some project ideas for using this technique and design: weave four or five columns of X's and O's together and make a bookmark; weave the design next to plain weave and make a cell phone pouch, coin purse or sewing kit purse. Even the smallest sample can be made into something useful. I sewed a zip into the little shadow weave sample I showed you last week and made a sewing kit purse.

###################################################################

BACK TO ECUADOR

A typical house in the rural settlements of coastal Ecuador and the home of my weaving teachers there


Removing the seeds from natural brown "mico" cotton

I thought I would finish this post by revisiting coastal Ecuador and the weavers there who taught me this simple warp float technique in the first place. I showed you all a little about their weaving here in another post so this time I will show a bit about their spinning. The weavers I stayed with are amongst the few in the area that still weave with their own homespun cotton.

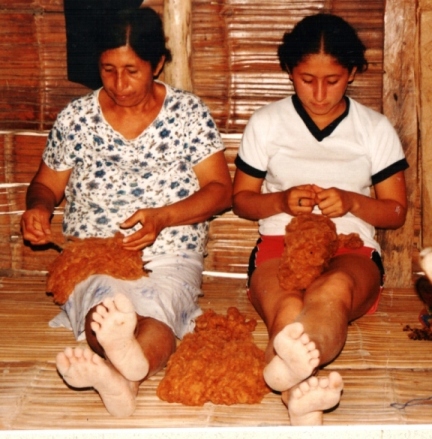
Although there are still a few wild cotton plants scattered about the settlement where these weavers live, they usually have to buy their cotton in the market. It needs to be deseeded, teased and beaten into a smooth even sheet before it can be spun.

While natural brown cotton is highy prized and expensive in Guatemala, it doesn’t seem to be considered anything special in Ecuador.


The cotton is draped on a wooden stand called the "rueca" for spinning. The "rueca" has a notch cut into its top which grabs the cotton and allows the spinner to draw out the fibers under tension. A small basket is woven from plantain fiber underneath on which the spindle sits when not in use. This is a miniature version of the "rueca' which I made with my teachers' help so that I could take an example back with me to Bolivia. The typical spindle can be seen at right with its wooden whorl. More often now you will see people using yo-yo halves and metal wheels as whorls.
Here my teachers are spinning with their large ruecas-one hand twirling like mad while the other draws out the fibers. I am having a go. I found this a lot harder than spinning with a drop spindle. I taught Trini to spin with my drop spindle and she picked it up in seconds.
The people in these settlements are basically farmers - up at 5am with the roosters and the donkeys to go out and work the fields so they can be indoors during the hottest part of the day. Then off to bed at 9pm. Here are some bead spindle whorls that they have unearthed while digging and turning the soil for planting. Mind blowing!!
Some simple warp float designs from coastal Ecuador that I wove and have used as covers for my journal.
And the spinning tradition lives on...the anthroplogist whom I accompanied on this trip has just gotten back from Ecuador and tells me that this little one is now up and spinning!

####################################################################


Backstrap Weaving-MORE mysterious sticks and beautiful braids

MORE MYSTERIOUS STICKS!

I set up  my loom yesterday to weave a narrow band – just 28 ends. Once I had made my simple heddles, tied them in a bunch and added the shed loop I realized that my entire loom consisted of just two simple sticks – the two loom bars and that’s all – one attached to a bed and the other to me. My weft was tied in a butterfly – no sticks there. The only other stick involved was a wooden beater to prop open my sheds and beat in the weft. How much simpler can it get?

I filmed the entire process from warping stakes to ready-to-weave if you would like to take a look. (Donna, I made this especially for you!)

So, again I ask you, how much simpler can it get?

Actually it can get simpler! I was in Tarabuco recently and watched a weaver sitting on the ground deftly wind a warp around her hand and foot. She tied one end of the warp around her foot, passed a length of yarn through the end loops at the other end and secured it to her waist. Then she made simple heddles around her hand, added a shed loop and started to weave. Briiliant! All in a matter of minutes.

A weaver in Tarabuco using a “toe” loom

You are probably thinking: okay, a simple loom for a simple weave– but even very complex weaves can be done on a very basic set-up.

A weaver from Tarabuco creating a complex design on a simple loom

You may recognize Felicia above with her sleepy cat from the video in this previous post. She has a shed rod, a heddle stick and some bars between which to stretch her warp. She has just inserted a couple of thin sticks to help with the pick-up but look at the photo at left and see the complex designs that she creates on this simple set up.

Now what about those looms that you see in pictures on the internet and in those Youtube videos? Some of them are loaded up with sticks – all those mysterious sticks – what in the world do they do? Hopefully I can solve the mystery behind at least some of them here. I have to admit that there are Asian looms that I have seen online with a multitude of patterning sticks and that I still haven’t figured out how some of those sticks work.

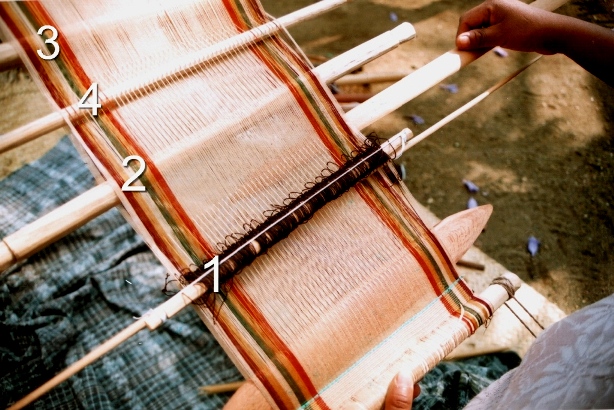
An extra stick added in a second cross in Guatemala

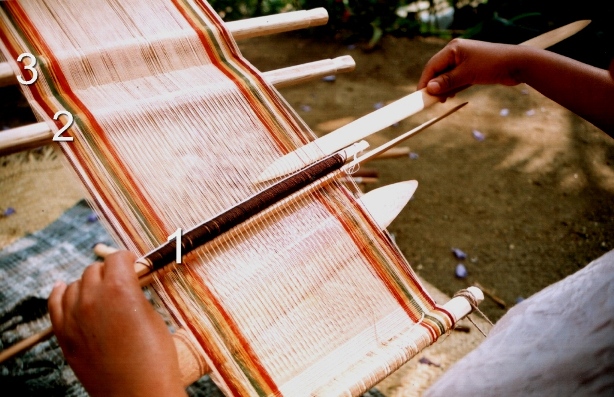
But at least I can let you know a bit about  the sticks I have seen here in my travels in Central and South America and what they do. In the picture at right, number 1 is the heddle stick and number 2 is the shed rod. We are familiar with these. But what about number 3? This is an extra stick to hold a second cross. A lot of weavers wind a second cross as they warp. I don’t.  I find that the fewer twists and turns I make on the warping board, the easier it is to wind a warp with  good even tension. I only use a second cross  on narrow warps to stabilize my shed rod which tends to slip from side to side and be a thorough nuisance. Making a second cross and putting a stick within will lock the shed rod into position.  It is very easy to create a second cross once your warp is already on the loom. Here are the steps…

LEFT: Your loom is set up with heddles and a shed rod. RIGHT: Open the shed rod shed, place your beater within and draw it down to the weaving line. Remove the shed rod. It is important that the beater not fall out at this stage as it is saving your shed rod shed. Use a back up safety string if necesary.
LEFT:Open the heddle shed and place an additonal stick within. RIGHT: Tilt the beater to open the shed up beyond the heddles and place your original shed rod within. Tie or tape the shed rod and additional stick together.You have created your second cross.
Another Guatemalan loom with a second cross installed. The shed rod is pvc pipe which is often used as it can be thick without being heavy. Notice the orange safety string – if disaster strikes (and it most probably will with those 3 little guys hanging about!) and all this weaver’s sticks fall out, the safety string will save her cross. Even the experts use them! Look at the little future weaver there on the left. She is wearing the typical long “corte” skirt and even has her own woven belt.

Some looms have a mind boggling amount of sticks but the reason can be very simple!!

LEFT: The 11 sticks on this upright loom in Ecuador will become heddle sticks. The 22-row design, which is horizontally symmetrical, will be programmed into these 11 heddles. RIGHT: This is one of my own warps set up on my Navajo loom in Chile. As I am using 4 colors in my pebble weave I have extra sticks to separate and keep the colors in order for the pick up.
Miguel Andrango’s granddaughter poses with one of the looms. You can see the two shed rods above the heddle stick. The space for the extra shed rod is programmed into the warp by using an extra stake during the warping process.

In Ecuador I saw the use of an extra stick which I have not noticed anywhere else. This is especially useful for wide warps or particularly fine yarns but I saw it being used on warps of all widths and yarn sizes in Ecuador. It is an extra shed rod. I know from my own experience that the shed-rod shed on a wide piece with fine yarns is really difficult to open. It was a very slow and tedious process on my Abba Yohanni piece, for example. The extra shed rod in Ecuador holds every second warp that passes over the main shed rod. This means that half the number of warps can be raised using the extra stick. Then it is very easy to use the main shed rod to raise the rest of the warps.

This is one of Miguel Andrango’s looms. He is a very well known weaver from Agato, a small town near Otavalo. You can watch a video of his work here. Fifty-seven seconds into the video you will get a very nice close up of the two shed rods. You will also see the typical white woven alpargatas he is wearing. I spent some time with an alpargata weaver and hope to blog about that some time. Miguel Andrango is not a large man and, although the piece above is not particularly wide,  he weaves some of the widest backstrap woven pieces I have ever seen!

A weaver near Otavalo is preparing to make her string heddles. She is using the extra shed rod on her loom. This rod has a dual purpose as it also serves to stabilize the main shed rod.

Now we come to the patterning sticks that are used by weavers in Guatemala to create designs using supplementary wefts. The supplementary wefts are either laid in to form block patterns or wrapped around warps to form little figures.

It is not my intention here to teach you how to insert and use these sticks. So, don’t worry if you don’t quite get it. No doubt, I will be doing a tutorial on this in a future post. I just want to take a little bit of the mystery out of it so that when you are looking at weavers and looms in books and on the net you may have a better understanding of what all those sticks do. For now, read on and  just enjoy the beautiful textiles!!

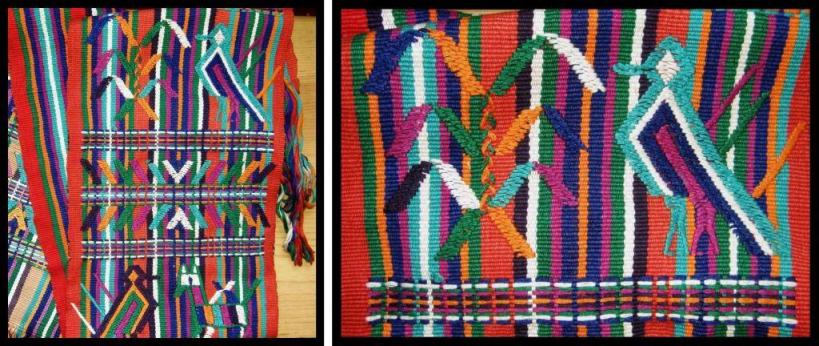
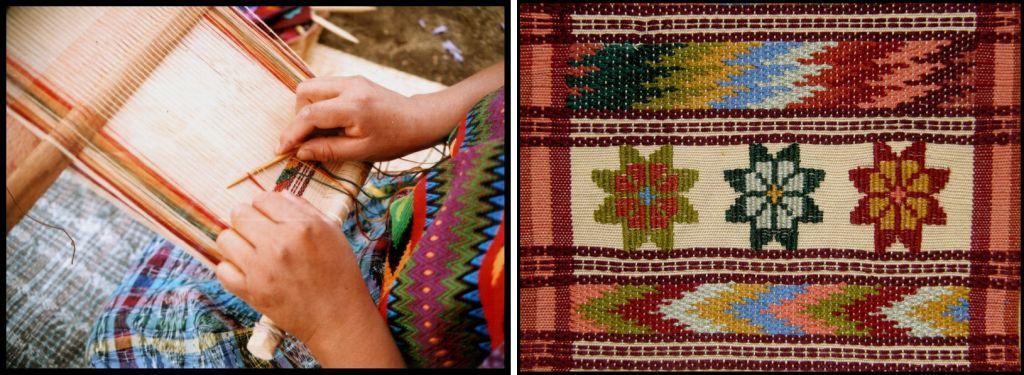
Typical designs of Santa Catarina Palopo.LEFT:Supplementary wefts have been laid in to make designs like the X’s in the center or wrapped around warps to form figures, like the stem of the plant below and the arms of the woman above. RIGHT: The upper design has been woven using the technique employed in making the typical huipil of this town.
LEFT: Bands woven using patternig sticks and offered to toursits. RIGHT: The typical huipil of Santa Catarina Palopo. These colors are a relatively recent introduction. Old huipiles in crimson and white can be seen in paintings by Carmen Pettersen. My teacher told me that only the very oldest women in the town may still have the old huipiles.
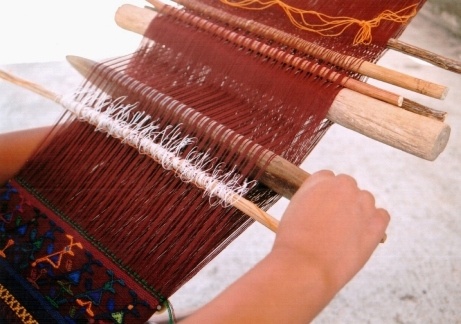
Carmelita is teaching me on this loom in Santa Catarina Barahona. Number 1 is her heddle stick, number 2 her shed rod, number 3 the stick in the 2nd cross and number 4 is her newly introduced patterning stick.

These patterns are created by adding two extra sticks to the loom – the patterning sticks. In Santa Catarina Barahona, the weavers open the shed-rod shed and pick up every fifth warp. They store these warps on a stick – the patterning stick that sits up behind the shed rod.

The heddle shed is then opened and, once again every fifth warp is picked up but in such a way that each picked up warp sits between two that were picked up on the first patterning stick. The warps are stored on another patterning stick which sits behind the shed rod but, this time, under the warp.

Here is how the loom looks with both patterning sticks installed.

Number 1, heddle stick. Number 2, shed rod. Number 3, stick in 2nd cross. Number 4, 1st patterning stick and number 5 the 2nd patterning stick. The patterning sticks are simply drawn down towards the heddles to create sheds for laying in the supplementary wefts.
This diagram shows a loom in profile with the positions of the patterning sticks
LEFT: Lydia is laying in a supplementary weft in one of the patterning sheds. RIGHT: The patterns at top and bottom were made with the aid of the two patterning sticks.

Sometimes a second pair of  patterning sticks is inserted when the weaver wants to change the design. These are only temporary and will have to be removed when she wants to return to the original design.

Take a look at the photo below…can you name all the sticks?!

Two pairs of patterning sticks are in this loom

################################################################################

BRAIDS AND FINISHES

A sling braid made from llama fiber from the Colca Canyon area of Peru. It comprises a braid with a finger loop in one end and a cradle in which the stone to be hurled sits.

Now to return to the simplicity with which I started this post…………some braiding and edging techniques with few or no tools required.

After having done the tutorial on cross knit looping last week, I  remembered another interesting edging that I learned with my sling braiding teacher in Yanque, Peru. We used it to edge the cradle section of an Andean sling braid.

I made one sling with him and he taught me to make three different braids. Men in Peru braid their slings holding all the braid strands in their hands – no other equipment is required – and can quite happily stroll along the road while braiding. Two of the braids I learned had twenty-four strands and the other twelve. I was told that the main use of the slings these days is to hurl stones in order to  keep control of animals straying from the herd.

LEFT: The single cross two-color edging that I was taught on my sling. RIGHT: A double cross two-color edging on an Andean sling that I bought.
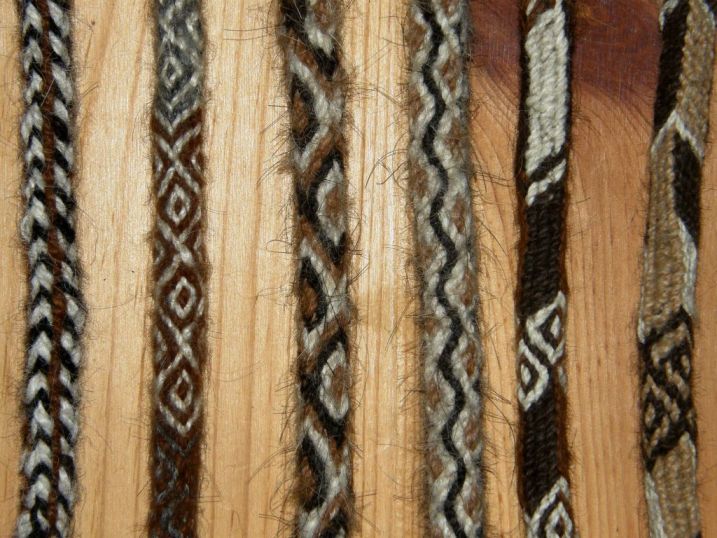
A few of the braids used for Andean slings. Named from left to right…PALMA, MARGARITA (2nd and 3rd),SALSA and CAJAMARCA (5th and 6th)

When making an Andean sling, first, one half the braid is made. The strands of llama fiber are measured from the tip of the nose to the toes and then doubled. The first section usually includes the finger loop. More strands are added to weave the cradle in tapestry technique and then work the braid for the other half.

The cradle is woven on a backstrap set-up tying the braid to the waist while the strands which serve as warp are tied to a fixed point.  Then the second half is worked in two braids – first a thick one and then a thin one to finish.

Decorative tassels and edgings are the last things to be put in place. Some of the tassels can be quite flamboyant. My teacher didn’t care at all for the more extravagant decorations!

I love these slings as there are several skills involved. Without even realizing it, this was my very first taste of backstrap weaving and with this one teacher I learned so much. He taught me the Palma and Margarita braid styles and a thin version of the Palma which didn’t seem to have a name, a little tapestry weaving by backstrap as well as tassel making and decorative edging.

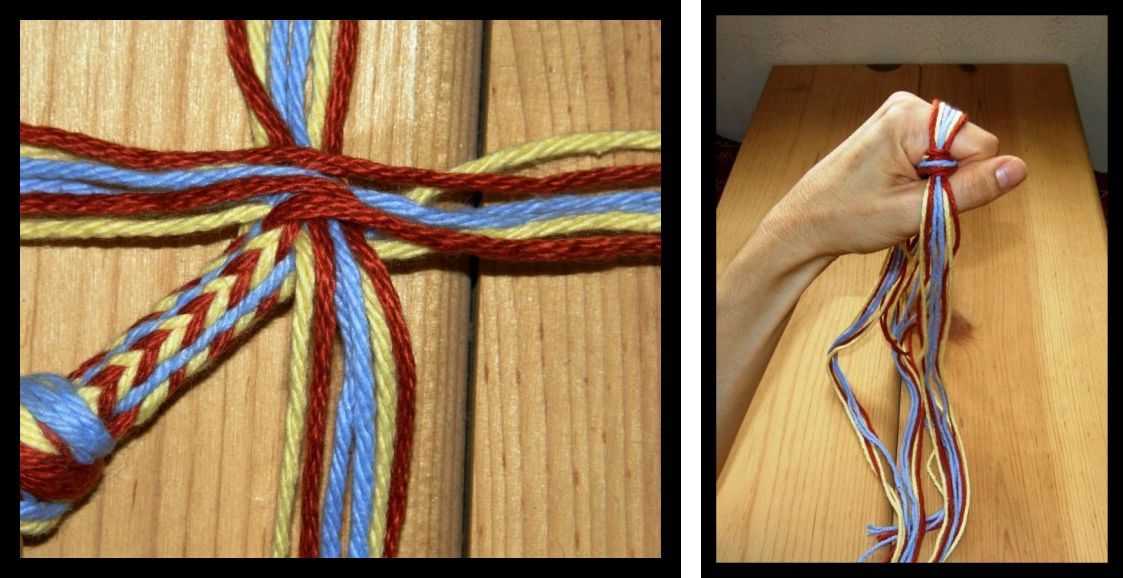
LEFT; The very start of the Palma braid with the 4 sets of 6 strands used to make it. RIGHT: My hand in the braiding position. Two opposing sets of strands are interchanged. The braid is then rotated  90 degrees so the other two sets can be worked.

Zacarias was a marvelous teacher with a lot of patience. He would get me started on my work and leave me while he harvested the barley crop – plans were afoot to make some alcohol – moved the animals from one field to another and generally took care of things on his property.

LEFT: My sling braiding teacher, Zacarias on his property near Yanque, Peru. RIGHT: A woman by the shores of Lake Titicaca shows me how to hurl a stone with a sling braid.

################################################################################

WHAT HAVE YOU GUYS BEEN UP TO?

I know that backstrap weaving isn’t for everyone and I am so glad that people are still able to make use of the instructions here and at Weavolution and use the techniques and designs on other looms. Ellen Turner, in Denmark, has woven a double weave band on her inkle loom using my tutorial at Weavolution.


She made a celtic design inspired by something she saw on the internet.

I also ran into Jessica’s blog where she has been experimenting with double weave on an inkle loom too. Check it out.

Kristina in Germany  wove a double weave band on her inkle loom using her own handspun llama fiber. She commented that it put a lot of stress on her inkle loom so that is one important thing to take into consideration.

So if you have been enjoying the designs and have found the tutorials interesting and tempting but are still hesitating about getting strapped in, remember that you can adapt these techniques to other looms. I have set up warps on my rigid heddle loom and woven bands with string heddles rather than with the rigid heddle.

I have to tell you, though, that for me the backstrap loom wins hands down for the ease with which I can adjust tension with the slightest of body movements.

And, finally, I mentioned above the paintings of Carmen Pettersen. Check if your library has a copy of “Maya of Guatemala-Life and Dress”. Her paintings of Guatemalan people in traditional dress are stunning.

Backstrap Weaving-Sitting at my loom and Salasaca strawberries.

A firm cushion, a stable place to tie up the loom and a broad well positioned backstrap.

SITTING AT MY LOOMergonomics

I have been weaving with my backstrap loom for around 14 years now and feel very comfortable with the set up I have here at home-a stable place to tie up the loom, a good cushion and a broad sturdy backstrap. I try to have everything I need – needles, extra dowels etc –  placed around me within reach before I get strapped into the loom as well as an emergency unstrapping strategy so that my warp and sticks don’t end up in a tangled mess on the floor when I jump up to answer the door. I always grab the loom bar and hold the warp under tension while I slip off the backstrap cords and then gently place the loom on the floor.  Other non-weaving related essentials that need to be on hand include the remote controls for the dvd player and tv, the cd collection on one side and the laptop and snoozing cat on the other. The phone can just ring for all I care! although I do have an answering machine which I sometimes remember to turn on.

I have to say that I have never put much thought into the “correct” way to sit. I feel comfortable sitting with my legs

I am looking and feeling very uncomfortable weaving at Felipe’s loom in Salasaca, Ecuador reaching high and with the backstrap up around my waist. I did like the stake at the bottom of the post for bracing my feet and the baby chickens that would come and sleep on my legs while I wove!

stretched out and my warp angled slightly upward. There are sheets of wood under the bed against which I can brace my feet and I do get up frequently to walk about and stretch. Yet I still don’t know if this is the “healthiest” positon for a backstrap weaver’s body or just something I have gotten used to.

And what about the indigenous backstrap weavers here in South America who have been weaving since childhood? Do they experiment with different positons or does tradition alone dictate the way they sit and weave?

I know that I am usually very uncomfortable at first sitting at other people’s looms when I am learning with my indigenous teachers.

I like to try to do things just as they do but sometimes it’s difficult-either the loom is angled too steeply, the sitting position, sometimes on cold bare concrete,  is almost physically impossible for me or the loom has been set up for someone a lot smaller or larger than me.

Felipe, very much at home at his loom with three of his four sons, his wife and mother-in-law.

Let me show you some pictures of other backstrap weavers including some of my teachers, the way they position themselves at the loom and some of their beautiful work.

Valeria in San Roque near Otavalo sits with legs outstretched and feet braced against a block of wood. The looms in the typical weaver’s home will have several blocks of wood like this which can be added to accommodate different warp lengths and the leg lengths of the various weavers in the household. She has just finished what will become the collar for a poncho and is brushing it with thistles that have been mounted on a frame.
Valeria’s father, Carlos, weaves the ponchos. His backstrap is a thick twisted cord which he is padding with cloth. I don’t imagine that feels too comfortable. He is about to make the last few weft passes in this four-selvedge piece.
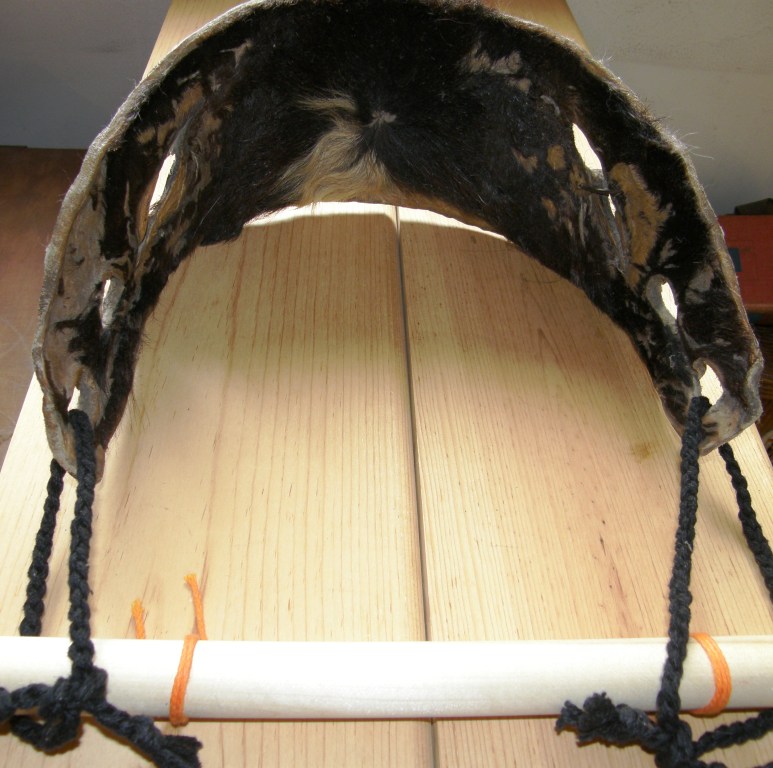
For narrower weavings, this piece of hide is the typical backstrap in the San Roque area. It is wonderfully sturdy, broad and comfortable.
Margarita is sitting crossed legged on a cushion and weaving this very narrow band with just a piece of yarn passing through the end loops and tied around her waist.
The tiny pebble weave bands that I made under Margarita’s tuition.
These ladies in Pisac, Peru are obviously a lot more felxible than I am as they kneel while weaving narrow bands which are used as decorative edging for their skirts.
A close up of the bands used in Pisac for skirt trim. I believe this is called “buyto”.
Catarina in Nebaj, Guatemala sits on a low chair. Hopefully she will be my teacher on my next trip to Guatemala. This looks really comfortable and I would like to have a small chair like this made for myself. I love how she has set up the phone on the table next to her. She is weaving a small huipil for her little daughter. She also wove the blue huipil that she is wearing.
Of course it always helps a weaver if there is a visitor to entertain the little guys. This is the little Nebajense who will be wearing the red huipil that is on the loom. The huipiles of Nebaj are amazing and I was fortunate to be there over Easter when everyone was out in the main square in their best outfits. More about that in a future post.
Another of Catarina’s beautiful huipiles.
In Zunil, Guatemala I learned how to make the typical hair sash of the area. The weaver is attached to a 4-shaft pedal-operated loom by backstrap. I sat for 4-5 hours every morning on a small wooden stool and had to take towels and sweaters for padding after a painful first session. Clara teaches a lot of the teenagers in the town so I was learning along with a 15 year-old neighbor.
Clara’s hair sash is on the right with my frst attempt on the left. I also had some of the essential parts for the little loom made by the carpenter in the town, photgraphed and sketched the loom and took measurements so that I can have one built here some day.
Clara also weaves this beautiful fabric on a large floor loom which is made into the typical skirt of Zunil
Most weavers I saw in Guatemala knelt to weave. This position is impossible for me to maintain for more than 5 minutes and so I would sit with legs outstretched for my lessons with Lidia. When Lidia once tried to sit and weave in my position, she just fell about laughing!

When I was in Guatemala in 2008, I met Karen Piegorsch who is President of Synergo Arts. Synergo Arts works to educate backstrap weavers about ergonomics and is currently introducing their ergonomic bench to weavers and carpenters in Guatemala ” to protect their health while producing more textiles of better quality.  As a result, they increase their ability to provide for their families, and also preserve their weaving culture.”.  In fact, their aim is to help all weavers and artisans work more comfortably.

In the words of the organization…

“Synergo Arts is a nonprofit, 501(c)(3), tax exempt organization based in Arizona.  Our purpose is to help artists and artisans around the world use ergonomics to maximize their health, income, performance, productivity, creativity, and art or craft quality.  We do this through a grassroots approach to innovating and delivering resources in ergonomics education, consulting and design.”
Information on the ergonomic bench project and other articles about ergonomics for artisans can be found here and here.
#################################################################################
SALASACA STRAWBERRIES….


Salasaca tapestries


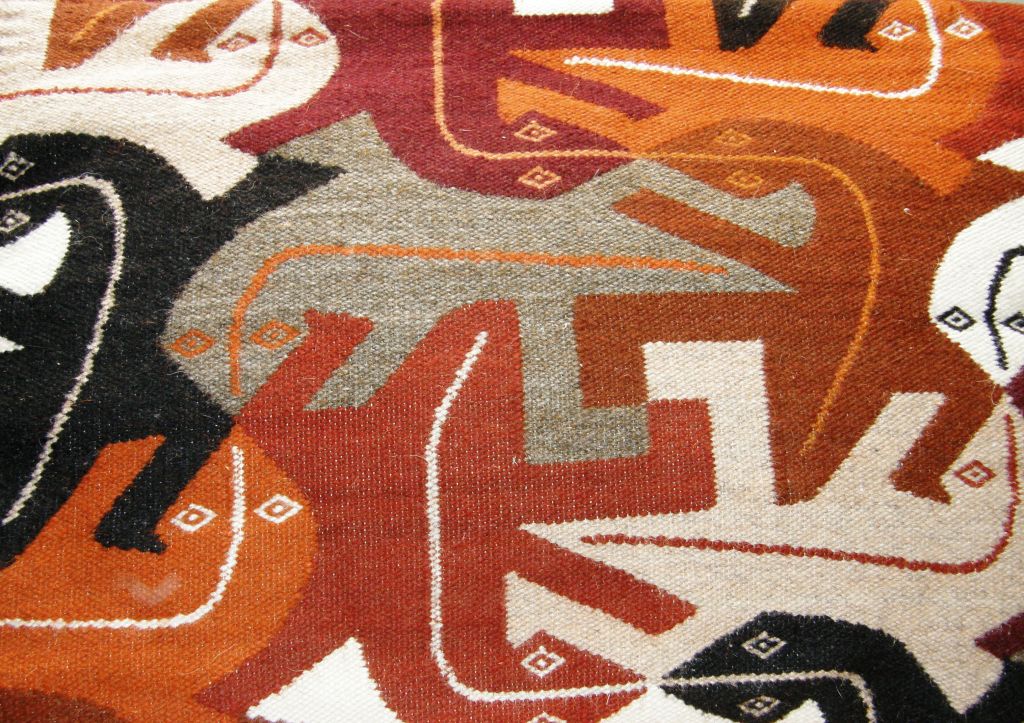
I showed you a picture at the start of this post of Felipe in Salasaca weaving on his porch with his family. I went to Salasaca in 2005 for the frst time and met Felipe’s cousin Anita. I was looking for someone to teach me to weave the supplementary warp patterned belts of Salasaca. Anita is not a weaver although she owns a wonderful set of six beaters of varying sizes made for and given to her by her father when she was a teenager. She doesn’t have any daughters and is waiting for the first grand daughter to pass these tools on to. Anita’s sons work at floor looms producing the tapestries for which Salasaca has become known. The designs include those from Navajo weavings, artwork of M C Escher as well as traditional motifs of Peru.

MC Escher inspired design on a tapestry made in Salasaca

I have read that not one of their tapestry motifs is Salasacan in origin. The tapestries are made specifically to be sold to tourists.

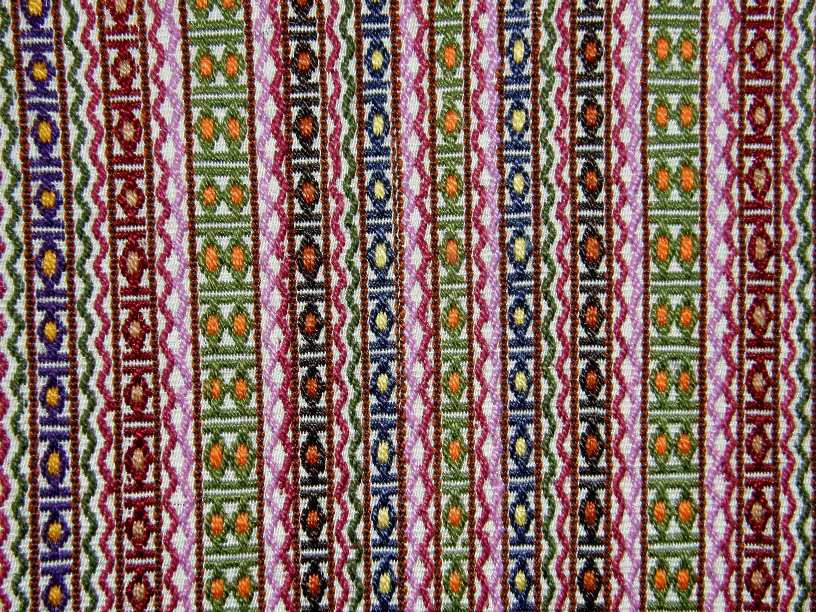
The traditional Salasaca designs can be found on their clothes and it was the frutilla (strawberry) motif belt that I wanted to learn to make. As it turned out, they persuaded me to teach them to weave instead! Anita had me teach her youngest son, Juan  and their neighbor Natalia to weave Andean pebble weave which is a story that I will save for future post.
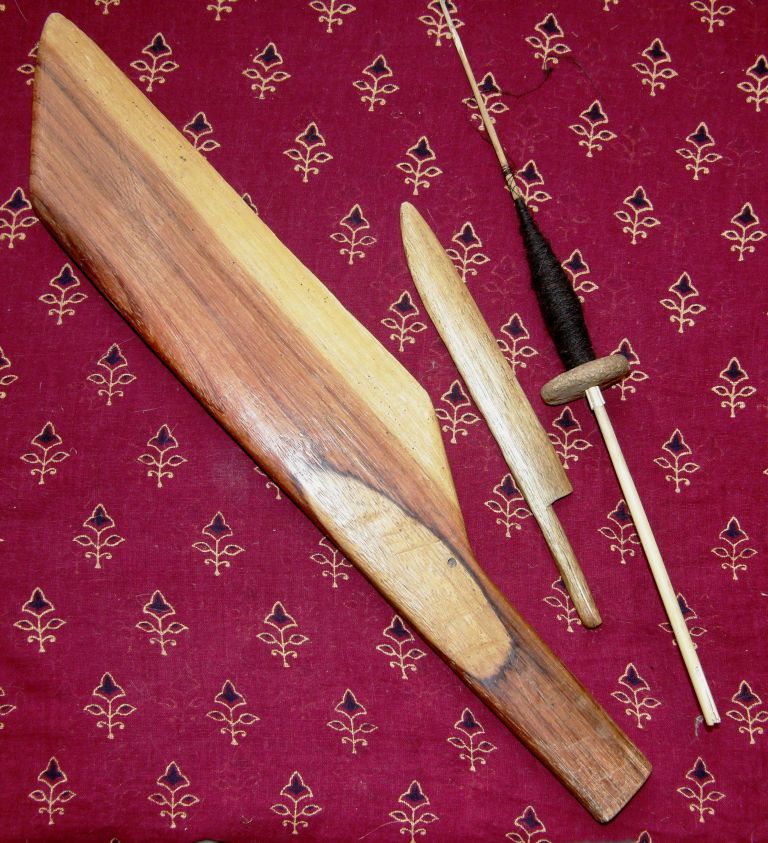
Two of the six beaters in the set that makes up the Salasaca weaver’s tool kit. The small one is used to pick up the warps. The typical spindle is called a “sig sig” after the pampas grass plant stems from which it is made.
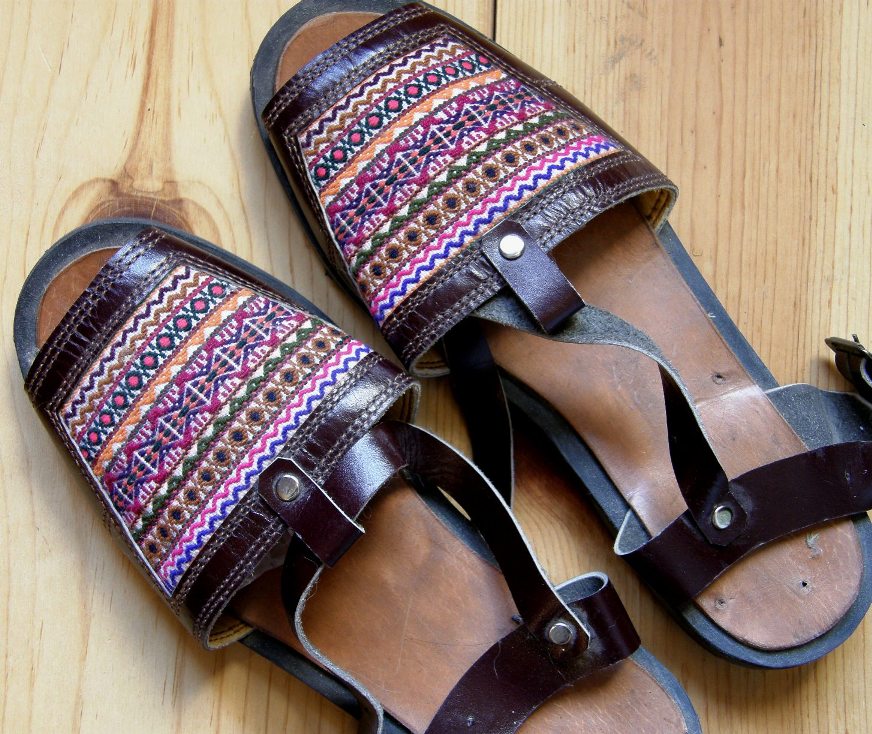
Eighteen months later I returned to see how my students were getting on and you will have to wait to hear more about that. It was on this return trip that Anita introduced me to her cousin who happened to have a warp all set up with which he was teaching his youngest sons to weave. This was so lucky for me as it meant that I coud also have classes and not have to worry about messing up someone’s precious belt. The acceptable parts of the belt were going to be salvaged and sold to the local shoemaker who had recently started making sandals using pieces of the traditional woven belts.
Pieces of the “frutilla” design belt used to decorate sandals.
“Manamay” belt with Anita’s spindle and distaff

Salasaca people are small and it was obvious that even the largest pair of sandals would not do for me. In fact, quite a crowd gathered to watch me trying to stuff my big gringa feet into them. I bought them anyway as this was the only way I would get to have a sample of this textile. I could not persuade anyone to sell me a belt eventhough  I jokingly pointed out how unfair this was to Anita as her pig was tethered to the gate with one of her old belts! She did permit me, however, to take photos of her frutilla and manamay belts.

So I spent a few mornings with Felipe and wove on his loom. The trickiest part was remembering to let go of the weft before slamming the gigantic beater down – bruised knuckles to show for the times I forgot! We wove on Felipe’s narrow porch and, as his home is on a hillside, enjoyed a beautiful view over the fields and surrounding countryside.
Front and back of a “fruitilla” belt/
The belt at right belongs to Felipe’s mother-in-law and she kindly allowed me to photograph it. Neither she nor her daughters know how to weave although they are all expert spinners.
I had a lesson in circular warping from Felipe and his youngest son and then came back to Bolivia to document the process in my journal. The warping was quite complicated with several colors traveling at the same time in different directions and being anchored under toes. Then I wove two pieces to be the front and back covers for my journal.
The back cover
The back cover piece on the loom
The front cover. The zig zag designs are called “kingus” and the circular designs are the “frutillas”. As the colored supplementary warps shoud be thicker than the ground weave warps, I used doubled sewing thread for the ground weave and perle cotton for the supplementary warps. In Salasca they use cotton thread for the ground weave and thicker acrylic for the colored warps.
Anita, her son Juan and Natalia wanted to pose for a picture. This was on my first visit and I was only able to give them the pictures on my return 18 months later as they don’t have a reliable mailing address. Women in Salasaca wear traditonal clothes everyday-all that you see here in the picture except for the hat and every spare moment is spent spinning. They normally use other kinds of head coverings on a normal day. Juan put on his festival gear especially for the picture. Anita and her family own a store and you can see their floor looms and tapestries in the background.

I have plenty more to tell about the wonderfully friendy people of Salasaca but will save it for another post.

##########################################################################

WHAT HAVE YOU GUYS BEEN UP TO?

I have some projects from readers to show again this week.

Jeannine made a supplementary weft patterned band from her own design. You can read more about the whole process and see more pictures of her band and her pattern charts on her blog.

Ann finished her supplementary weft patterned band. It looks great with that fringe.  Both she and Jeannine are about to embark on another project using this technique.

Stitchwort wove a backstrap following the instructions in my article on WeaveZine and is now weaving what will be a bag for her loom. She is weaving the bag from her own handspun tencel and it looks so wonderfully sleek and shiny on the loom. I have been curious about tencel for a long time having heard so much about it in online groups and seen gorgeous pictures of pieces with wonderful sheen.

I was lucky to be able to organize a swap of woven goodies with a friend in Denmark and my package arrived this week-tencel at my request and a couple of her own spectacular handwoven articles. The tencel is everything I expected and more!

First, here is a photo of Stitchwort’s projects…

She is using her own handspun ramie as weft and I must confess I have no idea what that is. But I won’t give too much away as you can read all about her backstrap projects on her blog. I just love the shuttle she is using.


Tencel, Japanese silk and Argentinean silk

There’s my tencel on the two spools with a ball of silk that a colleague brought for me from Japan along with a skein of raw colored silk from Argentina. The Argentinean silk is a lot thicker than the tencel and the Japanese silk and so I was thinking of using the thin yarns as ground weave and the white silk as supplementary warp. I am terrified that I will mess it up and waste this precious stuff. I will definitely be sampling on a bookmark.

Any thoughts on this project idea?

Backstrap Weaving-balanced weave, double weave and balanced double weave

BALANCED WEAVE, DOUBLE WEAVE AND BALANCED DOUBLE WEAVE….

I made some New Year weaving resolutions. What about you? One is to weave at least one balanced weave on my backstrap loom per month. So I got one done in January which I’ll show you later and I am planning February’s project. You will see that I am all about process rather than product for this project as all I know is that I want to weave a shadow weave piece but I have no idea what I want the piece to be. I am counting on an idea developing as I go through my yarn bags.

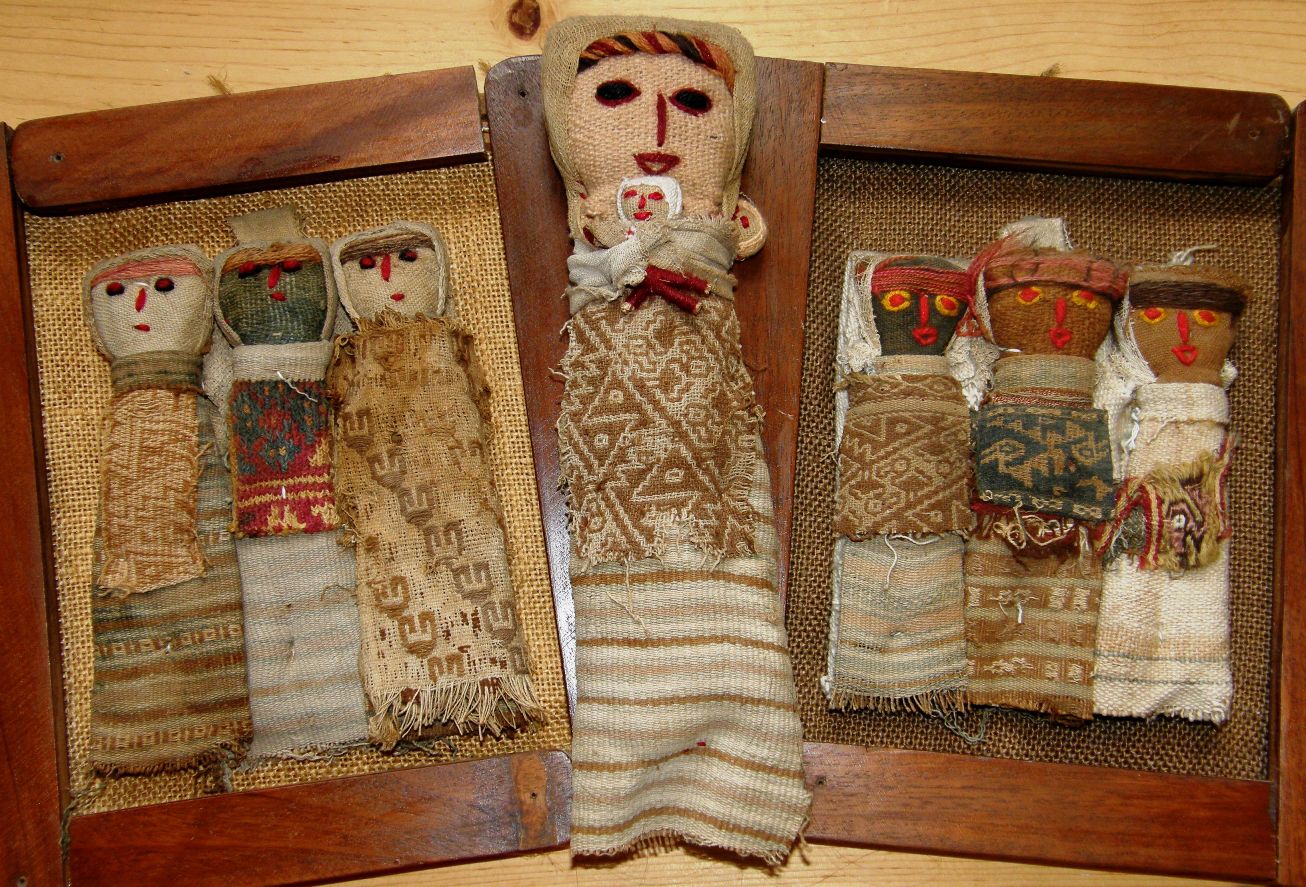
Another resolution is to weave reproductions of the designs on some pre Columbian textile fragments that I have gathered over the years. How did I get hold of these tiny scraps and fragments? Well, some industrious Peruvian artisans have been recreating Chancay dolls and dressing them in bits and pieces of old textiles.

Sets of Chancay doll reproductions

The Chancay culture existed  on the Peruvian central coast from around AD 1000-1476. It is believed to have been conquered and incorporated into the Inca Empire in the mid to late 13th Century. The people of this culture were prolific weavers and, as the central coast of Peru is a particuarly dry area, many of their textiles have survived remarkably well preserved  and are kept in museums around the world.

I was dubious for a long time about the authenticity of the textile pieces. However, it just didn’t make sense that someone would weave structures, some of which are no longer woven in Peru, take all the trouble to stress the fabric in order to make it look old, tear it up, sew the pieces onto dolls and then sell them for very little in the street market.

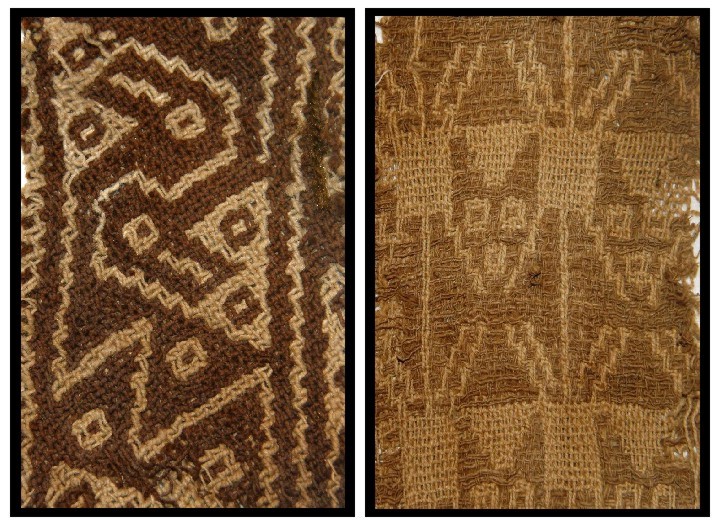
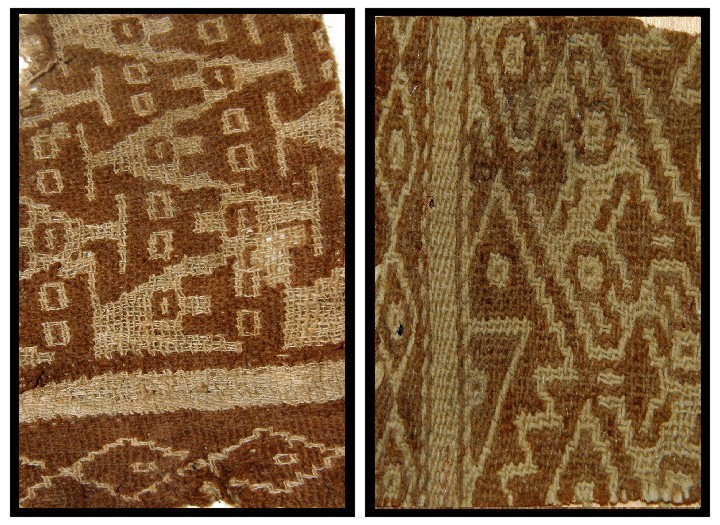
A close look at a couple of the fragments with bird and bat motifs

I have yet to find a good image of an authentic Chancay doll to make a comparison but apparently the originals did not have embroidered faces. Rather, the facial features were woven into a piece of cloth which was wrapped around plant fiber to form the doll’s head. As with most things, I imagine these dolls started out as quite faithful reproductions of the originals and that the quality of the work has since deteriorated.

Two more pieces with bird and snake motifs

The original Chancay dolls have been  found in tombs and were possibly funerary offerings. Recently I found an article online which, not only confirms the authenticity of the ancient textile fragments used to dress and decorate the dolls, but also gives information abut the Chancay culture and speculates about the dolls’ purpose. It just gives me chills looking at and touching these pieces-something the museums won’t let you do! and wondering about the weavers, their looms and their lives.

Snake motif in pebble weave

I have been weaving the designs I have seen in photos of museum pieces for years. The two pieces above  center and right were made by me in the 90s. Imagine the thrill when I found a fragment, on the left, with a very similar snake design some years later.

A piece in slit tapestry that I copied on my backstrap loom

I copied the slit tapestry piece at left on my backstrap loom without the slits and made it into a small sewing kit purse with a zip on three sides.

This little purse goes with me on all my weaving safaris. Some people tell me that the design looks like figures from a 1980’s video game!

This was a very slow and tedious weave using split embroidery floss for the weft. I was quite happy to see the end of this one!!

Bird motif in pebble weave

Again, I had woven this little 4-color bird motif many years before finding the little fragment almost completely in tatters on a doll at the Otavalo market. I had to work hard to hide my excitement while cooly bargaining with the vendor-bargaining at the Otavalo market is expected. Although my bird is a little different and was copied from a book, it is still thrilling to see a  similar original piece.

According to the aforementioned article, birds were highly esteemed in these cultures “because of their ability to cross between earth and sky” as well as due to ” their association with water…..and source of guano for fertilizing crops”.

Pre Columbian bird motifs

I love these birds and they find their way into a lot of my weavings.

Balanced double weave bird figures

Which brings me finally to balanced double weave and my weaving resolution for the year.  This structure is no longer woven here so there is no one around to teach it to me. I found out that the Huichol people in Mexico weave it and recently got Chloe Sayer’s Mexican Textile Techniques which has pictures of some examples. I had dismissed the instructions by Suzanne Baizerman in Double Woven Treasures of Old Peru as they were written for the treadle loom but recently returned to them to find, to my delight, that I understood them. So I set to and wove the above band using the pattern chart in the book which just happens to be the very same bird motif that I have on a doll fragment.  I used four sets of heddles for this weave and kept the cross sticks in to help spread the warps. This was just a narrow band.  Now I hope to make a large wall hanging incorporating bits and pieces from several of the fragments.

Something that is on the loom at the moment….supplementary weft patterning. You can see the tiny fragment from which I am copying the design on the right. This was another exciting find as, at least here in Bolivia, I have not seen this technique used for anything other than hat bands and on one old chuspa in a book. I would love to know the original use for this piece.

You can find the chart for this design here. I have also put the chart for the Abba Yohanni double weave design from last week’s post here.

This is just a small selection of my fragments. I am sure that more will show up in future blog posts as I strive to reproduce them. There is one technique that I as yet have not been able to identify.

Now what about those balanced weaves? I am still very much into my recently gifted rigid heddles and have been using them to make samples and a few useful pieces.

"Strawberries and cream" pinwheel mats

The rigid heddles arrived while I was in the middle of this “strawberries and cream” pinwheel piece. Rather than struggle on with my multiple stick spacers, I added the rigid heddle to the backstrap loom and finished it in no time.

Last month we had a WAL at Weavolution weaving rosepath motifs so I used my rigid heddle as a spacer and beater and used four sets of string heddles for the motifs.

Spring garden table runner
A small log cabin sample

Sometimes I just mess around and make samples trying to discover what is comfortably possible on my backstrap loom. The above log cabin piece was the first balanced weave I tried before my rigid heddles arrived. I thought the squareness of the design would look good as a notebook cover. I’ll take this little notebook along for my next weaving classes wherever that may be. It is nice to find a use for even the smallest of samples. You can see my test piece for the llama bookmark has been padded with foam and made into a pin cushion saddle cloth for the ceramic llama!

As the title of this post suggests, there is also some warp faced double weave to talk about. The last of my weaving resolutions is to design some nice letters to weave in double weave. I have been very much inspired by Linda Hendrickson’s beautiful book Please Weave Me a Message where she has designed alphabets to weave with tablets. You may have listened to Syne Mitchell’s recent interview with her at WeaveZine. I hope to come up with something like that for double weave. My stick alphabet above looks very humble next to her beauties.

Lastly, I would like to show off some work by one of my blog readers. Ann Littlewood wove a supplementary weft patterned  band using embroidery floss for her supplementary weft. It is a great way to “paint” in designs and play with colors. It absolutely makes my day when I hear from people who have  used my instructions. 🙂

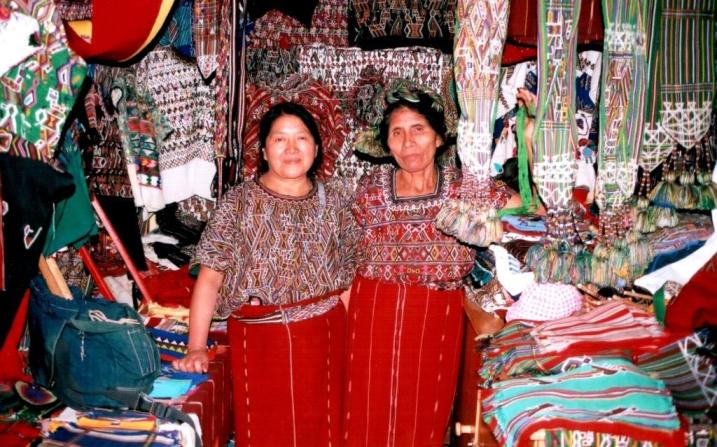
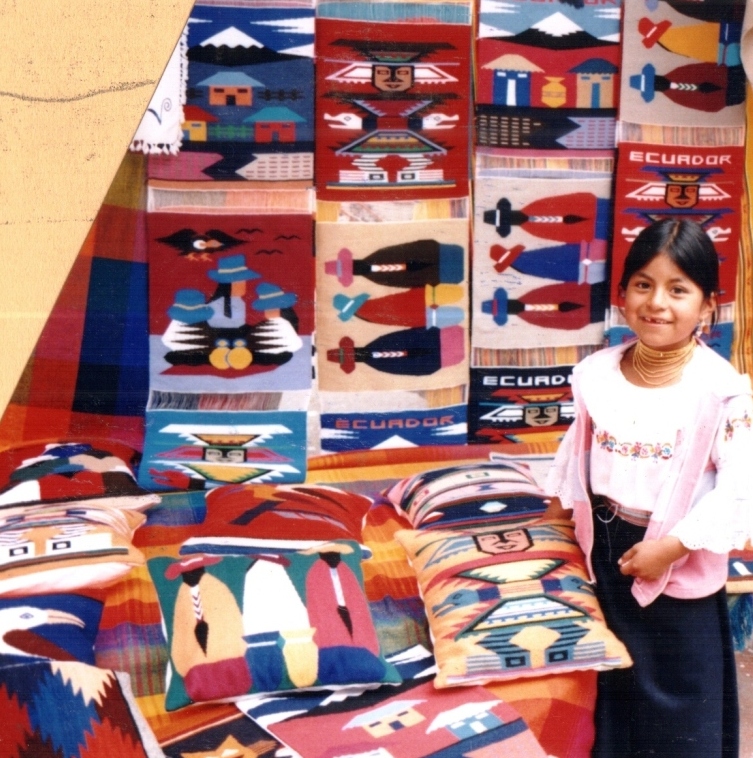
I will leave you with a cheery little Otalavalena, below, at her brightly colored market stall at the enormous Saturday market. Otavalo is a town in Ecuador which has a lively and popular craft market every Saturday and is where I bought some of my dolls. Goods from near and far are sold there such as braids and beads from Peru, molas from Panama and Colombia and belts from Bolivia and Guatemala as well as an enormous variety of weavings and crafts from all over Ecuador. While the market largely caters to tourists, locals also shop there for clothes, footwear and beads.

Thank you for the nice comments last week. I am glad you found the videos useful. One of  the visitors from Argentina, who has a limited understanding of English, had one of those “aha!” moments when she watched the double weave video. I hope to be able to show you one of her weavings soon 🙂

A girl from Otalvalo in typical dress-embroidered blouse, "anku" secured by a woven belt, beads, woven hair wrap and alpargatas