By Laverne Waddington. My weaving , my inspiration, tutorials and more……..
Author: Laverne Waddington
I am an Australian who has recently returned to Australia after having lived for 32 years in South America where I was teaching English, weaving, writing, and studying indigenous weaving techniques. I have been learning and documenting traditional textile techniques of various Latin American countries with indigenous weavers since 1996. Although I have studied using several types of simple looms, my loom of choice is the backstrap loom.
After many years of largely replicating, adapting and embellishing patterns that had been shared with me by my weaving teachers and friends, I now design my own unique pieces while continuing to employ the woven structures used by my mentors in South and Central America.
In 2009 I decided to leave my English teaching job to focus on weaving and, since then, have self-published eight PDFs on technique and patterns which were sold on various websites over the years. I now plan to sell them here on this blog...coming soon. Please subscribe to this blog for updates.
It’s been a long time since I last sat down to write a post. There’s been a lot going on and it’s been a bit overwhelming!
First of all, I sold my little one-bedroom apartment. I’d spent a large part of this year doing repairs and painting it, then slowly either selling or giving away my belongings. One of the last things to go was my backstrap weaving station, that is, the bed base to which I would attach my backstrap loom. It was quite sad cutting the straps off the base and dismantling the bed at which I’d sat and happily woven all these years and a little distressing not knowing when next I’d be able to sit at my loom again.
Many years have been spent in my bedroom-floor “studio”.
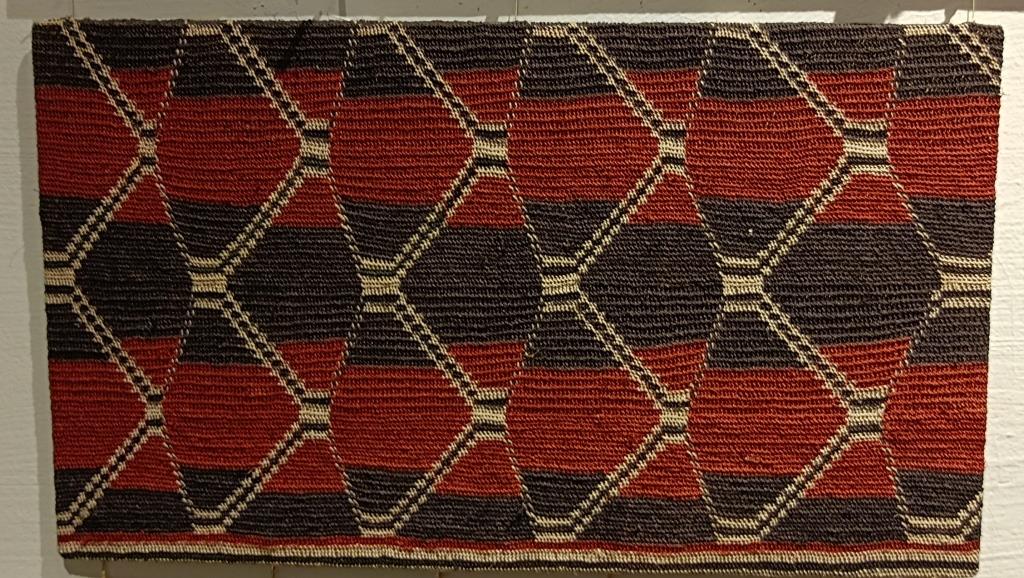
But that didn’t last long. I was soon occupied with other creative pursuits. In my last post I wrote about the short workshop I’d taken with an Ayoreo artisan learning about the looped stitch worked in plant fiber called garabatá that she uses to create the shoulder bags that both the men and women in this indigenous group carry about with them on a daily basis. The bags are almost a part of their clothing. They never seem to be without one.
My experience in the workshop hadn’t been as productive as I had hoped and while I’d finished it with a much greater amount of admiration for the work, I was also left quite disappointed in the limited amount we had been able to cover in that short time. I had been searching for an Ayoreo teacher for years and had actually given up on ever finding anyone who would be willing to take me on as a student. It seemed that I would have to content myself with buying examples of the bags to study while trying to replicate the stitch in cotton.
Well….I got lucky….so lucky! I was introduced to another teacher, Rocío, and she’s amazing! She’s not only been teaching me the basic stitch and the various patterning techniques but also has been very generous in telling me about the various clans and the origin of the patterns.
But we still had to work in cotton as Rocío explained that the recent fires (which, thank goodness, have now been finally extinguished) and drought either destroyed or weakened the plants meaning that the artisans haven’t been able to produce good quality thread from the extracted fiber.
Working the looped stitch with needle and cotton.
I did manage to scavenge a bit of garabatá fiber here and there so that I could start practicing with the real thing. Cotton really doesn’t do the trick. It behaves in a completely different way from the garabatá and in many ways is more difficult to work with. One nice thing about garabatá fiber is that you can join two strands together without having to tie a knot…a method which I have yet to perfect.
My initial projects will be wrist bands. I’d seen an Ayoreo lady at the International Folk Art Market in Santa Fe, NM many years ago wearing several and decided that these would make good learner projects that wouldn’t require huge amounts of thread. It’s always nice to have some kind of finished product rather than just endless samples and the thread was too precious to use only for sampling.
My first finished cuff with a pattern from the Chiqueno clan.
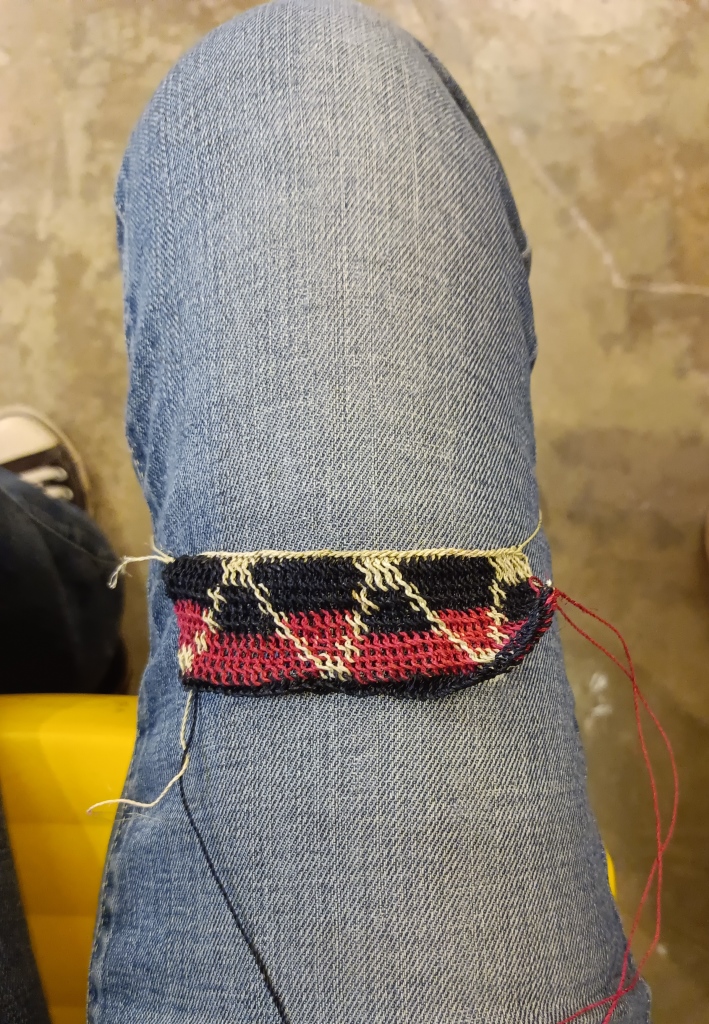
I then started a more complicated pattern from the Dosapay clan which has been stalled until I can find more fiber in these colors.
Sorry about the bare leg shot. As you can see, the project gets tied to the upper leg while the artisan sits crossed legged on the ground.
Rocío tells me that when the piece gets longer, the work is often tied to a bar instead, allowing the artisan to continue to work with the bulk of the piece in their lap. I am nowhere near that point yet!
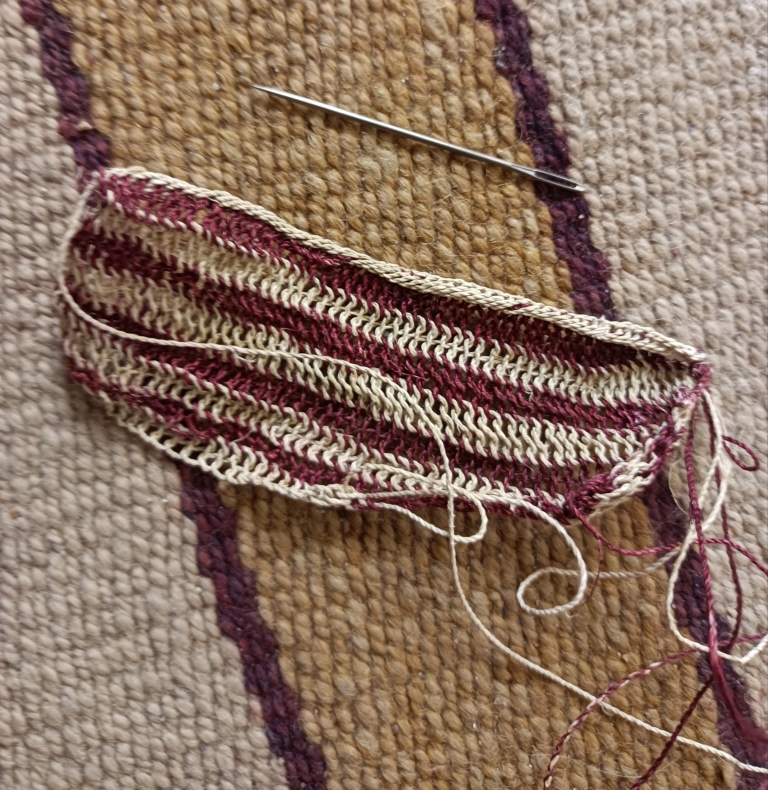
This next cuff that I made is a two-color example of the Dosapay pattern. It’s hard to appreciate the form of the pattern because I could only fit half of it on the cuff.
As I said before, working with the garabatá fiber is in many ways easier than working in cotton. One disadvantage is the varying girth and stiffness of the handspun thread which can be thin and relatively loosely plied in some parts and therefore quite flexible, only to become much thicker and tightly plied in others.
I dyed some of the fiber black for the third example and used a small version of the Chiqueno pattern so that I could fit the whole thing onto the cuff.
So, there’s been a lot of cuff stuff going on. Rocío told me that there was a chance of perhaps being able to buy a whole ball of spun thread. Her family lives five hours away from us here in the city and maybe they could bring some the next time someone travels in or she travels out.
What happened in the meantime is that someone did come in from the communities bringing a big wad of the raw fiber. I got a call from Rocio asking if I was interested in buying it. I was! It hadn’t been my plan to learn how to spin the fiber but it looks like it’s going to happen! She assured me that this fiber is top quality and will be worth the effort.
A photo that Rocío sent me of the purchase. This cost $7. I can’t even imagine the amount of thread this will produce!
I haven’t had a class with Rocío since that purchase. I know from my experiences learning to spin wool and cotton that it’s going to be a long time before I’ll be able to spin anything usable. I will then surely have a greater understanding of how difficult it must be to produce thread of consistent girth and ply. The fiber is rolled along the upper leg to produce thread. I’m envisioning a very sore leg and hand! My upper leg is already riddled with the evidence of having stabbed myself with the needle multiple times while practicing the stitching.
An Ayoreo lady at the Folk Art market in Santa Fe demonstrating the spinning method.
Three garabatá and four cotton wrist cuffs.
As you can see above, I’ve been weaving as well. Yes, I did manage to get back to my backstrap loom fairly quickly. After selling my apartment, I moved into a fully furnished room still here in the center of Santa Cruz city. It’s in a very vibrant part of the city and just a couple of blocks away from an awesome street market. And hooray, the bed has a wooden base which made setting up a new weaving “studio” very easy! I brought a little piece of the old studio with me…a wool rug woven in the foothill communities 2-3 hours from Santa Cruz city.
I’ve been weaving cuffs…just small projects as I really don’t want to unpack everything in my new home. I have four large wheelie bags packed and ready to go for when I make the final move to Australia and I don’t want to touch anything in those if I can avoid it. I’m just in a transition phase now while I take advantage of the fact that I can study with Rocío.
So, when I found that I needed a shuttle for the wrist cuff projects, it was easier just to buy and eat an icecream than dig through those four wheelie bags in search of one.
And who wouldn’t want to stick around during the Santa Cruz summer when those big beautiful mangoes are filling the street markets at a cost of four for $1.50! Those are Guarani-made placemats on the table which are part of the furnishings in this rented room. I’ve settled in so easily here. I can easily live in one room. My little flat in Katoomba in Australia that awaits me will feel huge after this.
The first two cuffs I made from the same warp have button-and-loop closures. The ends have been turned twice and hemmed. The garabatá cuff has a sliding knot closure. This kind of closure is something that I want to play with more as I hope to weave and sell cotton cuffs at local craft markets once I’m back in Australia. I will be needing additional income sources in order to be able to afford to live there and selling at the markets will also be a good way to publicize classes. The sliding knot closure will allow the cuffs to be adjusted to fit different wrists.
I’m back to using the Brazilian-produced Clea cotton that was pretty much all that was available to me before I started traveling to the States and got thoroughly spoiled with all the choices. However, now with the current amigurumi craze here, there are several other options. Clea remains my favorite, though. It’s fine enough to allow hemmed ends that don’t create excessive bulk on the wrist bands.
The second cuff warp. I plan them to get two cuffs out of each warp. That length of warp fits nicely into my available space here without having to do any rolling up. I’m also avoiding opening those wheelie bags to get out what I would need to enable me to wind longer warps!
There are other reasons to stay on here and not jet off back to Australia immediately. One is the opportunity to study with two Guaraní weavers. I spent time with Angela, my first Guaraní teacher many years ago. We never had any formal classes. It was more a case of my visiting her and hanging out watching while she wove. She was always very generous in allowing me to take pictures and video and ask questions. We would come across each other every few years as she made her way back and forth between the city and her Isoseño community sometimes stopping and living here but then suddenly disappearing back to her community. I eventually lost touch with her. My new Guaraní teachers told me that Angela passed away six years ago. Such shocking and sad news.
Angela in the patio of her home here in the city when I used to visit her. She always had several projects on the go.
I will leave that part of my recent activities to another post. I have my very own Guaraní loom now in mini form which I can work on in my room. Of course, I won’t be carting it to Australia and will give it back to my teachers when it comes time to leave. I love its simplicity and particularly like the shaped wedges of wood which are moved within the slot to reduce the increased tension on the warp that results from take-up. It’s such a simple and effective system! Two of the strings hold the cross while warping. The third is the dovetail string which I’ll tell you more about in the next post.
Mini Guarani loom on top of my wheelie bags set up ready to be warped.
I’ll leave you with this picture of it and tell you all about it and the weaving in my next post, hopefully before Christmas. I’m nicely settled here now and should be able to get back into posting more often.
First of all, I should point out that this post is not about anything woven on backstrap looms. I just always happen to start my titles with the term Backstrap Weaving.
The Ayoreo are a formerly nomadic indigenous people who live in the eastern lowland part of Bolivia known as the Gran Chaco. I’ve always admired the work they do making fabric using fiber from a plant in the pineapple family.
An example of the Bromelia Hieronymil plant from which the fibers with the local name garabatá are extracted.
Information about the Ayoreo people is sketchy. Population estimates in different sources range from seventeen hundred to four thousand Ayoreo people, distributed amongst seven to ten clans. They use off-loom netting, twining and knotting techniques, sometimes with the aid of a needle, to make a type of shoulder bag called utebetai using a fiber called garabatá fino from the Bromelia Hieronymil plant. The fiber is twisted and plied by rolling it on the thigh using ashes to take away some of its stickiness. It may also be dyed before use.
Chatting with one of the ladies representing the Ayoreo people and their work at the International Folk Art Market in Santa Fe, New Mexico many years ago. The group has been invited many times to attend the Market.
A special looped stitch is used by the women to create fabric which is then sewn into the utebetai bags that they use in their daily lives.
An example of one of the bags on display at the Arte Campo Museum here in Santa Cruz where I live.
The bags are of different sizes according to their use and are named accordingly. Each of the clans has its own unique patterns but in recent years it’s said that new designs are being created along with modified versions of the traditional ones. According to a booklet put out by CANOB (Central Ayorea Nativa del Oriente Boliviano), the designs used include representations of the patterns on armadillo shells, clouds, snake skins and the eyes of a jaguar.
I did at one stage own a few of the bags. I had unpicked the seams so that I could display the fabric opened out at full length. Later, I gave them away to appreciative friends along with almost all the art and handcraft pieces that I had gathered during the years I’ve spent here in Santa Cruz. It’s what you have to do when you are planning to move to the other side of the globe.
The three pieces that I had owned.
I have always wanted to learn about this but gave up some time ago trying to find a willing teacher. I’d had many leads but they’d all ended in dead ends.
But then….just a few weeks ago I spotted an ad by the Arte Campo Museum here in Santa Cruz about a very short workshop in which an Ayoreo lady would be teaching the special looping stitch that they use to make the bags. I couldn’t believe my luck.
I can tell you that there’s nothing like having an experience like this to make you appreciate the tremendous skill that goes into making these pieces. I’ve always admired them and do so even more now that I know just a little bit about what goes into making them. I can only hope that the things I post online and the classes I give have had a similar effect on my students and readers in that they have a greater appreciation of the textiles that are created in the highlands and lowlands of these South American countries, the people who make them and the simple tools with which they work.
I can’t believe that I actually went to the class thinking that once I learned the “stitch”, I’d be able to make myself a little bag. Ha!
First I explored the museum and took notes and photos, dreaming of the wonderful patterns I was going to be able to create.
The pieces are worked while tied to the leg. Luckily I had chosen not to wear a skirt that day which is my usual attire in the tropical heat.
Samples were handed out to the ten participants. I was thrilled with mine as it was in one of my favorite color combinations. The idea was to have us stitch a couple of rows and then sew the little piece into a miniature bag that could be hung around the neck. Easier said than done!
I’m very much used to the “look-and-learn” style of teaching with all the experience I’ve had studying weaving techniques with my teachers here. There are no explanations….just watch. “You look, you know”, as my Vietnamese twining teacher would say to me. However, those were one-on-one experiences. It’s quite different when there are ten people battling to get a good view and capture every move on an iPad or cell phone…plus the garabatá thread was so fine! I didn’t even try to record it.
I soon realized that the row that I was supposed to looping onto was black and that I couldn’t make out a darn thing! Sadly, I swapped my beautiful sample for another so that I could stitch onto white. My active thread, however, was brown and that was very hard to see too. There were moments when I was thinking, Wow, maybe I’m getting too old for this!
The younger ones reviewing footage on phones and iPads.
So, much of the two-hour class was spent just trying to figure out the basic stitch. Mine were too dark and too tight to really tell although Teresa, the teacher, kept telling me that it was okay. I wasn’t convinced. She did point out that my work was too tight. I don’t know how she could see anything at all! No one got to make their little bag in the allotted time. We were all struggling! Some people got discouraged and left early. I stubbornly kept going. I don’t know how many times I ripped it all back to the beginning of the row. Now I can see that it’s actually a very very simple two-part process that was made complicated because ten people all wanted to be helped at once.
As with all these kinds of things, tension is key. You can have the stitch down, but it just won’t look right if it hasn’t been properly tensioned. The ends have to be pulled this way and that as the loops are tightened in order to position them correctly. I stitched along to finish the brown row and went home still not knowing if I was doing it right. I then changed to white which happened to be thicker than the brown and then quietly at home without the chaos of ten people all competing for attention, I started to get the hang of it.
You can see my squashed and uneven brown row and then my much nicer white one in progress.
And now, I’ve run out of garabatá. I think it’s quite amazing that we were given the laboriously prepared and precious thread to work with in the class in the first place instead of some industrially prepared substitution and I really appreciate that.
I decided that I needed to get out some chunky stuff to continue practicing stitching with proper and even tension. I have to say, though, that here is absolutely nothing charming about the work in this size thread and in these colors!
And now you can all get a closer look at it. Perhaps you’ll find that you already know how to do it.
I think I’ll go down in thread size now and continue practicing.
So I simply had to go back to the store and buy a bag and I was blown away by the quality of the work I saw there. The stitching is even tinier and more dense and beautifully even than the pieces I bought all those years ago. It actually makes the samples we were given in class look quite clumsy. I can’t get over how beautiful the bag that I bought is. Now I’m thinking that the teacher prepared the samples with larger, looser and more open stitches to make things easier for us.
The Ayoreo create their pieces flat and then sew the sides together. They work from left to right and then turn the piece over to work the next row so that they are always working in the same direction. In my thick-thread example above I was attempting to create it in a continuous circular form thinking that it would somehow look neater than having to create a seam. I have a vague memory of having read somewhere that the same looped stitch is used in Papua New Guinea to make bags but that the pieces there are worked in circular form.
However, the joining of the two sides in the piece that I just bought is so finely and beautifully done that the stitching is practically imperceptible. The sides don’t overlap. They are perfectly butted together. I’m so pleased to have this piece! It feels so good and has the most wonderful plant-y smell. And how in the world do the Ayoreo ladies go about adding in the colors to create those shapes is beyond me. That was actually one of my main motivations for buying a bag…I wanted to be able to study it and discover what was done with the start and end tails at the color changes. I can’t tell! It’s so expertly done. Mind blown.
Was I equally enthralled when I bought those three pieces twenty-four years ago? I wasn’t. I certainly admired them but then eventually gave them away. The difference has been having just that tiny introduction to the technique and that tiny amount of interaction with Teresa, our teacher.
Here again is the young lady I met in Santa Fe showing how she twists and plies the fiber. Of course, looking back at this photo now, my eye is captured by her wrist cuff.
So, if I never get to make a bag in this lovely looping technique, maybe I could aim at making a wrist cuff instead if I ever figure out those color changes. A simpler striped one may have to do for now. But maybe I’ll find another teacher before I have to move away.
I’ll finish with a photo I took recently of my cuffs in Fall colors, even though it’s Spring here. I happened to be in an Autumn kind of mood. I always get questions when I post these photos from people who’d like to know more about how I finish my cuffs. I might make my next blog post about that.
I was recently asked to describe the kind of weaving that I do in an audio-only interview. Ummmmmm ….I was completely stumped and now I don’t even remember what kind of awkward response I made! When talking about my weaving, I’ve always been in settings in which I could basically just let the textiles do most of the talking for me. Although I ramble on in these blog posts, I always try to include lots of captioned images for those who just want the eye candy yet still want to get a general idea of what I’m talking about.
Even when I am away from home and on a plane, for example, chatting with a stranger and the topic of what we do comes up (it doesn’t always), I can just show them perhaps a wrist cuff, my belt or a purse I’ve made with my woven cloth to give them an idea.
Although I don’t typically wear four at once, I’m almost always wearing a wrist cuff when I’m traveling.
I remember the time I was at the CNCH conference in 2010. Inkle weaver Annie MacHale messaged me to see if we could meet up. We’d never seen each other and she spotted my woven belt first from behind and was immediately able to identify me. The weaving did the talking.
Wearing my woven work, such as these belts, is sometimes more effective at gatherings than wearing a name tag!
A more recent addition to my belt collection using both warp and weft-faced structures.
And then there are always my bags and purses. In the last few years I’ve gained more confidence in my hand-sewing and have created quite a few more but there was always one to carry to show to curious strangers.
Using my cotton-spinning bag as a purse on an outing with my friend Emerald in Australia. Multi-purpose items are a bonus when traveling with limited space in luggage.
I was never without my big camera in the earlier days of my travels and a camera strap is always a nice way to give folks an idea of what I do (not forgetting of course all the images stored in the camera). Of course we all prefer to be able to touch textiles, right? We see textiles online and want so much to be able to reach out and touch them. We have to imagine how they feel. What about when you can only hear about them in an audio-only context? Um, I hope I did a decent job of answering that question.
My updated camera strap woven in my own handspun wool and original hummingbird figure in three-color reversible pebble weave.
It was nice when I got my little iPod and was able to leave the bulky camera behind on trips. I would use it as my camera, wearing it around my neck in its special woven pouch. It was often a conversation starter because it was plain to see there hanging around my neck…
Backstrap loom weaving with camera at the ready. There was to need to let the pouch do the talking in this case as there was plenty going on there at my loom.
Which reminds me, there are also woven necklaces like the one I’m wearing above to do the talking on my behalf.
Wearing jewelry in the street here in Santa Cruz is not a good idea. I learned that the hard way in my first months here. Naturally, I do enjoy being able to do so when I’m away.
After the iPod, I got a phone to use as a camera but I found it hard to find a commercially-produced case for this Redmi brand. So of course I had to weave fabric to make a case instead which allowed me to show it as an example of some of my work with wool…
Fabric for the phone slip case on the loom. I only use it when I travel.
Perhaps when I complete my move to Australia and live in the cooler Blue Mountains, I’ll be able to use my scarves and neck gaiters when those “let the weaving do the talking” moments arise. I confess that those items have only very rarely been worn here in the tropics. Even putting up with their unwanted warmth in order to photograph them was a big ask.
Hurry up and get the shot before I melt!
So when I was faced with the question of having to describe my weaving just in words, it was a big “Ummmm” moment. Even given a second chance, I’m not sure I could do it. As I wrote in a previous blog post, I feel that I’ve drifted away from having a particular recognizable style…my style actually being the loom I use rather than the kind of cloth I produce. As I get more and more into creating my own original patterns and change my home to the other side of the world, maybe a whole new assortment of patterns and structures will emerge. Whatever happens, I hope there’s more growth.
Designs with SE Asian leanings have already been starting to appear.
Ikat, rep weave with pick-up, warp-faced double weave, open balanced plain weave with inlay, complementary-warp pick-up, supplementary weft patterning.
I put this collage together to show some of the different kinds of things that I do. But of course, if you’ve been following my blog (maybe there are some die-hards who’ve even been with me for the last 15 years!) you’ll already know. I guess my purpose in writing this post is to to see if I can in fact, by way of these ramblings, answer the question for myself in my head….how would you describe the kind of weaving you do? I often find myself pondering certain things at the time I’m writing a blog post and find a solution right here as I sit typing. That’s one of the reasons I keep writing this blog and am so grateful to all of you who follow along and “listen”. It really helps clear out the mental clutter.
Until next time…….long-time blog followers may remember this dearly loved one making appearances in various posts. Rest in peace sweet girl.
And so continues the journey of my Ashford Traditional spinning wheel….and I never once took a photo of it 🙁 I got it in the Falkland Islands (Islas Malvinas) back in the 90s and had it in my home in southern Chile. I wished I’d asked how it had made its way to the Falklands in the first place…directly from the manufacturer in New Zealand or perhaps via the UK or perhaps by some other more exotic and convoluted route?
Whie living in Chile and before I got the wheel, I had brought some alpaca back from my first trip to Peru to spin with a drop spindle that I’d also bought there. My inexperience meant that I made a mess of it and so, discouraged, I put spinning aside for a while!
Later, I turned to sheep. There were sheep galore down there in Patagonia and I was given a fleece. So, I got experience washing and carding it and my first project was knitting! I can hardy believe it as I can barely knit. But I designed a pattern, based on the shape of a cotton vest that I owned, and fumbled my way through knitting the front of a vest using wool that I had spun on the spindle.
By this time, I’d acquired the Traddy and I wove the back panel using my first wheel-spun yarn which I dyed brown in a balanced plain weave on my Navajo-style vertical loom…without a reed. I probably didn’t even know that reeds existed back then (you can just get a glimpse of the brown back on the far right in the photo above). Spinning yarn that worked well for this knitting and weaving was a complete fluke. I really had very little idea about what I was doing. The vest is edged with a triple cross-knit-looping stitch that I’d learned both from my sling-braiding teacher in Peru and one of my weaving teachers in Bolivia. And I also used a band I’d woven as an edging.
I used left-over scraps of that wheel-spun wool along with some of the wool I used for my Navajo-style weaving in natural dye experiments in Chile. They were wrapped around rolls of paper and coiled into what you see here which I used as the lid for a basket.
And that was all the action the poor Traddy got to see in my hands. I brought it up to Bolivia with me and it gathered dust in a corner for a while before I eventually dismantled it (my cat was finding it way too interesting) and it sat in the closet while I continued to spin on drop spindles. Now it’s gone to the Brazilian owners of my local yarn store. Maybe it will make a trip to Brazil one day.
Bye-bye Traddy. Enjoy your world travels. The rest of this post on spinning includes some sections that I’ve posted before and so you may find some parts familiar.
I am a “cheap spindler” in much the same way as I am a cheap drunk…it doesn’t take much to make me happy! Don’t waste the good wine on me. I do not have a refined palate. So, it is little wonder that I am content to use my humble Cusco drop spindle when I get the urge to spin. I just don’t have a refined palate for spinning tools.
The Cusco spindle was the second one I ever got, the first being from San Pedro de Atacama in northern Chile. The Cusco one that I got in 1996, being more robust, became my constant travel companion. It was practical. Although I have collected many more spindles on my weaving safaris since then, this Cusco one is the one I always use while the others hang on the wall behind the sofa as souvenirs of places I have been and people I have met.
The spindle I got in Cusco in 1996.
Some of the whorls from the spindles on the wall fell down behind the sofa only to be retrieved later when a friend helped me move it. Here are three that I found there among the cat toys.It’s so interesting seeing the various styles of whorl.
The very first spinning that I did for weaving on my backstrap loom was with some extremely dry, brittle, and filthy llama fiber that I had bought from a farmer while wandering about the back roads of Uyuni in the Bolivian highlands. I cleaned and prepared it. The dust and dirt would have me wheezing and my skin would crawl and eyes run every time I opened the bags to get more. It made for good spinning training. I gave the fiber a tremendous amount of twist because at that time I believed that this was the only way hand-spun yarn could possibly stand up to the abrasion of warp-faced weaving. I have since learned that this is not so. That kind of yarn produces durable, hard wearing cloth and in a tight warp-faced weave can make a garment highly water-resistant. Of course, that isn’t always the kind of cloth I want.
The natural colors of the llama I spun. I was always amazed at how nice it looked when woven. Warp-faced structures are very forgiving in that way.
When I was given a large bag of spearmint leaves by a friend, I decided to use it it to dye some of the llama yarn. One batch gave me a nice neutral taupe color. The second lot my friend gave me produced green. I also had some cochineal for red.
I was able to buy a lovely fine commercial yarn in Chile that was a blend of alpaca and wool and came in earthy colors. I would use my drop spindle to add extra twist as, again, I’d thought that yarn for warp-faced weaving simply must have that tightly spun characteristic. The green in this band I wove with this yarn is actually cotton.
The first time I was given prepared alpaca to spin by my friend Janet, I decided that I simply couldn’t put all that heavy amount of twist into that beautiful fiber. With a bit of extra care in the way I handled it on my backstrap loom, it made lovely warp. The yarn was quite balanced and didn’t kink up on itself.
You can see that this alpaca yarn that I spun lies flat and relaxed when not under tension.
You can see how my teacher Maxima’s handspun wool yarn behaves when not under tension. All the energy from the twist causes the warp lying on the ground to tightly spiral. The yarn will produce hard-wearing cloth.
After that experience with the alpaca, I never added extra twist to industrially-spun yarn again. Of course I had to choose yarn that had certain characteristics. I used the soft Knit Picks Palette straight out of the cake for this next piece. It was actually just a stash-busting exercise to use up odds and ends and I wasn’t convinced that it would work for warp-faced weaving in string heddles. It did with a little extra care. I wove this piece with four-selvedges and only had to be very careful when needle-weaving the end so as not to split the loose ply with the needle.
I really enjoy reading the online group forums about spinners and their spindles. The participants’ love and enthusiasm for their tools is wonderful….I totally get it but I just don’t share it. Some of the spindles they show are beautiful pieces of craftsmanship and I love seeing them. But when it comes down to it, I just want to get the job done. If you like your tools to be uniquely hand-carved pieces of art, take a look at Allen Berry’s work on Instagram (allenrberry). All his fiber tools are amazing.
It seems that when it comes to spinning I am totally product oriented which is kind of strange as it is quite the opposite when I weave. I just want to get this stuff done so I can go weave with it. In weaving I am all about enjoying the process. I probably would not have been willing to devote any great amount of time to spinning if not for the pandemic. The combination of needing to keep my hands busy during Zoom sessions as well as a dwindling stash had me happily spinning up all the wool I could find in my closet.
Weaving a small tubular band as a test for my handspun wool yarn to see if a) it would be suitable for my warp-faced weaving and b) if there was enough contrast between the three colors for use in a three-color pebble project.
It was strange that after all these years this would be my first time weaving on my backstrap loom with my own drop-spindle-spun sheep wool. Was I nervous about it? Yes!
The warp for a three-color pebble project with my handspun “pandemic” wool in purple, pale yellow and a rust.
And then I took on a new adventure…spinning cotton. As with my favored Cusco spindle for wool, I have taken the takli that Elizabeth gave me in Australia as my one and only tool for cotton. It is all I feel the need for right now. It makes for quiet, comfortable, and fuss-free Zoom spinning.
My first lot of Sea Island cotton and the gifted takli spindle. I was pleased with this first attempt but hadn’t known at the time that Sea Island cotton has a longer staple length than other varieties and is therefore easier to spin.
My collection of spindles that I have gathered in my travels includes a few that are used for cotton. Here are two from Guatemala and one that I bought from my Guaraní teacher here in Santa Cruz. The whorl on that one is a piece cut from the sole of a sandal.
Two spindles from Guatemala flank the Guaraní one.
I couldn’t believe my luck when one of the local museums here offered a workshop given by two Guaraní ladies on spinning cotton. We didn’t get to keep the spindles but the whorls on the ones we used were also made from pieces of rubber sole.
Workshop spindle.
I love the way we are all so focused on our teacher’s demonstration. As it turned out, she is left-handed and we were all righties. She got us all started one by one turning the spindle in one direction and we then proceeded to unspin what she had started for us!
I came up with some unconventional ways of my own for handling the spinning and processing, like using this wooden mortar as the support for the takli. I like that I can grip its neck between my knees while I’m seated to spin. It works really well and the sound of the metal spindle tip against the wood is quieter than when I used to use a ceramic dish.
Moving on here to Upland cotton.
And I found these mesh pencil cups useful as a way to hold my singles under tension when they were being boiled to set the twist.
It was fun seeing how the colored cottons deepened in tone when they were boiled.
The color called Mahogany in the center after being boiled. The pre-boil color is below to the right.
And of course, there is the horizontally-held spindle for cotton spinning that is used by my teachers in coastal Ecuador.
The cotton is draped on a wooden stand called the “rueca” for spinning. It has a notch cut into its top which grabs the cotton and allows the spinner to draw out the fibers under tension. A small basket is woven from plantain fiber underneath on which the spindle sits when not in use. This is a miniature version of the rueca which I made with my teachers’ help so that I could take an example back with me to Bolivia. I need to place something in the little basket to weigh it down because it is so small and light. The typical spindle can be seen at right with its wooden whorl. More often now you will see people using yo-yo halves and metal wheels as whorls.
Here are some tiny whorls from coastal Ecuador that the family had found while ploughing their fields. There were close to forty of them sitting in a bowl on a shelf, just like that.
My very first experience with spinning cotton had been in coastal Ecuador where I got to work almost from scratch, de-seeding, teasing apart, and fluffing up the cotton. It was difficult spinning it on the horizontally-held spindles compared to what I do now with the takli. Unfortunately, I didn’t spend much time on it while there, being much more interested in the weaving part of the process. My teachers already had plenty of spun singles that they doubled for warp so that I could learn how they weave their double-pocket saddle bags and hammocks. We would pass time in the evenings on cotton preparation.
My first attempts with the horizontally-held spindle in Ecuadorwith my teacher Trini and her mother Luz (rip).
I put in a little practice when I got back home but the loom soon called me away…
My cat got to the point eventually where she paid no attention to my fiber-y pursuits.
I may have never gone back to cotton if not for the pandemic. The loom was always pulling me one way yet my stash of gifted sliver in the closet was growing. Thank you to all those, especially Betty, who were so kind with their gifts when I was visiting in the States.
I have woven with my singles thread. It was an even freakier experience than the first time weaving with my handspun llama yarn all those years ago.I was surprised to see how well it tolerated the string heddles and the close sett on my backstrap loom.
I love the look of all these handspun cotton singles lined up on my backstrap loom.
I’ve used it in plain weave for ikat pieces as well as for pieces decorated with pick-up patterns that I’ve used in small purse and wallet projects.
Wallet project with pick-up patterning in the structure that I call Andean Pebble Weave.
Right now I’m spinning some more brown sliver that I just uncovered in the closet. I’ve yet to use the brown in a project.
Ikat projects in my handspun cotton singles. The lower one uses some of the natural green cotton in both its boiled and not-boiled versions. Most of what you see there is the not-boiled green.
No doubt when I return to Australia I’ll have lots of access to sheep fleeces and will wonder about my Traddy and how it’s being used on this side of the world. I won’t be buying another wheel though, and will slowly work my way through, as is my habit, with my drop spindle. I won’t be displaying my other spindles on the wall either and that might lead me to picking up one of the others for a spin and giving the Cusco one a rest.
I’m still here looking at blank white walls quite literally watching paint dry on some days and hoping that I’ll wake up to suitable humidity levels so that I can get on with this task and back to my loom! The humidity levels haven’t been playing along lately. On those days there’s always the “delightful” sanding jobs to do and when I’m done with those I find myself taking a tea break while staring at the blank walls and imagining how I’ll decorate the walls of my place in Australia when I finally get back there.
We had one week of winter with, according to the local press, some of the coldest days on record here in the tropics and I can tell you that there’s nothing cosy about bare white walls and ceramic floors. Today we are back to a more typical 89 degrees.
About decorating those walls….I have four sets of panels in combinations of red, black and white that could be hung. You might remember these from my Textile Trails set:
The only time these got hung was at the ANWG conference back in 2015, I think.Terry (RIP), whom many of you may know as the owner of Magical Moons Etsy shop, made me some beautiful wooden hangers for them. I own and cherish several of her lovely swords.
And this, being one of the three from the Plain Tales set:
Warp-faced double weave in the center flanked by a single-faced pattern of three-span floats.
I haven’t yet given this next set a name. I’ll call it Three Little Birds for now because I love that Bob Marley song so much. This was one of my projects where I created a shape in ikat which was then filled with pick-up pattern:
For the panels on the left and right I used the ikat technique to create the bird shapes. The advantage of that over the center panel is that the background of the ikat panels can be a strong solid color rather than a pebbly one.
And of course there’s the foursome that make up the Within These Walls set:
In these I also first used ikat to create the shapes which allowed the black areas to be solid.
Creating the shapes in ikat might seem like an excessive amount of trouble to go to just to get the solid rather than pebbly background but my long-term plan for this method is to create curved shapes that I otherwise wouldn’t be able to using the structure that I call Andean Pebble Weave. The block-shapes that I’ve created so far are just the warm-up!
Hmmm….I don’t think I’ll have that much wall space for all of these. What do you think?
There are also some hangings that I’d like to make in blues. For example, I’d like to weave these flower and foliage patterns again on a much larger scale in blue and cream and have the two strips flank a panel of hummingbirds…
60/2 silk in warp-faced double weave.
I already have one piece in blues that I’d like to hang:
Ikat on 60/2 silk with a little supplementary-weft patterning in the center.
And so my mind keeps on turning things over. I start thinking about the colors I use in my weaving, one thing leads to another, and I remember this piece which I recently uncovered while emptying the closet for painting:
Figures that I learned in Guatemala with my teacher, Carmen.
No, this was never meant to be hung. I’m not even sure that I like it! It was the practice piece that I wove as soon as I returned from my trip to Guatemala. I wanted to use my scribbled notes to practice some of the techniques I had learned there with my backstrap loom teachers. This was the best way to see if my notes were thorough enough and if they even made sense! Sometimes I leave out things while making notes thinking that they are too obvious to bother recording. That’s something I regret six months down the track when I come to try the technique and find that there are missing links. Once I finish one of these practice pieces and add to my notes, making sure than even the most obvious steps are included, I can write out the good copy and add the detailed step-by-step photos that I’ve taken while weaving them.
With one of my teachers, Lidia, back in 2008.
Seeing this piece again (I’m still deciding whether it will go to live in Australia or be abandoned) made me remember how fun these supplementary-weft patterning techniques are. I don’t use them enough. These figures are created by using warp-wrapping techniques to form horizontal, vertical and diagonal lines rather than the inlay technique that I most often use. I think I need to weave something using these techniques in colors that I find more pleasing. Maybe something in blues that can hang alongside my flowers and hummingbirds.
These are the colors that I used when learning the techniques with my teacher.
While I might be craving minimalism in terms of furniture when I move to Australia, I’m afraid my walls might end up not being in keeping with this idea!
I’ll finish here by including below a tutorial for the Guatemalan wrapping techniques that I used in that colorful piece. This tutorial has been here on my blog since 2012 and I thought I might drag it out here from the Tutorials page for those of you who are unaware that these things are lurking back there just waiting to be discovered. Here’s a link to the tutorial list. It’s a lot of work putting these tutorials together and I often wonder how many people actually find them in my blog labyrinth!
If you’re not interested in the tutorial we can leave each other here until next time…..
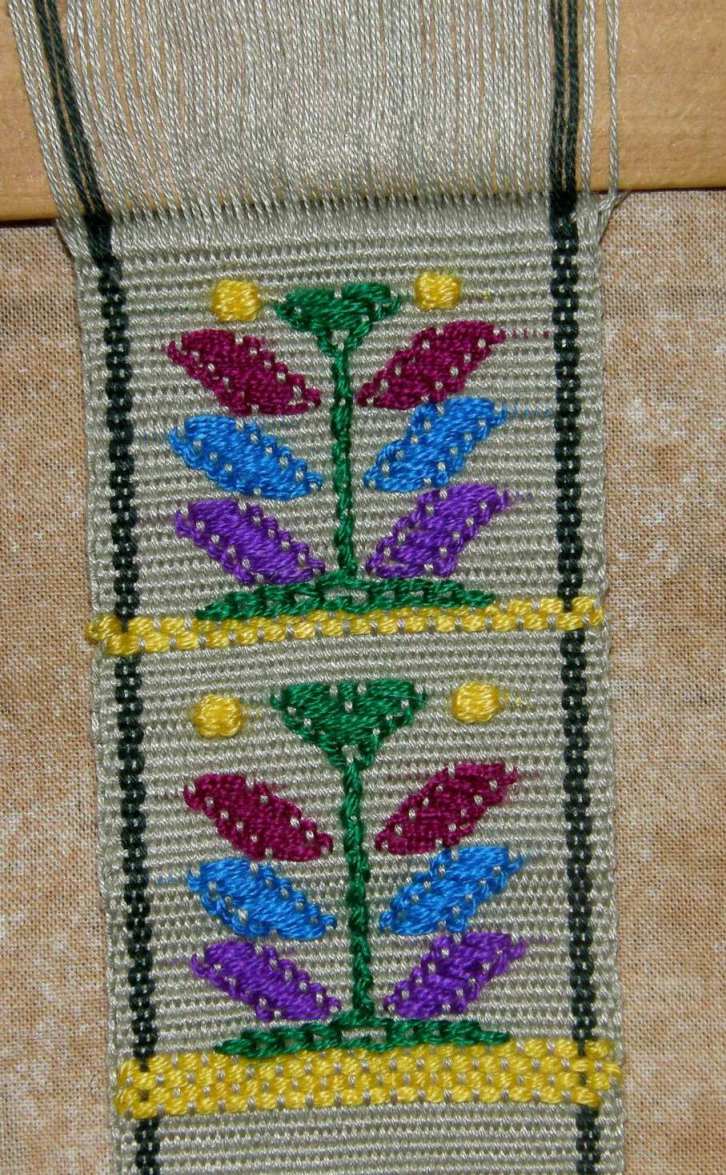
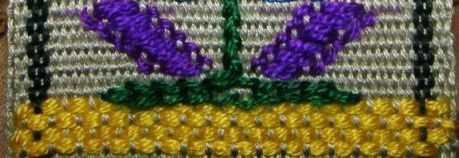
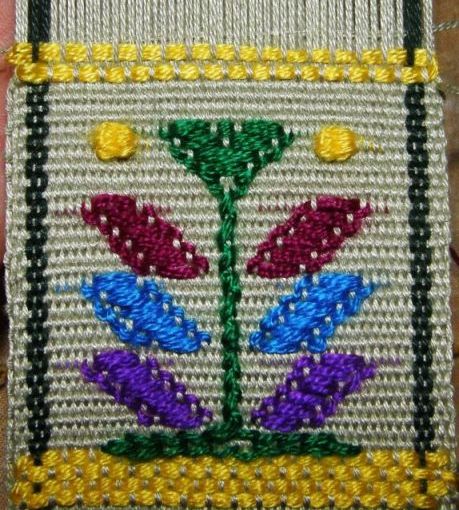
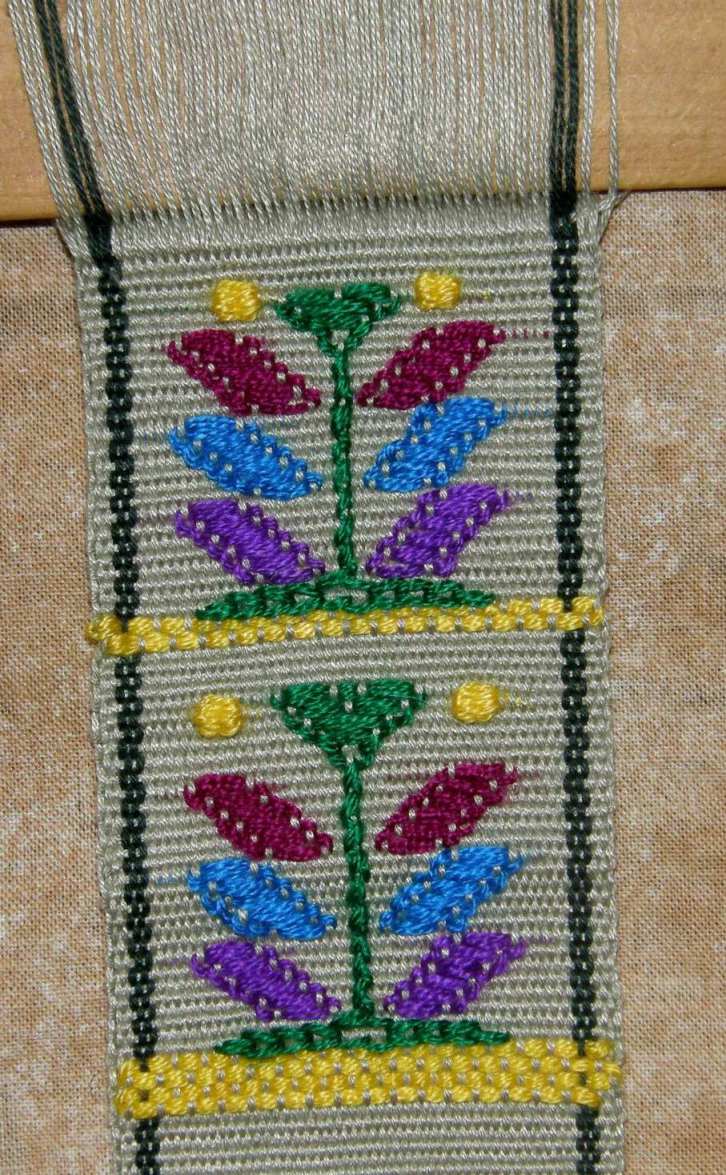
Guatemalan tree designs woven with acrylic supplementary wefts on a fine cotton ground weave.
I suggest you follow the beginner tutorial on supplementary-weft patterninghere before attempting this second more advanced one.
This tutorial was first presented over two weeks within blog posts so there are two parts. I have extracted the information from the two blog posts for this tutorial page. It shows the kind of supplementary-weft patterning that I learned in one particular town in Guatemala.
I wove a tree design at left using the various warp wrapping and inlay techniques that my Guatemalan teacher employs and this was fun as I hadn’t done any of this since 2008 immmediately after my return from my first visit there.
I learned these techniques with my teacher Martine and her daughter Carmen in Santa Catarina Palopo on the shores of Lake Atitlan. I met Martine in Panajachel where she sells textiles in the street market. She took me to her home and spent one morning setting up the loom and then her daughter took over weaving and teaching me for the next week or so. She was a good teacher. Each motif was repeated six or seven times across the cloth. Carmen would show me five times what to do and then would let me weave the last one or two motifs to practice what she had shown.
The weavers set up their looms with great care. Martine was obviously more skilled at doing this and Carmen only took over when everything was set to go. The warp is wound with two crosses. The second cross helps hold the shed rod in place.
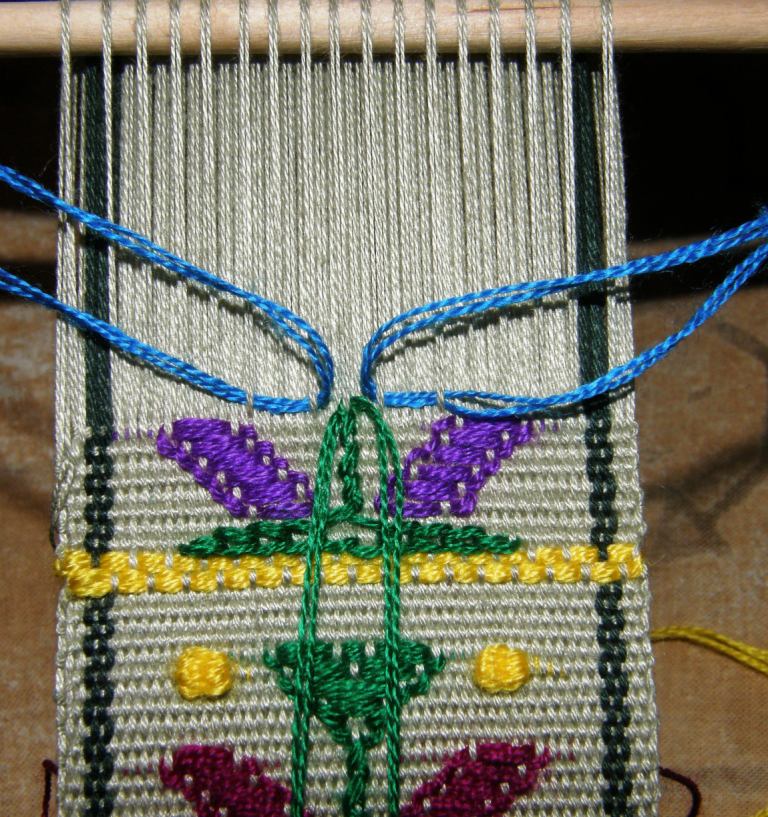
In the first part of this tutorial you will see a series of step-by-step pictures showing how the warp is prepared for this kind of supplementary-weft patterning. A plain-weave ground cloth is woven onto which the supplementary-weft motifs are woven. Certain warp threads are raised in each shed under which the supplementary weft threads are passed.
As the same warp threads for the supplementary weft patterning are raised every time, they can easily be picked and stored on pattern sticks so that the weaver does not have to continually pick them up by hand for every weft pass. There are two sets of these warp threads. One set is made up of certain threads from the shed-rod shed and the other of certain threads from the heddle shed.
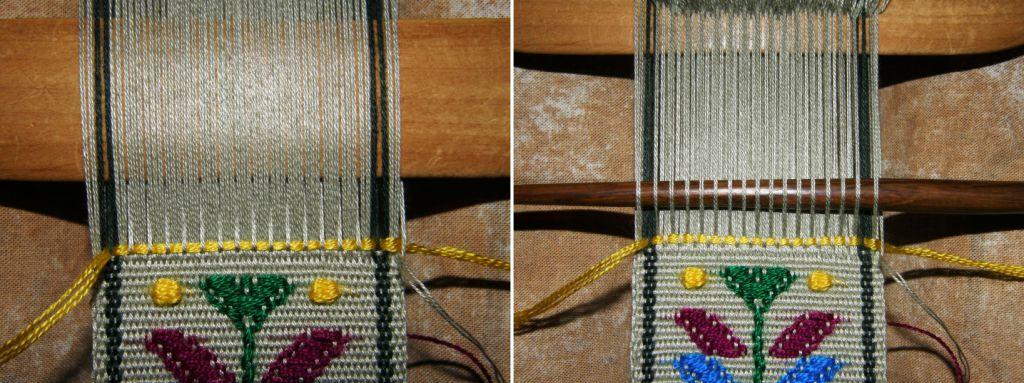
In the above picture you can see four passes of yellow supplementary weft under the warp threads which form the two pattern sheds.. All the motifs that my teachers showed me were created by passing supplementary weft thread under the warps in these pattern sheds.
Two pattern sticks are used. One stick is inserted under the selected pattern warps in the shed-rod shed and another holds the selected pattern warps in the heddle shed.
I show the process of picking and inserting the pattern sticks first in step-by-step pictures and then in a video.
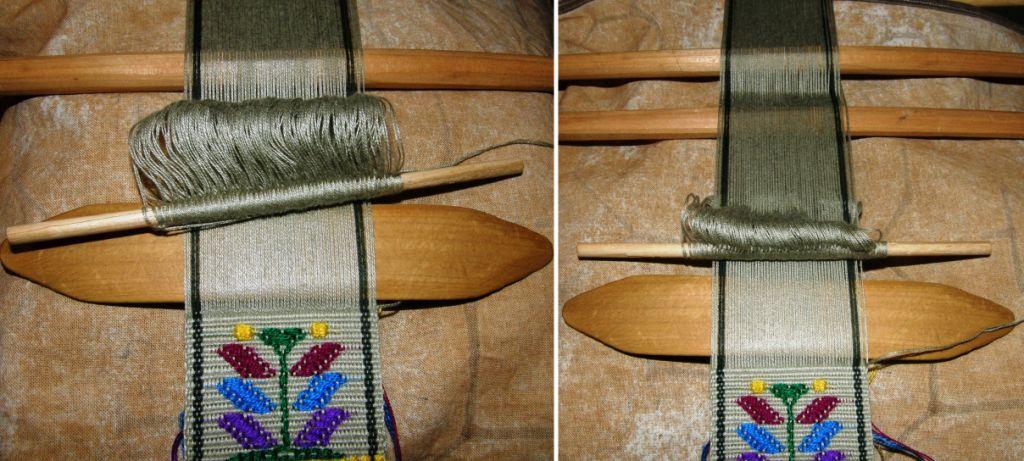
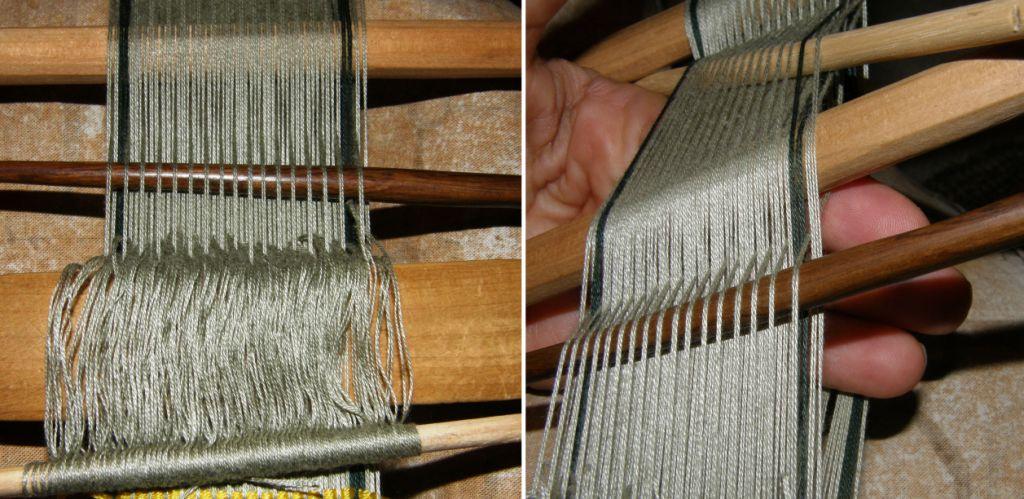
LEFT: This is the basic loom set-up with shed rod and string hedddles in place. RIGHT: An extra stick is placed in the second cross to hold the shed rod in position.
In order to create the patterns, two extra patterning sticks need to be inserted. These are stored up beyond the shed rod. One is stored on top of the warp and the other underneath.
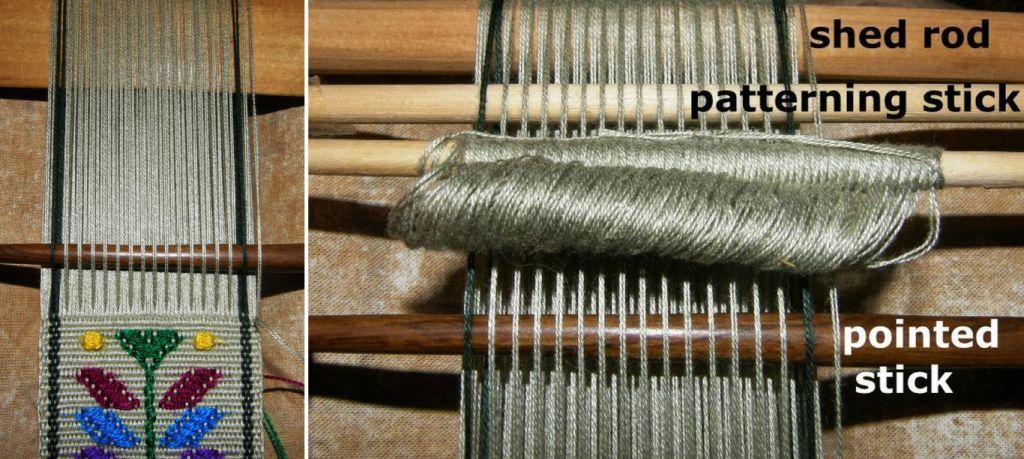
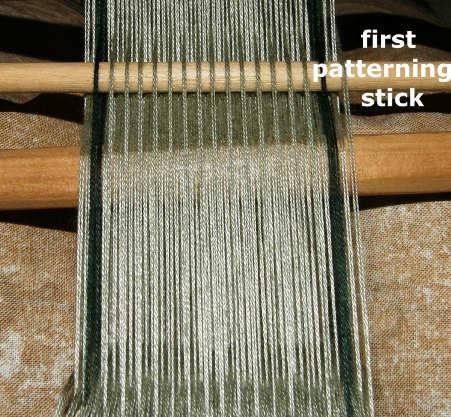
LEFT: To set up the patterning sticks, the shed rod shed is opened and the first set of patterning warps are picked up. Pick one, drop two, pick one, drop two across the width of the warp.. NOTE: I am using doubled threads so what looks like two threads in the photos actually counts as one thread. The weavers use a pointed stick to do this. RIGHT: The pointed stick is inserted under all the picked warp threads and then pushed up toward the heddles. This will raise the picked up threads on the other side of the heddles. Another stick is then placed under these threads on the other side of the heddles. This is the first patterning stick.
The first patterning stick sits up beyond the shed rod until called into use.
LEFT: A colored piece of weft is placed under the warps in the first patterning shed. This serves as a reference to make picking up the warps for the second patterning shed easier. RIGHT: The heddle shed is opened and the warp threads in the second patterning shed are picked up. Between each warp in the first patterning shed, there are three warp threads in the heddle shed. You need to pick up the middle one of these three warps. You will pick one, drop two, pick one, drop two all the way across the warp. The pointed stick is inserted under all the picked up warps. The pattern stick for these warps will be stored UNDER the warp and a special maneuver is required in order to do this…see the next set of pictures. (This is also all shown in the video clip a little further on).
LEFT: The pointed stick is moved up toward the heddles which will raise the picked up warp threads on the other side of the heddles. RIGHT: A stick is placed under the raised threads on the other side of the heddles. Then both the stick and the shed rod are raised in order to create a new shed underneath the two. In the picture I have my hand within this shed and will replace it with the second patterning stick.
Here you can see the two patterning sticks in place up beyond the shed rod…one on top of the warp and another underneath.
Now the warp has been prepared with its two patterning sticks ready to create patterns with supplementary wefts.
Watch the process again in the following video. I am using very thick yarn and only a few warps in the video just to demonstrate the basic process. The video is in two parts.
The second part of the video shows how to use the pattern sticks to raise the warps and lay in weft for some basic patterning. This is also explained in the photos below. I am using thick warp and weft in the video just so everything is easy to see.
Two wefts are used to weave the above typical patterns of Santa Catarina Palopo: a red weft is passed through the two main sheds (shed rod shed and heddle shed) to weave the red warp-faced ground weave and the brightly colored supplementary weft thread are passed under or wrapped around the patterning warps to form the motifs. Below are samples that I’ve woven since my return from Guatemala.
Motifs are usually started and ended with four rows of supplementary weft in the patterning sheds forming the yellow brick-like design shown above. The colored pattern weft (in this case yellow) is passed through the pattern shed and then the main weft (in this case light green) is passed through the main shed.
The two pattern sheds.
In this picture I have laid in the first pass of yellow supplementary weft and am in the process of passing the main weft. Four rows of yellow weft are usually woven before starting a new motif.
Here concludes Part One of this tutorial on Guatemalan single face supplementary-weft patterning. So far we have looked at how to pick the two patterning sheds and store them on sticks up beyond the shed rod, how to open the patterning sheds and how to weave the basic brick design which separates the motifs on a piece.
In Part Two, I will show you how to create the outlines of shapes by wrapping the supplementary weft around warp threads and fill them in by laying in supplementary weft. The Guatemalan weavers create all kinds of bird, plant and human figures in this way.
In this part of the tutorial I show you how to create the motifs using the supplementary wefts. I am using a tree motif as the example. You will see how to create:
a horizontal line for the base of a tree,
a vertical line to form a stem,
filled-in shapes for leaves,
diagonal lines to outline the tree top, and
spots for buds.
This is a fun technique with little or no counting involved which allows you to play freely with shapes and colors.
The resulting weaving looks like a piece of embroidered cloth except that the “stitches” only appear on one side of the fabric.
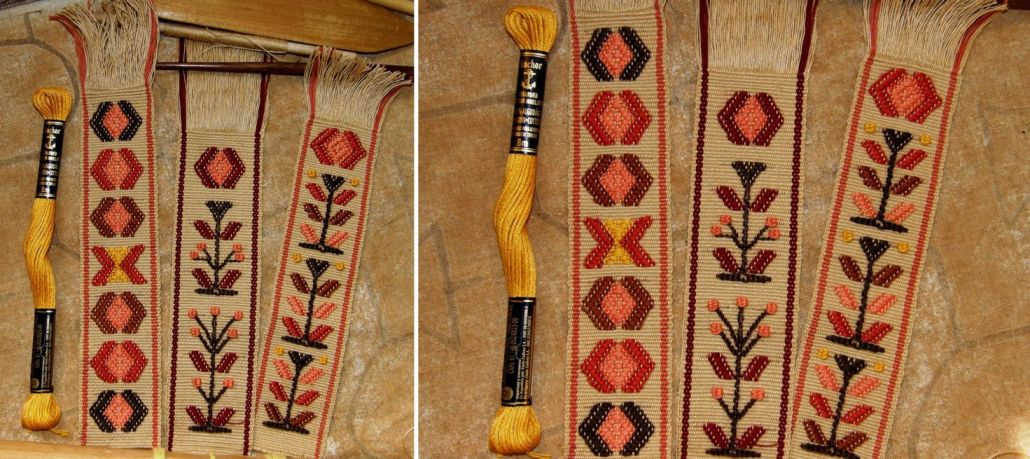
Bookmarks made with Guatemalan tree and sun motifs
Last week when I started the tutorial on this technique, I was using acrylic threads that I had brought back from Guatemala to create bright mutlicolored trees on a green background, pictured at left.
I decided to buy some embroidery floss to work with and it took some time to get just the right thickness to go with my chosen ground weave warp. The ground weave is a 50 wpi cotton and I used 4 strands of embroidery floss to do the patterning. (one piece of embroidery floss has 6 strands so you need to remove 2).
The 50 wpi warp produces a wonderfully thin cloth just right for bookmarks although the pattern wefts do add some bulk. Remember to always use a good firm beat.
So, let’s continue with the tutorial.
All the colored wefts that form the patterns pass under or wrap around the warps in the two patterning sheds. This green piece has 86 ends between the dark green border stripes. We will start with the horizontal line that forms the base of the tree motif.
FORMING A HORIZONTAL LINE
The base of the little Guatemalan tree is a double horizontal line. STEP ONE: To form this horizontal line, place a strand of around 40cm/16″ of supplementary weft under the central patterning warp. The two ends on either side should be of equal length. The central warp in my set- up just happens to be in patterning shed 2 so I have started in the heddle shed.
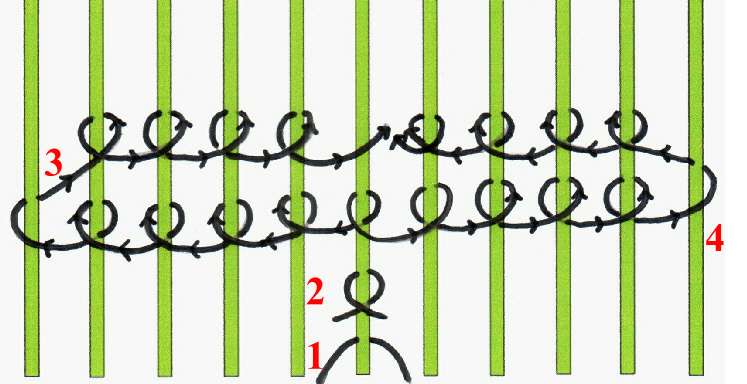
STEP TWO: Cross the ends of the supplementary weft as shown. STEP THREE: Start wrapping the left hand end around the 5 warps to the left of the central warp and return wrapping around 4 warps. The diagram below shows how this is done.
The steps for horizontal wrapping are shown here. The left end of the weft wraps to the left and returns and then in STEP 4, the right end wraps to the right and returns. These four steps all take place in the same pattern shed. The wefts wrap around four warps on their return journey to the center. STEP 5: Pass the main weft through the complete shed.
This completes the base of the tree. Now I am ready to start creating the stem….a vertical line.
FORMING A VERTICAL LINE
Open the next shed, which is, in my case, the shed rod shed and pass the main weft.
Open the heddle shed and raise the patterning warps in patterning shed 2.
Patterning shed 2 contains my central warp.
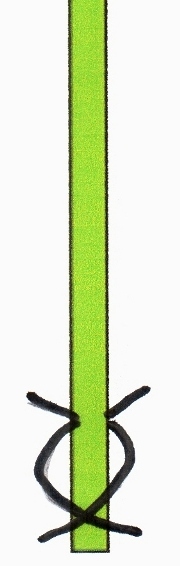
Every time I raise the warps in patterning shed 2, I will wrap my green tree base weft around the central warp to form a stem. The drawing at left shows the very simple vertical wrapping method.
The stem, therefore, is woven only in every second shed.
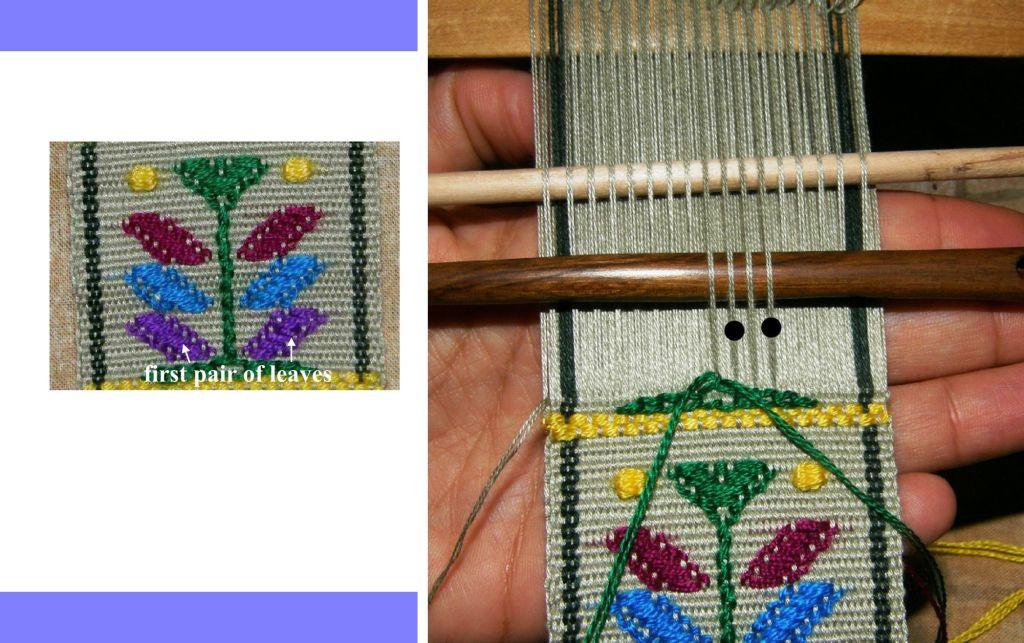
In this shed I will also lay in the wefts to form the first pair of leaves.
FORMING A SOLID SHAPE – A LEAF
Cut two lengths of weft around 24cm/9 1/2” long for the two leaves.
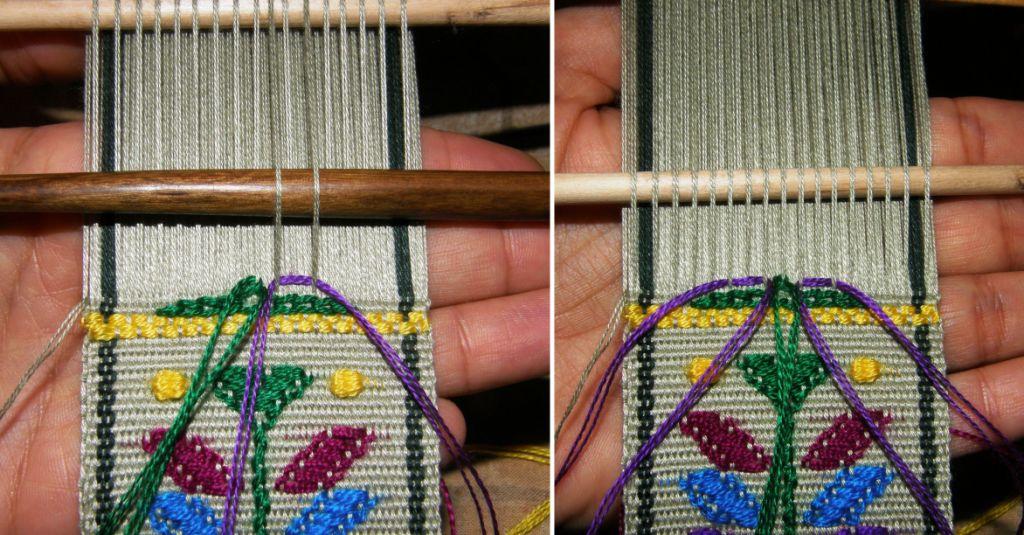
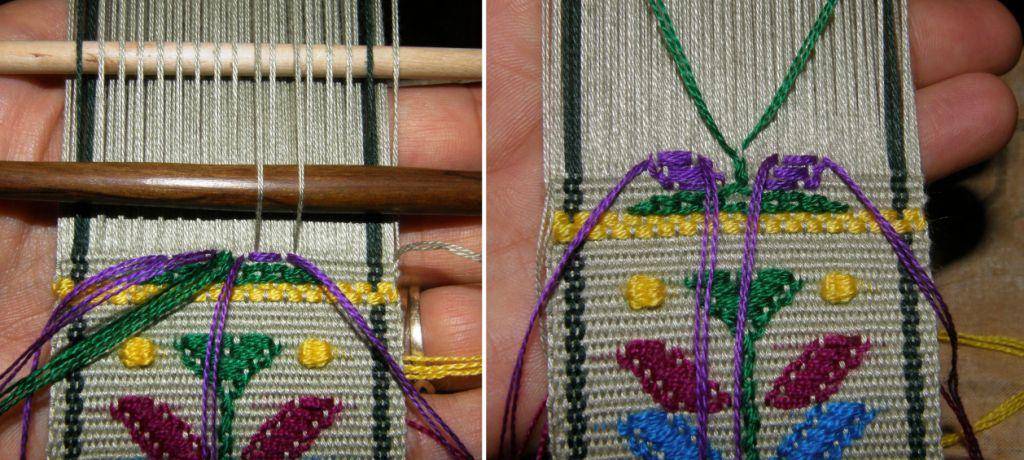
I choose the position of the base of the leaf shape from the available pattern warp threads. I decide on two threads (marked above with two black dots). Note that the two marked threads aren’t adjacent. I’ll use these to create one leaf on the right hand side of the stem and also select two threads on the left hand side.I lay the purple weft thread behind the two selected warp threads adjusting it so that its two tails are of equal length. Then I do the same on the left hand side. Now I can pass the main weft in the heddle shed, change sheds and beat.ABOVE LEFT: I’m now in the shed-rod shed. For the second row of leaf pattern I select two warp threads from the set of pattern threads on Pattern stick 1. For the right-hand leaf I select the two pattern warp threads that lie immediately to the right of those from the previous row. I pass the right tail of weft under these two warp threads from right to left and then the left tail passes from left to right. From now on, the supplementary weft is handled in this same way. The two tails are passed behind the selected warp threads in opposite directions. Use the tip of a pointed stick to gently push them down into position. they are relaxed as they turn around the warps. Make sure they don’t pull the warps out of position as they turn around them. On the left-hand side, I select the two threads that lie immediately to the left of those from the previous row and pass the supplementary weft tails in this same way. Then pass the main weft through the shed-rod shed. Change sheds and beat.
ABOVE RIGHT: I’m now working in the heddle shed and with the pattern warp threads held on the lower pattern stick. In this row I’ll turn the green weft around the center warp to continue forming the stem. I’ll also select pattern threads that sit immediately to the right of those used in the previous row for the right-hand leaf and immediately to the left for the left hand leaf.
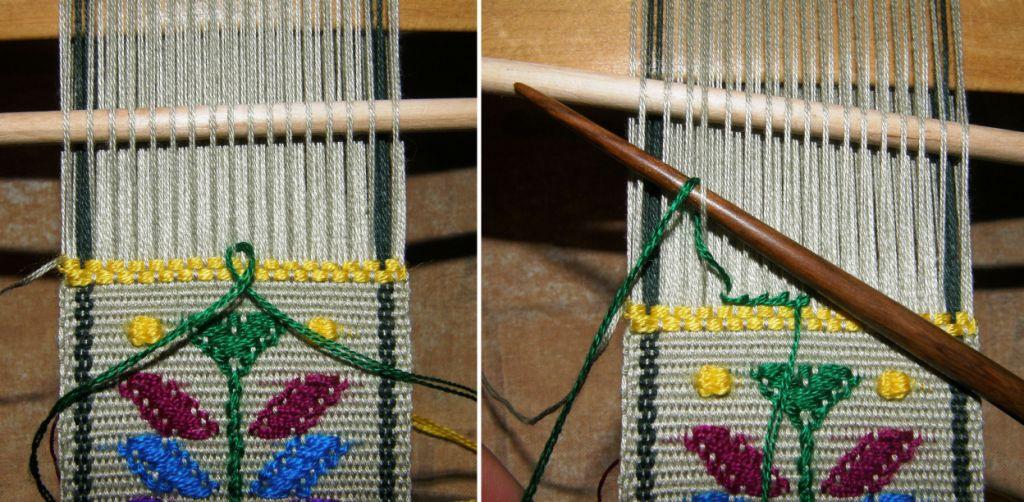
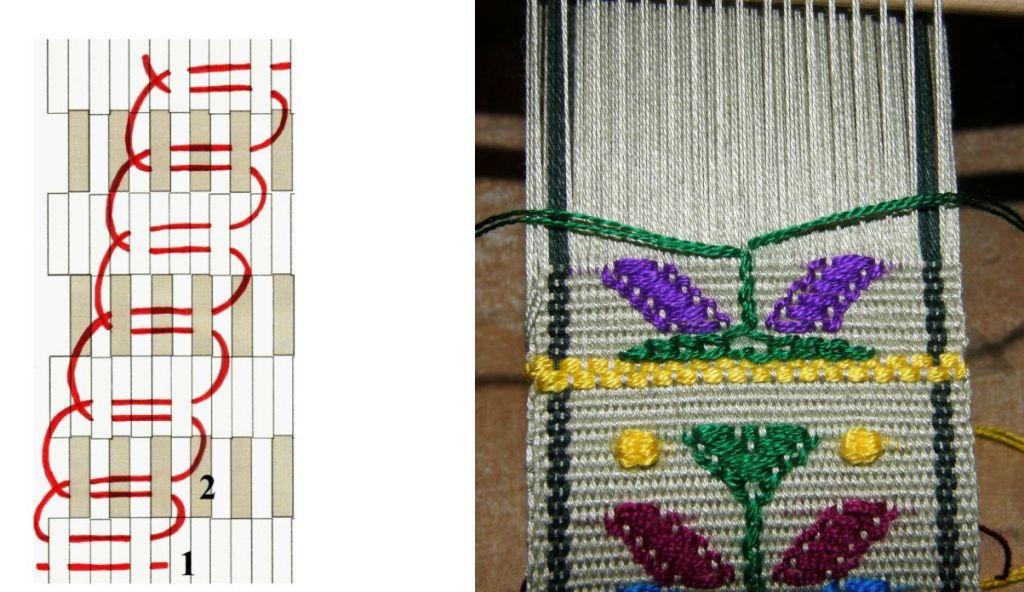
The drawing shows the paths of the two tails of supplementary weft from row to row. In every row the leaves advance and in every other row, the stem advances. Make the leaves as many rows as you like. In what you’ve decided is your final row of leaf pattern, pass the right hand tail of the supplementary weft under the pattern warps as usual and then pass it for a short distance to the left within the shed before pulling it out to hang from the back of the cloth where it can be cut later. The left tail does the same…passing under the two pattern warps and then continuing to the right within the shed. In the photo above right, you can just make out the slight bulge of the supplementary weft traveling within the shed to the right of the right-hand leaf.
Starting the second leaf.
The little Guatemalan tree has three pairs of leaves and the stem continues growing until it eventually widens out into the tree top. You can see the green V-shaped top of the first tree in the photo.
Once you have woven your six leaves, I am sure that it will be very easy for you to see how the tree top is formed.
You’ve been weaving your stem with two strands of weft – to form the top, one strand will start traveling diagonally to the right and one to the left forming a solid V shape. The V shape gets filled in the same way that you “filled” the leaves.
Sometimes you might wish to just weave a little branch rather than a leaf. In that case you would just wrap the weft thread around single pattern warp threads moving out diagonally as you progress from row to row as in the drawing below right.
Finally, there are the little spots that the Guatemalan weavers like to use to fill in blank spaces between motifs. I used them in my bookmarks as flower buds. You can see two yellow spots in the photos above and below.
To make a spot, you use two adjacent patterning warps as shown in the drawing above left. Use a strand of weft half the thickness that you were using for the tree. Around 12cm/5″ length should be plenty. First place the weft behind the right-hand warp in the pair that you’ve selected making sure that the two tails are of equal length. Then join the two ends together and go wrapping them back and forth in in a figure-eight in the same shed about six times as shown in the drawing. When you’re done, pass the ends a short distance through the main shed and out the back of the weaving.
It is very easy to improvise with this technique. Have fun with it!