Backstrap Weaving – Pick-up or Wrap Up?

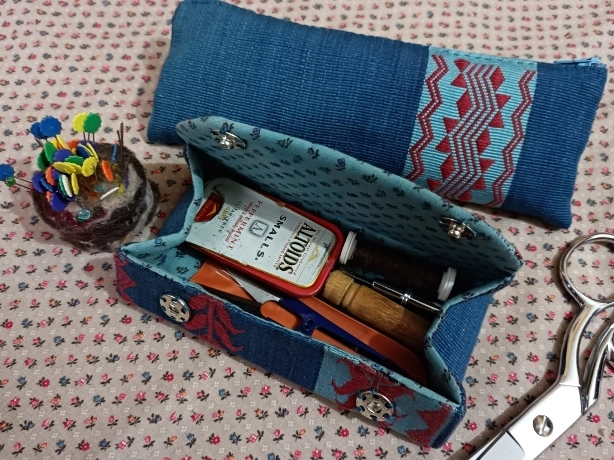
The sewing box purse with its snap closures.
The finished folder with one large central button and two side buttons to keep all the bulk contained.
Plain-weave zippered purses that were fun to create.
This is my supply of the Upland cotton variety.
Wrapping the folded warp for the zippered purse project.
That’s what it looks like on the loom.
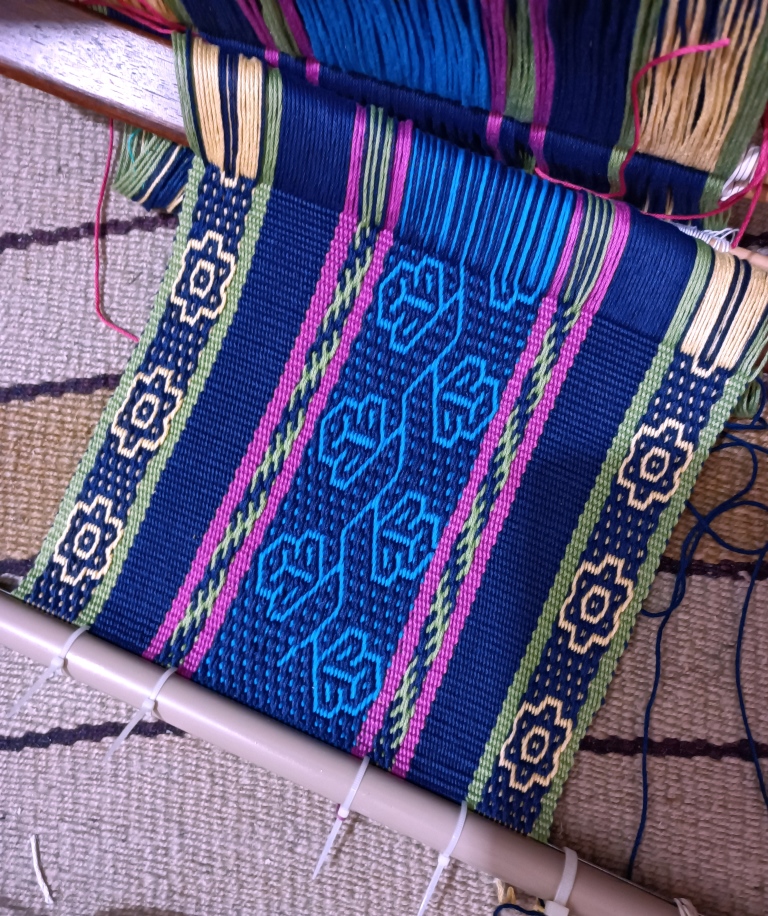
The two faces of the band using the structure that I call Andean Pebble Weave.

In the meantime, I’m doing something I’ve never done before…I’m using up leftover scraps from other projects. I usually can’t bear to throw them away immediately after completing a project. They hang around until I turn them up six months later and think… why the heck am I keeping this?…and throw them away. But these I’ve kept. Perhaps I’ve been watching too many HandyMum videos (she often uses the tiniest scraps of fabric from her vast stash of commercial fabric to make sweet projects). I’m making a sample wallet with them so that I can test my ideas for putting one together. It might even be good enough to keep and use.

I have bits left over from ikat projects using my handspun cotton (that black scrap, for example, is the end of the ikat drawstring bag project). There’s a bit from the ikat cross-body purse that I wove in 20/2 cotton. You’ll recognize the stitched shibori leftovers from my folder project. The other side of the stitched shibori rectangle that you see in the picture (which is the inside of the wallet) is leftover plain blue Andean Pebble Weave fabric from this project….

Some of the varieties of complementary-warp weaves.
This book teaches three methods for weaving these patterns to suit different learning and weaving styles. It includes access to supplementary instructional video clips.
This book shows one method that allows you to weave any kind of complementary-warp structure. It includes patterns in the structure that I call Andean Pebble Weave as well as other complementary-warp styles.


Backstrap Weaving – Putting it All Together.

The button-and-loop closure that I used for the first folder. I’d like to use two such closures on the new folder, one on each of the plain weave side panels, as this second folder is going to be quite stuffed full of charts.
In my last post I showed you how different the two faces of this cloth turned out…both attractive in their own way. I eventually decided on using this bolder face for the folder project.
First things first…finish the main pattern fabric. At this point I was celebrating passing halfway.
I prefer to weave the two strips separately rather than as one long band which I then cut in two. That saves me having to set up to accommodate the longer warp in my limited weaving space. It does result in a bit more waste, though.
These will be the fan-folded pieces that make the expandable sides of the folder. I use two for each side…one for each half… and join the two halves together as the very last step of the process.
You can see the line in the middle of the fan-folds where the two halves are eventually glued together.
The four fan-folded pieces are then sewn to the inside of the folder. The first folded section in each is sewn down flat along the the edges of the folder. That piece of cardboard is only there for the photo to help distinguish the folded pieces from the background lining cloth.
Think of the side pieces as being folded into a series of valleys and mountains. The dividers extend across the folder from mountain peak to mountain peak. There are two mountain peaks on each half of each side.
I hope this photo gives you the idea. This isn’t the tricky part, by the way!
You can see the center join which forms another mountain. The interfacing tabs on the last cardboard divider are glued in and sandwiched between the two sections.
All I need to do now is braid some loops and find two nice silver buttons.

Backstrap Weaving – Hitting the Ground Running

Arriving in Sydney in the early morning, I had hours to kill before my afternoon train up north. I put my luggage into storage at Central Station and went down to the harbor on what was an absolutely glorious day.
Flying into Sydney at day break reminded me of the colors I had chosen for my woven piece named Sunrise, Sunset.
My expandable folder project has a woven wool cover with three-color patterning. It holds my various styles of blank pattern charts.
I used some fabric that I happened to have to line the cover and make the expandable sides.
At this stage, all the leaf shapes have been stitched and I am pulling and tying off the threads to prepare the cloth for dyeing. The folds of cloth in the tightly gathered areas will mostly resist the dye. I completed this task and took the piece home ready to go into the dye pot.
Sleep was denied me the first couple of nights. That along with the fact that day time temperatures have been outrageously and unseasonably high (and I don’t have air conditioning), had me dyeing the cloth in the wee hours and attempting to remove the stitches. That was the only time that I could bear to use the stove. It was lovely sitting and working on it in the quiet and relative coolness of 3am.
I’ll probably use one face for the lining and the other for the sides because I simply can’t decide which face I prefer.
This was what was waiting for my return so that I could hit the ground running. I’d separated the threads onto two sticks for the two sets of heddles and left the heddle making itself as the task that would get me straight back into the groove on my return.
I got some smart and wonderfully thin black cable ties while in Australia for my unconventional way of lashing my warp to the beam.
Approaching halfway and rolling up the woven cloth around beams and paper.
Woo hoo!….past halfway and time to reverse the pattern. No more broken threads. I’m really pleased with the new pattern I created.
My favorite Bolivian weaving teacher, Maxima, stands here on the left with one of her daughters and a granddaughter…..three generations of weavers! Her granddaughter proudly shows her first ever weaving that has been accepted for sale by the co-op of weavers in her community. It was woven on the traditional leaning frame loom using handspun and naturally dyed wool. Dorinda, who works with these ladies to transport and help sell the products made from this beautiful cloth, has just written a blog post showing all that she has available to ship now from the USA (until Dec 6) if you are looking for Christmas gifts.

Backstrap Weaving – Winter Colors

I wonder what colors spring to mind when you think of winter…blues, greys, winter white? As I sit here in shorts and a tank top, I have to remind myself that it’s actually winter here in the tropical lowland part of Bolivia in which I live. It’s the same in the fall when flowers are still blooming and the city is alive with the bright colors and fragrances that are usually associated with spring. It’s easy to forget that the leaves in the fall season in other places are turning all sorts of stunning colors.

I was lucky to have been visiting my friend Lausanne in Vermont one year around the Columbus Day weekend.
One sign for me that the seasons have changed is when the rays from the low winter sun find their way through my bedroom window to fall softly across my work at my backstrap loom. At other times of year, my windows ae blacked out to keep out the heat.

I guess all this has been on my mind lately because I am in the midst of a long move back to Australia to a place that has four very distinct seasons. It will be a little too cold in winter for my liking but hey, I lived at the southern-most tip of the South American mainland for five years and spent eleven seasons living in ski resorts. I’m no stranger to cold…just getting fussy in my old age! I do look forward to the more classic fall colors but I’ve heard that the winters can be grey and foggy. The locals like to call that mountain mist “the champagne air”.

So, what are winter colors here in Santa Cruz?…all the bright colors of tropical fruits and flowers.

I love going out for a late afternoon stroll and coming home with these little tastes of sunshine. Pineapple and papaya vendors selling slices are scattered about the street markets ready to skin, de-seed and chop just the right amount for you.

And in keeping with that, I’ve had some quite bright colors on my loom lately. As you know, I am only working with yarn that I have stashed away here…no new purchases. I decided to pull out the tub of Omega Sinfonia cotton thread that I often use to prepare workshop samples. It’s a riot of tiny balls left over from years of workshop prep. I almost took one look at the mess and turned around to put it straight back into the closet. The worst part was that what looked like the bigger balls of thread were actually made up of dozens of tiny quantities all rolled into one ball.

From the days when my living room would look like a yarn jungle with piles and piles of Omega Sinfonia workshop warps.

In my last post, I talked about weaving a grocery tote using the Mayan Hands naturally-dyed cotton but I just couldn’t get inspired. I turned to the Omega Sinfonia instead and decided for a start to scrape together enough to dye navy blue for outer pockets for the tote bag. If I wove the pockets in the structure that I call Andean Pebble Weave, I could show both faces of the cloth…one pocket on each side of the bag displaying each of the two faces.

As for the rest of the bag, well you know my style….I’ll figure that out later. I grabbed some other colors from the tub and set out to plan a pattern…something very colorful and jolly. I was going to say spring-like but it would actually be all-year-round-like here where I live. It would certainly be something lively to brighten the days of “champagne air” when I end up living in Katoomba.

Then it occurred to me that I had never actually woven anything substantial with this thread and that I would have to, therefore, sample….eye roll…..I wasn’t in the mood for sampling! But no, fortunately, I remembered that I had put together a warp for the cover of my video class, Operating a Backstrap Loom, in good ol’ Omega Sinfonia.

My video class that is available to stream on Taproot Video. There might even be some copies of the DVD left.

Having done its job as the DVD cover, the warp had sat unloved in a drawer for quite some time until I had the idea to unweave that small woven section and turn it into a backstrap with a bit of pick-up patterning. I took it traveling.

Weaving outdoors in beautiful Maine.
The finished backstrap which happens to be the one that I am currently using (almost all the others are now living in Australia)

Speaking of weaving one’s own backstrap, let me show the one that Natalie wove using the instructions in my free tutorial here on my blog that includes video clips. I love how the yarn she used has created its own pattern.

Backstrap woven on a backstrap loom by Natalie Marie Robinson.

So, I had all I needed to be able to make my width calculations, I dyed the scraps navy blue and drew up an idea.

Not my usual color palette and way out of my safe color comfort zone, to be honest, but it looked okay on paper, so why not?
Off paper and onto yarn, the warp kind of freaked me out…argh, I didn’t know if I could live with those colors.

I remembered a colorful warp that I had taken traveling with me years ago…hastily put together the night before I had left. I had hated it so much that it never left my bag. But I did eventually weave it when I got home and made it into a sewing kit pouch. It had grown on me, and I still like it.

Fortunately this latest warp also grew on me. I think the pockets will look very jolly against a dark solid-color bag.

I haven’t woven using thread this size in ages. It wove up so quickly!

All these patterns are in my Complementary-warp Pattern Book. If you have followed my instructions for either complementary-warp pick-up or Andean Pebble Weave, you’ll be able to weave these.

I wove 20″ on this 26″-warp, enough for the two pockets and some extra just in case. You’ll need to put on your sunglasses to look at the other face!

I love the fact that my backstrap loom allows me to create lovely neat third selvedges…

A third selvedge means one fewer hem to sew and saves a little warp waste at the start.

I have what you might call an unconventional way of setting up to create my third selvedge in that I don’t do it the way my teachers here in South America showed me. But then who is to say what is “conventional” when it comes to this kind of thing? You can see the way my indigenous teachers do it here. I talk about how I do it here. That link takes you one of my FAQ pages….a resource that is often overlooked by my readers or perhaps forgotten. In my latest project I used an umbrella rib as the header to create my third selvedge.

To create the neatest third selvedge, you do need to dedicate some time to making sure the warp threads are all well settled in their correct positions before you start weaving. Then you open a shed and beat really well against the beam. When doing the four-stake warping that I show in Method 2 in my free warping video, paying attention to how the doubled threads pass around the two end stakes will make all the difference to the amount of time you need to spend tidying up before you start weaving. Try to have them pass consistently with one of the two colors always sitting above the other on the stakes. Of course, if you plan to start with a fringe, none of this matters.

In the meantime, another pouch got lined with a stitched shibori learning piece. This time there was an attempt to create a bird. I will do better next time. You probably know where this is heading and perhaps hummingbirds will make their appearance soon.

You could turn the bird figure upside down and call it a stem and flower.

I scoured the fabric on which the shibori pieces sits in the hope that I can do some stitched resist on it. I am intrigued by the idea of using the technique on printed fabric. I know that I’ll have to place the figures carefully or the original dark blues of the cloth and the dark dye color will just merge. If that happens, the figures won’t have clearly defined outlines.

I threw a strip of this scoured fabric into the dye pot when I was dyeing the Sinfonia thread blue. The scouring did the trick and the fabric took up the dye nicely. You can only faintly make out the pattern and I think this will be a nice effect.

A much better dye result than my experiment with the fabric that had simply been washed with regular laundry detergent.

I’ll finish with a quick reminder of the pages on this blog that list and provide links to my free tutorials and video clips. These may not be immediately obvious to those viewing the blog on certain devices. Check them out 🙂 See you next time.

Backstrap Weaving – Taking Flight

The Jaunty Bag is finished and will be taking flight with me tomorrow night to Australia. It’s stuffed full of Upland white cotton sliver, my mortar spinning bowl, and takli spindle. I don’t plan to spin on the flight although I wish I could. I don’t think my fellow passengers would appreciate having my extended arm in their faces.

It’s one heck of a trip…60 hours from door to door. There’s a reason why some tickets are less expensive than others! At least I arrive at my brother’s place in the evening and can go straight to bed. A million thanks to my weaving friend Emerald who will help me out with my 150lbs of luggage (this is Phase 1 of my eventual move back to Australia) while waiting in Sydney for the train up north. The hardest thing about traveling alone with so much luggage is queuing to buy food and then somehow finding a hand free to carry it away, and going to the restroom.

As for the Jaunty Bag, here’s where I left it in my last post…

The bag had been constructed and I was weaving the strap. I used the structure that I call Andean Pebble Weave in only one color rather than two for the warp-faced part of the strap. I turned Andean Pebble Weave sideways and wove it using weft for the little figured squares. I had planned to weave the strap with four selvedges but overestimated the amount of take-up. With four selvedges the strap would be too long. But I am crazy and created the four selvedges anyway because it’s good experience! As I mentioned in a previous post, I find it much easier to fill the gap between the two ends of weaving with weft-faced weaving rather than warp-faced.

I cut off the excess length of band and sewed it onto the bag. It doesn’t have its lining yet but I did buy a book on stitched shibori which is the technique I would like to use for the lining. When I looked online again for that thirty-five-dollar Stitched Shibori book, it had magically become twenty-six dollars. I’ll have plenty of flight time in which to read it. Even without its lining the Jaunty Bag will go traveling with me.

I haven’t been back to Australia in three and a half years and I haven’t been there in the summer months since 2014. I’m not teaching on this trip because I have no room for any workshop equipment but I will meet up with a weaving friend or two just to have some fun weaving together. I wonder if I’ll be able to attend the guild meeting in Sydney.

I’ll be back in March. There’ll be lots of thinking time on flights to plan my next project. I’m not going to bring back any yarn (Ha! Lets see if I stick to that plan). Working with dwindling yarn stash throughout the pandemic and these last years has been a really good experience and I’d like to keep that going. I will however, bring back some acid dyes.

I guess I’ll see you when I get back to Bolivia. I’ll be posting Aussie things that catch my eye on my personal Facebook account.