I have woven a lot of things that have made me very happy but my latest piece is something of which I am particularly proud. That might sound a little obnoxious…but I can’t help it. The little cross-body purse that I just hand-sewed has me grinning from ear to ear. I guess it’s because I remember my school days when I was convinced that I was a total klutz when it came to any kind of craft project. In the end I even stopped handing in the work all together and my report cards would say “No work presented”, “Assignment incomplete”, or “Disappointing result”. I remember having a friend’s mother take pity and rescue and do
the sewing part of an assignment for me. My mother was also convinced that she had no craft-related skills or talents and I guess I just assumed I would be the same.
One of the 60/2 silk ikat pieces that I wove last year.
Not that this latest project is any great feat of sewing. It holds together and looks like what I had in mind and that is enough to please me. There aren’t any zips or fancy pockets. I took sewing skills that I had learned in my recent shoulder bag project and got to apply and improve on them. I took the ikat skills that I had learned in all the silk projects that I had woven during the worst of the pandemic and applied them to cotton.
In my last post, I showed you my ikat warp on the loom, heddled up and ready to go.
Almost all heddled. There are 880 ends in total of 20/2 cotton.
A coil rod in place on one of my older cotton scarf warps.
I had been deciding n whether it would be worth inserting a coil rod. I did go ahead and use one. Next time I will insert the rod right at the far end of the loom and leave it there. This time I inserted it, as is my habit, within reach just beyond my shed rod which meant that I had to roll it along the warp each time I advanced the warp. The rod will pick up the tiniest looseness in tension in any particular thread, take it up, and sort of push it along and away to the far end of the warp where it remains trapped. This is all very well unless you are trying to keep your ikat threads strictly aligned. In this case, it is preferable to have any tension differences gradually even themselves out as you inch your way along the warp in such a way as not to be noticeable at all. Each time the coil rod pulled a thread out of alignment, I had to take hold of the thread and ease it back into place. Lesson learned.
It’s amazing how fast the weaving goes after all the wrapping and dyeing that had taken place before I could even get the warp on the loom. Of course, it is only a meter of cloth which was the amount I had calculated as being necessary for my purse. I did not have a pattern for the purse and made up something very simple that is not all that different from my shoulder bag shape, except for the absence of pleats.
Rapid progress on the loom. The coil rod, unfortunately, is out of shot.
All my weaving friends will understand the reluctance to take scissors to a piece of your hand woven cloth and so it won’t surprise you that I had to let this cloth just sit about for a few days. In the meantime, I had to scale down the paper pattern I had made for my shoulder bag.
The finished one meter of ikat cloth.
I sewed a dummy purse, minus flap, to see if the shape I had drawn worked. I felt that it did and was able to use that dummy piece as the drop-in lining. It’s chocolate brown and I guess I was influenced by these naturally-dyed quilting pieces from Threads of Life in Ubud, Bali when I came up with my combination of colors. I have also seen ikat work in Guatemala that combines natural indigo blues with chocolate brown.
Hand-spun, backstrap loom-woven cotton pieces from Threads of Life…swoon.
Sadly, I neglected to take in-progress shots of the sewing part of this project. I wove three bands, one of which became the sides and base of the purse. The other is the strap and the third is the tubular edging on the flap. I was pleased that the pattern on the flap lined up quite nicely with that on the body of the purse and I used a magnetic clasp for the flap.
Feeling proud…can you tell?
Finished cross-body ikat purse.
These are sloooow projects but I find the slow hand-sewing so very relaxing. I posted my cloth in an online weaving group and one member responded with something like….”That looks like so much work!” I was kind of surprised. That’s the kind of thing that non-weavers say when I do a demonstration of backstrap weaving at an event. I have always felt that weavers, on the other hand, just get it!
A benefit of slow projects like this is the value you get from a relatively small amount of yarn! It has certainly kept me out of trouble for a good while. It never fails to tickle me that the bits that you see below can be transformed into a patterned purse.
20/2 mercerized cotton thread, dye for cotton, and ikat tape.
Next up…an attempt to make a small zippered coin purse in warp-faced fabric as a way to test my hand-spun Sea Island cotton. My teachers in coastal Ecuador used hand-spun cotton singles doubled rather than plied, and not sized, for their warp-faced weaving. My singles have stood up well to a balanced structure in an early test sample. Warp-faced will be a different story all together with all that added abrasion. Why am I using singles? I guess it’s only because I want the thread to be that fine. I may be completely misguided in this but we shall see what comes out of this next small experiment. I don’t think I will be wasting too much thread while learning these lessons. If my single thread stands up to the abrasion it just might be because I have put in too much twist and perhaps robbed it of its rustic hand-spun qualities. There are so many lessons to learn!
Mariana weaving warp-faced fabric for a double-pocket saddle bag using doubled hand-spun cotton singles, coastal Ecuador.
In my next post, I’ll have photos and information that my online weaving friend Christina has shared with me on her experience studying with ikat weavers in Mexico in 2019 as well as some images by another online friend who was in Ecuador interacting with ikat weavers in the 1970s. There might be a little something to report on my cotton coin purse project. I might even get to use my cochineal and alum.
And speaking of the red color of cochineal, here’s a teaser from next week’s post as the weavers in Mexico remove an ikat wrap to reveal one tiny part of the overall pattern…just in case you have seen enough blue for today! (Note that these weavers were using synthetic dye for their large production runs of 90-meter warps but use cochineal for their single unique backstrap-loom-woven pieces).
I have a short blog post today just to show you the latest book cover that I have finished.
I had planned to have a break between book covers to experiment with cross-knit looping and the little hummingbird figures that I showed you in my last blog post. You can see my initial experiment with tail feathers in very heavy cotton here. I was able to track down Sue Prior via the backstrap weaving grapevine and she was kind enough to send me some good resource material on creating three-dimensional figures in this structure. Irina also told me about another source. In a future blog post I’ll list them but for now, if you scroll down my RESOURCES page, you’ll find a link to an article by Lila O’Neale. (I just noticed that a few of the links on that page no longer work. I must go through and tidy it up).
The break was supposed to give me time to mull over the design and colors for the next book cover but as it turned out, the idea came to me very quickly. Some time ago, I found a nice collection of hummingbird poems online and decided to go back and read through them once again. Two lines from an untitled poem by Emily Dickinson (often referred to as “The Hummingbird”) sprang out at me:
A resonance of emerald,
Arush of cochineal
Rucker’s Hermit Hummingbird by John Gould, 1861.
Color! My new book would be A Dyer’s Notebook. I had written in my last blog post about how horrifyingly unscientific I am about dyeing. Maybe having a nice book in which I can keep notes will motivate me to be more organized.
I only had natural white in the 30/2 silk that I would use as warp and so I mixed my dyes to create purple and green. My color choices are dictated by what I have left in the 60/2 silk that I use as supplementary weft to make the patterns. I don’t have any really light colors left. Gold is the lightest in any decent quantity. I over-dyed the small amount of pale blue that I have to a light shade of green for the leaf patterns. That left me with gold for everything else. I would have preferred a pale buttery yellow but I used up all of that on these!
Another possibility would have been to dye the natural white 30/2 warp thread a pale color which would have given me lots of choices for the patterns from my range of dark colors in 60/2 silk. However, I wanted the colors for this piece to be deep and rich.
It would have been nice to have found a way to include a little cochineal and emerald in the hummingbird figure. I tried a few different things but none of them worked well enough. And so my little hummingbird figure is showing a furnace glow of gold in this moment of its flight. From a poem by Alexander Wilson:
Each rapid movement gives a different dye,
Like scales of burnish’d gold they dazzling show,
Now to sink to shade—now like a furnace glow!
The dark green stripe is placed to wrap around the spine. I knew that I was going to wet-finish the cloth and that it would shrink in width and length just like the cloth for my Weaver’s Journal did but I didn’t add extra warp ends to this piece to account for that. You may remember that I fixed that loss of width on the last cloth by adding narrow woven strips in 60/2 silk. I decided that fixing cloth that is too narrow is possible but adding more warp ends and possibly having then to deal with cloth that ends up being too wide would be a problem.
I wove narrow strips in 60/2 teal silk to account for the loss of width and added strips to other parts of the cover for balance.
For the new book, I extended the width with a narrow strip of the green spine color only on the back cover.
So, I am thinking maybe one more book…perhaps A Traveler’s Diary? That might create some magic and get me back on the road. In the meantime I’ll chew over whether to spell traveler with one or two l’s.
I’ll leave you with some Christmas decorations that I made a couple of years ago if you are looking for some ideas for uses for odds and ends of band. I don’t think these necessarily need to have Christmas-themed patterns. The metal ends are called ribbon crimps and come in various sizes. They clamp onto and protect a cut edge. I add a bit of weft twining to other end just above the fringe to stop the band from unraveling. You could use the same color as one of your warp colors or a different color all together.
And I have a free tutorial on weft-twining here. It starts with a little cultural context and then you’ll eventually get to the tutorial part with its video clips.
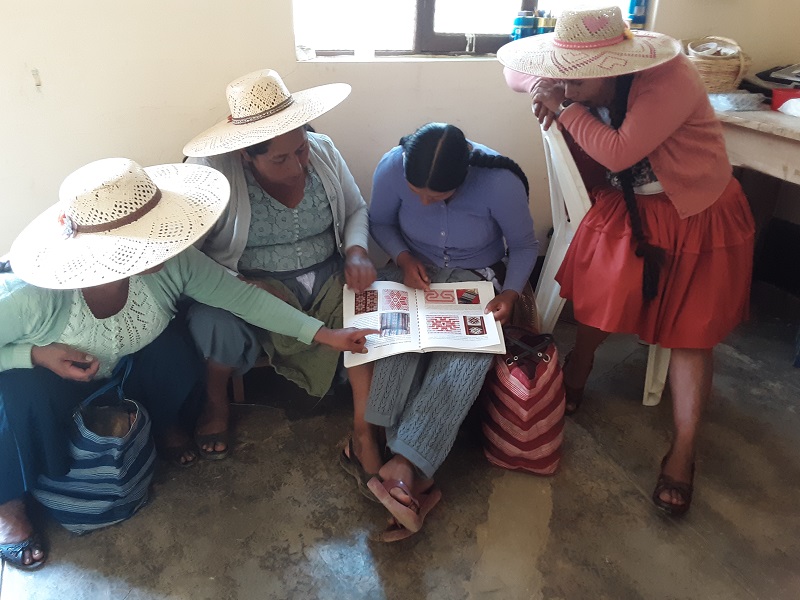
My friend Dorinda recently got back from the highlands where she had been visiting my teacher Maxima and the other ladies in the weaving co-op. The last time I was up there, the ladies were interested in the woven sample bands I had brought which had patterns that they had never seen before. They wanted to learn them and because I was only able to leave a couple of samples behind, I left behind one of my pattern books. Before I could leave, Maxima had already set up a warp and was copying one of them. On her recent trip, Dorinda took this photo of the ladies examining more patterns in the book. Just like us, they love to learn new ones.
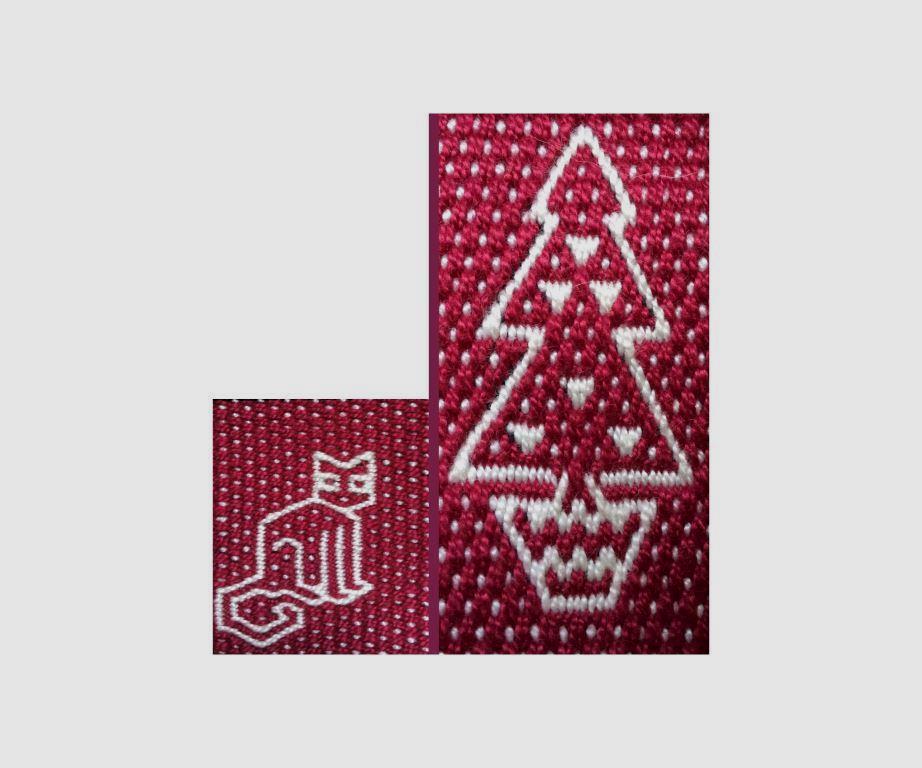
And just for fun, here’s a compilation of patterns for a Christmas card for all those experiencing the annual battle of Christmas tree and cat…(these patterns are from the Complementary-warp Pattern Book). I am going to buy myself a new tripod for Christmas so that I can start using my good camera again.
Enjoy your end-of-year celebrations, stay safe and see you next time.
I don’t like being in weaving Limbo Land. Usually, while I am sitting weaving one project, I have the next one already developing in my head or on paper. I’ll be gathering yarn and charting patterns when not at the loom so that I can launch myself straight into warping once the current project is off and washed and sewn.
While I had the general idea for the next project sorted out, I hadn’t quite pinned down the finer details and so I found myself in Limbo Land once my current project was off the loom.
Urgh…I dislike Limbo Land. Limbo Land is the place where I do crazy things like suddenly decide to cut my own hair. Fortunately, I decided to spend this little jaunt in Limbo Land in a much better way….starting my next book! And then I suddenly got the little spark of idea I needed to pull together all my thoughts for the next project. I really need to write these things down because I have already forgotten the source of the spark.
The ikat piece that I just finished was about weaving shapes that would allow me to calculate take-up for future projects. I was interested to see how much length was lost in the original ikat shapes once they were woven using warp-float patterning rather than the plain weave that I usually do.
I think I mentioned in my last post that I was getting bored with the pick-up pattern that I had chosen to weave within the ikat shape. Well, I came up with a way to amuse myself for the second half of the pattern. I decided that the bottom half looked like foliage and that I could slip a little hummingbird in among the plants in the upper half. Planning that out was fun and I realized that this was really what I originally had in mind when I saw the drawing of a hand in that magazine ad that I have mentioned in past posts….weaving pictures within pictures.
So I have decided to weave a series of small silk pieces based on this basic shape filled with pictures. I have just finished tying off a larger and simpler version of this shape in red 60/2 silk again which is now soaking in preparation for dyeing tomorrow. I have a pretty good idea of how I want to fill it. Let’s see where all this takes me.
I suspect there will be some moments of “What was I thinking?” when it comes time to weave and I have to come to grips with all the detail that I have put into the pictures! I can guarantee it won’t be boring to weave!
Another source of inspiration for this idea of pictures within shapes arrived in my inbox just this morning. The Textile Museum in DC announced the arrival of The Textile Museum Journal, Volume 47 and the cover picture fits very well with my latest weaving projects.
This volume is devoted to “color in textiles across time and space” and includes an article by Elena Phipps on “Woven Brilliance: Approaching Color in Andean Textile Traditions.” You can take a lookherefor more information about subscribing to the journal, this issue, and back issues.
The cover of latest volume of The Textile Museum Journal…what I see are pictures within pictures!
I have actually had a pretty colorful morning all told as I got to attend a Zoom presentation by dye master Dagmar Klos on the basics of dyeing which was simply marvelous. There was plenty of information for me to apply to even the occasional dyeing that I I do for my ikat projects.
This picture of a weaver taking a break from her backstrap loom from the Threads of Life Facebook page really speaks to me. Maybe she is turning over ideas for her next piece.
And, sticking with the subject of color, I wanted to tell you about collections of beautiful backstrap-woven fabric squares that Threads of Life in Ubud, Bali is selling via their online store. I have been signed up for the Threads of Life newsletter ever since my failed attempt to attend their weft ikat workshop back in 2017. They were incredibly understanding about the misfortune that prevented my being there and I have always been very grateful to them for that. Of course they are just one of the many organizations that are being sorely affected by the pandemic and the resulting absence of tourism. They rely heavily on the purchase of textiles from visitors to their gallery in order to be able to continue supporting the various backstrap-weaving communities with whom they work.
From their website: By aligning with indigenous culture in its fieldwork and marketing, Threads of Life alleviates rural poverty, helps weavers to form independent producer groups, and facilitates their sustainable management of their natural dye resources.
I was very impressed by how quickly theThreads of Lifestaff sprang into action once the full extent of the pandemic had been realized and came up with new and truly unique ideas for their online store. Apparently, they have been holding onto an assortment of textiles that have been purchased from the weaving communities over the years that, due to having some small flaws, have not been sold in the Gallery. These pieces have been cut into squares and are being sold in beautifully coordinated color sets that can be used in patchwork and quilting projects. They make my mouth water!
The sets include squares of solid-color naturally-dyed cloth in stunning indigo blues and in rust and terracotta tones woven from handspun cotton as well as ikat and batik pieces. The cloth originates from various Indonesian islands and have been placed in these sets accordingly.
Here are some pictures of some of the sets: those blues!!
This is just a small sampling of all the products that they have to offer. There is also a range of large naturally-dyed lengths of fabric in the collection that they call Farmer to Fabric, tablet-woven trim in naturally dyed cotton and heirloom quality textiles and baskets representing various islands and communities.
This link to Threads of Life won’t just take you to their store. I hope that you can take some time to explore the site. There is a nice slide show at the bottom of the page illustrating the steps and time involved in the creation of an ikat textile. There are also tabs that take you to pages with information on the organization’s field work, natural dyes, the artisans with whom they work and the organization’s classes and workshops.
And, finally, I would like to tell you about the inclusion of an article I wrote in the latest issue oftinyStudio Creative Life magazine….”The Inspirational Publication for Mindful Crafters”.
(I would like point out that I would never have dared to wear shorts if my weaving teacher, Trini, was not also wearing them! This picture was taken by anthropologist Kathleen Klumpp when I accompanied her to stay with Trini and her family of cotton spinners and weavers in coastal Ecuador.)
I met the magazine’s editor, Suzy Brown, when I was in New Zealand last year. We wove together over a couple of days and she later invited me to write about my experience learning to weave in South America. The magazine comes out quarterly and this issue has 126 pages of luscious fibery inspiration and yes, there is quite a lot about color in there too with extensive articles on dyeing with woad and cochineal. It covers topics ranging from sheep breeds to fiber preparation, spinning, dyeing and felting, spinning tools and equipment and includes focus articles on various fiber artists (this issue includes an artist who creates amazingly innovative art work using machine-knit fabric as a base), visits to artists’ studios, as well as instructions for craft projects.
Suzy puts together a fun flip-through video for each issue on Youtube….
With a new ikat project about to hit the dye bath and a new book in the works, I don’t see any more wallowing in Limbo Land in my near future!
I have come back full circle to my ikat explorations again. I meandered over to Finnweave for a while and then made a quick visit to three-color double-faced pebble weave. Now I am back in ikat territory and making experiments by adding a twist of my own. Meanwhile, I am planning on paper the large projects in Finnweave and three-color pebble which will be next on the to-do list.
I smile when I remember one of my first ever attempts at ikat. I am pretty sure that I did this after my first trip to Ecuador in 2005. There I had seen that ikat weavers were using strips of cabuya fiber (agave) to wrap their warp threads and I brought back some to try for myself. I found it impossible to use! There must have been some tricks to effectively preparing and/or tying the cabuya that I had obviously missed.
For some reason, I decided that it would be a good idea to use my own hand spun llama yarn as the warp for this first attempt. Bad idea. Even worse was my attempt to dye it with cotton dye. I had no idea about such things at the time. For me, dye was dye and should work with any material. I was mad about the fact that what was supposed to be a strong so-called Mexican Red came out Barbie-pink but I started weaving it anyway.
Looking back on it now, I tend to think that it wasn’t a bad first attempt but it hadn’t pleased me at the time and I abandoned and discarded it. I wish I had kept it now. I suppose the Barbie-pink would have faded and washed out eventually anyway. I have learned some stuff since then!
After giving up on the cabuya, I tried using strips cut from plastic bags but I found that the plastic stretched and often broke as I tried to tie knots. Besides that, it was very hard to cut really fine strips. I remember watching a tv show in which someone was destroying some incriminating evidence on tape. They ripped the tape out of the cartridge and broke it apart. I was thinking…yeah, right, tape is not that easy to snap apart in bare hands. And then it dawned on me that cassette tape might make good wrapping material. That Barbie warp is wrapped with cassette tape. (I learned later that it doesn’t stand up too well to very hot water).
The next attempt was with wool singles that was sold as warp for tapestry weaving. I figured it wouldn’t be as stretchy as my hand spun llama. I am pretty sure that I used hair dye on this one! It was also abandoned because the threads shifted more than I was willing to tolerate once I started weaving. In any case there was and always is something to learn in these ikat experiments.
Let’s try again with something even less likely to stretch. This one was in UKI 20/2 cotton and the appropriate dye (I only owned cotton dyes at that point and was still under the impression that the Mexican red dye that had turned out Barbie-pink had just been a bad batch.)
What was supposed to be a deep ocean blue came out like this…what?! Another bad batch?! No. Here’s a new lesson. You need to scour the cotton thread to make it ready to accept dye. Fortunately, I really liked this kind of blue but this experiment also went to the trash despite the fact that the ikat patterns had come out quite nicely.
This next one on un-scoured cotton (the lesson was yet to be learned) came out a wishy-washy grey instead of black and had me contacting the seller of this 20/2 thread for help and it was he who told me about scouring. Who knew?! I was able to rescue the wishy-washy grey piece by running it through a second dyebath. It gave me something very close to the jet-black that I had been looking for…
And so goes the process of learning on your own!
Hooray, this time I got the color I was expecting. This is 8/2 cotton. These experiments were taking place in 2012.
In 2015 I started playing with creating shapes in ikat and filling them with pick-up patterns as I wove. I used both two-color and three-color pebble weave in the bird series at left. While doing those, I learned that if the proportions of the shape were important (for example, if I wanted to weave a circle rather than an oval), I needed to account for take-up when I wrapped the pattern into the warp. The tied figure would need to be slightly elongated.
Those experiments were in 8/2 cotton. At this point I had been given a roll of Japanese ikat tape which held up well in very hot water, I knew about scouring, and I had learned that there were different kinds of dyes made especially for protein fibers and other kinds for plant fibers. Now I could just concentrate on wrapping warp threads and weaving!
Fortunately, my most recent experiments with ikat in silk, which were started in 2019, have made it off the loom complete and have stayed out of the trash.
Recently, I experimented with leaving some spaces in the ikat pattern to add motifs in supplementary weft as I wove. That was fun and I enjoyed figuring out the exact point at which to start adding the supplementary-weft pattern and choosing a motif that would fit nicely in the available space.
I added just a small motif using supplementary weft to the center of this one…
These latest projects have been about learning to fold the warp in half either horizontally or vertically in order to wrap two layers of threads at once and create instant repeats of the pattern.
It has also been fun seeing the effect of using a multi-colored base warp and making some useful things in the process like this silk cowl.
And now I am back to the experiments in combined ikat and pick-up. I am starting out with a sensibly small project in 60/2 silk. No one wants their silk to end up in the trash!
I am going to revive a picture that I posted back in 2015 when I was first combining ikat with pick-up. This is what you get when you do a Google search for those two terms…
Michelle Nussbaumer’s ikat pickup truck from the Dallas Morning News
In my last post, I showed my latest attempt at this combination on the loom…
Here it is off the loom waiting to be something. Of course, it could just spend its life being a sample but I decided that, although there are some kinks to be ironed out in the process, the finished piece would make a nice second pouch for my iPod.
I added eye-patterned tubular bands to the sides and made a simple four-strand braid for the neck strap. I didn’t like the blank space at the top of the warp and added a piece of a pair of earrings that one of my students had made. I remember telling her when I bought the earrings that I wanted to dismantle them and use the pieces as pendants. I had planned on weaving or braiding the necklaces for the pendants. Of the four pieces, I still have three to use as pendants and one which now nicely fills the space on my pouch.
A second experiment with this technique is underway. I am adding a little something more this time. We’ll see how that goes. I am still at the wrapping stage.
So, that’s what I have been up to at my loom. I have also been doing a lot of Zooming with weavers. I feel that we can quite nicely re-create the feeling of a weaving circle via Zoom….not quite like these intimate circles of which I have been a part in the past but I feel that Zoom meetings have been working remarkably well and are doing a wonderful job of creating a sense of together-ness. My Zoom workshops on Andean Pebble Weave on Inkle Looms have been going really well, I feel.
Here we have a group from New Zealand and a group from the USA from back in the good ol’ days. Now we can have individuals gathering via Zoom from all over the world!
In one of our get-togethers, Mary showed me the backstrap that she had just woven. I was so happy to see that the instructions from my tutorial are still being used. I wrote that one way back in 2009. I particularly like this way of making a backstrap because you use the entire warp. The unwoven parts at the start and end are braided and become part of the backstrap. Mary did a beautiful job with her braids.
You can find the tutorial for this backstrap here. It tells you how to weave it on a backstrap loom and what to use as an improvised backstrap as you do so. The article includes instructional video clips.
Todos Santos is approaching when here in Bolivia it is customary for all the family to visit and spend time with one’s departed relatives at the cemetery. Part of the act of remembrance is baking what are known here as tantawawas (bread babies). This picture from the website of Bolivia Bella shows one of the many forms these bread babies can take…
Small ceramic faces can also be bought in the street markets. They are pressed into the dough and then removed before baking. Once out of the oven the faces are fixed to the bread ( in some manner unknown to me). This image is from the bolivianitawebsite….
This year some enterprising folk are selling some special 2020 faces that ae wearing Covid-protecting face masks. I would like to think that they are locally made and not brought in from China.
I am wondering in what creative ways Halloween will be celebrated in this extraordinary year. I’ve seen pictures on Facebook of people creating special shoots via which candy can be delivered while keeping a safe distance way from the kids.
It’s interesting to see what my online friends and acquaintances are doing with the time they have on their hands during these periods of lock-down and self isolation. I won’t call it “killing time” as who would want to kill a commodity that is so precious? Most are using the time, their hands and yarn from their stashes to weave, crochet, braid and knit. A couple of friends have been drawing. My friend Yonat just finished a spectacular tapestry piece and I have seen some amazing quilts developing.
It’s no secret what I have been doing with my time and it’s not really anything different to what I would be doing in a “normal” world. The only difference is that I am not organizing my time around the fact that I have a trip away coming up. The last few years gave me the opportunity to travel to Australia in the down-under winter months. We are still in strict lock-down here and for me the biggest difference is having to pick through my stash to plan my future projects rather than plan something and only then buy yarn specifically for those projects on a trip away. There’s something rather nice about that. So, it’s all about weaving for me and soon it will be about planning my next book.
Oh, and I have been juggling. That’s a new one. My nephew taught me to juggle many years ago when I was on a visit to Australia. You never forget but you do get rusty….in my case, very rusty. It’s a great way to warm up my arms and shoulders before I do other exercises, not to mention all the other parts of the body that are involved in retrieving dropped balls. Now I am thinking about how to make my own juggling balls. I don’t need another set but some custom-made ones would be fun. I have a “good” set and then a set of crocheted rice-filled ones that I bought from Guatemala. It’s amusing watching the grains of rice escape and fly about the room as I toss the balls in the air. Maybe I’ll learn something other than the basic three-ball toss.
I hand-sewed my face masks. They came out pretty well. I picked apart a disposable pleated surgical mask to use as the model, made it a bit wider to reach to my ears, and added a little tuck under the chin. I had some wire to use for the nose and used the elastic from some eye masks that I had. One mask is only a single layer of fabric and the other is doubled. I wear them both at the same time. They’ve been through the wash several times and survived. I guess my hand-sewing isn’t that bad after all. Wearing a mask is mandatory in all stores and businesses here. I have not heard a single peep of complaint from anyone here about that.
My sister-in-law, Debbie, is one of the people that I mentioned who took up drawing during some of her stay-safe-at-home time. She had never done any drawing at all in her life and she whipped up this sketch of me wearing a mask and surprised me with it. I love it….
I don’t sew and don’t have a stash of fabric. The masks were made from fabric that my friend Claudia had given me so that I could sew an edging on my ikat cowl. I guess I favor these autumn colors. They happen to be the kinds of colors that I have been using in my recent ikat experiments.
After having finished experiment #8, above, I calculated the amount of 60/2 un-dyed silk that I had left to play with and saw that I had enough to make a sash that could hang on the wall with the other two pieces. That would leave me with a tiny bit to make a wrist cuff. I always like to be able to wear cuffs when I teach. They serve as nice portable examples of the various techniques that I use in my work. After all this time spent on ikat, I felt I needed to add an ikat cuff to the collection. However, I wanted it also be an experiment and planned to make it a test of some of the dye colors that I would use in the larger sash project….autumn colors.
Here it is on my arm along with other cuffs and bracelets that I have woven in autumn colors. It is fresh off the loom here and so it looks dull and fluffy and you can still see the charcoal markings where I drew the pattern on the warp before tying the tape. Its look would change after a wash and press.
One of the tape ties came partly undone in the dye bath which spoiled the pattern a little. I guess I got distracted and didn’t complete the knot for that particular tie. This piece went through three dye baths. That’s a lot of fuss for such a small piece but I learn something every time. Figuring out the most efficient way to stage the steps for dyeing the three colors colors is something that I am learning. On this occasion, I dyed with the burnt orange first. Then I unwrapped the parts that would be yellow and dyed those. Then I unwrapped the border threads and covered the entire pattern section with tape and dyed brown. Other possible sequences come to mind and I guess it depends on the ratio of pattern area to negative space, the colors that are being used, and just how much wrapping, unwrapping and re-wrapping you want to do. I had been hoping that the border and the rest of the negative space would be significantly different tones of brown….a solid dark brown on the borders and a reddish-brown in the other negative spaces. They are different but not so much as to be really noticeable.
I cut and hemmed the ends. The 60/2 silk is fine enough to allow me to hem without creating too much bulk. I’ll add some small snaps, two at each end. I usually add ribbon crimps to cuffs that are too bulky to hem. Jump rings and lobster-claw clasps finish them off nicely. As with any kind of bracelet, attaching the clasp with one hand can be tricky. I have done it often enough now to have a method that works well. That’s something that you might want to consider if you are planning a cuff of your own.
I hemmed and used snaps for these bands in 60/2 silk. There are some very low profile plastic snaps out there but I actually find them quite hard to do up and am sticking with metal ones for the time being.
I also like using a button along with a braided loop. The metal ribbon crimp has a built-in loop through which the braided cord can be passed and knotted to make a loop. The crimp covers and protects the cut raw edge of the band. The other ends of my bands are usually selvedges. Weaving bands like these on my backstrap loom allows me to start with a selvedge and so I can sew a button directly to that end. I don’t have to worry about a raw edge unraveling.
If a band has two raw edges and you want to use a button and loop, I think that adding a ribbon crimp to protect both ends would work well. The button could still be sewn to the band to overlap the crimp (and therefore hide the loop in the crimp.). I have since found out via a Facebook friend that you can buy ribbon crimps that don’t have the loop. One of these days, I’ll get some of those via an Etsy store called TwilightsFancy.
One of my favorite ways to finish a cuff is with a woven tubular band that is woven and sewn to the fabric at the same time. The weft becomes the sewing thread. The tube encloses and protects the edge of the band and really becomes part of the piece rather than just perching as an addition along the very edge. These kinds of tubular bands need to be used on fabric that is quite sturdy. In these two examples I used an eye-pattern tubular band.
I used the tubular band to cover and protect the raw edge of these wool bands. The band on the left is 20/2 worsted spun Mora yarn and the one on the right is my hand spun yarn made from from some particularly nasty llama fiber that I bought in the highlands way back in 2002 when I didn’t know any better. The center color comes from cochineal. The button is made from tagua nut from Ecuador.
The use of magnets as closures for these kinds of cuffs has been discussed but I can’t say that I trust them unless they are lockable. I would hate to lose my hand spun cuff and the tagua nut button which is a souvenir of my travels in 2005. One Facebook friend laughed about the fact that she has walked away and left bracelets with magnet closures attached dangling to metal cabinets.. Maybe a magnet closure with a safety chain would work although I do remember one weaver whose safety chain was attracted to the magnet and was therefore always stuck to it in a crumpled mess!
I have set up what could be the last 60/2 ikat experiment for a while (I say “could be” because I do have colored 60/2 silk a-plenty and as long as I have dark colored dye, I can continue to create ikat patterns. In fact, I already have some ideas!). This latest project is for the sash wall hanging…a long-ish narrow warp which I am doubling so that I can wrap two layers at once and create a pattern repeat.
First some scratchings on paper….
That’s the basic pattern that will be repeated as a mirror reflection of itself length-wise. Other bits of pattern will be added later if all goes well. And here’s the warp extended on its frame and the start of the wrappings….so far, so good.
My plan to use autumn colors has changed. I would like to try two tones of blue. I love some of the Indonesian textiles I have seen where the ikat artisans tie a pattern and then dip the warp in indigo to create a pale shade of blue. Then they tie more patterns into the pale blue and dye the warp a much darker blue. The challenge is to see if I can adjust the blue dye I have with maybe some bits of black or grey to get the kind of blue I have in mind and then create a light and dark shade. Considering the fact that none of the colors I have used so far have turned out as I had envisioned, I am thinking that this plan is quite unlikely to succeed. I will have black dye on standby to cover up any mess! I haven’t had to resort to this Plan B yet. Fingers crossed.
And now I get to show you what my online weaving friends have been doing…
You may remember that last year I spent a weekend with some of my backstrap-loom-enthusiast friends during which we focused on preparing wide projects. Here is Ann last year making heddles after a day of planning and warping….
Aunt Lydia’s size 10 has some bold and beautiful colors and Ann combined them so nicely.
Ann has had time to finish this project during time spent at home. She noted that it took a year to get through the first half and only a week to finish the rest! She’ll be sewing the fabric into a bag. I know that Ann is really skilled at the sewing machine and that this will be something awesome.
Sally Backes has more than one band project on the go. This one is on her Windhaven Fiddle loom and she is creating a pattern from my More Andean Pebble Weave Patterns book. If you have studied either the Andean Pebble Weave method or the complementary-warp pick-up methods that I teach in my books, you will be able to weave the patterns in this pattern book. I love the red and white border arrangement that Sally has chosen.
Karen Rein chose flower and leaf motifs to decorate her first warp-faced double weave band. These motifs form part of the 11/12-thread set which are designed to fit on the first learning band. There are also sets with 15/16 threads and 19/20 threads. This was woven on an inkle loom using the instructions from my Warp-faced Double Weave on Inkle Looms book.
In the double weave book I recommend using a loom that gives you, as an absolute minimum, five inches of working space. That is the distance from the weaving line to the heddles. However, where there is a will there’s a way. My weaving friend, Kate, had to run some errands which involved some sitting about and waiting. She took this tiny loom along with her as it is the most portable one she has. Another online weaving friend of mine owns one of these and says it fits in her purse! There isn’t what I would call a comfortable amount of working room for doing pick-up on this loom, particularly not for double weave, but Kate made it work and wove the little llama figure from my book while she was out. This wasn’t Kate’s first double weave band. She wove the first one on a much larger inkle loom that gave her a much more comfortable amount of space in which to work. The little loom is adorable!
I am so pleased to see that Susi Saparautzki has got to the stage where she is comfortable weaving warp-faced double weave and has moved on to designing her own patterns. One of the things I have emphasized in the book is just how easy it is to do this. Susi created a motif with dolphins and I love the splash of background on which she has placed them.
Stacy Holder’s Andean Pebble Weave band is stunning. I often forget when I am planning my projects that one can use something other than white as the lighter of the two pattern colors. I love this combination. This pattern along with several other knot-work motifs is charted in the More Andean Pebble Weave Patterns book.
Wendy has been out backstrap weaving again with her clever self-contained set-up. For this band she has been using beautiful reeled silk from Bhutan as warp and supplementary weft in jewel colors and plans to make a wrist cuff…..
Vonnie Galusha’s first Andean Pebble Weave band was used as inspiration for members of the Sacramento Weavers and Spinners Guild in their recent news letter. Vonnie worked with my Andean Pebble Weave on Inkle Looms book.
And, finally, back to the backstrap loom. Here’s Jennifer Kwong’s set-up and first ever band in complementary-warp pick-up. It’s a beauty. We love her clever use of a crepe spatula as a sword. (Complementary-warp Pick-up book…also available in German).
That’s all for now. Mask up, if you can, and stay safe, please.