Backstrap Weaving – New Challenges

Laverne WaddingtonI guess I could say that I have a lot of experience with weaving warp-faced fabric on my backstrap loom. Years of practice have led to my having a certain consistent way of handling the weft, a certain amount of tension that I apply to the warp with my body and a certain beat (depending on the structure I am weaving). My weaving has settled.

Therefore, I can use a sample I wove a year ago to give me the reliable information I need for a new project in terms of the number of ends I must measure in order to achieve a certain width. This wasn’t so when I first started backstrap weaving when I would find that my weaving had dramatically changed within the space of a few months and that I couldn’t rely on old samples to give me the information I needed. My notes had to be constantly upated.

Sampling rep weave and various finishes for a larger project.
Sampling rep weave with various finishes for hemming before taking on the larger project.

I don’t depend on a wraps-per-inch type of calculation to tell me the width I can expect from a new yarn. Certainly, it would give me an idea, but there’s no getting away from the need to sample.

I can give an identical warp to eight weavers and each will weave a good warp-faced band of a different width to that woven by their companions. I can’t make a calculation for the yarn based on wraps-per-inch and then expect everyone’s band to turn out exactly the same. Some weavers have the warp threads rammed up tightly next to each other, others have them barely touching or with a hair’s width distance between. The weft will still be concealed and the resulting fabric will be warp-faced. The width achieved from one weaver to the next can vary considerably.

I tend to weave at the more relaxed end of the scale with my warp threads barely touching. The new challenge I am facing now is how to keep that sett consistent across the entire width of the warp when doing plain weave with fine cotton thread. This is what I am dealing with in my latest project.

Cotton from Guatemala.
One of the scarves I wove with cotton from Guatemala.

The other day, I uncovered some Guatemalan cotton in a basin on the shelf. I had dyed it from yellow to red a long time ago hoping I would get a nice deep tone similar to the dark-ish red I usually use in my wall hangings. It came out bright and happy rather than deep and somber. Oh well. It ended up on the shelf where I forgot about it and found some other yarn to use for my wall hanging.

After suddenly coming upon it, I see it with new eyes. Now I am in love with this shade of bright red and have decided to weave a square of cloth on which I can pose some of my small woven samples to show people.. It will make a nice bright splash of color on the table.

I took measurements from two warp-faced scarves that I had woven with this same cotton some time ago and figured that 1472 ends would give me 40 cm, or about 15 3/4″.  That width would sit well on my loom bars and I had several swords of just the right length for it.

The leaf pattern
One version of the leaf pattern.

If I wove this piece in un-patterned plain weave, I know that slight variations in the spacing of this fine thread would not be noticeable. If I had chosen to weave a single narrow column of supplementary-weft figures say, down the center, I doubt that spacing variations would have been an issue either.

Of course, I had to make things difficult for myself by choosing to weave repeated supplementary-weft figures all the way across the bottom. And this is where the variations, at least to my eye as I sit at the loom focusing on picking up tiny threads, become obvious. I am weaving a leaf pattern which I now like to think of as one of my ”signature” ones and I can see the variation in leaf dimensions, ranging from robust to slender, across the width of the warp. Well, I suppose that is the way leaves come in Nature and I shouldn’t let it bother me too much!

supplementary weft leaf patterns I had been aware of this potential problem from other supplementary-weft pieces I have woven with heavier thread and I did try my hardest to have all the threads spread evenly…dragging the point of my pick-up stick across the threads in attempt to have them settle in place as my teacher in Guatemala had done. I even unwove and started again when the leaves on the right were too narrow. I  shall have to seek out a Master and try to capture the secret of getting all those very fine threads evenly distributed. I long for such an opportunity.

What I have woven so far is the bottom border. Only the pattern of three leaves on the far right and left will continue in a column, waving to and fro, until I  finish with a band of leaves across the top to match the bottom. In the space within this border of pattern, I plan to weave scattered leaves.

It will be relatively easy going from here onward as I only have to pick up threads on the two edges. I LOVE sitting in a backstrap loom and using almost the full length of the loom bars. I love picking up those big swords and guiding them through the sheds. I love having to put a little ”oooomph” into opening sheds of fine sticky cotton and beating. I am having a really good time with this project!

As for the ikat circles project that I wrote about in my last post…well, I have created a very unusual looking laptop slip cover with the resulting fabric.

ikat circles backstrap weavingI have mentioned before the fact that when you do pick-up patterning within ikat shapes, you don’t get the delightful fuzzy outlines that are typical of ikat in plain weave. Because warp floats are involved, the outlines of the shapes are broken, disjointed and a little messy…not what I would call attractive. I got creative and decided to edge the shapes with tubular bands in order to cover the irregular outline.

Ikat in plain weave. The motif I created has fuzzy edges due to the shifting of the warp threads while the piece was being woven.
Ikat in plain weave. The motif I created has fuzzy, yet attractive, edges due to the shifting of the warp threads while the piece was being woven.

ikat circleThis is the second circle. Once I had decided that I would use the tubular band edging, I planned a pattern for the second circle that would match the pattern on the ñawi awapa tubular band. I wish I had thought about that for the first circle as well.

ikat circles with pick-up patteringI had to fold the cloth through one of the circles so that it would fit the laptop….let’s call that ”quirky”. Yep, it’s a pretty quirky computer sleeve. I wove and sewed another ñawi awapa tubular band to the sides and around the opening.

Lessons learned….

ikat circles1. I need to create elongated shapes when I apply the ikat tape if I am going to use a warp-float structure. That way, the shapes will contract while weaving to take on the correct proportions. You can see that the woven circles have come out flattened.

2. I should put a bit more thought into the construction of the final product before applying the ikat tape if I seriously want to use the fabric for something in particular rather than just have it as a sample. That way, the ikat shapes will appear in the right place on the fabric.

After all that black and white, let’s finish this post with a splash of color. I have pictures, courtesy of Dorinda and PAZA Bolivia, of my weaving teacher Maxima’s new aguayo. I showed you the ch’uspa she was weaving for her husband, the new Mayor of Huancarani in a previous post. Unfortunately, Dorinda hasn’t shown the finished ch’uspa on the website. That piece was woven in plain weave with embedded columns of figures in double weave.

The aguayo has columns of double weave as well as pebble weave.intenseconcentration
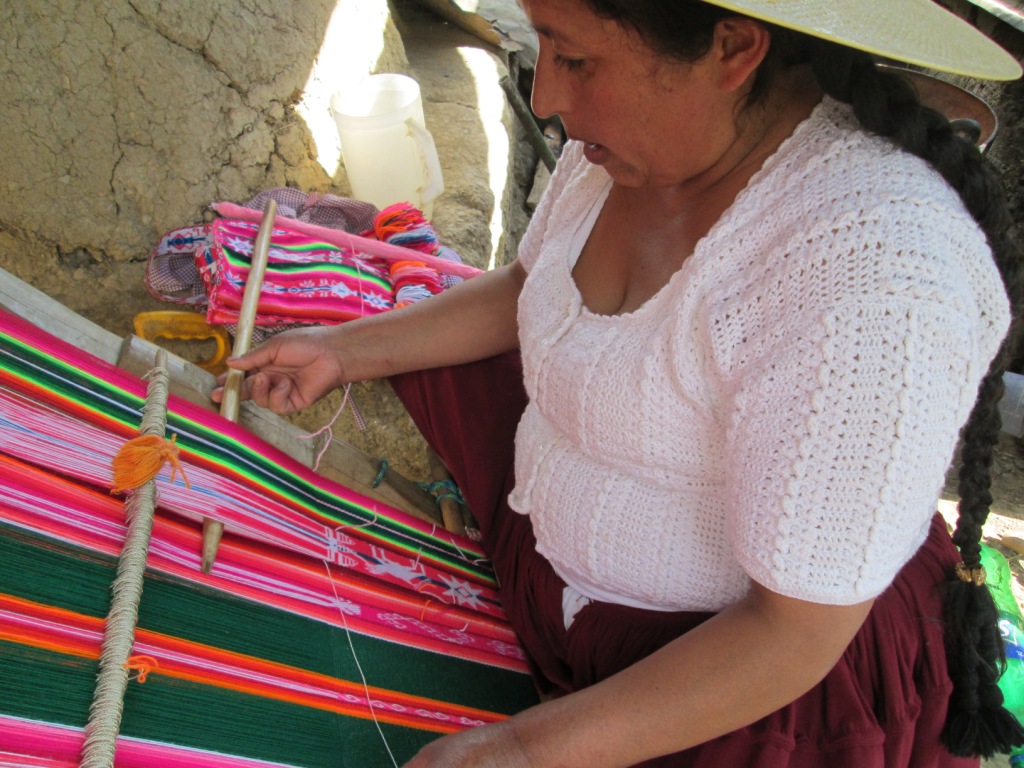
The aguayo is the large cloth which women drape over their shoulders and back and tie at their chest. It is used to wrap and carry their babies and any other bundle that needs to be transported. It is woven in two identical pieces which are usually joined together with decorative stitches. You can see the first finished piece on the ground next to Maxima while she busies herself with the second.

Dorinda writes on the PAZA blog that Maxima took 2 weeks to weave the first panel. Before the weaving could begin, she had to use her drop spindle to add twist to the store-bought yarn to make it strong and smooth enough for warp-faced weaving. She commented that the cheerful colors made the naturally-dyed handspun wool that she has been using in the cooperative look dull and boring. Then she took a break from the high concentration required for the double weave pick-up and wove a plain-weave poncho in only four days. I can understand that need for a break!
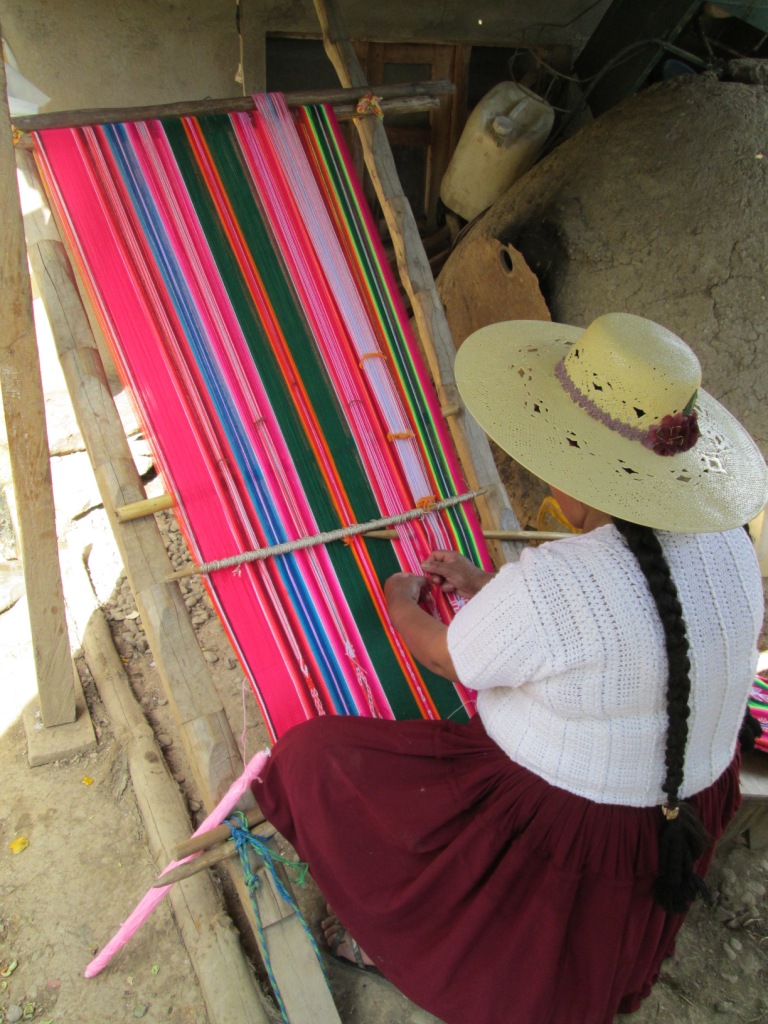
MaxThe weavers in this region of Bolivia use leaning vertical looms for large pieces. Narrow bands are typically woven on a body-tensioned loom sometimes using just an index finger and a toe as the warp beams!

aguayocompleteAfter the ”poncho break”, Maxima immediately warped up for the second aguayo panel. The two pieces have been joined with the colorful decorative stitches. It s not quite finished as Dorinda says that Maxima plans on adding a crocheted edging. Please do visit the PAZA blog to read more about Maxima and the spinners and weavers of the Cochabamba region of Boliva.

As I sit happily weaving what I hope will be a red square of a mere 16” x 16”, I have something to which I can aspire in Maxima’s incredible work. One day I would also like to weave two large identical panels and join them. New challenges. I somehow suspect that each one will take me longer than 2 weeks to complete.

Oh, and I am not done with the curved ikat shapes filled with pick-up patterns. I am just taking a break from it, as Maxima did with the poncho, to weave something completely different. 🙂


Backstrap Weaving – Forehead Slaps

handspun llama fiberI have a small zip lock bag full of left overs of my handpun llama fiber.

There’s less yarn in those balls than you might think as I remember having wound the thread around clay beads. What to do with them?

For me, combining them all into one project won’t work as I don’t feel I have enough dark colored thread to create a decent amount of contrast. Maybe I could darken some of the colors by over-dyeing with tea, or I could come up with some small projects to weave using just two or three colors.

And then I remembered the beautiful handwoven cuffs I had seen on the Peruvian Connection website…

peruvian connections

Aren’t these gorgeous?! When I first saw these pictures I longed to try making a cuff with my own handpsun and edging it with a tubular band. Then I got distracted and carried away with other projects. I did make cuffs in the end…several of them, in fact…but in silk without tubular edgings.

Now I could finally get around to trying this with my handspun. The reason I was looking for small projects like these is that I really needed frequent breaks from tying plastic strips around warp threads for my latest ikat experiment. I like to be able to weave every day. Even taking a whole day off from warp tying was most welcome…talk about tedious! So, it was very nice to be able to take a break and pick up a small project and weave away.

cuff with handspun yarnHere’s the second cuff I made which is the one with which I am most pleased. I used the Tinkipaya star pattern that I recently used on a wool bag project.

handspun cuffs and wool bagThat’s the first one I made on the right. It’s a little rough and I wish I had put more thought into the layout. The pick-up pattern in the center would have looked better if it hadn’t been bordered by red, I think. I guess I wasn’t very confident about it being a success and was a little careless as a result. Both are edged with tubular bands. The red one has an X and O pattern that I saw being used for a tubular band by a weaver in Pitumarca, Peru. The other has the eye pattern that I learned in Chinchero, Peru.

I didn’t manage to make any sweet yarn buttons like the Peruvian weavers have in their beautiful cuffs. I used buttons made from tagua nut that I had bought in Ecuador many years ago.

tagua nut buttonsOne end of the cuffs that I wove is a selvedge and the other end is raw. I turned the raw edge over, sewed it down and then stiffened it with diluted white glue. This enabled me to then securely apply the tubular edging. I wove and sewed it to the edge at the same time.

The tubular band does a pretty good job of covering that turned edge. As always with these tubular bands, you can start with a selvedge but then have to get creative with the finish where you are left with a bunch of unwoven warp ends to somehow hide away. When edging a bag, this is easy. All sorts of things can be hidden on the inside of a bag. You can see the place where the end of the tubular band meets the beginning in the picture above. Like I said, you just have to get creative. If you can’t see it, that means that I did a pretty good job ;-).

Of course, I had already woven three cuffs before I realized that it would have been wise to position and hide the join in the tubular band under the button! Forehead Slap #1.

tinkipaya design cuffA braid at one end of the cuff loops over the button to secure it around my wrist.

3 cuffs from handspunI made three and each is edged with a different tubular band. The third has the Chauaytire style of tubular edging. The pattern does not show up so well due to the lack of strong contrast in the colors.

The third one has a pattern that I adapted from a belt made by the Tarahumara weavers of Mexico.

3 cuffs with handspun yarnSo, the cuff weaving was a welcome distraction that got me through the tiresome process of applying ikat ties on my larger project. I have seen pictures of young ladies in Uzbekistan seated around a horizontal frame and tying bundles of warp together for ikat. It could be fun as a group activity. It doesn’t really require concentration if the design has been already marked on the warp threads.

ikat circlesI had originally intended having four circles on this warp….two on the front of what will hopefully be a slip cover for my laptop and two on the back. But, after two, I was done! I am still in the experimental stage and I figured I could learn plenty from just two circles…and indeed, I did. I already have new strategies planned for the next attempt.

ikat circle filled with pick-up patternOne of the big lessons…Forehead Slap #2…is that the original tied shape will contract considerably lengthwise if it is being filled with patterning. So, I have a squat circle underway. You can see my original cardboard template on the floor nearby. I hadn’t even noticed this happening when I wove the block-like patterns in my Bird ikat project. However, I don’t mind this squat circle too much.

But, one of the best things I learned this week was the value of having time to let my mind wander freely. This is probably why I seem to solve all my weaving problems when in the shower! When traveling, I have plenty of time to do that…all the airport waiting time and bus trips give me lots of opportunities to let my mind wander and I get my best ideas that way. Once I am home, I spend all my time implementing those ideas, very focused and concentrating on pick-up patterns….a wandering mind leads to mistakes.  All the time I spent standing at the ikat frame and a few hours spent sitting at the doctor’s office this week (where I was surprised to find that I was the only one without an electronic device) have allowed my wandering mind to bring me a whole new set of fresh ideas.

I am going to leave you this week with a couple of videos. The first is a 14-year old Peruvian girl singing Michael Jackson’s The Way You Make Me Feel in Quechua. I love it! This was produced as an effort to promote young people’s pride in their native Quechua language. A word of warning…I have had this song in my head for the last three days.

This second video was produced in Argentina and the song is about Doña Ubenza who, according to this web page, is a shepherdess who spins while she tends her grazing sheep. Inspired by the spinning and sheep, the producer applies the fiber theme to stop motion animation with felt figures to tell the story. It is adorable as is the song itself. Unfortunately, Doña Ubenza is not spinning in the video but you can see here there with her sheep.

ENJOY!


Backstrap Weaving – Sunrise, Sunset

Do you know the song ”Sunrise, Sunset” from ”Fiddler on the Roof”? I have had that in my head for a couple of weeks as the hours and days fly by, I travel from place to place and winter becomes spring before my eyes..

From Florida sunrises ro Pennsylvania sunsets and a whole lot of activity in between…

Sunrise at the Florida Tropical Weavers Conference
The ast rays of the setting sun over the creek at The Mannings Handweaving Studio in Pennsylvania.
The last rays of the setting sun over the creek at The Mannings  in Pennsylvania.

Sunrise, Sunset. This is the name of one of the songs that we sang gathered around the table while David played the guitar at the Passover Seder in which I participated at my friend Claudia’s home in Maryland.

10471195_10206350602506701_1973694388140159785_nThat was one of my stops on my way to my current ”home” in Pennsylvania. The journey took me to New York,  Ohio and Delaware.

I attended the monthly gathering of the guild in Wilmington in what is the prettiest meeting venue I have come across so far…Greenbank Mill. As we drove by, I was just about to ask Carol if we could stop to take a picture of the mill and its wheel and then I realised that this was the meeting spot and I would have all day to enjoy and explore it. It was a short stay in Wilmington and I left with images and stories of Dupont, grain and textile mills and lively, gushing, cascading creeks and a desire to return and see more.

greenbank millInside Greenbank Mill along with all the preserved mill equipment – stones, wheels, cogs – a hefty post surrounded by plenty of open space allowed us to hitch up our backstrap warps and stretch out like wheel spokes.

???????????????????????????????A visit to the Hagley Museum the previous day brought us to an unexpected sort of ”yarn bombing” of the entry gates…

yarn bombing Hagley Museum

In Ohio, at Tracy’s home, I knew I had come to the right place when I saw this…

???????????????????????????????Tracy’s warp weighted loom stands like a work of art in her living room along with the Tonkinese cousin of my own cat back in Bolivia.

warp weighted loomI got to throw a couple of shots of weft, just enough to see how to operate the the two sheds. I realised pretty quickly what hard work it is on the shoulders to be standing and reaching up to pass the weft and beat with an upward motion.

We wove together at the Canfield Fair Grounds, home of the largest county fair in the US. I have never been able to plan my visits to coincide with a county fair in the US and would love to go to one.

Tracy and Marjorie had woven with me a couple of years ago. They worked on their own projects while the rest of the ladies tackled simpler projects.

??????????????????????????????????????????????????????????????Tracy had bought some Harrisville Highland wool on that trip to The Mannings and had saved it for a backstrap. The red and green are the Harrisville Highland wool (the kind that is sold washed in skeins rather than on cones). The grey is a mystery  wool which is slightly heavier than the other two. It gave Tracy’s Andean Pebble Weave design a nice three-dimensional look. This wool was really fabulous….not at all sticky…a real pleasure to work with. Tracy is using it here to weave a backstrap. It’s the perfect weight for that. She chose a pattern from my second book.

???????????????????????????????Marjorie went to the other end of the yarn weight spectrum with a very fine alpaca yarn that she bought on giant cones on one of her trips to Cusco. This is not what I would call easy yarn to work with and I have all my fingers crossed for the success of this project. She also worked on a backstrap using Plymouth Yarn Fantasy Naturale mercerized cotton but, at the same time, was curious to see how the alpaca behaved.

Marjorie also brought in this marvelous llama bone tool that she had acquired in her travels in Peru. I have never seen a carved one like this….how beautiful!

???????????????????????????????Here’s Tracy’s backstrap off the loom, braided and finished…

???????????????????????????????In the evenings, I had tatting lessons with Tracy and I got the chance to be a student,  which is always a useful experience. I would be going along with a nice rhythm convinced that I had it all down and then suddenly completely lose the plot and create an ugly string of knots instead of hitches.

My friend Vonnie in Sacramento had also taught me to tatt but Tracy showed me a different way to hold and manage the shuttle which doesn’t require the ”flip”. It is is less elegant but it is nice to have options. I was sent off with a couple of shuttles and thread. I hope to go back to Ohio some time and learn bobbin lace with Tracy. Those of you who are into lace will probably already know Tracy in her former business as The Lace Maker. She was even at Convergence in 2010 in Albuquerque as a vendor when I was there. I had been attracted to her stand because of the small warp-weighted loom she had on display but we didn’t meet.

In fact, Tracy’s home was a showcase of all the fiber activities and techniques in which she has been involved. I enjoyed the opportunity to learn a bit about the Theo Moorman technique from the runner on her dining table. You all know that I am a big fan of supplemental weft…

??????????????????????????????????????????????????????????????I’m hoping that she will feel confident enough and find the time to use the handspun and naturally dyed yarn that she got when she attended the Tinkuy in 2010 in Cusco.

Yes, we were both there in 2010 and had a brief encounter. It’s about time we spent some more time together.

She has a large supply of the handspun dyed yarn in her plastic hamper as both she and her boyfriend took the natural dye workshop at the Tinkuy and I know that she will do something spectacular with it.

Hands have been busy and continue to be so as I move along from place to place. It is always great to hear from people as I move on and find that they have been working at their warps.

Here are some shots of busy hands at the loom. This first picture was taken by Sara Norine James at the Florida Tropical Weavers Conference and shows Berna expertly working the two sets of string heddles to open a shed on her Andean Pebble Weave warp…

berna FTWG by Sara Norine James

???????????????????????????????It was nice to meet Facebook friend, Alison, who came down from Ontario, Canada to weave with me. She wove the leaf pattern and then continued on her own to weave it as a negative image. In the picture you can see her busy hands selecting threads under which to pass her supplemental weft. Alison has been weaving using my books in her home in Canada and has made some lovely Andean Pebble Weave pieces….

???????????????????????????????And whose hands are these? Well, those are mine with the silk Andean Pebble Weave cuff on wrist.

Laverne at the ManningsAnd now….no hands…not even any arms!

Laverne in huipilWe guessed that this must be a child’s huipil. I just managed to get my head through the opening but there was no way my arms would pass through those armholes. Yet the piece is so big! All that purple and green work is embroidered. Amazing.

Kristen got herself set up with a pillow case as an improvised backstrap. She said that she was challenging herself to let go of the pattern chart by guessing what came next in the pattern by reading the cloth and then confirming by looking at the chart before passing the weft. Her cat helped, as cats like to do, by lying on the chart.

kristenHere’s Sarah, amongst the looms and spnning wheels, using hands and head to figure out the next step in the process…

???????????????????????????????I have a whole week staying here at the Mannings. You can be sure that there is no shortage of things to do and see when you are practically living in a yarn store. Linda and Carol dropped by on Tuesday to weave with me. Linda had read both my books cover to cover without touching a piece of yarn. Yet, she had somehow absorbed the technique and I needed to just to give her a little guidance before she was underway weaving lovely Andean Pebble Weave patterns. I figure that she must have amazing powers of visualization.

???????????????????????????????Here she is preparing her warp with its second set of heddles.

???????????????????????????????Carol came with something completely different in mind. She had been given an ikat warp from Guatemala. The warp had been wrapped and dyed and was ready to go on a floor loom. Carol wanted to weave it on a backstrap loom. She had put a similar warp on her floor loom and woven it as a balanced plain weave cloth creating a mobius shawl. Although the threads shifted more than she probably would have liked, I think that the finished piece is lovely. I hesitated over posting a picture of her shawl as my picture really does not do it justice.

??????????????????????

Carol is no stranger to ikat having studied weft ikat in Thailand and bringing home her dyed thread to weave stunningly fine cloth on her floor loom. She came  on Tuesday with the idea of putting the Guatemalan warp on a backstrap loom and weaving it into a warp-faced piece of fabric. We spent a great part of the day getting it sorted onto loom bars as it had somehow become almost hopelessly tangled. Here’s Linda holding one end of the warp while Linda and I try to straighten things out. The original warp was multi-colored and the several colors were bundled and wrapped together to create the motifs.

???????????????????????????????

???????????????????????????????Now it’s starting to look like something but there is still a long long way to go and with each handling those threads are shifting.

???????????????????????????????Carol has just inserted the cross sticks. That horizontal line at the start will be helpful but it remains to be seen if the upper layer and lower are well aligned. There are many many string heddles to be made before weaving can begin.

On other days, I decided to work on a ”three-fer”, that is, one project with three purposes. I wanted to get my hand back in with a Bolivian embellishment technique that I call the ”coil stitch”. This project would give me practice in something that I am not doing all that often, provide an additional technique sample, as well as a little slip case for my new iPod. One of my online studnets who has become a dear friend, along with her husband, gave me this iPod. I have never owned one before and am thrilled.

Bolivian embellishment coil stitchesYou can see some of the handwoven fabric made from naturally dyed handspun yarn that I use as technique samples. I had a small leftover piece that was just the right size for the iPod. I have started by edging it with coil stitches and will dress it up with all kinds of doo-dads. I love doing that and it gives me practice in the various techniques. Next, I’ll make a pouch for the charger and cable using the fabric with the cochineal tones that you can see above.

bolivian embellishments coil stitchesI am using Cascade 220 superwash yarn for the sewing and the colors match so well. It’s a fun little project which mostly keeps me out of the yarn store where there are too many lovely things to buy.

???????????????????????????????I have one more fun thing to show you.

I was persuaded to buy new sneakers and got a kick out of the laces on the ones I chose which have a classic little inkle weaving pattern which matches the strap on my own woven handbag.

Now I will be able to hike some light trails when I am invited. Hiking was such a huge part of my past and I miss it.


I will leave you with a shot of the sun casting its golden glow at The Mannings. Another day ends and I enjoy my time in this lovely peaceful place before I start bouncing again across the country

??????????????????????


.


Backstrap Weaving – Tying Up Loose Ends

It will be just a short post this week as I tie up loose ends on projects and get ready to travel.

unfinushed projects backstrap weavingThere are buttons to be sewn on cuffs, warp-ends to be braided on key fobs, books to be glued and weaving to be finished. I need to break down the two extra weaving stations that sprouted and grew during this latest homestay of mine…the ones in the living room and kitchen… which were needed for keeping up with  a weave-along while I worked on my usual large projects in the bedroom. I must clear away the various project piles with their balls of yarn, books with colored fingers of protruding Post-it notes, sketches and pattern charts so that all can be covered and kept dust-free in my absence.

The first thing I attacked was the journal-cover project. Once the weaving was done, the scary part, which involved gluing the cloth to the book covers, had to be faced. Fortunately, I had one rejected book cover piece which served as test fabric for the glue. You can see the rejected piece in the upper corner of the picture above. Would the glue soak through the cloth and appear as an ugly stain on the upper face? It didn’t! Now I can add a zipper to that test piece and turn it into a little pouch.

inside cvers of journals with backstrap weavingYou can see how I turned the end of the weaving over to the inside of the covers. The piece of cloth in the picture is still on the metal rod which I used to create a selvedge. I glued the fabric there and then used colored paper to completely cover the inside. Precisely positioning that colored paper while using a contact glue was probably the hardest part of the whole process. I also used a line of glue along the point where the book cover bends to open.

initials woven into spine of journalsI bought another journal and made a fourth cover. You can see the recipients’ initials on the spines. It is fun discovering that you can make recognizable letters with so few threads in such little space.

Here’s the fourth one set up and ready to go. I love seeing a fresh warp like this stretched out in front of me.

backstrap loom with two shed set up and coil rodI used a motif inspired by Guaraní textiles with snakes and a star…

backstrap weaving woven journal coversThen I settled into finishing the third panel in the Bird series with its ikat bird shapes filled in with three-color pebble weave. That was followed by a rather tedious session of sewing black on black as I lined the irregular edges of the ikat shapes with cross-knit looping…

ikat bird shapes filled with pick-upThese panels really fall into the category of ”samples” as I used them to learn much about tying warps for ikat. In the first panel, the dye leaked a lot under the ties, staining the threads within, which gave a surprisingly attractive softened look to the motif, especially around the edges, once the pick-up patterning had been finished. In the third panel, my tying skills had improved and the ikat shape had crisp, sharp outlines with the white threads within the ties completely untouched by dye. The bird shape in the third panel is brilliantly white as a result and leaves me wondering in the end which ”look” I actually prefer.

ikat bird shapes filled with pebble weave backstrap weavingWth this experience behind me, I shall have a lot of time in my travels to ponder the next ikat project that I want to start on my return. The aim has always been to create flowing curved shapes in ikat rather than the rigid block-like ones in the Bird samples. I want to fill beautiful curved shapes with pick-up patterns. I have two such shapes in mind and I will, no doubt, stumble across something while I am away that will inspire a third.

As you can see, the three panels above are still on their looms. So, I am not completely finished with this project. I have yet to decide how exactly I want to finish them in terms of weft twining, fringe or braids. Should I introduce some red in the first two panels? I will launch myself into that when I return.


Backstrap Weaving – Rewards

??????????????????????It is a fine comfortable feeling I have when I am  weaving away without challenging myself….I have the warping, set-up, heddle-making and loom operation all under control. I have not had to ditch a warp because of a ”fail”in any of these areas in a long, long time. I guess I am quite at home for the most part with creating motifs and charting patterns too.

But, throw in a little color challenge, I lose control and everything changes!

One of my personal challenges during the key fob WAL that we have been running on Ravelry this week was to take a bag of odds and ends of 3/2 perle cotton and put together some color combinations in plain weave…combinations that are not exactly natural for me. Yes, I am color-challenged. I had one result that I would call successful, the one pictured at left, one with which I am ”kind of” pleased and three ”fails”in the trash. It is funny how three colors that looked great together on their balls looked awful when warped up.

Luckily, only tiny amounts of yarn were involved. There was no point in trying to salvage them. I like burying failed projects deep in the trash and then immediately pretending that they never happened….clean slate.

I can understand the way that fellow weavers in the WAL feel when they have had to trash their projects too….things get tangled, sticks fall out, warps slip off bars before they can be lashed, crosses get lost. Throw that teeny tiny warp away, take a deep breath and start afresh.

plain weave backstrap weavingThat’s a five-strand braid at the end of my successful band. One of my students taught it to me and I love it. She had looked at me in horror when I had suggested finishing her band with lots of tiny four-strand round braids, my favorite braid for warp ends. She quickly grabbed all the ends and made this one fat attractive braid and then taught it to me. The looseness of this braid may not make it the best choice for a fob that will spend a lot of its life at the bottom of a handbag as the threads will most likely get snagged on things. This fob will hold one of my spare keys and will hang safely from a hook in my kitchen.There’s a tutorial for this five-strand flat braid here on my blog.

Sometimes it is good to be reminded of the process involved with setting up and weaving a plain-weave band on a simple body-tensioned loom. Here are a few process pictures…

This is the warping board I have been using….

???????????????????????????????It was built for me when I first moved up to Bolivia from Chile in 1998 and this is the first time I am using it. It is really quite awful. Of the ten embedded stakes, only four don’t wobble. Of the four sturdy ones, none stand perfectly straight. The whole thing weighs a ton. I would never consider warping all the way up the stakes as the difference in the length of the warp from start to finish would be noticeable due to the leaning stakes. However, I figured that with these very narrow warps we are creating for keyfobs, I could get away with using it as long as I kept my warp turns low down on the stakes. It has worked well, so I guess it is not so awful after all.

wal 3You can see the warp as it comes off the warping board with cross sticks in place. I attached it to my loom bar, and attached the other end to an S hook lashed to my bed. With the warp under tension, I made continuous string heddles around the ends on the near side of the cross and installed a shed loop around all the ends on the far side of the cross. In the last picture you see the warp all dressed up and ready to go.

Here’s a mini warping board that my friend Ruth made. She can dismantle it, throw it in a bag and to take it to weaving get-togethers in other people’s homes.

ruth's mini warping boardShe gave us some instructions and tips for making and using it….

To make one, get a piece of wood about the size of a furring strip—what I had is about 1/2 inch thick by just under 2″ wide, and a dowel at least 1/4″ in diameter, and make sure you have an Xacto or other carving knife to cut and trim the doweling. a sanding tool and a little bit of glue are all you need besides.

I recommend using the same size drill bit as the diameter of your doweling; you can wiggle the drill around a little bit in the hole to give yourself a little ease, without making it too loose.

ruths warping board 1Eyeballing all measures, I cut the board to the size I wanted (you may vary the length you want by how large is your usual carry-bag) plus two more little pieces to glue onto the ends; drilled holes to seat the pegs in for carrying, and the four holes for the pegs to friction-fit into for use. Here’s where you want to make sure your holes fit Just Right — you don’t want your pegs to lean inward at all when they’re under the tension that simple warping will put them under. If you’re unsure of your ability to drill vertically, use a drill press or a jig that ensures your drill bit is perpendicular to the wood in all ways.

ruths warping board 2You can hold the stick in your hand or set it on a table while winding your warp, which is ideal for travel use: you don’t need clamps for this part. 

Make sure you pick it up by the base when you go to finalize your warp set-up and make your string heddles, or no matter how splendidly wedged a post you pick it up by, it will pop out. If (ha. when) this happens, you can pick up your cross again from the nearest peg, and all is well.

Have fun practicing with many small warps!

Apart from the occasional color failures, I have been finding weaving these fobs lots of fun and really relaxing. I have been using them as little breaks and rewards while I slog away at my large project. My large projects are usually fun and relaxing too and the weaving is all the reward I need, but the current one went wrong and I had to unweave three days of work. I needed some little rewards to get over that!

Guatemalan natural dyed cottonHere is the fine Guatemalan cotton that I have been wanting to sample. This key fob WAL seemed like a fun way to do that. Cindy and I had bought this thread at ANWG in 2013. She bought a bag of the blue and I got the gold and we shared it. The tiny ball is the 60/2 silk that I have been using as supplementary weft.

Here’s the first fob in a set of process pictures…

wal 1

???????????????????????????????– Set up on the loom bar. I am using a fine steel knitting needle lashed to loom bar with cable ties which enables me to create a third selvedge.

– Removed from the loom bar and with the weft tail ready. I will thread that tail on a sewing needle, remove the steel knitting needle and, using the sewing needle, fill the space it occupied with the weft.

– Needle removed and space filled.

– The end of the band is fed through the ring and folded.

– The back of the band with the third selvedge that will be sewn down.

In the meantime, Julia has been using the WAL to try out some Maypole 3-ply worsted wool (before you Google that, let me tell you that, alas, the stuff has been discontinued) and some 5/2 perle cotton. We all think that the chocolate and melon together look fabulous. I like her use of the weft twining at the ends of her bands.

julia collageJanet  has been using her gorgeous handspun. She only uses natural dyes now and but still has some yarn in her stash of handspun that she colored with synthetic dyes.

janet collageThe yarn in the upper bands is Perendale lamb dyed with cochineal and walnut husks. The lower one is natural alpaca and dyed kid mohair.

JoAnne made the wee viscacha motif in Andean Pebble Weave using 5/2 perle cotton…

joanne collageLinda made three bands using stripes and tiny horizontal bars all with nice third selvedges. Joyful had me looking for the the beads I bought while in the US last spring when I saw the way she had used beads in her band. Our other Julia used the more traditional lashing method to attach her warp to her dowel and create the third selvedge. I love this combination of stripes and horizontal bars.

linda joyful juliaHere’s more handspun, this time from from Erin who actually made these fobs with Andean pick-up patterns before the WAL for an exchange amongst her weaving friends. She’ll be joining us to learn and practice some new techniques with cotton before trying them with her lovely wool yarn. She uses natural dyes.

ErinBetsy just started an Andean Pebble Weave fob with her handspun today and I will show you that next week when she has made a bit more progress, Each person’s handspun yarn has quite a different look and Betsy’s looks beautifully soft.

I am back on track with my current large project after all that unweaving. It is the third panel in my ”bird” project. This panel will have bird shapes in ikat filled in with Andean Pebble Weave motifs in three colors. I have decided to make one bird red and black and the other white and black rather than mix all three colors in each bird. I think it would be a bit too busy that way. Besides, it is quite a fiddly technique that I haven’t used all that often and I want to keep things simple while I get back into it.

???????????????????????????????What I am most pleased about so far is the ikat. I did some things differently this time and the ikat came out so very well even on the long sections. And the best part is that I know it wasn’t random and due to luck this time. There was only one tiny leak as wide as a pencil line. It feels like a nice reward for all the time spent experimenting.

And now you are going to want to slap me because I am about to complain….I kind of miss the seepage! My ikat shape is sharp and clean and in-your-face. While I am very pleased with having gained control over the leaks, I think I actually prefer that fade-in-fade-out look when the dye seeps in at the edges of the motif. Anyway, I feel prepared to go on to large circles and other curved shapes now and securely wrap long areas….yay.

Unweaving three days of work might sound like a lot of unweaving, but when you are doing pick-up it sometimes doesn’t represent a lot in terms of inches. I think I have mentioned here before that one of my weaving teachers here told me that weaving the distance of four fingers is what she would consider a good day’s work.

I spent breaks from this larger project working on the key fobs. I have been loving using the fine Guatemalan cotton with the silk supplementary weft and it is always fun to throw in work with 3/2 perle cotton and play with stripes. I have all my fob ”tools” sitting to one side ready to grab when I feel like I want to warp up for a wee fob…

???????????????????????????????…pick-up stick (optional for supplementary-weft inlay), sword/beater, pencils for cross sticks, heddle stick, coil rod (optional…I use it to eliminate ridging in plain weave) far loom bar (optional… string through the warp ends can be looped over an S hook or over a big toe!) near loom bar with cable ties…the steel needle slips under the ties. The steel needle is also optional and my use of one is not traditional. If you would like to see how a weaver from the Bolivian highlands lashes her warp to her loom bar take a look at the video on the right hand side of this webpage.

I have been using motifs that I wove into a ”Four Seasons” wool project some time ago. It’s been interesting seeing how my charted motifs look in this very fine cotton. It seemed fitting to weave that snow flake even in the middle of summer down here. Julia showed us snowy scenes from the window of her Pennsylvania home.

???????????????????????????????Linda gave me a great reminder of how luscious a bold solid color can look in warp-faced plain weave. She has been weaving her fobs using a pillowcase as a backstrap and decided it was about time she had a woven one.linda backstrap

She used a cotton yarn that I had never heard of …Luisa Harding’s Jesse…and it really looks beautiful. I will get to meet Linda this spring and will have a chance to look at this up close. Now I have the urge to make a whole bunch of fobs in bold bright solid colors like this! Maybe some of my wee balls of 3/2 perle cotton will do the trick. Beads, solid colors, handspun..I have been rewarded with lots and ideas and motivation in just one week of WAL.

??????????????????????