I traveled and now I’m back home trying to get my sleeping patterns back in order. I’ve found after all the trips away that I have done that one of the best ways to ease the effects of jet lag is to hit the ground running on my return. In the days when I was teaching English here at the Centro Boliviano Americano, I would arrive back from a trip to Australia and be back in the classroom the next day. I seemed to shake off the effects of jet lag so easily that way. If I come home and am just faced with cleaning, laundry, grocery shopping and a pile of yarn, it’s way too easy to give into the temptation to lay everything down and go take a nap. That doesn’t help at all with getting back to normal sleep patterns.
So, where did I go?
Arriving in Sydney in the early morning, I had hours to kill before my afternoon train up north. I put my luggage into storage at Central Station and went down to the harbor on what was an absolutely glorious day.
My gosh it was crowded down there. Was this the mass tourism that I had been hearing about? Not quite. I eventually realized that people were coming to witness the 50th birthday celebration day for the Sydney Opera House. Crowds were gathering for the day’s events.
Flying into Sydney at day break reminded me of the colors I had chosen for my woven piece named Sunrise, Sunset.
Now I’m back in Bolivia and have hit the ground running as far as my fiber-y pursuits go….not so much as far as cleaning and laundry go, though. Has it helped with the jet lag…..hmmmm, maybe just a little bit.
I had taken some cotton fabric away with me so that I could keep busy during any down time stitching for a shibori project. If you’ve read my most recent posts, you’ll know that I have plans to create another expandable folder just like this one that I just finished…
My expandable folder project has a woven wool cover with three-color patterning.It holds my various styles of blank pattern charts.
I used some fabric that I happened to have to line the cover and make the expandable sides.
I’m planning to use my stitched shibori fabric to line the cover and make the sides on this second folder project. I chose a simple leaf pattern to suit my beginner skill level. I’ve only made a few small stitched shibori experiments so far which I’ve used to line some of my woven bags.
At this stage, all the leaf shapes have been stitched and I am pulling and tying off the threads to prepare the cloth for dyeing. The folds of cloth in the tightly gathered areas will mostly resist the dye. I completed this task and took the piece home ready to go into the dye pot.
Sleep was denied me the first couple of nights. That along with the fact that day time temperatures have been outrageously and unseasonably high (and I don’t have air conditioning), had me dyeing the cloth in the wee hours and attempting to remove the stitches.That was the only time that I could bear to use the stove.It was lovely sitting and working on it in the quiet and relative coolness of 3am.
I’d used stronger thread than in my previous projects and removing it was quite a challenge. I was amazed at how different the two faces of the cloth looked. The photo above shows a soft image while the other face, below, has much bolder lines and higher contrast.
I’ll probably use one face for the lining and the other for the sides because I simply can’t decide which face I prefer.
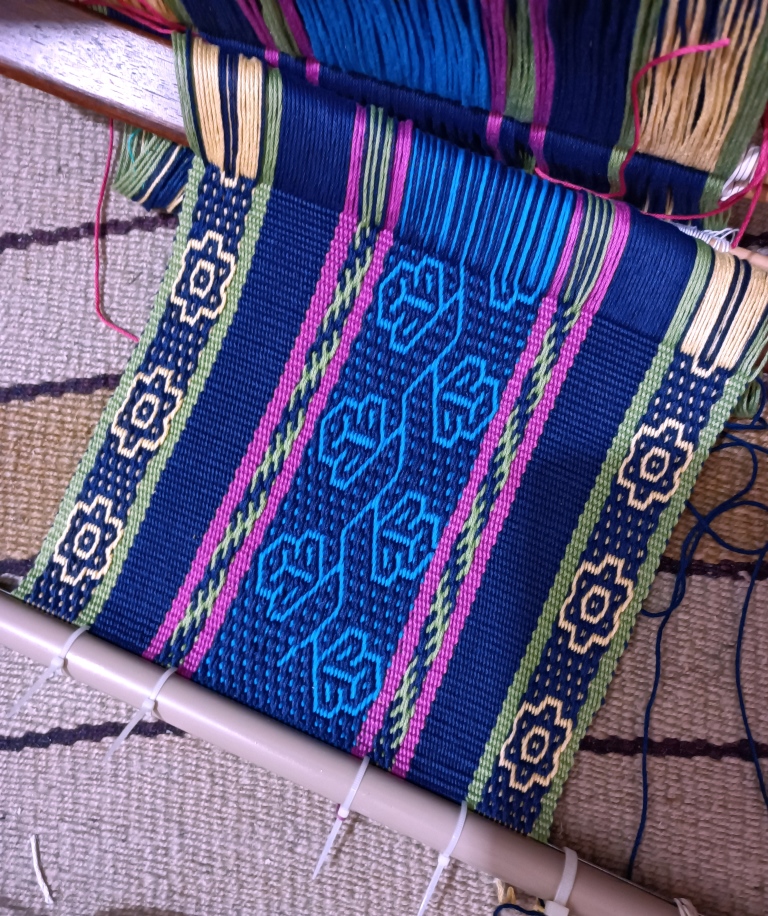
I’d created a new pattern for the three-color weave I was planning to use for the cover of the new folder. I was once again going to use the wool singles that I’d got from the farmer in California. I dyed two blues to use alongside the natural grey. I think the pattern I drew for the structure that I call Andean Pebble Weave was born from having spent some time looking at textiles and basketry from Borneo and Sulawesi.
I made all the necessary calculations and wound the warp leaving it ready to be picked up when I returned from my trip.
This was what was waiting for my return so that I could hit the ground running. I’d separated the threads onto two sticks for the two sets of heddles and left the heddle making itself as the task that would get me straight back into the groove on my return.
Weaving with these wool singles is all about gently taming a hairy squiggly beast. I’d barely got into it when I broke a warp thread. This was a convenient reminder of just how careful I needed to be.
I got some smart and wonderfully thin black cable ties while in Australia for my unconventional way of lashing my warp to the beam.
Approaching halfway and rolling up the woven cloth around beams and paper.
Woo hoo!….past halfway and time to reverse the pattern. No more broken threads.I’m really pleased with the new pattern I created.
I’ll construct the folder in the same way I did the other. The cover will be three woven panels that I join with a decorative stitch. I had requests from a few people to explain how I put the folder together. Hopefully, I’ll remember to take pictures of the process this time so that I can write a blog post about it and show you.
Before I leave, I’d like to invite you to visit the PAZA Bolivia blog that my friend Dorinda Dutcher writes about the work of my weaving teacher Maxima and the other ladies in the co-op in the central Bolivian highlands. There are exciting plans to perhaps introduce the ladies to indigo-dyeing techniques and I can’t wait to see how the weavers combine it with their current gorgeous range of natural colors.
My favorite Bolivian weaving teacher, Maxima, stands here on the left with one of her daughters and a granddaughter…..three generations of weavers! Her granddaughter proudly shows her first ever weaving that has been accepted for sale by the co-op of weavers in her community. It was woven on the traditional leaning frame loom using handspun and naturally dyed wool. Dorinda, who works with these ladies to transport and help sell the products made from this beautiful cloth, has just written a blog post showing all that she has available to ship now from the USA (until Dec 6) if you are looking for Christmas gifts.
Another reason to direct you to the PAZA blog, is to make you aware of the woven products that the ladies offer via the co-op especially now that Christmas is approaching. I do hope that you will consider making a purchase to support them. Dorinda’s latest blog post shows what she has available in the US to ship until December 6 (after which she will be traveling and unable to process orders). Dorinda fills the blog with personal stories and photos of the weavers’ rural lives and is well worth a read even if you aren’t in the market for a beautiful piece of handweaving. Here’s the link again.
Until next time when I’ll hopefully have a finished folder to show you…..
I wonder what colors spring to mind when you think of winter…blues, greys, winter white? As I sit here in shorts and a tank top, I have to remind myself that it’s actually winter here in the tropical lowland part of Bolivia in which I live. It’s the same in the fall when flowers are still blooming and the city is alive with the bright colors and fragrances that are usually associated with spring. It’s easy to forget that the leaves in the fall season in other places are turning all sorts of stunning colors.
I was lucky to have been visiting my friend Lausanne in Vermont one year around the Columbus Day weekend.
One sign for me that the seasons have changed is when the rays from the low winter sun find their way through my bedroom window to fall softly across my work at my backstrap loom. At other times of year, my windows ae blacked out to keep out the heat.
I guess all this has been on my mind lately because I am in the midst of a long move back to Australia to a place that has four very distinct seasons. It will be a little too cold in winter for my liking but hey, I lived at the southern-most tip of the South American mainland for five years and spent eleven seasons living in ski resorts. I’m no stranger to cold…just getting fussy in my old age! I do look forward to the more classic fall colors but I’ve heard that the winters can be grey and foggy. The locals like to call that mountain mist “the champagne air”.
So, what are winter colors here in Santa Cruz?…all the bright colors of tropical fruits and flowers.
I love going out for a late afternoon stroll and coming home with these little tastes of sunshine. Pineapple and papaya vendors selling slices are scattered about the street markets ready to skin, de-seed and chop just the right amount for you.
And in keeping with that, I’ve had some quite bright colors on my loom lately. As you know, I am only working with yarn that I have stashed away here…no new purchases. I decided to pull out the tub of Omega Sinfonia cotton thread that I often use to prepare workshop samples. It’s a riot of tiny balls left over from years of workshop prep. I almost took one look at the mess and turned around to put it straight back into the closet. The worst part was that what looked like the bigger balls of thread were actually made up of dozens of tiny quantities all rolled into one ball.
From the days when my living room would look like a yarn jungle with piles and piles of Omega Sinfonia workshop warps.
In my last post, I talked about weaving a grocery tote using the Mayan Hands naturally-dyed cotton but I just couldn’t get inspired. I turned to the Omega Sinfonia instead and decided for a start to scrape together enough to dye navy blue for outer pockets for the tote bag. If I wove the pockets in the structure that I call Andean Pebble Weave, I could show both faces of the cloth…one pocket on each side of the bag displaying each of the two faces.
As for the rest of the bag, well you know my style….I’ll figure that out later. I grabbed some other colors from the tub and set out to plan a pattern…something very colorful and jolly. I was going to say spring-like but it would actually be all-year-round-like here where I live. It would certainly be something lively to brighten the days of “champagne air” when I end up living in Katoomba.
Then it occurred to me that I had never actually woven anything substantial with this thread and that I would have to, therefore, sample….eye roll…..I wasn’t in the mood for sampling! But no, fortunately, I remembered that I had put together a warp for the cover of my video class, Operating a Backstrap Loom, in good ol’ Omega Sinfonia.
My video class that is available to stream on Taproot Video. There might even be some copies of the DVD left.
Having done its job as the DVD cover, the warp had sat unloved in a drawer for quite some time until I had the idea to unweave that small woven section and turn it into a backstrap with a bit of pick-up patterning. I took it traveling.
Weaving outdoors in beautiful Maine.
The finished backstrap which happens to be the one that I am currently using (almost all the others are now living in Australia)
Speaking of weaving one’s own backstrap, let me show the one that Natalie wove using the instructions in my free tutorial here on my blog that includes video clips. I love how the yarn she used has created its own pattern.
Backstrap woven on a backstrap loom by Natalie Marie Robinson.
So, I had all I needed to be able to make my width calculations, I dyed the scraps navy blue and drew up an idea.
Not my usual color palette and way out of my safe color comfort zone, to be honest, but it looked okay on paper, so why not?
Off paper and onto yarn, the warp kind of freaked me out…argh, I didn’t know if I could live with those colors.
I remembered a colorful warp that I had taken traveling with me years ago…hastily put together the night before I had left. I had hated it so much that it never left my bag. But I did eventually weave it when I got home and made it into a sewing kit pouch. It had grown on me, and I still like it.
Fortunately this latest warp also grew on me. I think the pockets will look very jolly against a dark solid-color bag.
I haven’t woven using thread this size in ages. It wove up so quickly!
All these patterns are in my Complementary-warp Pattern Book. If you have followed my instructions for either complementary-warp pick-up or Andean Pebble Weave, you’ll be able to weave these.
I wove 20″ on this 26″-warp, enough for the two pockets and some extra just in case. You’ll need to put on your sunglasses to look at the other face!
I love the fact that my backstrap loom allows me to create lovely neat third selvedges…
A third selvedge means one fewer hem to sew and saves a little warp waste at the start.
I have what you might call an unconventional way of setting up to create my third selvedge in that I don’t do it the way my teachers here in South America showed me. But then who is to say what is “conventional” when it comes to this kind of thing? You can see the way my indigenous teachers do it here. I talk about how I do it here. That link takes you one of my FAQ pages….a resource that is often overlooked by my readers or perhaps forgotten. In my latest project I used an umbrella rib as the header to create my third selvedge.
To create the neatest third selvedge, you do need to dedicate some time to making sure the warp threads are all well settled in their correct positions before you start weaving. Then you open a shed and beat really well against the beam. When doing the four-stake warping that I show in Method 2 in my free warping video, paying attention to how the doubled threads pass around the two end stakes will make all the difference to the amount of time you need to spend tidying up before you start weaving. Try to have them pass consistently with one of the two colors always sitting above the other on the stakes. Of course, if you plan to start with a fringe, none of this matters.
In the meantime, another pouch got lined with a stitched shibori learning piece. This time there was an attempt to create a bird. I will do better next time. You probably know where this is heading and perhaps hummingbirds will make their appearance soon.
You could turn the bird figure upside down and call it a stem and flower.
I scoured the fabric on which the shibori pieces sits in the hope that I can do some stitched resist on it. I am intrigued by the idea of using the technique on printed fabric. I know that I’ll have to place the figures carefully or the original dark blues of the cloth and the dark dye color will just merge. If that happens, the figures won’t have clearly defined outlines.
I threw a strip of this scoured fabric into the dye pot when I was dyeing the Sinfonia thread blue. The scouring did the trick and the fabric took up the dye nicely. You can only faintly make out the pattern and I think this will be a nice effect.
A much better dye result than my experiment with the fabric that had simply been washed with regular laundry detergent.
I’ll finish with a quick reminder of the pages on this blog that list and provide links to my free tutorials and video clips. These may not be immediately obvious to those viewing the blog on certain devices. Check them out 🙂 See you next time.
The Jaunty Bag is finished and will be taking flight with me tomorrow night to Australia. It’s stuffed full of Upland white cotton sliver, my mortar spinning bowl, and takli spindle. I don’t plan to spin on the flight although I wish I could. I don’t think my fellow passengers would appreciate having my extended arm in their faces.
It’s one heck of a trip…60 hours from door to door. There’s a reason why some tickets are less expensive than others! At least I arrive at my brother’s place in the evening and can go straight to bed. A million thanks to my weaving friend Emerald who will help me out with my 150lbs of luggage (this is Phase 1 of my eventual move back to Australia) while waiting in Sydney for the train up north. The hardest thing about traveling alone with so much luggage is queuing to buy food and then somehow finding a hand free to carry it away, and going to the restroom.
As for the Jaunty Bag, here’s where I left it in my last post…
The bag had been constructed and I was weaving the strap. I used the structure that I call Andean Pebble Weave in only one color rather than two for the warp-faced part of the strap. I turned Andean Pebble Weave sideways and wove it using weft for the little figured squares. I had planned to weave the strap with four selvedges but overestimated the amount of take-up. With four selvedges the strap would be too long. But I am crazy and created the four selvedges anyway because it’s good experience! As I mentioned in a previous post, I find it much easier to fill the gap between the two ends of weaving with weft-faced weaving rather than warp-faced.
I cut off the excess length of band and sewed it onto the bag. It doesn’t have its lining yet but I did buy a book on stitched shibori which is the technique I would like to use for the lining. When I looked online again for that thirty-five-dollar Stitched Shibori book, it had magically become twenty-six dollars. I’ll have plenty of flight time in which to read it. Even without its lining the Jaunty Bag will go traveling with me.
I haven’t been back to Australia in three and a half years and I haven’t been there in the summer months since 2014. I’m not teaching on this trip because I have no room for any workshop equipment but I will meet up with a weaving friend or two just to have some fun weaving together. I wonder if I’ll be able to attend the guild meeting in Sydney.
I’ll be back in March. There’ll be lots of thinking time on flights to plan my next project. I’m not going to bring back any yarn (Ha! Lets see if I stick to that plan). Working with dwindling yarn stash throughout the pandemic and these last years has been a really good experience and I’d like to keep that going. I will however, bring back some acid dyes.
I guess I’ll see you when I get back to Bolivia. I’ll be posting Aussie things that catch my eye on my personal Facebook account.
I once created what I called the “yurt-shaped” bag from woven cloth. The hand-dyed and painted reeled silk warp had been given to me by Sara whose weaving and dyeing studio is a yurt. It seemed appropriate to weave cloth from her warp and shape into a yurt!
Sara’s yurt-shaped studio in the woods.
Sara gave me the warp ready to go and I adorned it with a pattern in the structure that I call Andean Pebble Weave. I am sure that many of you will recognize Sara Lamb’s color palette.
It wasn’t a terribly long piece of fabric but it turned out to be just long enough to form the walls of a cylinder with circular base. Adding a drawstring at the top completed the yurt-ish look.
The circular base with tubular edging challenged my limited sewing skills. Cutting into the fabric was stressful!
I added tassels and a braided strap. I’ve never been happy with that strap and one of these days I’ll weave another.
The reason I am looking back at this old project is that my current project….a bag for my cotton-spinning tools was meant to be the same shape. I chose that shape because the mortar that I use to support my takli spindle is round-based and so a round-bottom bag seemed like a good idea.
However, once the fabric was off the loom with circular base sewn in place, I decided that I would lose too much height with a draw-string top. I added a band of fine cotton to the mouth of the bag. I figured I could sew a channel along its center to hold the drawstring but even so, I felt that I was sacrificing too much height. I wanted to be able to fit a good amount of cotton sliver in the bag along with my tall mortar and spindle. And so, the “odd-shaped” bag was born! I have been trying to find something to which I can liken this shape so that the bag can have a better name. I haven’t come up with anything. If you do, let me know, please. I am thinking that once it has its strap and is being carried cross-body wise, it may look less odd.
My bag for cotton spinning tools awaits its strap.
You’ll see that I went with a zipper in the end. The cotton band that I added at the top is woven from 30/2 indigo-dyed Guatemalan cotton that I got from Mayan Hands at a conference many years ago. It’s lovely stuff and I have used it in the past to weave covers for books. It was the perfect color for this project.
Weaving cloth from Guatemalan cotton to cover a small journal. My friend Claudia’s initials, CS, were placed to sit on the spineof the book.
That indigo-dyed cake of thread has sat on a shelf far away from windows for years. It’s amazing how much the color has faded. I had to pull thread from the center to find the original rich blue. However, I do love the unevenly faded stuff too and will definitely use it in a project one day.
In my last blog post, I showed you my progress with the spinning-bag cloth on the loom. Here’s a slightly different view of it resting on the floor.
This was just before I added the final band of patterning which would be made up of woven words. The darkest blue sections that you see in this piece are warp-faced….a complementary-warp structure that I call Andean Pebble Weave. The other horizontal bands in various shades of blue are weft-faced. I have basically turned the Andean Pebble Weave structure on its side and woven it as complementary-weft instead. This means that I can weave it in any color I like. I chose to use various shades of blue and teal in this piece.
The woven words that I chose to use are “Spinning Cotton” and ” Hilando Algodon”. This is the first time that I have woven letters using the structure that I call Andean Pebble Weave. I showed you many others structures that I have used for lettering in my last post and I wonder if any of you were inspired to try them. I used the letters that Alison Irwin designed and published in the latest issue of Little Looms magazine. Letters in Andean Pebble Weave are naturally quirky. The nature of the structure doesn’t allow them all to sit along the one line. That makes them seem to dance jauntily along the warp. Because I wove them as complementary-weft rather than as complementary-warp, the words I wove run width-wise across the warp rather than along the length as Alison has woven them in her article. I think they perfectly suited my jaunty little bag. Okay….I’m liking that…The item formerly known as The Odd-shaped Bag will now be called The Jaunty Bag.
I altered a couple of Alison’s letters to better suit my layout.
I always love the moment when the cloth is off the loom and I get to see the detail on the other face. In this case I don’t have to try to decide which of the two faces I prefer because of course the words are backwards on the reverse. Still it’s nice to enjoy looking at it before I sew and it gets hidden forever inside the bag.
I was able to continue weaving once the lettering was done and the bag cloth finished because I had enough warp left to enable me to weave a piece that could be cut into the circular base of the bag. I stabilized it with heavy interfacing before cutting and that gave me a nice sturdy base for the bag.
I hadn’t planned on adding a strap to the original draw-string bag idea. It was just going to be a storage bag for my spinning tools that would go into another bag when I was out and about. However, I felt that the jaunty bag was asking for a strap. No problem. I was happy to have a reason to continue practicing combining warp and weft-faced structures in the one piece.
I wound a warp for the warp-faced strap using only one color instead of the two that I would normally use for Andean Pebble Weave projects. The warp-faced sections would be one solid color and I could play with weft colors for the small weft-faced sections. That way, the strap would not be too loud next to the rather busy bag.
I’ve been conservative in my color choices in this project. Perhaps in the next I’ll weave a solid black band with a variety of lively weft colors for the weft-faced patterns.
Take a look at this colorful warp-faced hair sash below from Jacaltenango in Guatemala. The weaver has made good use of the fact that she is free to change the color of her supplementary weft at will. Complementary-weft doesn’t allow that much freedom but I could still create some quite lively spots of weft-faced color along the length of a warp-faced band in which the weft is normally completed hidden.
Speaking of hair sashes of Jacaltenango, Carol Ventura will be giving a free Zoom lecture on them on Friday the 11th. Follow this link to register.
And now the thought has crossed my mind that perhaps I can line the Jaunty Bag…but not with my handwoven cloth. I’ve been thinking that I would like to try stitched shibori. For those who don’t know what that is, it is a resist dye technique for patterning cloth in which stitches are used to pull and shape cloth before it is dyed. The stitching creates areas that resist the dye and remain the original color. I’ve never done it before but was lucky enough some years ago to be in the area when Kris Nardello (and another dear lady whose name, forgive me, I have forgotten) were giving a workshop on it at the Textile and Fiber Arts Guild of Santa Cruz in California.. I wasn’t able to attend the whole thing but did bring home the kit which was made up of three sheets of scoured cotton cloth, needles, beads, thread and other bits thinking that one day I will take it up. The day has arrived.
The only things I have found from the kit so far are the sheets of cloth. I can decorate and line my bag with them and try something new…and if I make a mess of it, well, it will be hidden inside the bag, or I can just over-dye the whole thing. By the way, Kris kindly left a very helpful comment on my blog for me when I puzzling over my cochineal dyeing experiments a while ago. She is an expert in natural dyeing techniques.
This book cover will give you an idea of what stitched shibori can look like in expert hands….don’t expect to see anything like this in my next post!
The initial knee-jerk plan of action was to go looking on Youtube for instruction. But then it occurred to me that there will be highly experienced people who have devoted time and effort to writing books on the subject and that it would be nice to support them. As I have written a number of how-to books myself I know what it’s like to be in their shoes. Trust me…no one is getting rich from writing these kinds of books. The Kindle version of the one I have looked at is $35 and so I will need to give that some thought. If you own a book on the topic and can recommend one, please let me know. I have only just started to look. It will have to be a Kindle edition, though.
I hope in my next post to show you the finished jaunty bag with its accompanying sedate strap…and maybe my beginner attempts at stitched shibori. It will be one of those “mess or success” projects and no doubt, much will have been learned.
Some place last week, I have completely forgotten where, I heard (or read) someone say that reading is like breathing in and writing is breathing out. That really appealed to me.
Because I have been house-sitting for the last couple of weeks and don’t have all my stuff around me, on top of the fact that the whole city was on strike for 36 days (the strike ended last Saturday), I had been feeling a little as if I were standing still and unable to be as productive as I would normally like to be. However, since hearing that thought on breathing, I’ve been thinking of these weeks as a period of breathing in…time to sit back in my enforced stillness and cruise the internet, soak up inspiration, make sketches and notes in my weaving book while figuring out if the projects I have in mind are actually technically doable, and deciding if my stash will stretch far enough to make them possible…. readying myself to eventually breathe out and create.
Just a handful of the sample bands in the bucket.
But of course I haven’t been completely idle. One thing I did during the strike was go back to my home on one of the permitted shopping mornings and bring back the bucket-load of woven samples that I have accumulated over the years. Most of the pieces are bands of motifs that I wove to photograph for my pattern books and double weave book. Some were width samples as I tested a new-to me yarn for a larger project while others were just fun experiments…those funny little “what-if” things that I get a sudden urge to explore now and then. Some have stories attached to them. I have felt an urgent need to downsize lately and I’ve been procrastinating about attacking the pile of woven samples. Taking those pieces out of my home to this unfamiliar place has somehow made the task of sorting and tossing things away easier.
I managed to whittle the bucket-load down to a more acceptable amount of bands. This is one of the samples that I decided to keep. Maybe it’s the horrendously hot and dry weather we have been having lately that has made me feel a particular attachment to this watery scene with its cooling blues.
I expect that I will make something out of this band one of these days. It might end up being the strap for a bag. It wouldn’t be the first time that a strap has inspired a bag project.
The bag project that grew from a simple strap. Every part is handwoven…even the lining.
During the strike I hadn’t been able to get the distilled water that I need to continue with my cochineal dyeing experiments on silk. I finish house-sitting on Thursday and I will get that organized on my return home. In the meantime, someone on Facebook suggested using bottled water…not as a substitute for distilled, but just to see if it made any difference. I thought, why not?
Cochineal dye experiments on scoured 30/2 silk using hard tap water for some and bottled water for others.
The dusty pink upper right is the result of alum mordant on silk in bottled water with added cream of tartar. I really like it!
This is what the tap water and cream of tartar dye bath had looked like….so promising, right? However, a tap-water rinse sent it right back to purple again. Oh well. It was worth a try.
While on the topic of dye experiments, I can tell you that I just happened to come across the Long Thread Media podcasts again a couple of days ago. I have listened to these chats with fiber artists in the past but because I haven’t subscribed, I keep having to remind myself to go and check out the new episodes. I listened to the fairly recent one with natural dye expert Catherine Ellis the other day and was so happy to hear her speak about the time she had been teaching someplace in the north east and was unable to coax any red out of cochineal bugs. This was due to the hard water that they were using. She also mentioned that using distilled water had provided the solution to this problem. Hooray. It’s so nice to have this confirmed by such an authority. It squashes the thoughts I have every now and then that I am simply doing something very wrong and that it isn’t the fault of the water that I can’t produce red. And so, while I don’t have any nice dyed red silk to show you this time, hopefully in my next post there’ll be some lovely red tones to add to my collection of samples.
The other thing that I have been working on here is the case for my friend’s quena (flute). I showed you in my last post how I was weaving two bands at once in the structure that I call Andean Pebble Weave on my backstrap loom so that I could have two pieces each with a third selvedge.
The idea was to use the third selvedges at the mouth of the case and at the edge of the closure flap as you can see below….
That gave me two raw edges to take care of at the other end of the case. I joined the fringed endings of the two bands together with weft twining which sealed the raw edges. You can see that in the photo below. I’ll leave it up to my friend to decide how short he would like to cut the fringe. He does tend to like things on the wild and woolly side. All that’s left to do is add a large snap closure or a magnet closure, or even velcro tabs if that’s what he prefers. I have a tutorial on this kind of handy weft twining here on my blog.
I am so happy with the way the pattern on the flap lines up with that on the body of the case. The pattern is a modified version of one that I include in my More Andean Pebble Weave Patterns book.
I then got the idea of replacing the decorative bands on the flute itself with woven ones. The bands that are currently in place are made from colored nylon fishing line. There were three bands and I have managed to remove one of them so far. I think that woven bands in red and black would look much nicer.
So, if it’s fun to weave two bands at once on my backstrap loom….how much more fun would it be to weave three? That way I get three pieces each with its third selvedge to place around the flute. The selvedge will slightly overlap and cover the raw edge at the other end of each band. I am weaving these in much finer cotton than the thread I used for the case. This is the good ol’ Clea thread that I used to use for almost everything long before I started traveling a lot to the States to make my yarn purchases. It’s made in Brazil and I have a bin of its odds and ends from all those years ago. It’s a 2-ply crochet cotton which isn’t as highly mercerized as the crochet cottons I have come across in the States. When I eventually move back to Australia, I am sure that I will long for it. I prefer the flatness of 2-ply thread over the round-ness of 3-ply and the less polished feel of the Clea thread.
Three bands to encircle and decorate the quena in the structure that I call Andean Pebble Weave. This is just one of the hundred patterns in my Complementary-warp Pattern Book.
And when the evening comes and its time for cat-sitting cuddle duty, I brush this little old lady and spin her fur for fun.
I have two takli spindles here with me. One is occupied with the natural brown cotton labeled as “cinnamon”. By the way, I did some boil tests with the cinnamon thread to see if the darkening of the brown color intensified the longer it was boiled. I started with the two extremes, boiling one lot for 40 minutes and the other lot for only 5. The difference is disappointingly barely noticeable and so that’s the end of that experiment! It was actually the label on the brown color called “coyote” that stated that a range of tones could be obtained by boiling the thread for different lengths of time. I haven’t started spinning the coyote yet and so I will perhaps try this experiment again when I have spun a decent amount of thread.
I’ll be back home by the time I write my next post. I’ll be breathing out some kind of mixture of everything I have been breathing in these last couple of weeks. See you then.