
Backstrap Weaving – Thinking Outside the Walls

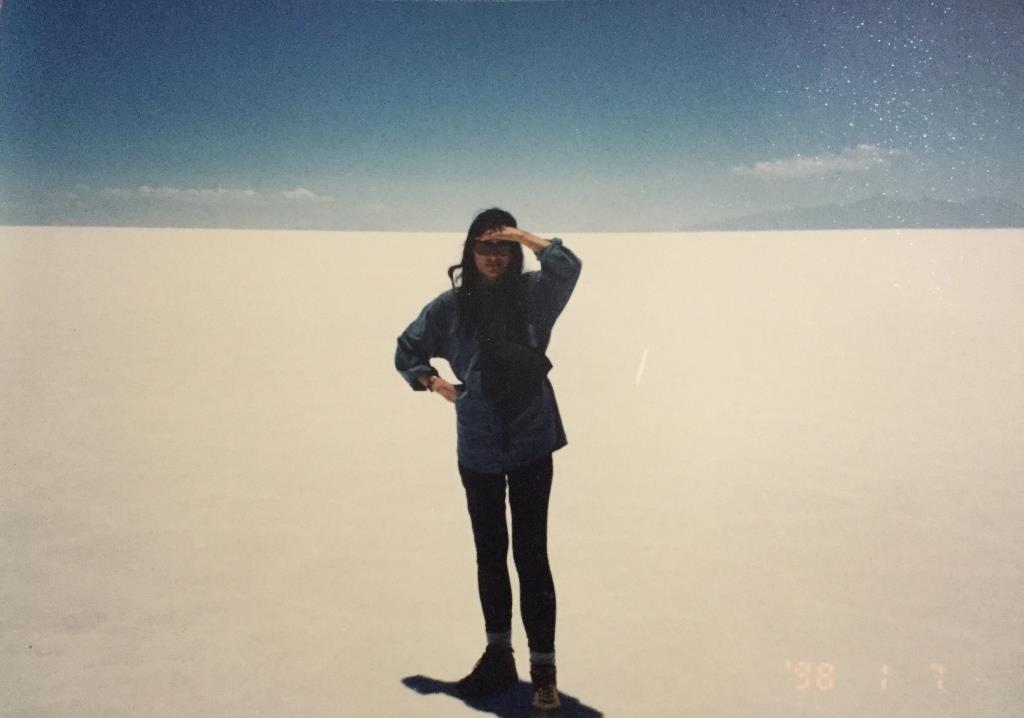
Is there anybody out there?! This was taken on a visit many years ago to the fabulous Salar de Uyuni here in Bolivia.

Fully vaccinated (albeit with the Sinopharm one in which I have little faith), I decided it was time to think outside the walls and venture out for my first outing, since the arrival of Covid-19 in Bolivia, that didn’t involve the supermarket or the dentist.

What would I find out there? Would I find that I have been behaving in an overly cautious way all this time and perhaps one of the few still hiding away within walls?

Would everything be completely normal? After all, we are not under any kind of restrictions now. Case, hospitalization and death numbers rise and fall from day to day as the third-wave curve wends its way downward. The fourth wave has already been predicted to arrive in October. Have we all just learned to live with this?

I have always been good at physical distancing! This was taken on a visit to a large expanse of sand dunes that inexplicably emerge from the surrounding jungle right here in Santa Cruz where I live.

This outing wasn’t about visiting spectacular salt lakes or mysterious sand dunes. It was simply about eating a burger with a friend in one of my old favorite hang-outs…the main Plaza here in the center of Santa Cruz. I used to live one and a half blocks away from it and would pass through it every day on my way to and from work. After finishing work at 10pm, I used to love stopping to sit there on balmy summer nights. The place would be full of activity as others gathered to enjoy the relative coolness of the evening before reluctantly heading home to face a restless night within heated walls.

My companion suggested the Plaza. The thought of being amongst all those people doing something that required the removal of masks made me nervous, even though it was an outdoor setting.

A typical sunny weekend afternoon would see the Plaza completely full…standing room only… as families gathered to eat ice cream and watch the world go by. There would be wandering coffee cart vendors in their crisp white uniforms, others selling cotton candy, balloon animals and toys and trinkets, people feeding the pigeons, kids chasing the pigeons, teenagers gathered in their little groups in every corner, the shoe shine guys poised ready for the next customer, elderly men playing chess surrounded by youngsters studying their moves, wanna-be models having their photos taken outside the cathedral. The Municipal Police would be strolling around although it is hard to imagine anything “bad” happening in that place of good clean fun. In a city in which it is often impossible to escape the blast of salsa and cumbia music, the Plaza is blissfully music-free.

And so it was with a mixture of relief and sadness that we found the Plaza almost deserted. There was no need to make circuits while looking for a place in the shade. Clearly people are being careful and largely staying home which is a big ask when home can often be a simple adobe or single brick dwelling, the interior of which resembles a pizza oven on hot days. It was sad to see this popular cooling refuge abandoned in this way.

Yes, I admit that it is strange to be writing several paragraphs about an outing to get a burger! So I’ll get back to the weaving now. In my last post I showed you the start of my hummingbird piece. This is another effort to think outside the walls and capture a feeling of uninhibited movement and joy.

I am weaving this in warp-faced double weave. It is certainly not the fastest patterning technique that I know. However, you might remember that I have just spent seven months picking up threads one by one to form intricate patterns on four panels. As a result, nothing feels slow any more and I just simply enjoy watching each and every one of the little figures I have created emerge. I loved designing the plants and piecing all the figures together. Weaving this lifts my spirits!

This is the final third of the band which I photographed so that you can see what the two faces look like. The plant at the very top is the one which is showering the scene with its parachuting seeds.

There was never meant to be an end product but I did find myself thinking about cutting this strip into three and sewing the pieces side by side to make something useful. But then a couple of people in a recent band-weaving Zoom gathering suggested weaving two more strips to flank this one. They could reveal more of the garden that surrounds this happy scene. I like that idea. It spares me the agony of having to do any cutting. All of you who produce hand woven cloth will know exactly what I mean. Plus it gives me a chance to do some more designing in this fun double- weave structure. It amazes me how far removed this is from the kind of pieces that I generally choose to weave.

And so I get to sprawl on the floor and do some more double-weave doodling. The chart for the hummingbird piece ended up being 130 inches long! I suppose I could photograph it in sections, erase the drawings and re-use the paper.

I was very pleased to see that Vicky Erker has been designing her own double-weave motifs after having learned the technique from my book Warp-faced Double Weave on Inkle Looms. My book includes a section on designing in which I use a leaf motif as the example. Some people take to designing more easily and quickly than others while some have no desire to design at all and are happy weaving from charts that have been provided in books.

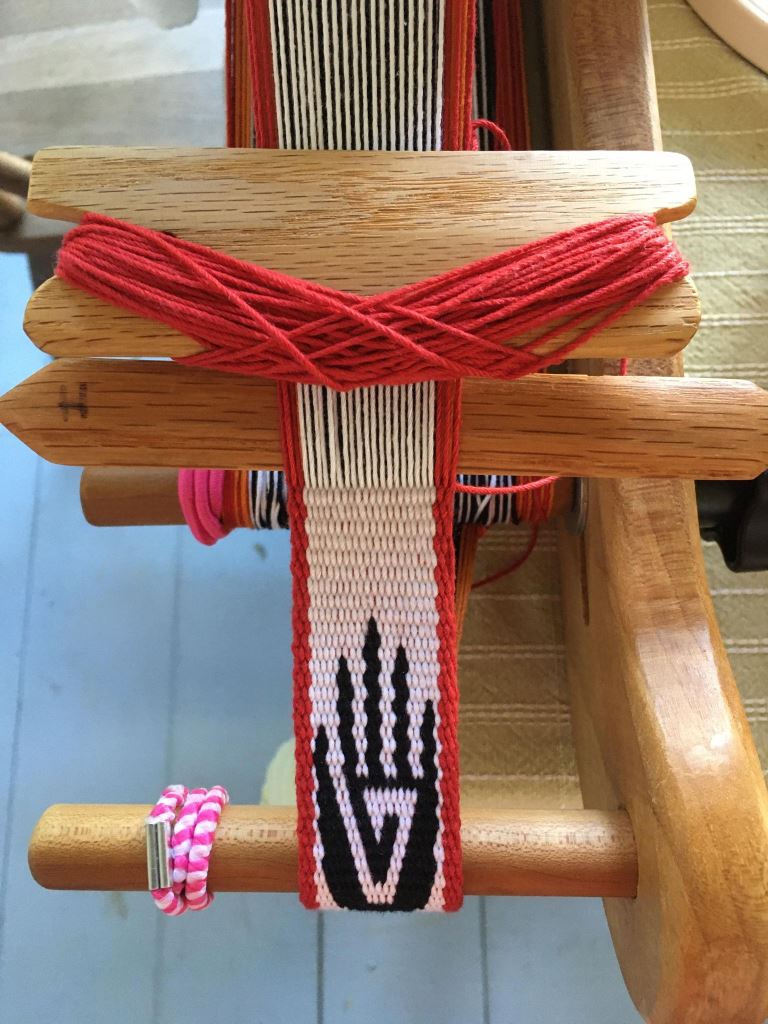
This striking hand petroglyph is the first pattern that Vicki showed me…..
And then she blew me away with this pattern that she based on a Quetzal motif that is often used in textiles of Guatemala. In Guatemala it is woven using completely different patterning structures.. Isn’t that awesome!
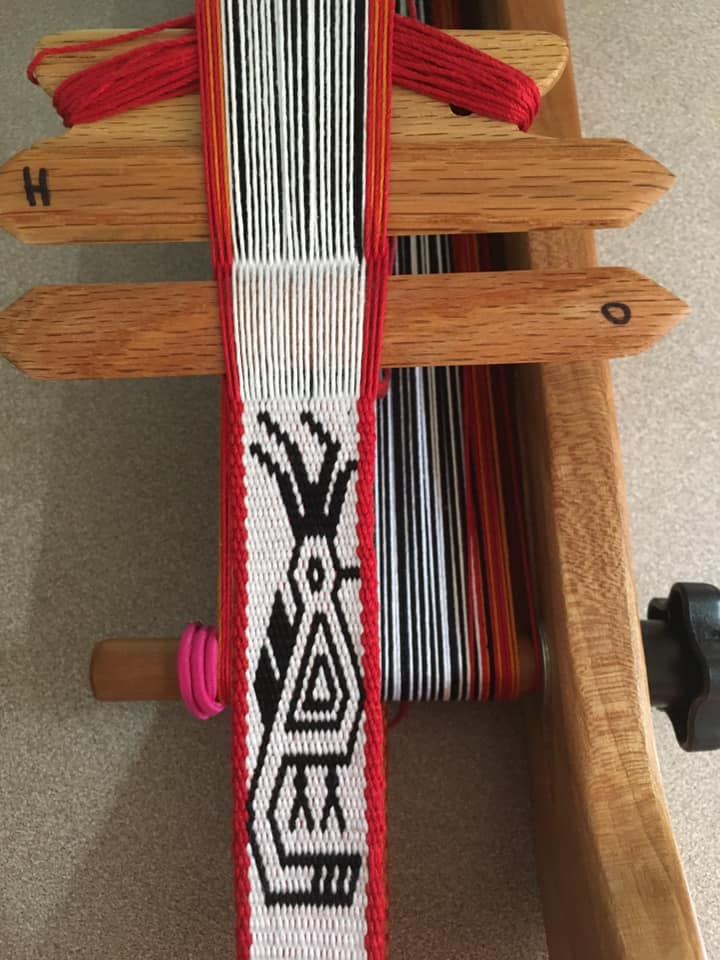
If you are wondering about the H and O lettering on Vicki’s swords. it is something I suggest doing to help you keep track of the shed in which you are working when weaving double weave. You can always mark tape and apply that to the sword if you don’t want to mark your sword. The H stands for Heddle Shed and the O for Open Shed. It is one of the tips I give weavers for working in double weave which of course will make much more sense when you are using the book. I hope you might consider trying warp-faced double weave. There are plenty of charts in the book and perhaps you will feel motivated to try creating some of your own designs.

When I was going through my old photos and finding the ones I posted earlier of the Uyuni Salt Lake and the sand dunes, one of my first thoughts on seeing those pictures, was…wow, not a single tree to which I could attach a backstrap loom! Of course, a tree would not be entirely necessary as backstrap weavers can turn themselves into completely self-contained looms using our feet or toes to hold the end of the warp.

Carolin shows here that if you happen to find yourself at the Uyuni salt lake while cycling from Alaska to Ushuaia, one’s bicycle can always provide a handy anchor point for the end of the warp….

Carolin with tiny loom tied to her bike and weaving on the salt lake.

Others have chosen to create something a little more comfortable that can be picked up, carried around and enjoyed both indoors and out. I don’t quite remember who started the frame-making thing in the Facebook group but several members have found these to be a really nice idea when they got fed up with looking for suitable places in their homes, both indoors and out, to which they can attach the ends of their warps. Here’s the one that Martina in Germany built….

Here’s Jenny’s with a clever pool-noodle hack to stop the beam from sliding….
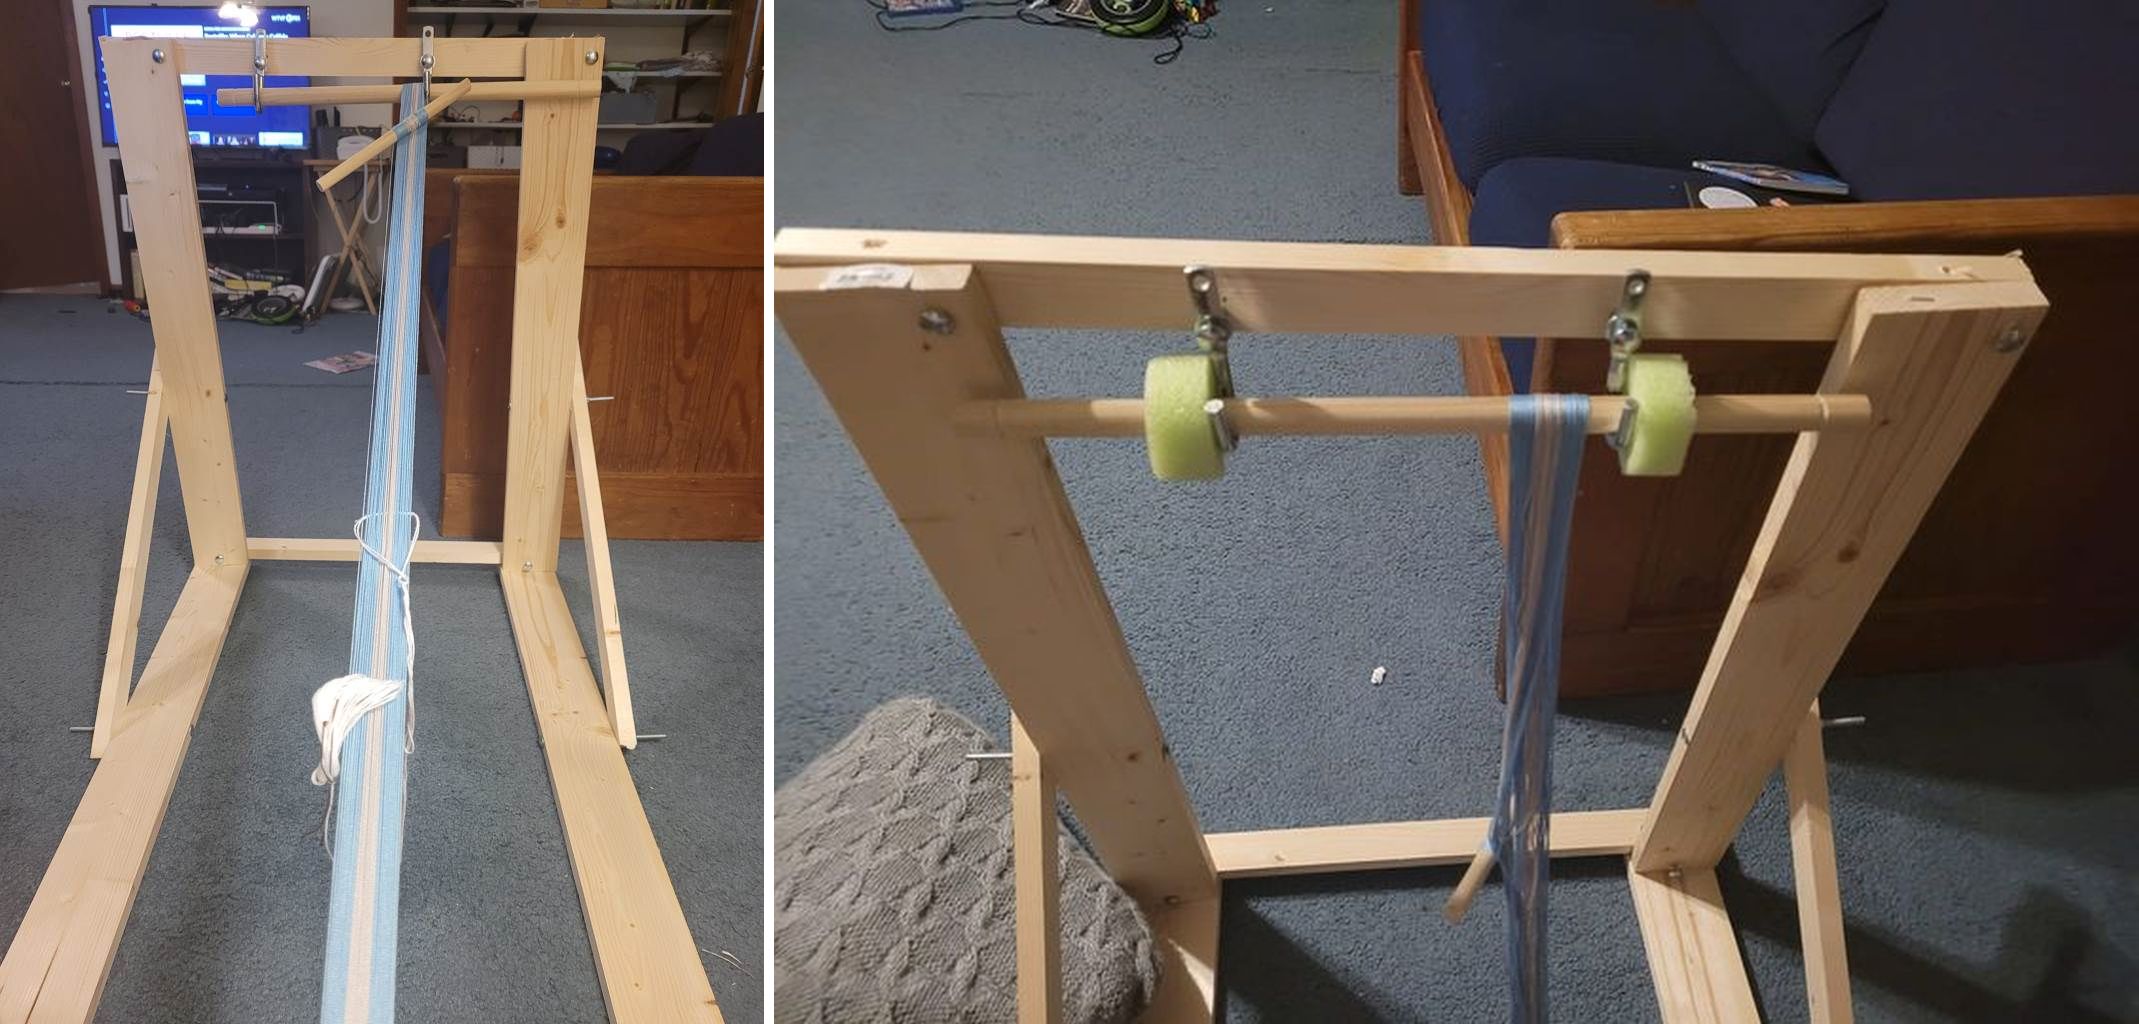
And here are models by Carlos on the left and Rosemary on the right…

Ritika Mittal allowed me to show this image of a weaver in Nagaland using a study frame to hold the end of her warp and provide a nice place for her to brace her feet.

Nancy’s anchor point isn’t exactly a portable one, but I always enjoy seeing a simple backstrap warp being attached to the more complex floor loom…this is Nancy’s first ever backstrap loom project and its a beauty.
When I was having my Operating a Backstrap Loom class filmed, we had some trouble finding an anchor spot in the studio that was close enough to the set because I insisted on sitting on the floor. Eventually we managed to pile a lot of heavy stuff into a portable storage bin and use that.

While on the topic of that video class, Operating a Backstrap Loom, I’ll take this opportunity to let you know that the stock of DVDs is really low now and that I won’t be replacing them when Taproot Video runs out. The purchase of the Lifetime Streaming option caught up with, and now far outnumbers, the purchases of DVDs. So, if DVDs are your preference (they still are mine), you might want to make sure you get one while they are still around.

I showed Nancy’s first-ever weaving on a backstrap loom. I neglected to ask her if this piece is destined to become a backstrap. The dimensions are right. The backstrap itself is often a new backstrap-loom user’s first project and I am happy to see that the article I wrote about weaving your own backstrap way back in 2009 is still being used and enjoyed.

Here are a couple of backstraps that have been woven recently by Lieve on the left and Louise on the right….

My birthday is on Friday (lucky Friday the 13th) and I’ll hopefully be venturing outside the walls again for a little celebration.

Until next time.

Backstrap Weaving – The Road to Double Weave

Weavers often classify themselves as being either Color and Texture people or Structure people. I know that I fit very well into the latter category. There might also be categories for those who are more motivated by Product or by Process. Again, I am all about the latter. The other thing that I love is imagery. I love to weave pictures.

I am in awe of the iridescent effects that floor loom weavers are achieving these days. The cloth is astoundingly beautiful. However, I don’t have any desire to create that kind of cloth myself even though I would be happy to wear it! These days, more and more, I find myself turning to pictures. And lately, it has become more about a desire to tell a story.

Standing outside my seasonal rented home in Vald’Isere. You can just make out the date in stone above the other door…1627.

When I was in my early twenties, my life revolved around mountains and skiing while I wandered back and forth between Thredbo in Australia and Val d’Isere in France. I worked three jobs in the Australian ski resort so that I could just ski without a care for the entire French season. I did eleven seasons back to back. One of the three jobs was making headbands and hats on a knitting machine and selling them in the ski shop that I worked in and eventually managed. I had a punch-card machine and wove pictures, hundreds of them! The fun part was coming up with patterns and designing the pictures.

On a visit to Australia many years ago, I was surprised to find one remaining item from those knitting machine days among the bits and pieces that were in storage. Anyone who knows me will know that I am not about color and so I suspect that the strange combination in this hat (there’s baby pink!) is the result of my just throwing together a bunch of odds and ends of left over yarn. I was happy to see that even back then I was attracted to the kinds of bird figures that are found in textiles of South and Central America.

Hummingbirds from the Within These Walls series.

Andean Pebble Weave is really nice for designing pictures and I have learned to work within its limitations figuring out how to tie down floats so that I can bend the rules a little and create shapes that would normally not be possible.

That allowed me to have a lot of fun with my pandemic story project ”Within These Walls” but there were really only a few times when I decided to bend rules.

But even without bending any rules, there are so many possibilities and I have filled two books with a wide variety of Andean Pebble Weave patterns. They include many original contributions from my students and friends who were thinking right outside the Andean box to come up with figures and patterns that had meaning in their every day lives and surroundings. In doing so, they encouraged me to do the same.

My instructional book includes 24 patterns. The follow-up pattern books contain over 200 more.

If you have been following my blog, you will know that I am once again weaving hummingbirds in a new piece. I guess that I am just telling a story of joyous freedom as they hover and turn and flit from flower to flower. It’s a nice change from all the walls I was erecting in my last project! And along the way, thanks to my online weaving friends who send me links and articles, I learn more about the role hummingbirds play in the lore and legends of indigenous groups here in South America.

One of my most recent discoveries was that the Yaghan people who live in the southern part of Chile where I used to live in the 1990s, tell the tale of a hummingbird called omora, which means “little spirit”. It battles and defeats a wily fox that has fenced off water during a drought allowing the Yaghan people to once again access water. I also read that the Mapuche people of central Chile and Argentina associate the hummingbird with life-giving water.

Another online weaving friend wrote and told me about having read an interpretation of a figure that is made up of two opposing hummingbirds in textiles of the community of Karhui in the Peruvian Andes. The two birds appear with their beaks touching. The use of these figures in this community demonstrates that the weaver has feelings of affection or love towards the textile’s recipient. And right on the tail of having received that information, my online weaving friend, Bonnie, sent me this extraordinary picture of two such hummingbirds that was taken by her photographer son, Darik Datta. I am showing it here with his kind permission….

I decided to use warp-faced double weave to design my little hummingbird figures in my latest work as this structure gives me the flexibility to design birds in all kinds of positions and stages of flight. I am weaving for the pure joy of it and for the fun of designing.

I learned to weave warp-faced double weave with two sisters in Potosí, Bolivia back in 1997 when I was still living in Chile. Since then, I have observed several other Bolivian and Peruvian weavers using this structure using a variety of set-ups. My favorite and simplest way will always be the way I was taught by Juliana and Hilda in 1997 although I choose the backstrap loom over the horizontal ground loom that they use.

My first lesson was on a narrow band. This was my first time using a horizontal ground loom set-up and I hadn’t quite figured out how to position myself to comfortably weave the narrow band. I soon learned that unless you were raised weaving on these looms and therefore developed the right amount of “bendability”, there is no comfortable way! At least back then I was able to tolerate being in bent over positions for hours but I certainly wouldn’t describe it as comfortable.

I learned to select colors using the tip of a bone tool called wichuña and manipulate the two basic sheds to form the lower layer of the double weave.

Dark and light threads are wound together as pairs when the warp is being created. By simply selecting one of the two dark and light threads in each warp pair, I was able to weave pictures of little birds in lovely solid colors…light figures on a dark background. If I had just left it at that and not taken any more steps, the colors that I discarded from each pair would have floated untidily on the back of the band as in this example on the left of the front and back of a band…

The beauty of warp-faced double weave is that all those unruly discarded threads can be woven into a second layer below the first with just a few clever manipulations of the two basic sheds. The upper and lower faces then look like two smooth-faced bands with no floats at all…example on the right.

From the simple band, I advanced to a much wider piece under Juliana and Hilda’s guidance. Juliana would keep scoffing and saying that I really needed to learn a warp-float technique and not this double weave which she considered child’s play. I am pretty sure that this was mostly said to tease Hilda who had not learned, or at least not fully mastered, the warp-float technique that Juliana had been taught to weave as a child! It is often the case where one sister had the opportunity to learn a technique from an elder that the other sister did not.

You can see the difference between warp-float patterning on the right and the smooth warp-faced double weave in these two examples of belts woven by the Mapuche people of central Chile and Argentina.

When weaving the wider piece, I was finally able to settle into a position doubled over on my knees. Unfolding myself at midday was a slow and painful task! My hands took some time to get used to gripping and beating hard with the bone tool. There were ruptured blisters to deal with.

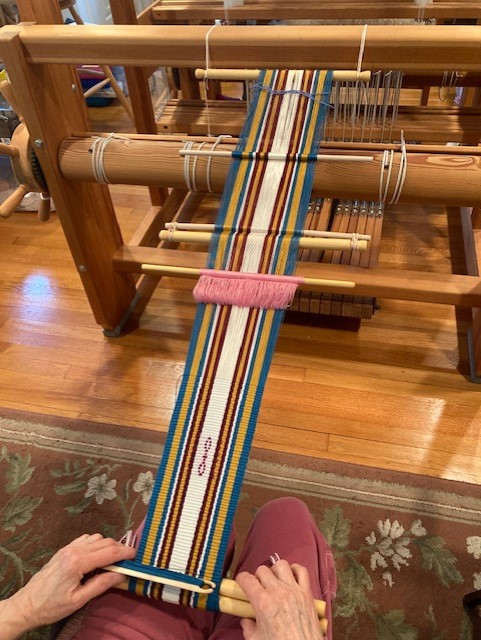
You can see the simplicity of the set-up in this wider warp. It’s just two basic sheds of doubled threads, one of which is controlled by the metal rod that holds the blue string heddles. The other layer of threads lies on top of the long broom-handle stick that sits beyond the heddles. This simple set-up is what made it possible for me to write a book showing how weavers can also enjoy using this simple two-shed set-up on a standard inkle loom.

If you already know how to use an inkle loom and enjoy manipulating the threads by hand to create patterns, I know that you will enjoy my book….Warp-faced Double Weave on Inkle Looms. I have tried to cater to several different learning styles by providing dozens of step-by-step pictures for those who like to see the process frozen in small steps. There are detailed descriptions of each step for those who like to use text to create their own visuals in their mind’s eye. And there are video clips for those who like to hear the steps described while watching them in action.

With Hilda and Juliana I got to weave a nice variety of the bird figures that are so typical of this region of Bolivia. When I was in Otavalo in Ecuador back in 2005, it was interesting to see that many of the younger women were opting to wear the typical belt of Potosí rather than the traditional belt that they would normally weave themselves. Goods are brought from Peru and Bolivia to be sold at the famous market of Otavalo and the Bolivian belts were one such item to end up in the stalls. It seemed to be a way for the young ladies to show that they were well-off enough to be able to afford to buy an exotic foreign item rather than weave their own belt. But that was many years ago. I wonder if these belts have since gone out of fashion and been replaced by something else.

Typical bird figures of Potosi, many of which I wove into my cloth.

Hilda was always checking on how hard I was beating the cloth. The quality of the textile in the eyes of these weavers has a lot to do with how firm it is.. They are looking for durable hard-wearing cloth that is wind proof and highly water resistant. This comes from a combination of the tightness of the twist in the warp threads and the heaviness of the beat. My desire to please Hilda is what led to my gripping the bone tool so hard and tearing up my hands. It was worth it because the finished cloth was admired by other highland weavers that I met in my travels. This was the only time that I was ever praised for my cloth because since then I haven’t generally aimed at creating the kind of hard-wearing textile that my weaving teachers favor.

Over the years I have found that the warp-faced double weave structure does not necessarily need to be reserved for stiff and durable cloth. I have made lovely flowing and flexible tapes with it as well as sturdier pieces that work beautifully as belts. I have designed both angular and curved shapes, animal figures, lettering and geometric patterns.

Which brings me to my current hummingbird piece. I filled all the space on my paisley sampling warp with frolicking hummingbirds and my experiments with foliage. I then made the necessary adjustments to my charts as I wasn’t entirely happy with some of the figures. However, I do I find that over time I become less and less critical. And so I am going to listen to others who tell me to stop calling this a sample band and see what I can do with it. Because it is so difficult to choose one face over the other, I hope to be able to weave several strips and place them side by side alternating dark and light faces to create some kind of useful “product”.

The combination of my arrangement of paisley shapes and the hummingbirds was purely accidental but I think that it somehow works. It adds just the right touch of magic.

I know that I have mentioned before that possibly the only disadvantage that I can think of when using this structure is the fact that the two layers of cloth do not connect in the areas of solid color between the pick-up patterns. This can create a sort of ballooning effect if the solid-color area is vey large. You you might just be able to make out a little of that on the light side of the fabric.

It’s one reason you find that a lot of the Bolivian pieces are very busy with pattern. Little squiggles and spots are often placed between and around the main figures which ensure that the layers connect as frequently as possible to create more stable cloth. I think I have come up with a clever way to create more frequent connection in my hummingbird piece without making the whole thing look too busy. I invented a fantasy plant that is losing its parachuting seeds. The seeds are floating around in some of the open spaces.

And so, it was time to think about the next strip of hummingbirds. I could use all that I had learned from this piece in the planning of the next. Time to piece together the next pattern chart. You know how I love that part!

Once I had drawn out enough pattern to keep me busy for a while, it was time to wind the warp and make all the heddles. As you can see I use a four-shed set-up when I am using threads as fine as this 60/2 silk. I only bother with the extra time and effort to set up this way if the threads are fine like these or if there are lots of them. This warp satisfies both criteria…there are 720 heddles there! The process wasn’t as straightforward as I would have liked. When I first sat down to make heddles, I realized that I had mixed up a ball of 140/2 silk with the 60/2s when I was warping and hadn’t noticed because I was winding two colors at once. The difference in weight of one of the strands just wasn’t apparent when I was holding two threads in my hand. Back to the warping board! Unwinding doubled strands of fine thread is not fun.

The different colors in the heddle string show that I am scraping the bottom of my supply of the fine thread that I like to use for these heddles. It makes for a colorful warp.

And this is where I am at so far in the weaving. No paisley this time. I have run out of charted figures and now need to take a break from the loom to continue creating my patterns. There is still plenty of band to be filled.

I hope that this post might motivate you to try warp-faced double weave. My book includes a tutorial on designing using a lovely leaf pattern as an example and of course there are plenty of charted patterns to keep you busy before you get to the designing stage. The book is available as a PDF or as a spiral-bound book at Taproot Video.

I just gave myself my fourth DIY pandemic haircut. I went pretty short this time and I am sure that I will appreciate this length this weekend as our Santa Cruz “winter” promises to bring us temperatures in the high 80s. Until next time…..

Backstrap Weaving – A Bit of the Blues

I don’t have the blues. In fact, the opposite is true. I have been getting such a lift from the various Zoom events that I have been attending lately and I try to focus on these rather than on the news.

One such Zoom event that I found very uplifting was the annual conference of WARP (Weave a Real Peace) that took place last weekend. My friend Dorinda had given me a one-year subscription to this organization which allowed me to take part in the Members Only social sessions over the course of the three-day gathering. The rest of the conference was free and open to the general public. The webinar style of the panel discussions did not give us the chance to see who else was attending and so the social sessions were particularly nice in that they enabled me to see and chat with many of my “old” weaving friends, some new friends that I have made during the pandemic and meet new-to-me textile enthusiasts via the break-out rooms.

Zoom and loom…they are both still very much major parts of my life.

During the Sunday morning coffee social, Mari took a screen shot to show what we were all working on while chatting. It seems that I am not the only fiber person who finds it hard to sit still with hands unoccupied. I have been using Zoom time to spin on my drop spindle.

I chose to use the word “blues” in my title for this post because I have finally shifted away from the red and black that I have been using for the last seven months. I started sampling my new hummingbird figures in warp-faced double weave on a sample warp of black and gold 60/2 silk. Yes, black again, but I find that sampling in black is handy because I can adjust the patterns on the cloth with a black charcoal pencil before changing my chart. Most of the charcoal dusts off with some coaxing if I want to revert to the original. Now, a variety of blues are creeping into my work.

There is no lack of images of hummingbirds on the internet to help me chart my patterns. I think it must be quite a feat to be able to capture an image of one in flight with its wings showing sharply. I have read that they flap their wings up to eighty times per second. The giant varieties that are found in South America flap at more like ten to fifteen times per second. But even without internet access there was an image available to me right under my nose….

There it is, the picaflor gigante! This new Ten Boliviano bill has been around for a few years now and I can’t believe that I had never noticed this! I am not sure what made me stop and examine the bill just the other day and discover the hummingbird.

It didn’t take me long to fill my black sample band with figures, many of which were multiple re-workings of the same motif and I was still left dissatisfied. Some looked too chubby, some too pigeon-like. Back to the warping board. I could barely face the black thread again!

In the meantime, I found an article about the Guaraní people’s legend of the hummingbird. One of the regions that the Guaraní people inhabit is the part of Bolivia in which I live. I studied for a while with a Guaraní weaver here and while her textiles in the Moisy structure contain images of birds, they are not recognizable to me as hummingbirds. If I ever find my Guaraní teacher again, I hope to ask her about that.

Polytmus guainumbi (source watermarked)

The legend tells of the forbidden love between Poti, (flower in Guaraní), a princess belonging to one of the tribes, and Guanumby, a member of another rival tribe.

When the affair is discovered, it is forbidden and a marriage is arranged with a member within Poti’s own tribe. In her despair she begs the gods to kill her. Instead, they turn her into a flower. The moon tells Guanumby of this and he extends his arms to beg the heavens to help him find Poti. He is transformed into a hummingbird going from flower to flower trying to recognize the kiss of his beloved Poti.

Before I could make it to the warping board, I suddenly remembered a silk warp that has been lying dormant in one of the drawers for a few years. It was the warp that I used to sample my arrangement of paisley shapes before I moved on to the real project. It was all heddled up and ready to go. Brilliant. As much as I love making string heddles, being spared having to make the seven hundred and twenty that have already been made for this warp made me very happy. I loved being able to revive this warp. The rubber bands had rotted but the sticks had not jumped out of the cross. I don’t know if it was a conscious need to be color coordinated when I chose that pretty blue for the string heddles. That’s a DMC mercerized cotton thread in size 60, from memory.

Because the silk threads are so fine and because there are so many ends, I use four sets of string heddles to help me to do the double weave pick-up. Warp-faced double weave can also be done using just two basic sheds which is what enables us to do it on inkle looms. That is the method I teach in my book Warp-faced Double Weave on inkle Looms. It works beautifully when weaving narrower bands using thread of larger girth.

The pattern appears on both faces of the cloth with colors reversed. I find warp-faced double weave a very nice structure for designing and include a tutorial in my book with suggestions on how to go about it. There are no warp-floats to consider which means that anything that you draw on the chart will be structurally sound.

I used a metal rod in the warp ends which is then lashed to the warp beam. This enables me to create a third selvedge. You can see that in the center picture above. Using a metal rod is not traditional and is just one of my own quirky practices! It works for me and makes it easy to remove a partly-woven project from the beam and store it away. These soft colors are so nice to look at after all those months of black!

And so, I continue sampling my hummingbirds and can test my charts of bits of foliage in the process.

In the real project, whatever that might turn out to be, I won’t be leaving all that open space. That will be mostly filled with foliage. It will be quite a busy scene.

This is one thing about warp-faced double weave that should be kept in mind. In places where there is no pick-up pattern, the two layers of double weave do not connect. The two layers of double weave in this piece are bound at their edges by the green strips of plain weave. Wherever there is pattern, the layers are connected. The fabric can feel unstable or even experience a sort of ballooning effect if there are large plain solid-color areas between the figures.

I think that I am pretty happy with these two figures but there’s still some work to be done on the others. I also want to experiment with weaving the hummingbirds as solid shapes rather than as outlined figures. I think that it is fun seeing the birds emerging from the splash of paisley shapes. I enjoy using my ice cream-stick shuttles which are just the right size for this piece

This will keep me busy for a while and in the meantime, I will think of what exactly I want to weave once I am happy with the designs. If you know me at all, you will know that I am really all about the process. The idea for the product may only come once the fabric is off the loom. I agree that it’s a strange way to operate.

And here’s some more gorgeous blue. Lately, I have been creating to-do piles instead of to-do lists and so my bedroom floor is an obstacle course of little piles of yarn, woven samples and scribbled notes to remind me of my intentions. Among the piles is some beautiful indigo-dyed 30/2 (or perhaps it’s 20/2s?…I don’t remember now) cotton from Guatemala that I bought at an ANWG conference way back in 2013, I think. I don’t think that it is possible to buy more and so I must choose its project very carefully. I used some of it to weave a couple of journal covers as gifts. You can see my friend Claudia’s initials in this piece that I wove some years ago which lay along the spine of the book….

At the moment the thread sits in a pile next to my weaving spot simply because I like looking at it. I haven’t yet come up with the idea of what I would like to do with it. Actually, just pausing to stare at this picture on the screen is starting to give me ideas. Maybe it is in fact 20/2s. Hmmm….I have some white 20/2s but do I have dye for cotton?

But then there are all the other piles to consider. There is certainly no shortage of projects to keep me busy for the rest of the year. I know that I won’t be traveling anywhere this year no matter how optimistic some people seem to be in other parts of the world.

I know that one day my life might be very different and I will be wishing that I had more time to weave and so I plan to make the most of the rest of this enforced time at home. What about you?

Until next time…..

Backstrap Weaving – That Inevitable Question

If you are a maker, I think that you know the question to which I am referring in the title of this post….”How long did it take?”

I find that I am being asked that a lot when I show people the completed second panel in my Within These Walls series. I actually have to look back through my photos and find dates to be able to at least remember when I started this second one. I was shocked to see that the first picture that I had taken with the warp on what I call the ikat frame was taken on January 2nd. I am not able to process that! I can’t remind myself that…oh yes, I was doing that when a certain event occurred. I can’t tell myself that I was tying the heddles the day after I went to such-‘n’-such a place or that I dyed the warp on the afternoon after I hung out with a certain friend. I am sure that you can all relate. I am not doing anything or going anywhere to set the landmarks through which I can meander and mark the passage of time.

However, it’s strange that I can remember the song I was listening to when I wove the first hummingbird as that marked a change in pace. I recall the episode of the BBC comedy show I was listening to when I was roughly an inch into the chaos section because it had taken an inch of weaving that pattern to convince me that this idea was going to work. I know which re-run episode of The Gilmore Girls I was watching when I reached the main blacked-out section of the design because that blacked-out section reduced the amount of pick-up I had to do in each row….it was an event! 

I just don’t know WHEN those things were happening. Were they two weeks ago, a month ago? Not that it matters. I really have settled into this sort of timeless existence and I am sort of okay with that. I had wasted a lot of head space getting anxious about Carnival and its associated disruption. It didn’t happen. It was DEAD QUIET…seriously, not a peep! So, I can’t even associate part of the weaving process with Carnival craziness. Not that I am complaining! 

I have to say that I enjoyed every step of the process….the drawing and charting, the warping, bundling, wrapping, soaking, dyeing, drying, unwrapping, heddling and weaving! Even a broken thread didn’t phase me. However, there was a jolt when I realized, at some distance into the  weaving, that I had neglected to wrap one part of one bundle of twenty threads. How to quickly become an expert in replacing broken threads…replace twenty of them in a row! I had to tie and dye a bundle of twenty ends so that they would match the color changes in the warp and then cut out the offending threads and replace them, carefully matching the black and red sections along their lengths.


A big part of the enjoyment in every step came from the fact that there had not been anything nagging and telling me that I need to hurry up because I’ll be traveling soon and will need to stop weaving to spend weeks winding literally hundreds of warps for up-coming workshops. But, having said that, gosh, I miss the traveling and weaving with friends! Thank goodness for Zoom.

A weaving party at Janie’s!

Anyway, here’s the finished second panel (which is actually Part 1 of the story told by this series)…

If you know the Bob Marley song Three Little Birds, you might know the message of hope that the little hummers in this piece are bringing me along with yarn and sticks for my loom.

Here are two of the three panels….

The third panel will soon be underway. I’ll be using doubled 140/2 silk for it in a different tone of red. It will be the center panel and for that reason I think that I can get away with it looking a little different color-wise. You might ask what in the world am I doing with 140/2 silk. Allow me to drop some names! These cones were given to me by Betty Davenport and Sara Lamb who had decided that they certainly were not going to put them to any use. They have sat in my drawers for quite a few years and now out they come to rescue my project. It’s a different kind of silk and I hope that it takes the black dye as well as my 60/2s does.

And now I have realized that I really need to weave a fourth panel.

The third one in the series, which is the one on the left in the photo above, shows me in my present timeless state…happily weaving away within my walls in my own little world with everything outside the walls being a big black unknown. I think I need to finish the story with a panel that shows that I am actually able to imagine myself in a future post-pandemic world. I had a dream recently in which I could hear magpies singing outside my window which is a very Australian sound to me. It was so real. Birds seem to be carrying messages to me lately.

If you are unfamiliar with the sound of magpies, here is a little clip that I made the last time I was in Australia in 2019.

In this break between working on the panels, I decided to try out an idea for the fourth panel using some 20/2 cotton and warp-faced double weave.

I was inspired by Japanese braids that had been created on a takadai braiding stand that I had photographed at the Braids 2012 conference in Manchester, England. Yes, it has taken me this long to get around to taking a closer look at them.

What attracts to me them is the way the motifs are not contained within the width of braid. Sometimes you only see half the motif or even less lying along the edge. The motifs roll off the edge and then reappear later. If you understand that I want this fourth panel to represent the opposite to being confined within walls, you might see where I am hoping to go with this. 

My double weave sample is in black and gold 20/2 cotton with flowers that I saw on the Japanese braids just to see if I could create the same kind of effect using a totally different structure. The real project will naturally be in red and black 60/2 (or, more likely, doubled 140/2) silk and the motif will be humming birds. I am in the very early stages of getting this idea sorted.

So, that’s what I have been up to. Now I can show you what some of my weaving friends and online acquaintances have been doing…

Jessica used a band lock and rigid heddle in a backstrap set-up to weave this beautiful band in which the pattern is created by supplementary warp threads. You can see the brown belt that she uses to secure the warp to her body.

Susan Bratt is keeping all her friends supplied with her beautiful guitar straps. She uses a backstrap loom with dowel rods like I do and the patterning structure is Andean Pebble Weave. 

This beauty is by Rosita Scheidt using a pebble structure that doesn’t have regularly repeating pebble sheds. This is one of the classic Andean hook patterns which is charted in my More Adventures with warp-faced Pick-up Patterns book.

Here’s another classic Andean hook pattern that Joanne Teague wove on her inkle loom. This one appears in Andean Pebble Weave on Inkle Looms as well as in Complementary-warp Pick-up. That hook shape is the base of so many larger and more intricate Andean patterns.

This one was woven by Sally Backes. I love her beautiful dense twisted fringe. these kinds of knotwork patters work really well in Andean Pebble Weave. This is one that was designed by Louise Ström for tablets. She allowed me to adapt it to Andean Pebble Weave for my books. It’s in the More Andean Pebble Weave Patterns book.

I have shown Shilpa Nagarkar’s work here before. She combines bands and constructs the most amazing bags. There’s that classic Andean hook again in black and white. These patterns are in the pebble weave structure. She also weaves and includes bands that use supplementary-warp techniques and plain weave. Her piece is on one of the Windhaven double-sided band looms. You can see more of her work on Instagram.

Anyone for more hooks? The options seem endless and this is one of my favorites of the Andean hook patterns in the Complementary-warp Pick-up book. This was woven by Jennifer E Kwong.

To finish I want to show these five little dragon patterns in Andean Pebble Weave that I don’t believe I have shown before. Several years ago, I was asked to translate a popular historic double dragon figure that is traditionally woven using tablets to the Andean Pebble Weave structure. An online friend wanted to weave it on an inkle loom without using tablets. It’s the second one from the left. Of course, the chart I created is for a simplified version of the original and the structure is totally different. I liked the little dragons and looked for more tablet-woven bands that included the dragon heads. So, here are five of them.

The charts for these are included in my More Andean Pebble Weave Patterns book.

I am really excited about the fact that I have been invited to attend a presentation next Saturday by a lady who traveled to Costa Rica to learn about the preparation of cotton for weaving and the creation of cloth on a backstrap loom. I had no idea that the backstrap loom was still being used in Costa Rica by the Boruca people. I hope to have something to share with you about that next time.

Backstrap Weaving – Different Paths

Facebook is fond of showing me memories from past years and the latest one to show up is from November 2017 when I was at my brother’s home in Australia working on weaving the samples for my Complementary-warp Pattern Book. Sometimes, the will is there to start a new book but for some reason it is just so very hard to get the project off the ground. At times, I have started by laying out the table of contents in a Word doc and that has been enough to kick me into further action. In the case of Complementary-warp Pattern Book it was the act of sitting down with this lovely blank Andean Pebble Weave warp stretched out before me that started the ball rolling.

There would soon be four horses galloping along the length of that warp…four horses called “Eldy’s Mustangs” by their creator, my weaving friend, Deanna Johnson. I love the simplicity of this set-up. Another warp that I set up for this book would have angels dancing among snowflakes, candy canes and Christmas trees. I think that just the colors  that I had chosen would have provided a hint of what was to come.

And this next one was set up to display different kinds of maze-like and geometric patterns.

Watch and learn….Of course, I was focused on the way my teachers’ fingers were moving among the threads while picking colors to form the patterns. The body movements when using such narrow warps are very subtle.

All three warps are set up for the two-heddle pebble weave method that I favor when I weave this structure on my backstrap loom. The pencils that you see in the warp are holding what I call the “permanent picking cross”. In the twenty-four years that I have been traveling here and there to study these structures with my indigenous teachers, one of the most important things that I have brought home with me time and time again is the fact that there is no one correct way to do things. There are many different paths that can be taken in order to arrive at the same place. I am so glad that I have been exposed to four very different methods that can be used to weave the Andean Pebble Weave structure.

The set-up that you see in these photos was the one that was taught to me by my very first teachers back in 1996. The mother and daughter who sat with me day after day as I wrestled around with those two sets of heddles came from Ayacucho in Peru. They happened to be living in Huancayo at the time.

I would like to say that they sat by patiently as I made a mess of their carefully prepared warp but it isn’t so. They were perplexed and annoyed by the fact that I was pulling away so violently at the heddles. My warp threads were breaking with all the friction and abrasion. I was not aware at that time of the role my body needed to play in the operation of the loom. The body needs to move and make subtle changes to the tension on the warp which makes the smooth operation of the heddles possible. Several movements need to be coordinated and when you finally find yourself picking up and slipping into the rhythm, it’s almost like a dance. Until then, you are brutish and clumsy and the result is heddles clogged with fluff, broken warp threads and annoyed teachers!

I didn’t understand that there was much to be learned about basic backstrap loom operation before I could hope to learn about the patterning technique. Fortunately it all started to come together eventually.

You can see my teacher picking out her pattern while working close to the cross sticks. This is the method used by weavers in Ayacucho. The two sets of heddles hold the regularly repeating pebble sheds….those that create the little spots, or pebbles, in the fabric.

(If you also find yourself seated at a nicely prepared warp but are unable to progress because of heddles clogged with fluff, you might consider taking a look at the video class that I prepared back in 2016…Operating a Backstrap Loom. It’s available as a dvd or as streamed content from Taproot Video.)

My weaving teacher here in lowland Bolivia uses this pebble weave structure on the large vertical frame loom that is used by the Guaraní people to weave hammocks. Angela uses three sets of heddles…one set holds the threads from one of the two pebble sheds. A second holds all the dark threads and the third all the light threads. The threads for the second pebble shed lie on a shed rod or in one large loop depending on the width of the piece being woven. The Guaraní weavers have a very interesting way of making their string heddles. You can see how they are sort of chained together.

Angela was only working on very narrow commissioned pieces when I studied with her and so I have included here a picture (courtesy of Aude Rossignol) of another Guaraní weaver who is using the full width of her loom for a hammock in pebble weave. You can see the advantage of those loose chained heddles on such a wide piece. If the heddles were suspended on a rod, it would not be possible to just pull on the rod and achieve a good shed clear across that wide warp. This is a fixed tension loom and so using the body to make tension adjustments as one does with a backstrap loom is not an option. Instead, the weavers pull on groups of chained heddles working their slowly way from one side of the loom (in this case from right to left) to the other and inserting the sword as they go.

Picture courtesy of Aude Rossignol.

My weaving teachers in the central Bolivian highlands use yet another method when they weave narrow bands to create the same Andean Pebble Weave structure…

The only name that I can think of for this kind of loom is “body-tensioned”. Maxima’s index finger is one “beam” and her big toe is the other. Her left index finger is permanently in this position to maintain and adjust tension on the warp. All loom operation and pick-up is done with the other hand. There’s no backstrap. The warp is set up with one pebble shed in heddles and the other pebble shed in one large loop. Max makes a picking cross with these two sheds and from there picks the colors to form her pebble weave patterns. And, you should see the speed with which she does so!

The last time I visited Max and the other ladies in the co-op, I demonstrated a new pattern for them using a warp that was tied to my waist in the manner to which I am accustomed. I could see Max studying me and I could almost see from the expression on her face that she approved of this set-up which gave me two free hands with which to operate the loom…a definite advantage when working with the rather sticky handspun wool thread. All the ladies kicked off a sandal and started winding warps using their fingers and toes as warping stakes. Max took a length of yarn and tied hers to her waist. She had decided to try out this “new” method that I was using which involved tying the warp to her body rather than just suspending it on one finger. To my surprise she was immediately mocked by all the other ladies for wanting to do things the “gringa” way!

Max, Antonia and some of the other ladies learned to read my pattern charts. You can see a picture of Antonia showing off the band she wove using patterns from the book I had left behind. Don’t we all love to learn new patterns?

The fourth way is the way that is used by some of the backstrap weavers that I have observed in the Cusco area of Peru in my travels. We were also privileged to have two ladies from Chinchero come to Santa Cruz Bolivia, where I live, to attend a small conference that was held here back in 2011. Only a handful of people from the general public applied to attend and it was wonderful to be able to spend so much quality time with these weavers over the three days that we had together. My Guaraní teacher, Angela, was also invited to demonstrate.

The warp being used by the Chinchero weaver in this picture is set up with all the threads of color A in heddles and all the threads in color B held on a shed rod. She uses two swords to hold what I call a “temporary picking cross” in which all the threads from both layers of warp are raised at the same time and held on swords. She can weave a variety of complementary-warp structures using this method. Some of the patterns that Chinchero weavers use are a complex combination of more than one structure which means that there is no real advantage to storing the pebble sheds in heddles. Some parts of a large motif can be woven using the two-two-two pebble arrangement of warp floats while other parts of the very same motif can be based on a two-one-two-one arrangement.

This two-sword method is he one that I teach in my Complementary-warp Pick-up Book. In my Andean Pebble Weave on Inkle Looms book I teach both this and a modified version of the two-heddle method. In fact, I teach three methods in that book.

You might have guessed that my favorite method for the backstrap loom is the first one that I showed with its two sets of heddles. For me, it has many advantages. I won’t go into them but, if you have ever taken one of my Andean Pebble Weave classes on a backstrap loom, you may recall my talking very enthusiastically about a thing called the “saver cord”. On the inkle loom, I guess I prefer the two-sword method of the three different methods I teach on that kind of loom.

Mary Spanos has woven with me on several occasions when I have been visiting the USA. She loves the backstrap loom and recently showed me her latest project….

This is a Japanese sashiko pattern that is charted in my Complementary-warp Pattern Book. Julia Weldon translated the traditional stitched pattern to the Andean Pebble Weave structure and kindly contributed it to the collection. Mary is weaving it beautifully into this band. I particularly like the way that she has chosen to use a lavender and white strip of plain Andean Pebble Weave as a border stripe instead of a solid color.

And, here’s another band by Mary using a series of fish patterns from the same book alongside some of her own creation…

Carlos is also using a backstrap loom and the two-heddle method to weave a wide piece of fabric to be made into a shoulder bag. The same book mentioned above has charts for three bee motifs. The center bee on this piece is included and is Carlos’ own creation.

Lausanne also learned the two-heddle method using a backstrap loom with me on one of my visits and you can see her here weaving a hatband for her husband with, yet again, a pattern that is charted in the Complementary-warp Pattern Book (from a pre-columbian textile fragment). This is one of my favorites…one of some cheeky viscachas rocking to and fro…

Here it is on the hat….

Annette Giles is using the two-sword/temporary picking cross method to weave the Andean Pebble Weave hummingbirds. Yes, they’re from that book again.

And, here are some initial results from Carol Berry from one of the very first Zoom classes I gave on Andean Pebble Weave on Inkle Looms…

So…… enough pebble weave! How about some double weave?

Nancy Ayton is using her inkle loom to weave warp-faced double weave bands and is creating her own fabulous patterns. Don’t you love the elf?! That’s just one of Nancy’s original designs on this band.  The band includes some motifs from my book Warp-faced Double Weave on Inkle Looms.

I think I will weave the elf on a set of Christmas tree hanging ornaments like the ones I made last year.

On Maureen Farndell’s warp-faced double weave band you can see the motif that I adapted from Bedouin textiles and charted in the book. It’s lovely the way she has connected the motifs and turned them into one continuous pattern along the length of the band.

As for me, I am plodding along with another silk ikat sample. This one is a study of take-up  and the number of warp-ends and picks I need to create a square. Hopefully the information on take-up will help if I later decide to try and tie some curved shapes into a warp. I do hope so because the study sample pattern I have chosen is just plain boring to weave! It’s rare for me to sit at my loom and think “Urgh, I just couldn’t be bothered”! But sometimes you just have to slog through this sampling process. Hopefully, when it comes time to write my next post, it will be off the loom and I will be on to something else with all the valuable information I have gathered from this sample.

Until then….stay safe and well.