
Backstrap Weaving – The Sounds of our Craft

It’s been a while since I last heard the scritchy sound of hairy warp threads releasing their grip on each other as I open sheds on my backstrap loom. I am hearing it now because I have taken on the challenge of weaving with mill-spun wool singles that I bought from a farm while traveling in California. I don’t really know what I had in mind when I bought that yarn. I had just wanted to buy something as a souvenir of that part of my travels from the lovely people who had allowed my friends to gather and weave in their barn.

Because traveling to far off places to buy yarn like this is off the table at the moment, this is another case of my exploring my dwindling stash and enjoying the new challenges that this presents. My idea is to use this yarn to weave the body of a bag that will go with the strap I just finished. I used a three-color reversible Andean Pebble Weave structure for this strap and the wool yarn that I had been spinning and plying on a drop spindle during pandemic Zoom gatherings.

Despite the dark colors, I think it’s a happy garden scene of flowers and hummingbirds.

I did start off with the idea of creating an orderly, cohesive pattern layout but the temptation to play with the three colors and pop those hummingbirds wherever I wanted took over and I had a lot of fun doing just that.

One thing that I had wanted to do was use one color for the pebble spot that represents the hummingbird’s eye and another color for all the other pebble spots that sit within the figure’s body…but you know, I forgot to do that every single time! Well, almost every single time. I was determined to remember to do two things before I eventually finished the band…take a picture of myself at the loom working on it and get those colored eye spots in!

I once met a bird photographer that told me that it is really important to capture the little spot of white light in a bird’s eye in order not to have it appear lifeless. I have looked for it in every bird photo I have seen since. In the same way, I think the different colored eye spot on these last two hummers makes an enormous difference.

I didn’t hear any woolly scritchy sounds while working with this hand spun of mine. I had been concerned about how well it would stand up to this rather dense structure but realized after a while that I had completely forgotten all my concerns and was able to enjoy how friendly it was and how lovely it felt.

I remember the first time I wove with my hand spun. It was with some rather nasty dry and dusty llama fiber that I had bought from the animals’ owner up in the highlands. At the time, the scritchy tearing sounds were freaking me out and the yarn I had spun was anything but soft and lovely to handle. I had put a tremendous amount of twist into it so that it would stand up to warp-faced weaving. I don’t do that any more.

And now, there is a new experience…weaving with these mill-spun singles. This is a first for me. Yes, there’s some “scritchiness” but I am actually finding it pleasant…almost like the warp is whispering to me. That llama fiber had seemed to be screaming at me in that first-ever experience. I made adjustments to the way I was spinning it, it became friendlier, and I was able to enjoy weaving with it more. 🙂

This is my sample for the bag fabric that will follow. I wound a warp of 27″ length and 160 ends. The idea was to weave and allow it to settle into a consistent width so that I could then make calculations for the bag fabric. I most typically start off too narrow with new-to-me yarn and have to let the piece gradually widen and settle. Once I am happy with that, I put it aside and work on the real project. This time, however, I was enjoying working with this wool so much, I decided that this piece really needed to be something and I figured that my cell phone, which currently sits in a case, could do with a pouch. So, I unwove a good 3″ of fabric so that I could start over at the correct width. The fact that I was able to unweave the warp-faced cloth woven with wool singles yarn without losing my mind, tells me that this yarn and I are going to have a happy weaving relationship.

And I decided to use some of my plied hand spun as supplementary weft to weave in a pattern. This is some of the thicker “Zoom” hand spun that I first created and used to weave a wrist cuff before deciding to try and go finer. It is making a very nice supplementary weft. I am using the outlining technique of supplementary-weft patterning in which the weft does not travel from selvedge to selvedge. I can make my hand spun yarn go further that way. It is precious to me and I don’t want it to be just hidden away between the layers of warp as it travels to the selvedge. I can’t tell you how much fun I am having with this!

Wrist cuff with the initial run of hand spun.

A couple of observations: There had been a tendency for me to think that the action of the heddles against the wool would be the cause of most of the abrasion and subsequent pilling or shredding. Lately I have found that with good loom-operation technique, this isn’t so. There is actually a point of layer exchange that sits between the heddle and the shed rod where most of the abrasion is occurring for me. This exchange happens when the threads that lie on top of the shed rod are lifted and brought down through the heddles to the weaving line. (I keep my shed rod stationary and don’t slide it forward to the heddles as some backstrap weavers do which explains why the point of layer exchange on my particular warp is in that position.) That abrasion point is the one I need to watch and I notice that a little bit of fluff accumulates there. I am particularly gentle there and tend to spread the threads with my hands and lift them through that point in sections. It is also important to advance the warp as often as possible so that the abrasion point is constantly changing position.

I love the multiple tones in the warp and its rustic look. I had considered a hummingbird pattern but decided that this one better suits these natural earthy colors.

But despite all that gentle handling, the warp does continue to whisper to me in its scritchy voice, possibly just as a reminder not to get cocky and careless when I open the sheds. This talk of sound playing a part in our weaving, reminded me of some thoughts I had posted way back in 2013 that I thought I would revisit and share with you.
tools01

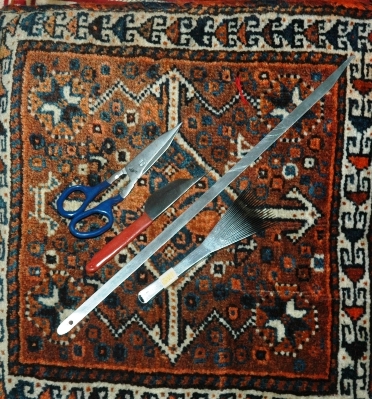
Back then, something a weaver had posted on the Weavolution website had resonated with me. An Australian gentleman, Hakim, was learning to make cut pile knotted rugs with an Iranian teacher in Australia. He said that when he is at home working on his practice piece, he can tell that the tension of the warp threads is correct if they make the same sound  when he handles them as they do when he is working on his learning piece with his teacher in class.

What a piece of priceless knowledge!

(At left you can see an example of a set of tools that Hakim was able to get for me from his teacher for the day when I try this technique. It’s on that long, long to-do list).

Hakim’s comment made me think about the different sounds that are connected with weaving on simple looms and how much I enjoy them.

I am not one for placing things in my ears and listening to music while busy with something else. I can’t stand that. I like to be in touch with the sounds around me. They form a very important part of my memories of places and experiences.

In my skiing days, I would wonder at people who skied with headphones on. I would never give up the pleasure of hearing the wind and the swish of the skis on the snow, or the sudden change of sound as snow turned to ice giving me time to react and adjust position. Back then, no one wore helmets. I am told that the helmets being worn now don’t affect the skiers ability to enjoy those sounds.

I learned to fly a glider when I was 19. There is nothing like the sound of an engine-less craft rushing through the air. There was so much with which to be occupied while learning (especially for someone like me who was so utterly un-coordinated at the time!) but I could always simply rely on my ears for certain information. For example, if the sound of the rushing air suddenly disappeared it was a sure sign that I had the nose up too high and that told me that I had better do something quickly before the glider stalled!

When we first went into pandemic lockdown here in Bolivia, I remember finding the sudden absence of sound really disturbing and almost frightening. Then I realized that what was missing were familiar sounds of human activity and that they had been replaced by much more pleasant ones…bird song and the sound of leaves being blown across the cobbles…sounds that normally were drowned out by the hum of city living.

As for sounds while weaving, I love using multiple big swords. I so enjoy the musical tok tok sound they make as they knock together in the sheds. And I love the chuckling chatter of all the sticks on the loose as they fall together when I release tension and roll up the warp at the end of the day. Below, you can see the sticks I used in a wall-hanging piece….many different kinds of wood making interesting sounds. It can become quite a collection.

O

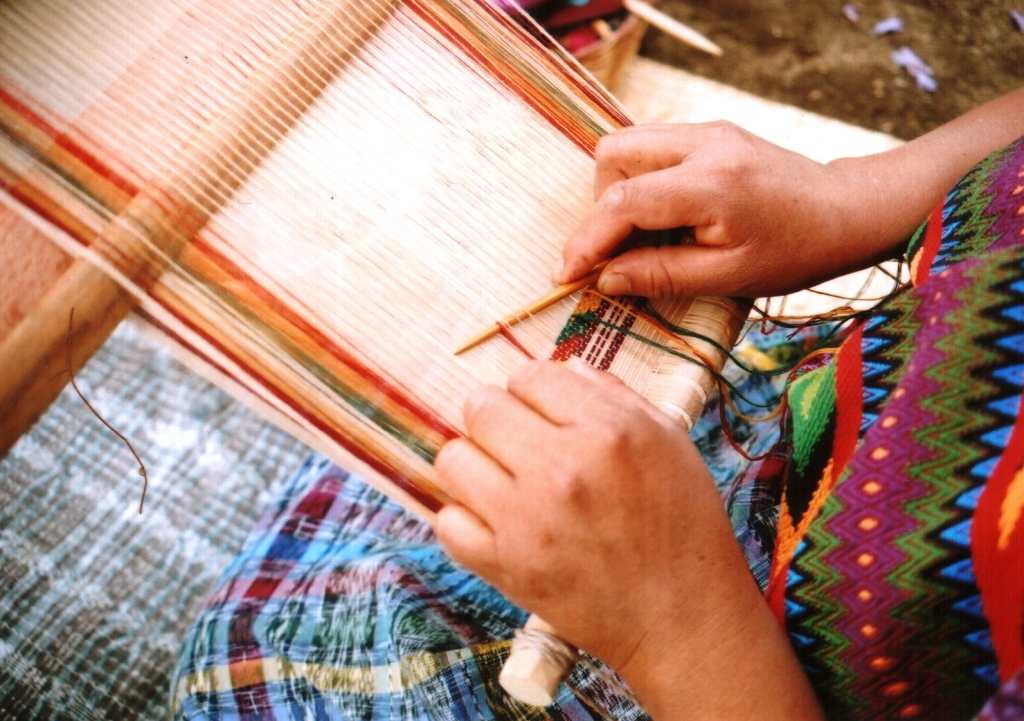
Then there’s the plink plink sound as the tip of a delicate Guatemalan pick-up stick slides from one taut warp to the next as the weaver counts out threads for supplementary-weft inlay.
weaving-tijera

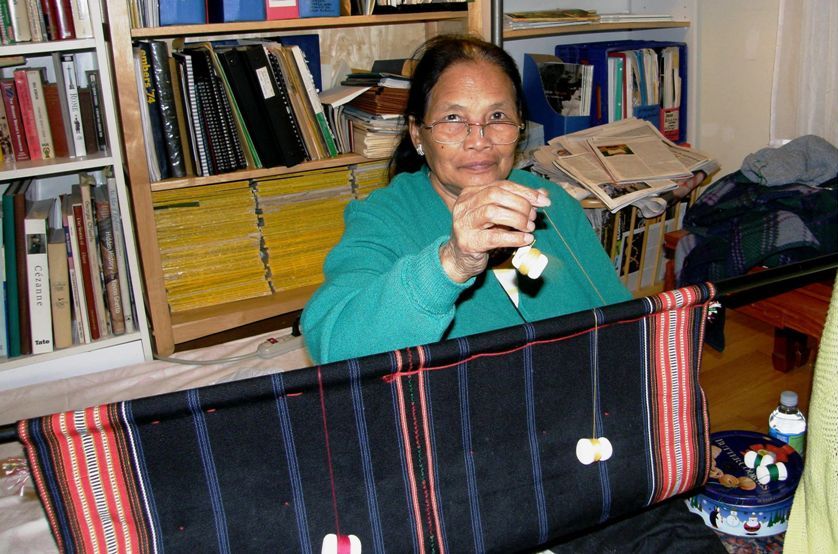
The dancing dangling bobbins used in weft twining go clackity clack as they twist and jiggle.
final-twining-session

And they enable my teacher to create such beautiful work as this:

Examples of kteh work by my Montagnard weaving teachers.

I loved the opportunity to drag the llama bone tool across the strong highly-twisted wool threads that my teachers in Peru had prepared below…scritch, scritch, as I strummed to help separate the warps. Only warp threads with certain characteristics will tolerate this.

O

Listen to my teacher doing it…

If you stroll around a  village of weavers in a certain part of the central highlands of Bolivia, you will know in which houses a weaver is at work by the LOUD THWACK!! THWACK!! of the llama bone hitting the sword as the wefts are slammed into place. That sound is one that is not really pleasant, at least not to my ears, when I am seated right next to my teacher. Here is one of my teachers in Candelaria at work at her loom:

When I stayed in the stilt-house home of my weaving teacher in Ecuador, I was often awoken at dawn by the muffled thump, thump and accompanying vibrations as Trini drew down her heavy beater while working at her vertical loom. This was combined with various house shaking and creaking sounds as the loom was connected to floor and ceiling beams…a part of the house itself. You can see that big sword/beater lying across Trini’s leg below and get an idea of the muscle that goes into operating this particular set-up.

trini-opening-shed1

The sound of threads in a warp-faced weaving rubbing past each other as a shed is opened can range from a soothing smooth swish to a seemingly painful tearing protest depending on the yarn being used and how it has been prepared.

When weaving with new backstrap weavers, we even learn to be amused by the constant clatter of swords jumping out of their sheds and hitting the floor. Each sword has its own musical tone…nowhere near as much fun on a rug! A cement floor like the one in this picture greatly enhances the melody.

Joan following a pattern chart at the Mannings.

By the way, I am in charge of picking up the fallen swords….gives me something to do. It is funny that as time goes by we have people weaving in silence. What happened to our musical accompaniment? Well, new weavers, without even realizing it, get a feel for the right amount of tension and the sweet spot in the warp where the sword will sit happily upright and not leap to the floor. Or…they just get rather good at catching the sword on its way down!

Maybe one of the nicest sounds for me is the fwip fwip fwip fwip in rapid succession as I pull my heddle string quickly but carefully (or else it will tangle miserably!) off its heddle stick. This means that the piece is finished.

And with that soft, happy sound in your head, I will leave you.

Until next time.

Backstrap Weaving – What if?

When I last posted, I had just wound this warp using my “Zoom” hand spun, that is, the wool that I had been spinning and plying on a drop spindle during the various pandemic Zoom sessions that I have been attending. It took a while for some participants to get used to my sitting there with my arm raised as I attempted to get maximum drop distance for my spindle. I was often asked if I was signaling my desire to ask a question. I hope I wasn’t too annoying!

I dyed the blue and tobacco colors so that I could have three colors that would work well together on both faces of this three-color warp. Basically, I wanted to work with a dark, a medium and a light color and the challenge was finding a medium color that contrasts well with both the light and dark.

I am not sure why I always seem to find myself working with wool at some point in the hot, steamy summer months we have here. It kind of made sense when I was traveling a lot as these summer months used to be the longest period of uninterrupted time I would get to spend at home. I would work on as many different projects as possible before having to think about workshop prep, packing and traveling again. But now I have all the time in the world as I play it safe at home and can be more selective about which project I tackle, and when. I suppose stash limitations may have something to do with my choices now.

In my last post I told you that I had bought Joan Ruane’s video class on Spinning Cotton on a Takli from Taproot Video. I am using Joan’s spelling of the word takli. I am only 30 minutes in on her 2-hour 20-minute class and have already learned so much. I get to spend a little time with Joan via Zoom as she is part of the Taproot Video team and I was once her roommate at the Mannings. However, I had never seen her in teaching mode and I can tell you that it is no surprise that she is fabulous.

The blue and brown above are my early attempts with the takli from a few years ago. The white is the remainder of what I bought from a spinner in Guatemala back in 2008. It’s what I used to weave the little sheer-cloth sample that you can see in the photo.

I got some lessons in spinning cotton with Trini and her mother, Luz in coastal Ecuador in 2007.

Now I just need to figure out a way to use the takli comfortably while participating in the Zoom gatherings. I had a few wool plying mishaps when I got too engrossed in what was happening on the Zoom screen. I expect I will be presenting a furrowed brow of concentration to everyone as I try to put what Joan is teaching me into practice. I have a wooden mortar that I could clamp between my knees to use as the platform for the takli. Joan says that using something wooden has the advantage of being virtually noiseless although she does say that it is better if the bowl does not have high sides. I’ll see what I can figure out.

What to do with the cotton? Well, I guess that I would like to use singles in another sheer cloth piece using one of my bamboo reeds. This is what I wove using the hand-spun singles that I brought back from Guatemala. This is part of a scarf that I wove.

But of course I am getting way ahead of myself! I know that I need to put in lots of miles of practice before I can produce something with which I am satisfied.

As for my current hand-spun wool project, I have always said that warp-faced weaving really flatters my hand spun. It’s a very forgiving structure for those thick and thin bits in my yarn. When the threads are all pressed up close together they look wonderfully even. I am pleased to say that my yarn is holding up beautifully. I don’t have to think anymore about the possibility of it being abraded to the point of breaking and am focusing on the colors and patterns instead now.

Which is where the “what-if” comes into it. I have given up any thought of creating an orderly and cohesive design on this strap because I simply can’t resist the urge to explore the what-ifs. What if the hummingbird is outlined in white with a tan filler, for example….what if I reverse that…what if the body and wings are two different colors…what if I change the pebble spot color…how many variations can I create? And so on!

5 hummingbird varieties.

I have a nice assemblage of tools by my side…swords, pick-up sticks and a tool I use to press the weft extra-firmly into place. I have to add my long thumbnails to that group. They really are my favorite tools! I am blessed with having nails that grow as hard as rock. I usually have to cut them back now and then to a socially acceptable length.

You’ll also see some leafy what-ifs here.

This is destined to become a bag strap. I have some lovely wool singles that I bought from a co-op farm while in California. The owners used to allow my group of backstrap weaving friends to gather in their barn. It will be nice to weave something with fiber from their sheep that they had sent out to be spun. I guess I will dye it dark blue and use it for the body of the bag. I am thinking plain dark blue with perhaps a three-color edging to which I will add this fancy strap. And what if I add some lines of color in weft twining to the body of the bag? I love those what-ifs!

Wool singles from the farm.
Fond memories of weaving in the barn.

Maybe I’ll have some of my hand-spun cotton efforts to show next time. And before I forget, you may remember my mentioning, Allen Berry as the maker of beautiful swords for backstrap weavers (allenrberry on Instagram) when my weaving friends gifted me two of his gorgeous pieces a few years ago. Here’s one…

An Allen Berry sword with some of my wrist cuffs.

He doesn’t have a website and so you will need to go to Instagram to see his work. You can contact him via a direct message there. I am not sure if he still making the swords but the reason I am telling you this is because he has added, along with his many other wooden spinning and weaving tools, ADORABLE dishes for supported spindles. Here’s just one example. Go check him out on Instagram (allenrberry).

And while you are there, you might like to follow me. I am on Instagram as lavernewaddington. I post quite a few things there between my blog posts. See you next time.

Backstrap Weaving – An Interesting Beginning

First of all, I will say that I am not superstitious. I jokingly wrote on this blog some time ago that getting bitten by a dog on a recent outing was a sign that perhaps I was getting too cocky in the range and frequency of my outings. And then I opened my big mouth in a Facebook post on December 29 with this: “I feel less locked-in now and more able to manage this situation we all find ourselves in.”

The universe responded: “Lol, that’s what you think.”

I strolled a block and a half to the bakery on Dec 31 and….bam! Five days later, Covid. Yes, sometimes you just get unlucky. I am well now, feeling back to normal and grateful that I had managed to get an AZ booster before this happened. First task now…find better masks. The chief medical officer in Australia is now coming straight out and saying that in the face of the more contagious Omicron, cloth masks (I am guessing he is talking about those home-made ones that we were all using) should not be used. I had been lining my two-layer cloth job with two disposable masks…still no good.

So, yes, the beginning of 2022 was “interesting”.

I had what I am calling Covid-head for a while which I would describe as feeling like particularly bad jet-lag. I dared not touch my weaving after losing the plot and destroying one of my PowerPoint presentations. This is what I had been working on before I got ill….

3-color reversible Andean Pebble Weave

This is 8/2 tencel and my attempt to get once more accustomed to the steps that I use to produce this 3-color reversible structure. My plan was to use the structure with my hand spun and I didn’t want to risk stressing my yarn with a whole lot of fussing about and unweaving while I got back into the swing of this technique. I wouldn’t call the way I do this efficient and I am waiting for that magical “aha” moment to come which will allow me to eliminate a step or two… or three. For now, I just plod along with it because I love the results.

Wrist cuff in 3-color reversible Andean Pebble Weave

During the pandemic I have been pulling out every bit of wool I can find in my closet and spinning it on my drop spindle during the various Zoom gatherings I have been attending. It has been slow going because I have only allowed myself to spin during these few gatherings. Goodness knows what I will do now that I have cleared out my closet and there is no more wool left to spin. Actually, there is a bunch of cotton to spin in there as well as alpaca…..

Part-way through the spinning project, I paused to try some of my yarn in two small wrist-cuff projects. I wanted to see if it would be able to stand up to the extra handling that it would experience in the 3-color method. They were just very short warps but I did feel confident after that test that my yarn would perform well even in much longer warps. I decided then that I would try to spin finer hoping that I could also produce finer yarn that would stand up well. That remains to be seen.

Applying an eye-pattern tubular band to a second 3-color pebble weave cuff in my hand spun.

I’ve been enjoying the tencel project. It’s just a mish-mash of various shapes and color combinations. And, yes, there are hummingbirds.

It has allowed me to play with swapping the outline and background colors and change the pebble spot colors at will. After sampling, I decided that a red outline with a green filler looks good against a yellow background while the same thing does not look good against a green background. The funny thing is that I had to walk away from this every now and then because the colors would suddenly start to get on my nerves! This never happens when I work with only two colors. So, I would go away and do something else and then return, look at the piece, and fall in love with it all over again.

Yesterday I knew for sure that I was fully recovered from Covid because instead of giving in to the post-lunch urge to nap, I was able to easily push it aside and go wind a warp.

These are the four colors I chose from my little stash of hand spun wool. Three will be part of the 3-color pebble and the one in the foreground will be the narrow border. I wanted to come up with a project that would allow both faces of the piece to be seen after going to all the trouble of using this reversible 3-color technique. I decided that a strap for a bag would be perfect….not very wide, but long enough to be able to play with patterns, and both sides would be seen. So, I am working completely backwards by first weaving a strap and then planning a bag to go with it. It’s not like I need a bag…I just like weaving and if I need an excuse and the piece simply MUST be something, then a bag strap it will be.

I know what you are thinking…that’s one ridiculously wide strap…but this will narrow considerably once I start weaving. My hand spun is finer than the 8/2 tencel and this warp has the same number of ends as that tencel sample. One of my concerns is that the blue is a tad thicker and hairier than the other two colors and may swallow them up. There’s only one way to find out, though.

I just really like this shot. It almost looks like ikat. This was right after I had made the heddles. I was testing my heddle-making by clearing the sheds. The three colors played together briefly as I raised one color layer above the others. It made for a pretty picture.

And so, I start 2022 with a weaving project that I find challenging and interesting, a collection of Covid anti-bodies (which of course won’t last forever), and the need to find something else to do during those Zoom gatherings. I find it impossible to just sit there. Maybe I will get back into learning about cotton spinning. I was playing around with cotton spinning a few years ago and even wove with some of the results, which you can see below, when I was studying the sheer cotton cloth with supplementary-weft inlay that is woven in some areas in Guatemala and Mexico. It’s the stuff of a beginner spinner but I was pretty pleased with it at the time

By Rodrick Owen

So, I just bought Joan Ruane’s video class on Cotton Spinning on the Takli from Taproot Video because I really need some guidance.

While on the subject of Taproot Video offerings, I should also let you know that Rodrick Owen’s beautiful book on braids that was published in 1995 and which is now out of print, has just become available for purchase as a PDF.

You can see that I am in some very fine company on the Taproot Video website! I hope that in this new year you might consider buying one of my books at Taproot Video if perhaps you have been thinking about it. We niche-craft authors need all the help we can get. Tell a friend, please! See you next time.

Backstrap Weaving – A Bit of This and That

I’ve been spending a couple of weeks finishing things off, sampling, researching, soaking up some online inspiration and planning while I build up to getting into some meatier projects.

First I added the loops to my cuffs so that I could call them well and truly finished. I made simple three-strand braids from some of my hand spun wool, threaded them through the bands and knotted them on the other side. These slip over the buttons that have been sewn to the other end and secure the cuffs nicely around my wrist.

Next, I decided that I really needed to add a Finnweave cuff to the collection. It was fun planning and weaving this small Finnweave project after the larger one that I had recently completed. I used rows of curl patterns that are often found on Huichol double weave pieces and designed a pattern that I thought had a Mexican flavor to sit between them.

You can see the difference in the gold color in my Finnweave cuff and the cowl on the left. So much of the gold color came out when I wet-finished the fabric for the cowl! Not a bit of black came out and my Color Catcher cloth turned a deep gold color, almost orange. The cuff fabric in 20/2 cotton was light enough to allow me to turn a hem at the two ends without adding too much bulk. I used two black plastic snaps to secure it.

Apparently there is some golden yellow inspiration out on the streets these last weeks. I haven’t been out to see them, but the Bolivia 360 page on Facebook tells me that the yellow tajibos have been blooming. This is one of their photos…

So all three of the latest cuffs are finished and are ready for an outing one of these days!

I would love to also make a cuff from my three-color pebble weave sample in 8/2 tencel on the left but it is just that little bit too wide for any of my ribbon crimps and too thick to hem. It can sit in the sample drawer until I come up with an idea for it.

Next on the list was a return to something I had been playing around with back in early 2015. Back then, I was in one of my ikat phases and wanted to create shapes in ikat and fill them with pick-up patterns. I was heading in the direction of creating curved shapes in ikat to fill with pick-up and was working with 8/2 cotton at the time. I wove a wall hanging with angular shapes…two bird figures that I had seen in a book on a large piece of pre-columbian cloth…I ended up making three pieces in this series of birds. They currently live in my closet. Hopefully one day they will hang on my walls.

That project of angular shapes was followed by ikat circles which I also wanted to fill with pebble weave pick-up. It was successful except for the fact that I had forgotten to account for take-up. when I first tied the shapes into the warp. When I wove the cloth, I ended up with shapes that were certainly curved, but not quite circles. 

Now I am taking the same idea to my 60/2 silk and starting off once again with the somewhat safer angular shapes in order to ease myself back into this. But, I am not making anything nearly as large as a wall hanging! In fact, I thought that I might make this practice piece into a wrist cuff at first but decided that something a bit wider would be more helpful as a sample for future projects.

I used some red silk as the base color, tied it with ikat tape and dyed it black. I really shouldn’t take photos late at night as they are always pretty awful, but I wanted to get a quick picture of this so that it could go into the tub to soak overnight and be ready for dyeing the following afternoon.

I should mention that tying red warp with pink ikat tape is not fun! The colors are too similar and it was very hard to tell if the tape was reaching all the way to the margins of the pattern.

The pattern is a very simple one…horizontal and vertical bars that are supposed to look as if they are interwoven as warp and weft. I may have mentioned in other posts about ikat that I find creating straight horizontal lines particularly challenging. My bundles were pretty small. I find it much easier to wrap a thick bundle rather than a thin one.

Here it is on the loom with some of the shapes filled with Andean Pebble Weave pick-up….

I had by-passed my folders of charts and gone straight to the shelf and taken down my own pattern books to leaf through and choose a pattern.  I used one from one of my pattern books after having modified it to suit these small strips of weaving. I wanted a fairly busy Andean Pebble Weave pattern but not one  that had horizontal lines because I didn’t feel like fussing with the necessary modifications while weaving with this fine silk.

So far, the threads are behaving quite well. I think the interwoven effect would be more pronounced if there was less space between the vertical and horizontal bars. I was concerned that if I left too little space and if the shapes blurred along their upper and lower edges, one shape might end up merging with the next. You watch….next time I’ll leave less space and that is precisely what will happen!

I don’t often look at my own books because I have folders and folders of pattern charts with all the patterns that are found in my books along with so many  more that haven’t yet been published. And so, it was kind of fun looking through my Complementary-warp Pattern Book and remembering the time when I was putting this book together. I spent something like six weeks at my brother’s home in Australia drawing charts and weaving the samples. That visit to Australia was supposed to be about visiting family and then popping over to Bali to take a workshop on weft ikat. You may remember my tale about being five hours into the six-hour flight to Denpasar when a volcano on the island of Bali erupted. That forced us to turn back and all flights from Australia to Bali got canceled for a week or so after that. Of course, the workshop went ahead without me.

And so I  stayed in Sydney with my family instead and  work on the book continued.

Starting the collection of sample bands.

The book was finished something like four months later and it has been wonderful seeing these patterns being woven around the world ever since….

By Gonit Poratin Israel (right) using a backstrap loom and one of her students using the frame of a rigid heddle loom.

Frances Lewis used the fish charts from the Rivers and Oceans set to weave a band of fish, but using tablets instead of heddles. She filled in some of the fish outlines with her own pattern ideas.

Julie B liked the set of four cats in the animal section. I love weaving these too and wove them into a silk wrist cuff along with some of the paw prints that are also charted in this book. There are three different kinds of paw prints in the book.

Wendy made this beautiful hat band for her fisherman husband using the fish and other watery patterns from the Oceans and Rivers set…

Bees get a section all of their own in the book as there are four of them to choose from. Here is Carlos’ backstrap-woven bee piece…

Carlos was one of the designers who made a contribution to this  book. You can see his own bee design (below) flanked by some of the patterns from the Borders and Dividers set.

Original patterns contributed by Maja Burger, Laura McCarty and Carlos Vargas.

Nora included one of the bees and its hive in her band of patterns from the Garden-themed set…

I chose some patterns from this book (along with a couple from another one of my books) for the Christmas tree hangers that I made last year…

Could this be my favorite among my books? I’m not sure. I certainly had fun sitting down and looking through it while planning my latest ikat experiment and there are certainly some nice memories associated with weaving the samples (despite the disappointment of the failed Bali trip).

I guess one of the things I like the most about this book is the fact that there were so many contributions from people who had bought my earlier instructional books and then gone on to create their own awesome original patterns. Within the book itself, it’s impossible to pick favorites from the one hundred options. Julia transferred Sashiko sewing patterns to the Andean Pebble Weave structure. I love those. They are charted in the Geometric set.

I have woven my slightly adapted version of Maja’s weaving woman quite a few times. Yes, she might be my  favorite….my current favorite in any case! She appears on the cover of the book. The cheeky viscachas (Andean chinchilla-like animals) also appear on the cover. I charted this pattern from a pre-columbian textile fragment. 

I hope that if you own this book, you may now feel inspired to take it out and browse through the patterns as I have done. And, if you don’t yet own it, perhaps you will put it on your Christmas Wish List. Complementary-warp Pattern Book. And, if you haven’t learned how to weave Andean Pebble Weave yet, both my Andean Pebble Weave on Inkle Looms and Complementary-warp Pick-up (for inkle and any other kind of loom that allows you to weave warp-faced bands) books show you how.

Our national election here in Bolivia is this Sunday. I hope it passes peacefully. I have re-stocked my pantry in case it doesn’t but let’s hope that there isn’t a repeat of last year’s upheaval.

Take care and stay safe, please.


Backstrap Weaving – The Flip Side

Lots of people ask me about how the pandemic is affecting me here in Bolivia and there is plenty to say about all the negative ways in which lives have been changed. But, there’s also a flip side…at least there is in my case…and there are some positive things going on as well as a direct result of not being able to travel and being obliged to stay in one place. I was thinking about it and this is the longest period of time I have stayed here in Bolivia since 2005! There was a period prior to that during which I hadn’t left South America for nine years but, after 2005, I seemed to be regularly picking up and flying away.

This long period at home has my Ideas Notebook crammed with planned projects and leaves me with plenty of time to play with those things that do require more sampling, planning, charting and trial-and-error which, for me, is best done over one long uninterrupted period of time. I have lots of uninterrupted time.

I showed my finished Finnweave sampler in my last post and am pleased to tell you that I found a use for it beyond just being a sample to which I can refer for future projects. It makes a wonderful cowl. Having worn my hair long for most of my adult life, I am very much aware of my bare neck and how cold it can get now that I have cut my hair short. I was very conscious of that on my winter visits to Australia and New Zealand last year.

Yes, I had a moment of frustration the other day and took it out on my hair in the form of yet another DIY haircut. At 10:30 pm with toothbrush in mouth this suddenly seemed like a good idea. While we are certainly not in cowl-wearing weather here south of the equator, the time will come when I can be back visiting the USA in the spring and fall, and hopefully Australia in the winter months, when the air can get a little nippy.

Quite a few people have been curious about the Finnweave I have been doing. I explain that I chose this structure simply because the pre-columbian textile fragments that I have were woven this way. There are of course other kinds of double weave pick-up structures that can be used to weave figures and the figures will have a certain appearance on the front and back of the cloth. Weavers can choose the look that they prefer. As always, I refer to the Doramay Keasbey article in Handwoven Jan/Feb 2011 in which she compares the front and back of bookmarks that she wove using five different doubleweave pick-up structures. 

So, what about the flip side of my Finnweave? The Keasbey article includes Finnweave and I can show you the two sides of a motif on a piece that I wove some years ago using 8/2 cotton which I think is much clearer than trying to show you the example in the finer 20/2 cotton that I just wove.

You can see that smooth horizontal lines on one face look like toothy lines on the other . This particular motif does not have any fine vertical lines but a fine vertical line on the “good’ face looks like a column of small disconnected horizontal dashes on the back. Occasionally, I prefer the way a particular motif looks on the back in that from a distance it resembles blurry ikat with those toothy edges. It’s a softer look. The upper face has a much smoother and sharper appearance.

So, I will keep my Finnweave cowl on hand as I think about my next project using this structure. There’s not much chance of it being used as a cowl any time soon as we have temperatures in the high 90s with one day at 100 degrees forecast for the next eight days. The tropical “winter” is over!

What has been keeping me busy lately is refreshing my memory on three-color reversible pebble weave. It’s another one of those things that grabs my attention every few years. I showed you in my last post the sample I wove in tencel using this technique some years ago in which I used yellow and white on a blueberry background.

I can’t find that sample anywhere now but, thank goodness, I am better at keeping tabs on my notes. However, my notes could have been better and it was frustration with trying to interpret them that led to the late night hair-cutting incident! After a good night’s sleep, I got the notes all sorted and I chose primary colors in 8/2 tencel once again to test whether I had indeed understood the steps.

Examples from Peru shared with me by Mary Spanos with the red, green and yellow sections of three-color pebble..

I am using my backstrap loom with string heddles as you know. If you are a tablet-weaver, three-color double-faced pebble weave is apparently quite straightforward. I have read about people doing it by using triangular tablets but also square tablets that have holes in the sides. So, if you are in a great hurry to learn this, you might want to go with tablets. I’ll leave you to investigate that further.

I will be writing a tutorial on this eventually for those who use string heddles. “Why don’t you just use tablets?” you might ask… I am more interested in the string heddle process as that is the way the technique is woven here in South America.

I have examples of three-color pebble weave in pieces I bought in Peru on my very first visit in 1996. These particular pieces were relatively expensive and I had to think long and hard about investing in them back in my do-it-on-a-shoestring backpacking days. They blew my budget for the following ten days. I am so glad I bought them, though. My weaving friend Mary also sent me pictures of some similar pieces that she owns.

The three-color pebble weave figures in these particular pieces are not identical in appearance on the back of the cloth.

Here you can see the back of one that I wove myself many years ago in a non-reversible technique….

I haven’t yet had the chance to sit with a weaver who knows how to do the double-faced version and so my efforts have been guided by the writings of Adele Cahlander and Marjorie Cason in The Art of Bolivian Highland Weaving and a lot of trial-and-error of my own. Just by chance I was able to pick up a small piece of cloth that was woven using the double-faced three-color version. It was being used as the cover of a small photo album that I found in a souvenir store right here in Santa Cruz. I grabbed it! Thankfully, it had only been glued to the photo album along its edges and I could easily remove the cloth.

Bolivian cloth with pattern in double-faced three-color pebble.

The cloth is so very tightly woven as is the way here in Bolivia, that it is impossible to separate the warp threads to perhaps get some clues about how it was woven. In any case, I am using a series of  steps for my own experiments and am getting the results I want. I feel that I could replicate the pattern on this cloth if I wanted to.

I would, however, love to be able to spend time with the Bolivian weaver of this piece of cloth and see if she has some other less laborious and more efficient way of achieving this which will no doubt have me slapping my forehead and exclaiming “Of course!” On the other hand, perhaps I am doing it just the way she does….I would love to know! Bolivian weavers think nothing of what may appear to us as extremely laborious weaving tasks….think of what they go through every time they finish a piece of warp-faced cloth with four selvedges, or the thread-by-thread pick-up that goes into weaving pieces like the red and black one you see here….

A weaving of the Jalq’a people of Potolo, Bolivia.

So, here is the piece in tencel that I wove to practice creating patterns using all three colors as outlines, background and fillers. My sample motifs got smaller and smaller as I gradually centered my focus on just some very specific aspects. These patterns are charted in my Complementary-warp Pattern Book.

The idea was to refresh my memory about this technique and, as it turned out, improve my notes for next time. But it was also about wanting to weave something using the wool I had started spinning during the Tour de Fleece. My spinning output is quite sad. I simply can’t manage to motivate make myself to devote that much time to it. I am more interested in charting and weaving. In any case, I have some yarn to use and after sampling in tencel, I was ready. I had originally planned to sample in some industrially spun wool but everything I found in the closet was either too heavy or too stretchy. I do have some Knit Picks Palette but I didn’t want to push my luck with that. The method I use has a lot of heddle action and I wasn’t sure how well the Palette would stand up to it.

A couple of wrist cuff projects seemed like a good way to start….

I used a little leaf motif that I had created for my Complementary-warp Pattern Book (slightly modified here) as well as part of a larger flower motif that I had created for the same book in the Garden-themed section.

One of the challenges for me when using this three-color technique is finding three colors that will work well together on both faces. I have a light color -white, a very dark color – black and a medium color- let’s call it tan. These three work well together. Other combinations may not. If, for example, I use two medium colors like purple and green, I can have them sit on either side of the  lightest color on one face, but they will have to sit right next to each other on the other face. In that case there may not be enough contrast between the two for the pattern to be easily distinguishable.

You can see that  tan and black sit right next to each other in the leaf motifs on the upper face and are separated by white on the lower face. I played with the outline color in the flower motif using both white and black as shape outlines and tan and white as the fillers.

My hand spun yarn stood up well. Admittedly, this is only a very short and narrow piece but I can tell thatf it will do well even in something much larger.

I added an eye-patterned tubular band in the same colors and then played around with different buttons for the button-and-loop closure. I love this cuff! 

Next on the loom, was another cuff project using the green and purple that I mentioned above. I didn’t do any outline color-flipping in this one. Here it is getting its tubular edging. I love weaving and sewing that edging! (Check out my book if you would like to learn how to weave this patterned tubular band to use independently as jewelry, for example, as well as weave and sew it as an edging).

These are the buttons that I eventually chose…a flower one for the garden-theme and an interlocking shape to match the interlocked motifs which are charted in my pattern books.

The last thing is to braid and sew on the loops that go around the buttons to close the cuffs.

So, what’s next? While I am in wrist-cuff mode, I might make one in Finnweave. I do like to have examples of the various structures that I use in my wrist-cuff collection. I also feel motivated to spin some of the colors that I am least likely to use and then dye them so I that I can continue to play with three-color pebble. If you have suggestions for three colors that would work well together no matter how they sit in relation to each other, please let me know. I wove this wool three-color pebble some years ago in which the orange and green played well together when placed right next to each other….….and look just as good on the other face where they are separated by white.

Finally, I would like to promote my publications…in this case, the one I produced on the eye-pattern tubular band which you have seen along the edge of the cuffs I made. My ability to earn has been greatly reduced with my inability to travel to teach and book sales help to keep me afloat. Perhaps you would like to try weaving an eye-pattern tubular band. I have two versions of the book. One, which is only available as a pdf, teaches how to weave the band as an independent tube which can be used in jewelry and other accessories. Ideas are given in the book.

In addition to this, the other extended version shows you how to weave and sew the band to the edge of cloth as I have done. It also goes on to teach two other decorative finishing techniques that are used by some of my Bolivian weaving teachers. This extended version is available as a pdf and as a spiral-bound book.

Both the short and extended versions, in either pdf or book form, give access to supplementary instructional video clips and are available at Taproot Video.

I’ll be donning my masks and venturing out a bit more in the next week or so as I need to re-stock the pantry before our national elections this month. I plan on staying in and well out of the way during and after that event.

Take care and please stay safe.